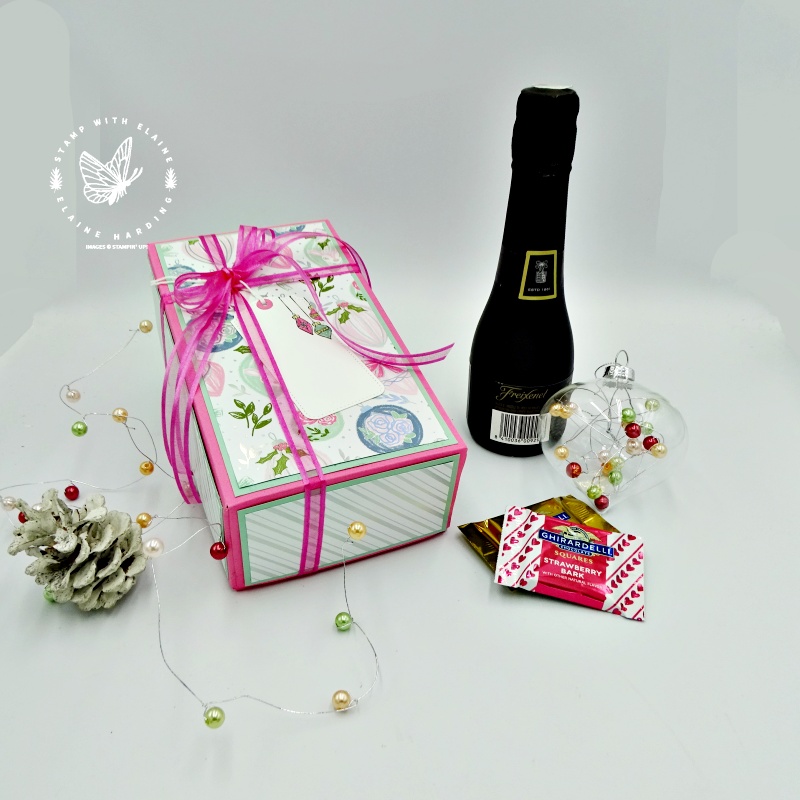
I have a bespoke gift box for wine and chocolates in episode 12 of 12 in my 12 week Christmas Countdown series, . For my final episode, I decided to create a bespoke gift box which holds a 200 ml bottle of Cava and some Ghirardelli chocolates.
Ghirardelli chocolates and Hershey nuggets are difficult to get hold of in the UK and I always feel it’s something of a coup if I manage to get some! Special chocolates called for a special way to package them as a gift! lol! Besides, it is the final episode in my Christmas Countdown series for 2021 and I wanted it to go with a “bang”!

This project was a bit of a challenge and after much wastage and trial and error, I finally managed to create something I was happy with. I’m afraid it does require a lot of card stock and paper.
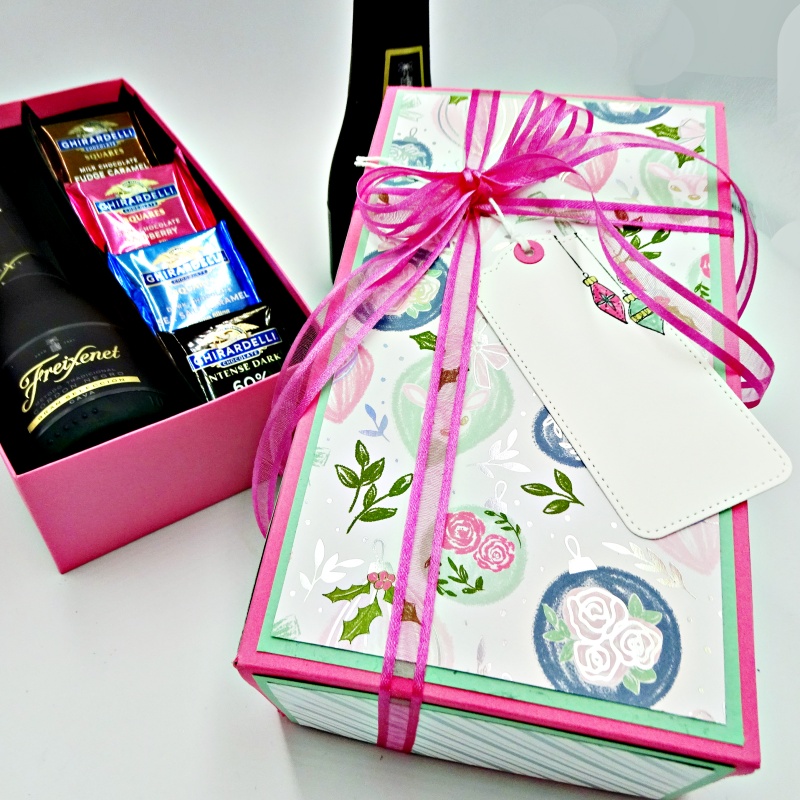
What’s inside?
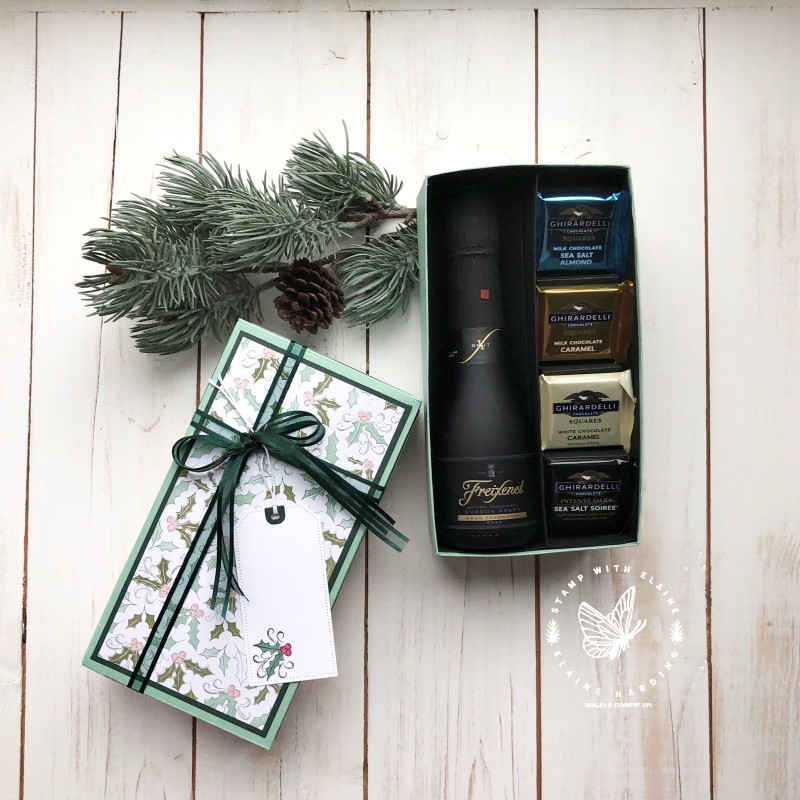
The box base contains two compartments. One to hold the wine, and the other compartment has “risers” to elevate it as well as individual risers for the chocolate.
You’ll notice that the lid comes off with the bow still in tact. I actually wrapped the ribbon to the inside of the lid and added an extra lid liner to hide the ribbon. This means you don’t have to untie the ribbon when you open the box. I’ve employed this method in quite a lot of my projects. By doing that, it doesn’t undo all the time and effort you spent in tying that perfect bow.

Gift Tag
In the Tailor Made Tags Dies set, it’s really cool that you can cut circles or D-shapes with holes in them so that you can colour coordinate your tag to your project.
Since I’d used the patterned paper from the Whimsy & Wonder collection, I could then die cut it from Polished Pink card stock and stamped the ornaments on it too.
As alcohol markers bleed, I used ordinary Stampin’ Write markers to colour the ornaments in Mint Macaron, Polished Pink and Mint Macaron.

In the video tutorial, I made this box in a different colour way using a different pattern. I usually pick coordinating card stock featured in the patterned papers. As there wasn’t an open weave ribbon in either Mossy Meadow or Mint Macaron, I selected a much darker green in Evening Evergreen with the coordinating ribbon. I wanted this gift to be suitable for either gender, so steered away from too much pink! Now I have one of each. Which do you prefer?
Measurements
Please note that the 12″ x 12″ card stock is not long enough to create the box lid and box base. It has to be done in two pieces. Once placed on top of one another opposite each other, what will be apparent is the middle section which will be wider. When you glue the middle sections on top of one another it makes the box whole.
Imperial
Box Lid
- Cut 2 pieces 7-1/16″ x 11-3/8″.
- Score each piece on the short side at 2-1/2″.
- Orient card stock so that the long side is at the top and score at 2-1/2″ and 10-7/8″. Repeat for 2nd piece.
- With the paper still in situ, partial score at 2″ down to first score line. Repeat for 2nd piece.
- Refer to video for cutting instructions.
Box Base
- Cut 2 pieces from 12″ x 12″ card stock at 7-1/2″ x 11-3/4″
- On short side, score each piece at 1/2, 3″.
- Orient long side of card stock with 1/2″ score line at the top and score all the way down at 1/2″, 8-3/4″ and 11-1/4″. Repeat scoring for second piece.
- Leave the paper in same position and partial score at 9-1/4″ down to second score line. Repeat scoring for second piece.
- Refer to video for cutting instructions.
Divider section
- Cut 4-1/2″ x 10-3/4″
- On short side score at 2-1/4″
- Rotate card stock so long side is at the top and score at 8-1/4″.
- Refer to video for cutting instructions.
Divider extension pieces
- First extension piece measures 2-1/4″ x 3″. On the long side, score one end at 1/2″
- Second extension piece measures 2-1/4″ x 2-1/2″. On the long side (2-1/2″ at top), score 1/2″ at one end.
Bottle compartment cradle
Cut a piece of card stock measuring 5-1/2″ x 8-1/4″. Score short side at 1″, 2-1/4″, 3-1/4″ and 4-1/2″.
Neck rest
Cut a piece 1-1/2″ x 3-1/2″. On the long side score at 1″, 1-1/2″, 2-1/2″ and 3″.
Chocolate Compartment Elevator
Cut a piece 4″ x 10-1/4″. Score all 4 sides at 1″.
Individual Ghirardelli chocolate risers
Cut 4 pieces of card stock each measuring 1-7/8″ x 5-1/2″. Score each piece on the long side at 3/4″, 2-3/4″, 4-3/4″.
Tip: Alternatively you can cut a piece of card stock measure 5-1/2″ x 7-1/2″. On short side score at 3/4″, 2-3/4″, 4-3/4″ rotate card stock on long side on trimmer and cut every 1-7/8″. This way you only need to score once. Thank
Box Side Liners for inside box base
Cut 2 side lines at 2-1/4″ x 9-1/4″. On the long side, score each end at 1/2″.
Card stock/Patterned paper for Lid of Box
- Top of box Mat Layer 1: Plain card stock 4-1/4″ x 8″
- Short sides Mat layer 1: Plain card stock – 2 pieces cut at 2-1/4″ x 4-1/4″
- Long sides Mat layer 1 : Plain card stock – 2 pieces cut at 2-1/4″ x 8″
- Top of box Mat Layer 2 Pattern 1 : Patterned paper 4″ x 7-3/4″
- Short sides Mat layer 2 Pattern 2 : Patterned paper – 2 pieces cut at 2″ x 4″
- Long sides Mat layer 2 Pattern 2 : Patterned paper – 2 pieces cut at 2″ x 7-3/4″
- Internal lining for lid of box: Plain card stock 4-1/2″ x 8-1/4″
Metric
Box Lid
- Cut 2 pieces 18 cm x 29 cm.
- Score short side at 6.5 cm.
- Orient card stock so that the long side is at the top and score at 6.5 cm and 28 cm
- With the paper still in situ, partial score at 5.5 cm down to first score line
Box Base
- Cut 2 pieces from 30.5 cm x 30.5 cm card stock at 19 cm x 30 cm
- On short side, score at 1 cm, 7.5 cm.
- Orient long side of card stock with 1 cm score line at the top and score all the way down at 1cm, 22.5 cm, 29 cm.
- Leave the paper in same position and partial score at 23.5 cm down to second score line.
Divider section
- Cut 12 cm x 28 cm
- On short side score at 6 cm
- Rotate card stock so long side is at the top and score at 21.5 cm.
Tip: ** Before adhering extension pieces, insert into box to see how it fits. If it’s too tight, trim off a tad (literally a slither) and then glue extension pieces on before inserting into box. If you find that the box is buckling once you insert the divider, you may need to trim the end tabs too.
Divider extension pieces
- First extension piece measures 6 cm x 7.5 cm. On the long side, score one end at 1 cm.
- Second extension piece measures 6 cm x 6.5 cm . On the long side (6.5 cm at top), score 1 cm at one end.
Bottle compartment cradle
Cut a piece of card stock measuring 14 cm x 21.5 cm. Score short side at 2.5 cm, 6 cm, 8.5 cm and 11.5 cm.
Neck rest
Cut a piece 4 cm x 9 cm. On the long side score at 2.5 cm, 4 cm, 6.5 cm and 7.5 cm.
Chocolate Compartment Elevator
Cut a piece 10.5 cm x 26.5 cm. Score all 4 sides at 2.5 cm.
Individual Ghirardelli chocolate risers
Cut 4 pieces of card stock each measuring 5 cm x 14 cm. Score each piece on the long side at 2 cm, 7 cm, 12 cm.
Tip: Alternatively you can cut a piece of card stock measure 14 cm x 20 cm. On short side score at 2 cm, 7 cm, 12 cm. Rotate card stock on long side on trimmer and cut every 5 cm. This way you only need to score once.
Box Side Liners for inside box base
Cut 2 long side liners at 6 cm x 23.5 cm. On the long side, score each end at 1 cm.
Card stock/Patterned paper for Lid of Box
- Top of box Mat Layer 1: Plain card stock 10.5 cm x 20.5 cm
- Short sides Mat layer 1: Plain card stock – 2 pieces cut at 5.5 cm x 10.5 cm
- Long sides Mat layer 1 : Plain card stock – 2 pieces cut at 5.5 cm x 20.5 cm
- Top of box Mat Layer 2 Pattern 1 : Patterned paper 10 cm x 20 cm
- Short sides Mat layer 2 Pattern 2 (optional) or stay with Pattern 1: Patterned paper – 2 pieces cut at 5 cm x 10 cm
- Long sides Mat layer 2 Pattern 2 (optional) or stay with Pattern 1: Patterned paper – 2 pieces cut at 5 cm x 20 cm
- Internal liner for lid of box : Plain card stock 11.5 cm x 21.5 cm
Video tutorial
I’ve created a video tutorial to illustrate the steps in this two compartment box for the wine and chocolate.
Thank you for visiting! Hope you’ve loved this series as much as I have!
Thanks for visiting. Stampin’ hugs!
Product List
- SHOP ONLINE – EARN 10% REWARDS ON ALL PURCHASES OVER £20
- PURCHASE A STARTER KIT : Get £155 worth of products for only £99. Choose from current catalogues and any specials available. Free Shipping. Read more
- Subscribe to my Video Tutorials – click here


