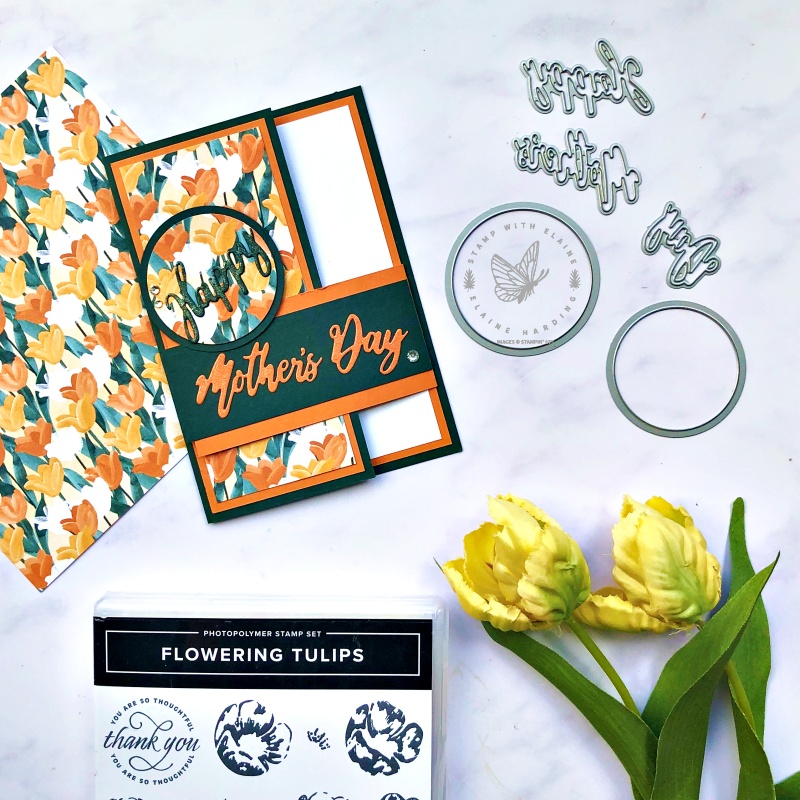
A fun fold Mother’s day card to say Happy Mother’s Day to everyone who is a Mum/Mom out there! Mother’s Day is celebrated at different times of the year all over the world.
I’ve often wondered where its origins came from. So here’s a little factoid.
This celebration, in the UK, is rooted in the Christian observance of Mothering Sunday. It takes place on the fourth Sunday in the festival of Lent, three weeks before Easter Sunday. Being connected to Easter, Mother’s Day changes each year.
It originated in the Middle Ages, when children who had left their families to work in domestic service were allowed to go to their home or “mother” church. The journey home became a Spring occasion for families to reunite. On the journey home, it became custom for children to pick flowers as gifts for their mothers.
Did you know that Mother’s Day began in America in 1907? The daughter of a peace activist, Anna Jarvis, treated wounded soldiers in the American Civil War and campaigned for a day on which to honour the role played by mothers. This idea gained so much traction that by 1911, all US states took on the holiday and it was declared a National Holiday by President Woodrow Wilson in 1914.
Eventually, this tradition reached the UK, and Mothering Sunday became more popularly known as Mother’s Day.

To mark Mothering Sunday, here’s the card I made. I used the Layering Circles dies to create somewhere to tuck the Mother’s Day flap when the card is closed.
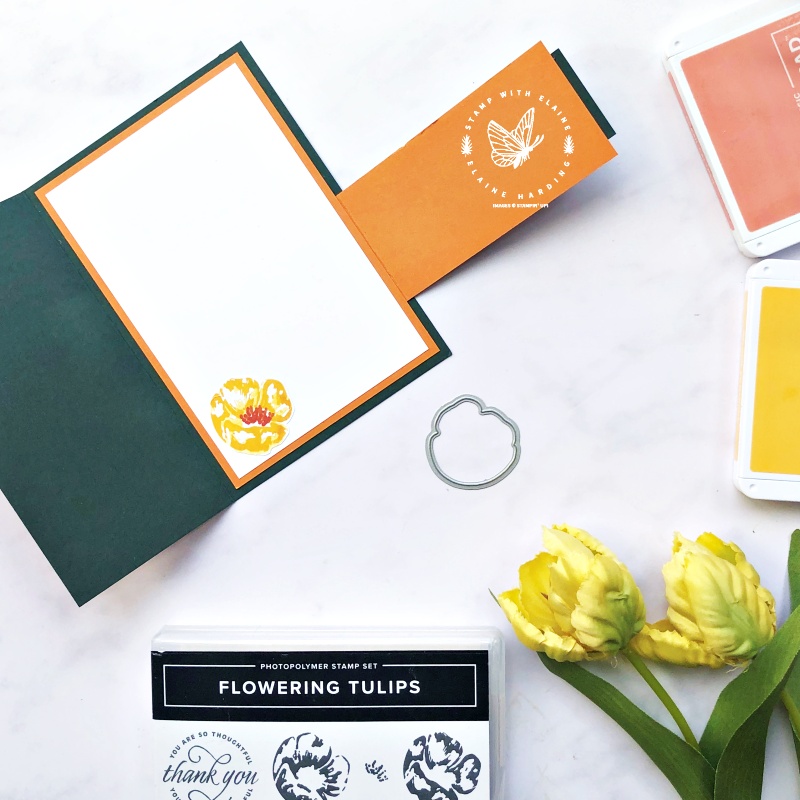
In the photo below, you can see the closure flap extended when the card is open. I stamped the floral image on a scrap of Basic white and die cut it with the Tulips dies.

Details
- The card base Evening Evergreen was cut at 6-7/8″ x 5-7/8″ (14.5 x 17.5 cm).
- Long side on top, score at 2-3/4″ (7 cm)
- Closure flap : Cut Pumpkin Pie 2″ x 4-3/8″ (5 cm x 11 cm). Long side score 1/2″ (1 cm). Tuck and adhere the 1/2″ (1 cm) piece underneath the Pumpkin Pie mat layer for the inside of the card.
- Mat 1 for Closure flap : Evening Evergreen 1-1/2″ x 4″ (4 cm x *10.5 cm). Adhere this to the Pumpkin Pie closure flap.
- Inside card Mat 1 : Pumpkin Pie 3-7/8″ x 5-5/8″ (10 cm x 14 cm)
- Mat 2 inside card : Basic White 3-5/8″ x 5-3/8″ (9.5 cm x 13.5 cm)
- Front of card Mat 1 : Pumpkin Pie 2-1/2″ x 5-5/8″ (6.5 cm x 14 cm)
- Mat 2 front of card : Flowering Fields DSP 2-1/4″ x 5-3/8″ (6 cm x 13.5 cm)
- Pumpkin Pie card stock : die cut the words “Mother’s” and “Day” and colour with Wink of Stella before adhering to closure flap
- Evening Evergreen card stock : die cut “Happy” and colour with Wink of Stella before adhering to circle
- Stamp and die cut the tulip and adhere to inside of card
- Add Rhinestone basic jewel to the card closure flap as a finishing touch.
Circle detail
I used a pair of nested circles to die cut the mat layer in Evening Evergreen and the other out of a scrap of Flowering Fields DSP. Leave the closure flap in the closed position over the front of the card and attach dimensionals on the top edge of flap. Ensure the dimensionals are hidden by the circle.
Supply list
Listed below is the supply list. Just click on the picture to take you directly to the item in my online store.
Product ListHave a lovely Mother’s Day to you all and especially to those who are no longer with us, but who remain i our hearts and minds forever.

- SHOP ONLINE – EARN 10% REWARDS ON ALL PURCHASES OVER £20
- PURCHASE A STARTER KIT : Get £155 worth of products for only £99. Choose from current catalogues and any specials available. Free Shipping. Read more
- Subscribe to my Video Tutorials – click here


