
Here’s a fun fold card with Natures Prints bundle. Say “hello” to the Sun Prints Suite Collection on pages 90-91 of the new 2022-23 Annual Catalogue. If blue is your favourite colour then you’ll love this Suite.
The Sun Prints 12″ x 12″ (30.5 x 30.5 cm) Designer Series Paper has a colour palette of four colours only. They are Pacific Point, Night of Navy, Starry Sky (new 2022-24 In Color) and Gray Granite. Images in the Nature’s Prints stamp set is mostly foliage and a splatter ink spot. There are four general sentiments in a mixture of script and typeface – I just love those, don’t you? Included in the Natural Prints Dies are not only dies which correspond with the stamped images but extras like a wreath, a trio of sprigs, a pair of leafy sprigs as well as a label die.
I had so many ideas buzzing in my head, I’ve split this into 2 Parts. Today is Part 1, and Part 2 follows hot on its heels this Friday.
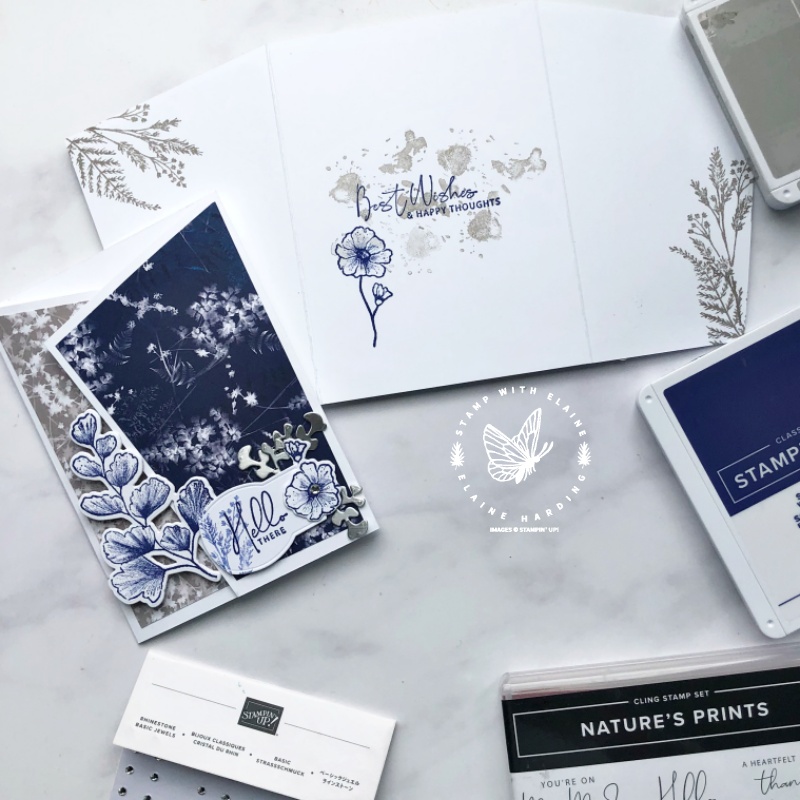
Do you love fancy folds? This is another take on a Gatefold card – it’s a bit of a mouthful but it does describe it perfectly. It’s “Elaine speak” – an Angled Overlapping Gatefold card. I don’t know what the official terminology is!
Card details
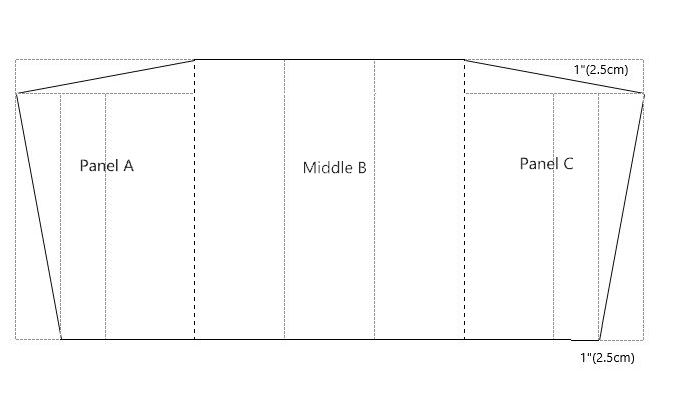
My skills in drawing diagrams is rather limited, and I couldn’t “merge” the cells so that the lines didn’t show. So please ignore the small dotted lines – they’re supposed to be invisible and shows the original size the the paper.
Imperial
- Cut Basic White Thick card base 11″ x 5-3/4″.
- Orient c/s with long side at the top and score at 3-3/8″
- Rotate c/s 180 degrees and score opposite side at 3-3/8″.
- Mark Panel A & C 1″ down from top edge on the short side. Cut from score line on either side to these marks. Refer to diagram.
- Orient c/s on the long side and mark 1″ in. Cut from the angled tip down to 1″ mark on the long side. Refer to diagram.
- Cut 2 pieces of Designer Series Paper 3-1/8″ x 5-3/8″. Mark 1″ on long and short sides as in steps 4 & 5 for your mat layers. Refer to video tutorial for further tips for completing card.
Metric
- Cut Basic White Thick card base 28 cm x 14.5 cm.
- Orient c/s with long side at the top and score at 8.5 cm.
- Rotate c/s 180 degrees and score opposite side at 8.5 cm.
- Mark Panel A & C 2.5 cm down from top edge on the short side. Cut from score line on either side to these marks. Refer to diagram.
- Orient c/s on the long side and mark 2.5 cm in. Cut from the angled tip down to 2.5 cm mark on the long side. Refer to diagram.
- Cut 2 pieces of Designer Series Paper 8 cm x 14 cm. Mark 1″ on long and short sides as in steps 4 & 5 for your mat layers. Refer to video tutorial for further tips for completing card.
Video Tutorial
Do watch the video tutorial. It’s so much easier to explain it that way with a visual than reams and reams in text!
Supply list
Listed below is the supply list. Just click on the picture to take you directly to the item in my online store.
Product List")


 Specialty Pack")
 Designer Series Paper")


Thanks for popping by.

- SHOP ONLINE – EARN 10% REWARDS ON ALL PURCHASES OVER £20
- PURCHASE A STARTER KIT : Get £155 worth of products for only £99. Choose from current catalogues and any specials available. Free Shipping. Read more
- Subscribe to my Video Tutorials – click here