
Layering a card with Hippest Hippos and the Hippo Dies from July-August 2022 Sale-a-bration brochure is today’s theme.
It took me ages to figure out how they made those waves in the sample card in the brochure. We were still in the pre-order phase and I had limited supplies. I didn’t realise that the waves were in fact from a pack of Designer Series Papers in the July-December 2022 mini as a Host Reward called Celebrate Everything. The pack contains 48 sheets of 12″x 12″ (30.5 x 30.5 cm) designer series paper, 4 sheets each of 12 double sided designs.
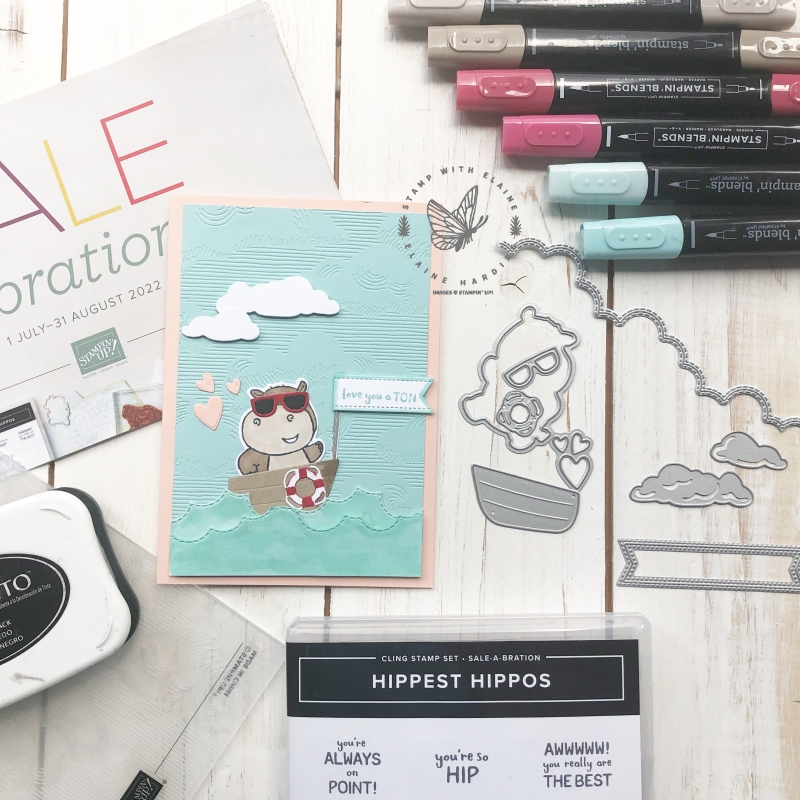
Typical of me, instead of waiting, I rifled through my existing stash to see how I could make those waves. I thought I could use the “negative” pieces of the cloud border die to make the waves and then colour them with pool party blends.
The hippo sporting sunglasses on the “high” seas makes me smile. Quite appropriate to be in a boat near the sea to cool down so long as you stay out of the midday sun!
The details
- Card base : Petal Pink 1/2 A4 sheet folded in half
- Pool Party mat layer for embossing with “Into the Clouds” embossing folder 1/4″ (0.5 cm) smaller
- Stamp hippo, colour with Stampin’ Blends then die cut.
- Die cut boat in Crumb Cake and from basic white die cut life ring, sun glasses, the hearts in Petal Pink from Hippos Dies set. Colour the glass rims in Real Red and the lens in Basic Black.
- Stylish Frames set – stamp and die cut sentiment and trim one end off to create flag
- Waves dies set – die cut clouds in Basic White
- Basic Border dies – die cut two rows of waves and colour them with Pool Party Stampin’ Blends.
Layering
- Start by adhering the embossed Into the Clouds Pool Party layer to card base.
- Attach the sunglasses to the hippo.
- Adhere hippo inside the boat.
- Next adhere the larger wave at the bottom of Pool Party layer ensuring you leave the middle bit without adhesive so you can tuck the boat behind.
- Use glue dots to attach the life ring to boat.
- Glue pole to the front and adhere sentiment with dimensionals.
- Apply dimensionals to the second smaller wave and adhere to front of other wave.
- Adhere trio of hearts with glue dots.
- Attach dimensionals to back of clouds, stagger and adhere them to Pool Party layer.
Supply list
Listed below is the supply list. Just click on the picture to take you directly to the item in my online store.
Product List")


Thanks for visiting – happy Sunday! Enjoy the rest of your week!

- SHOP ONLINE – EARN 10% REWARDS ON ALL PURCHASES OVER £20
- PURCHASE A STARTER KIT : Get £155 worth of products for only £99. Choose from current catalogues and any specials available. Free Shipping. Read more
- Subscribe to my Video Tutorials – click here