
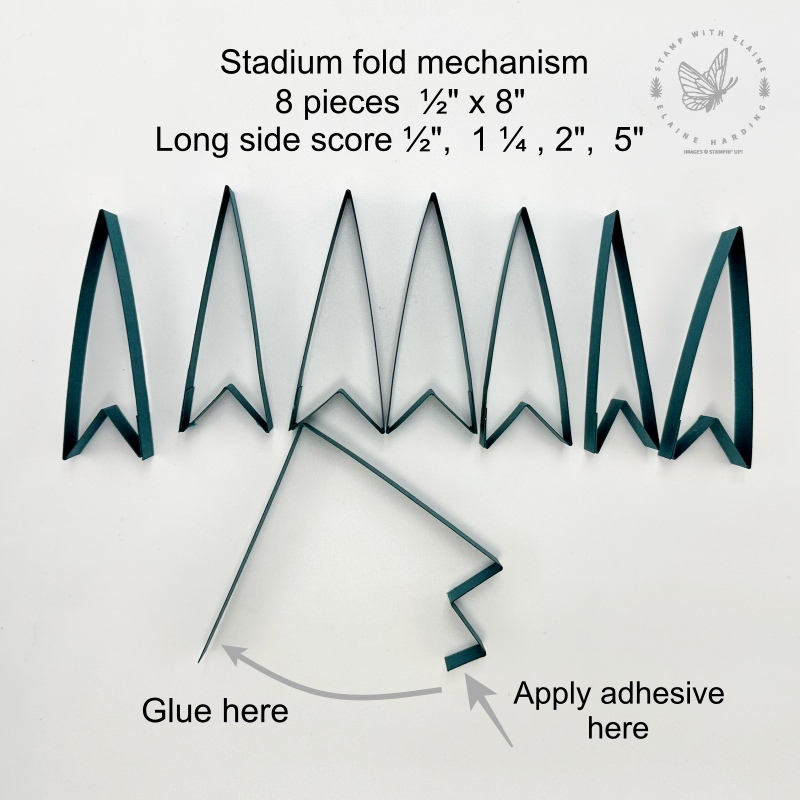
Fancy stadium wave fold. This fold isn’t as difficult as it sounds, the stadium wave fold mechanism are simply strips of card stock. You score, fold, and adhere to each other in a staggered formation to form a fan shape.
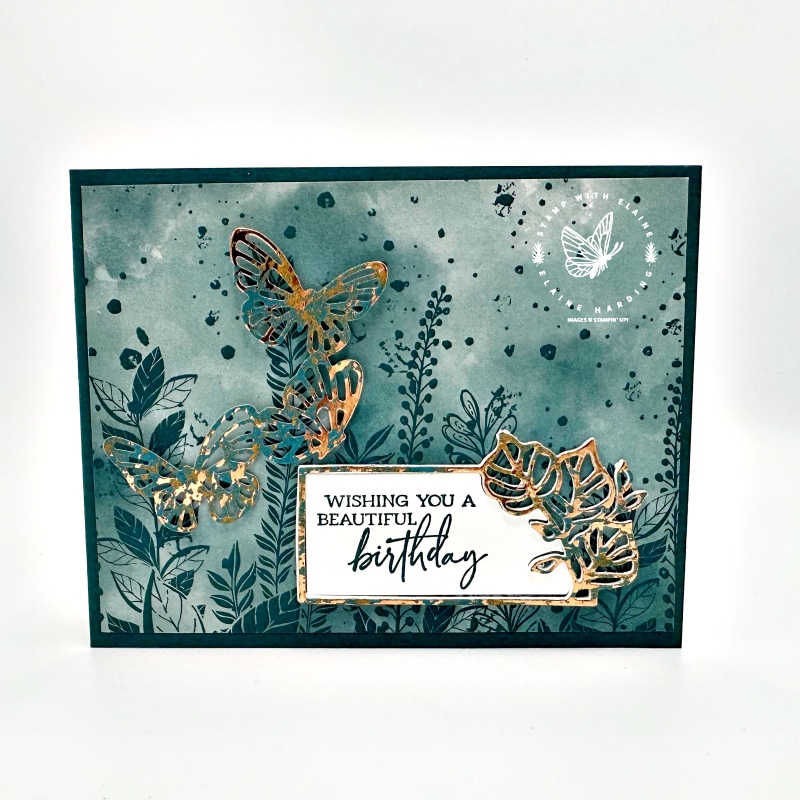
This card is quite bulky, so it may require extra postage, or better still, hand deliver it. The bundle I used is the Sketched Butterflies bundle. I also used the gorgeous Oxisidized Copper 12″x 12″ (30.5 x 30.5 cm) Specialty Designer Series paper to die cut the open work butterflies. The die set used to cut the sentiment on the front of the card is from Unbounded Love Dies. I also used an old favourite online exclusive “Hello, Irresistible 6″ x 6” (15.2 x 15.2 cm) Designer Series Paper (DSP).
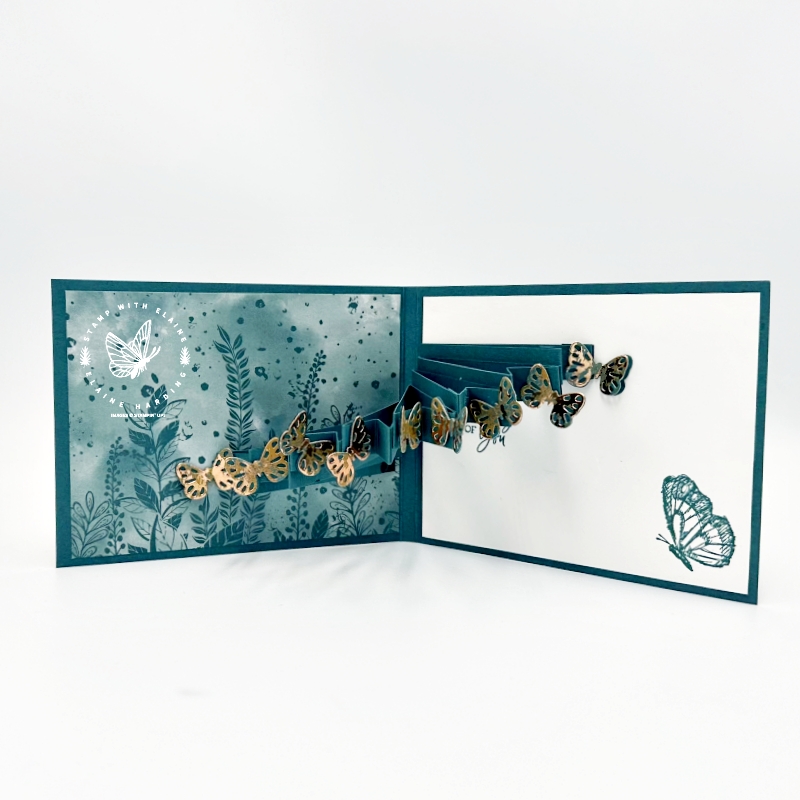
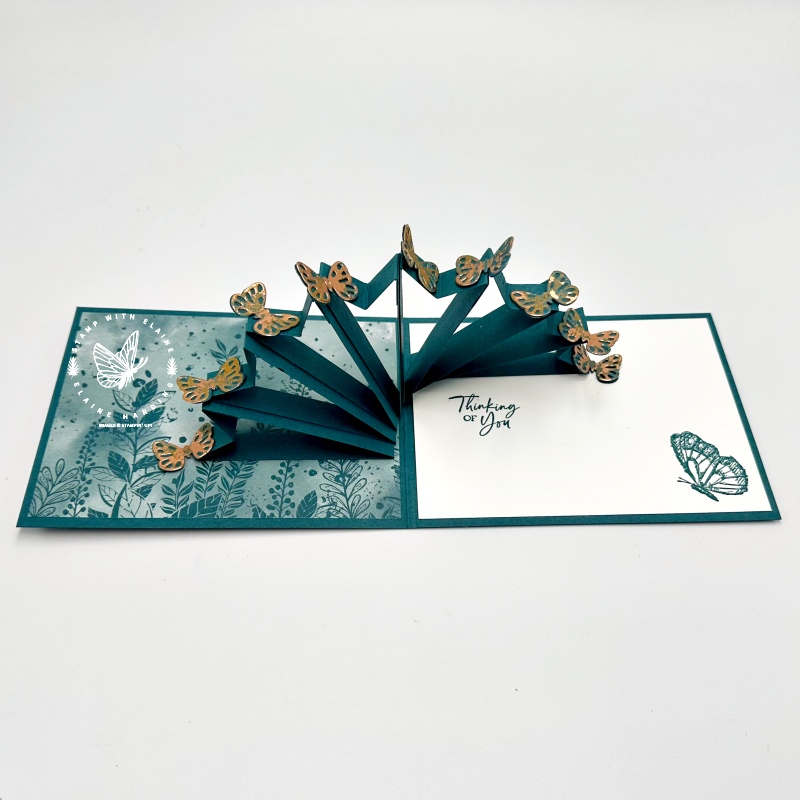
From the front, it looks like an ordinary landscape card, but as it opens to see inside, it reveals the stadium fold.
Video clip to see it in action
Stadium Fold mechanism
- Shortcut tip : Cut a piece of Pretty Peacock card stock 8″ x 4″. On the long side, score at ½”, 1 ¼”, 2″ and 5″. (1.3 cm, 3.2 cm, 5 cm and 12.7 cm) At 5″(12.7 cm) score line – Mountain fold, 2″ (5 cm) score line – Mountain fold, 1 ¼” (3.2 cm) score line – Valley fold, and ½” (1.3 cm) score line – Mountain fold. Flatten card stock out, then cut at every ½” (1.3 cm) to yield 8 pieces altogether.
- Apply adhesive to the small tab and glue to the long piece.
- With tab uppermost, apply adhesive to the left side on 7 pieces. In the photo, I’ve put adhesive on all 8, but omit the last one because I made a mistake.
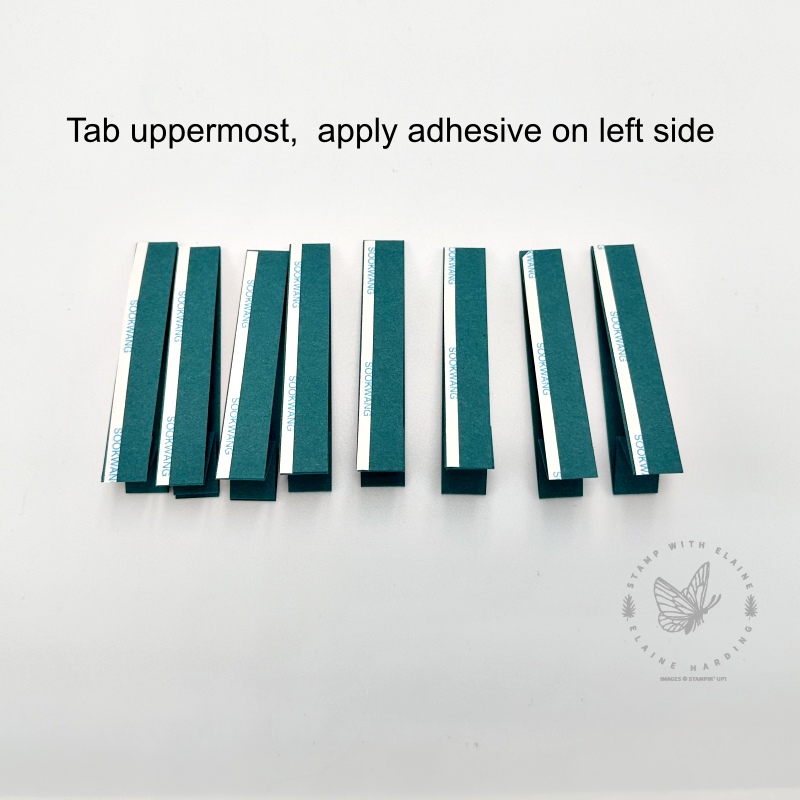
This is what it will look like once they’ve been glued to each other.
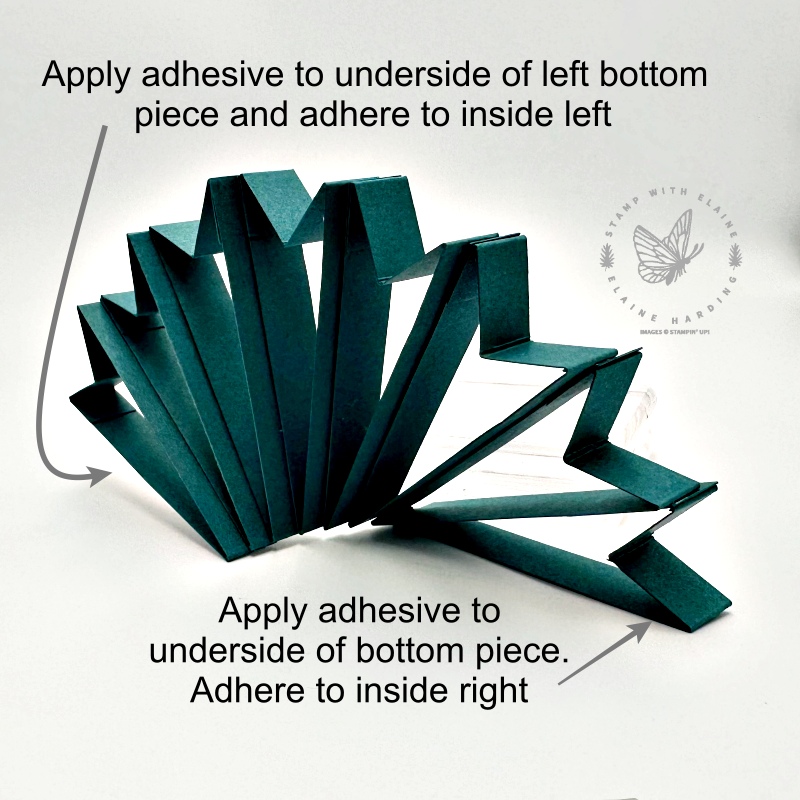
Close the fan and flip it over so that the bottom is face up. Only apply adhesive to the last stadium mechanism. Flip it back so the glue is face down, align with the Basic White mat layer (¼” in from score line) and adhere to card base on right side (photo on right). Next close fan so that it lies flat on card base on right side and apply adhesive only to the top stadium mechanism and close the front of the card over the top to adhere to card front (photo on left).
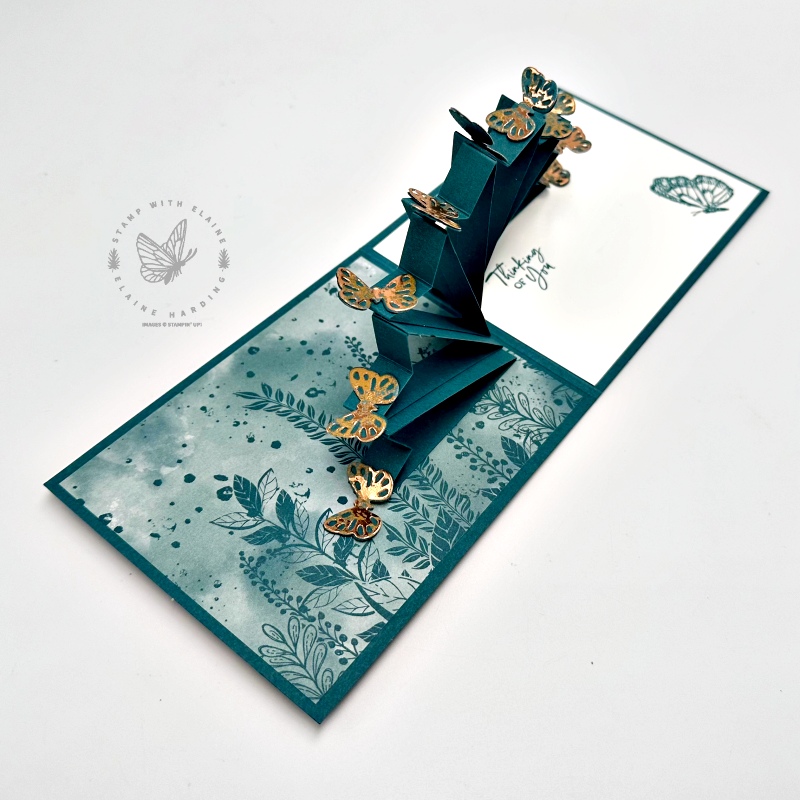
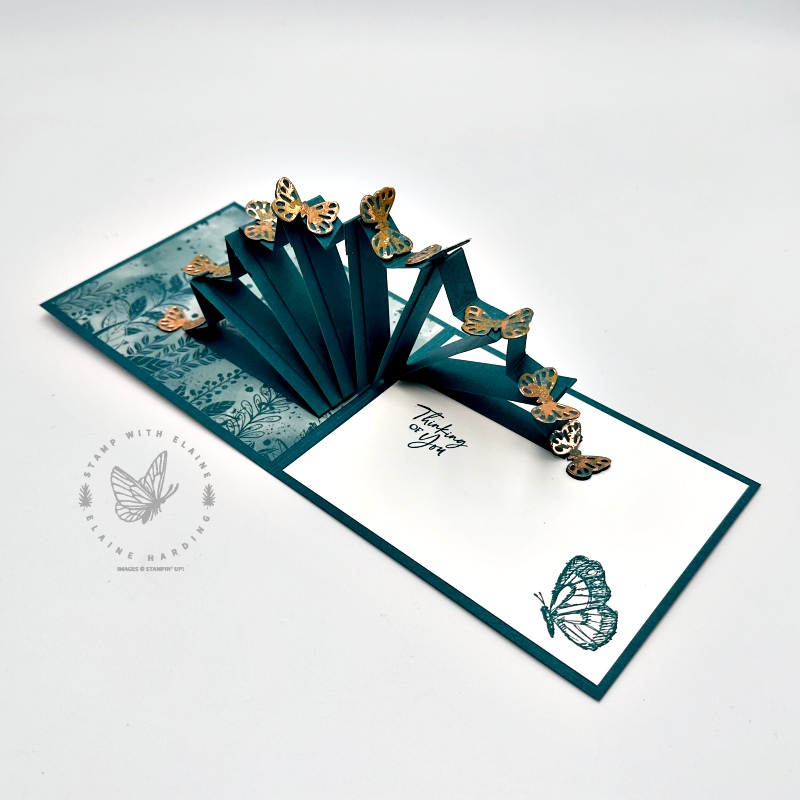
One end is stuck to the inside front of the card, and the other end is stuck to the inside back of the card so when you open it, it fans out as you can see what it should like in photos above.
Other card elements
- Card base Pretty Peacock 4 ¼” x 11 ¼” (10.8 cm x 28.6 cm). Long side score at 5 ½”, 5 ¾ (14 cm, 14.6 cm)
- DSP card front and inside of card front 2 pieces same pattern : 4″ x 5 ¼” (10.2 cm x 13.3 cm)
- Basic White inside back : 4″ x 5 ¼” (10.2 cm x 13.3 cm)
- Pretty Peacock scrap die cut 9 smallest solid butterflies from Sketched butterflies dies
- Oxidized copper 12″x 12″ (30.5 x 30.5 cm) Specialty DSP – die cut 9 smallest open work butterflies and one trio of open work butterflies and one leaf frame from Unbounded Love dies
- Scraps of Basic White – die cut 4 leaf frames from Unbounded Love dies, stack and glue on top of one another. Retain inside of one of them to stamp sentiment. Adhere the Oxidized Copper Unbounded Love leaf frame on top layer for front of card.
- Adhere the Oxidised copper open work butterflies to solid Pretty Peacock butterflies.
- Finally, adhere a butterfly to each Stadium Wave mechanism as shown below with glue dots. Counting from the left, the 5th Stadium Wave mechanism has two butterflies.
Supply list
Listed below is the supply list. Just click on the picture to take you directly to the item in my online store.
Product List")

 Designer Series Paper")
 Specialty Designer Series Paper")


I hope you’ve enjoyed today’s project. Fancy having a go? Any questions, drop them in the comment section below. Enjoy the rest of your weekend, thanks for stopping by.

- SHOP ONLINE – EARN 10% REWARDS ON ALL PURCHASES OVER £20
- PURCHASE A STARTER KIT : Get £155 worth of products for only £99. Choose from current catalogues and any specials available. Free Shipping. Read more
- Subscribe to my Video Tutorials – click here