
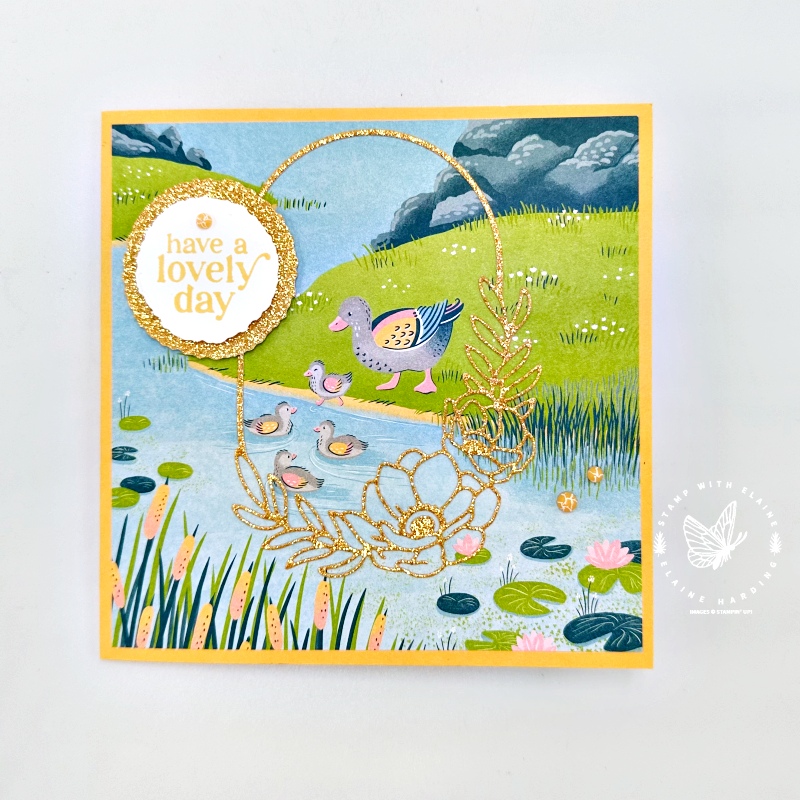
How to create a Rotating Pop-up card. This card looks quite ordinary from the front and springs into action when you open it. I used the products from the Lily Pond Lane Suite on pages 44-45 of the current Annual Catalogue 2024-25.
Featuring the Charming Duck Pond Bundle, the papers called Lily Pond Lane 6″x 6″ (15.2 x 15.2 cm) Designer Series Papers, and Adhesive Backed Dappled dots from the Lily Pond Lane Suite. Other items used are the Deckled Circle dies (which are an online exclusive) and the Lifetime of Love dies. The card stock used is Peach Pie, Basic White card stock and Peach Pie glimmer paper from the 2024-2026 In Color™ 12″ x 12″ (30.5 x 30.5 cm) Specialty Glimmer Paper pack.
Video clip
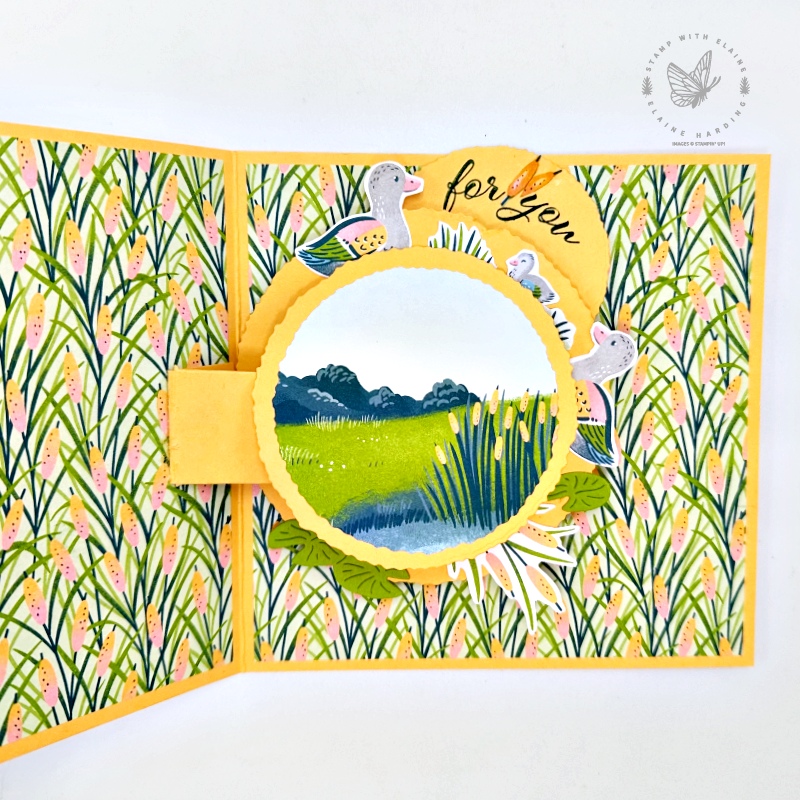
View how the rotating mechanism works when the card opens! You can use any stamps or papers you have in your stash. The most essential tools are the Deckled Circle dies or if you don’t have those, use a nest of circle dies to enable you to make the rotating circle mechanism.
Cutting guide
- Card base : Peach Pie 5 ½” x 11″ (14 cm x 28 cm) folded in half.
- Lily Pond DSP : 2 pieces same pattern for inside card 5 ¼” x 5 ¼” (13.5 cm x 13.5 cm)
- Pattern 2 Lily Pond DSP for front of card : 1 piece cut at 5 ¼” x 5 ¼” (13.5 cm x 13.5 cm)
- Scraps of Basic White to cut the small Deckled circle for sentiment on the front.
- Peach Pie Glimmer paper to die cut Lifetime of Love frame and the mat layer for the sentiment.
- Stamp your own images or fussy cut images form DSP like I did to adhere to the rotating mechanism frame.
Rotating mechanism
There are 14 nested circles in the Deckled Circles die set, no. 1 being the smallest and no. 14 being the largest.
- Die cut the no. 9 circle with Peach Pie card stock
- Nestle the no. 5 circle inside the die cut no. 9 circle and cut a frame. Set aside the no. 5 circle for using later as one of the rotating circles.
- Select the no. 7 circle and die cut a circle with Peach Pie card stock.
- Also select a Lily Pond pattern paper to die cut a scene with the no. 6 circle die for adhering to the no. 7 circle later.
Instructions for the Rotating pieces Mechanism
The overall size of the mechanism is 3 ⅜” x 4″ (9 cm x 10 cm) cut with Peach Pie card stock. Simply follow the instructions on how to score and cut this piece in Steps 1-6. The remaining steps show you where and how to attach the mechanism to the card base with all the other moving parts. However, do remember to adhere the two Lily Pond DSP 5 ¼” x 5 ¼” (13.5 x 13.5 cm) squares to the inside of your card base BEFORE you attach the Rotating pieces Mechanism.
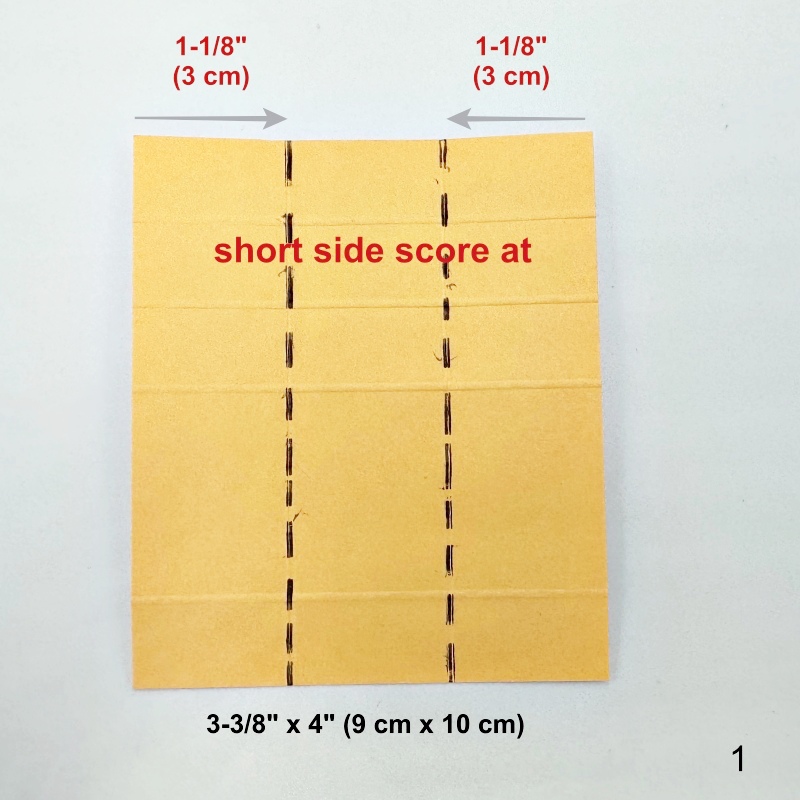

Steps 1-3
- On short side align left edge at 1 ⅛” (1.5 cm) to left of cutting groove on trimmer and score. Then slide c/s to right of cutting groove and align right edge at 1 ⅛” (1.5 cm) and score.
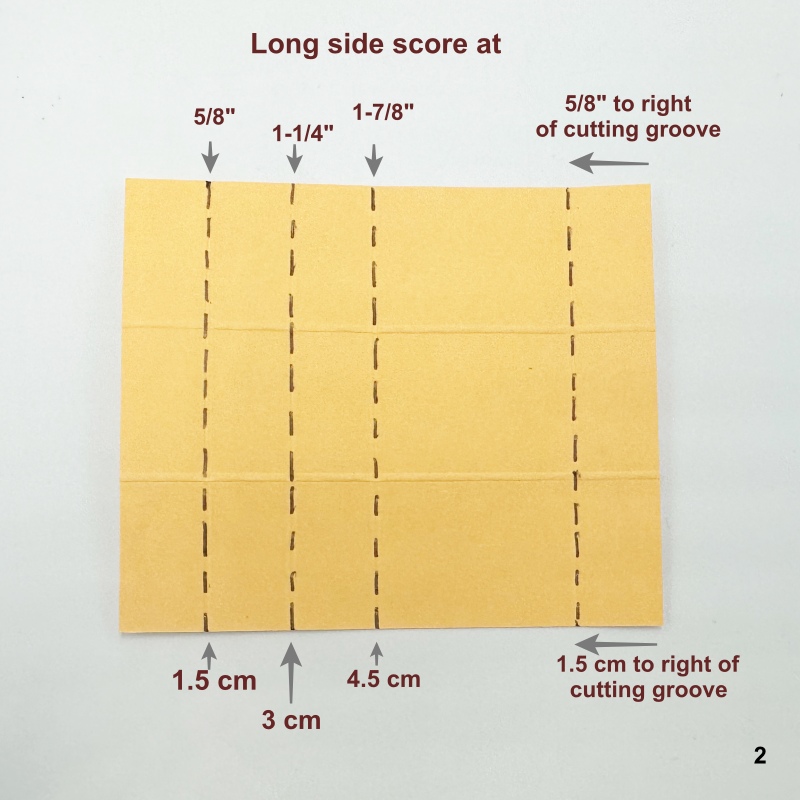
- Rotate card stock so that long edge is on top and score at ⅝”, 1 ¼”, 1 ⅞” (1.5 cm, 3 cm, 4.5 cm)
- Orient card stock so that the 3 score lines are at the top and the single score line is at the bottom. Score a diagonal line from top right on the first score line down to the bottom left. Repeat from top left down to bottom right to form a cross. Find mid-way point on middle score line and score additional lines. Cut away four outer rectangles.
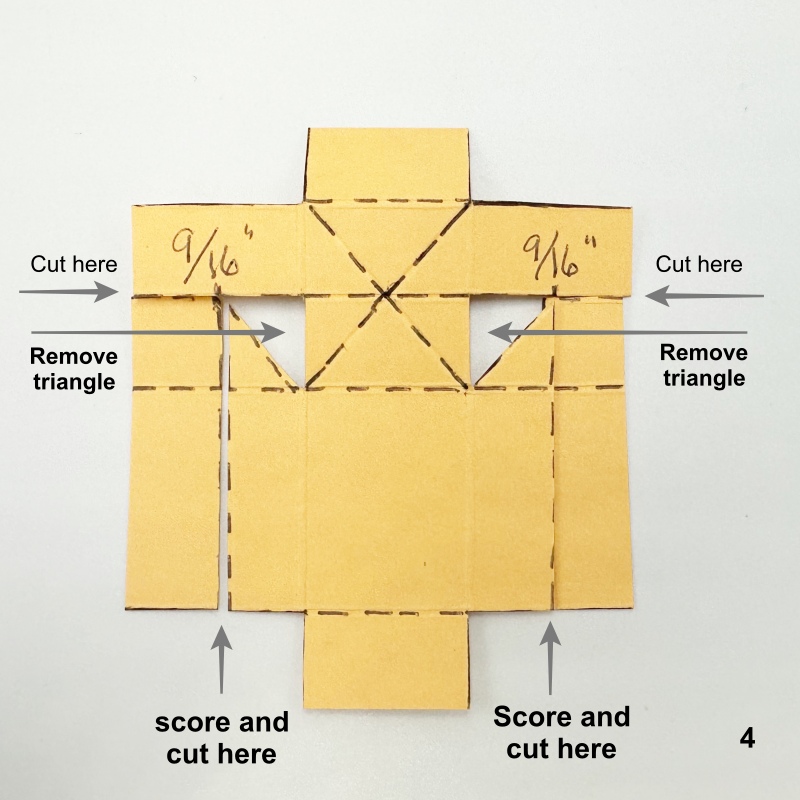
Steps 4-6
4. Cut along the middle score line as shown from both ends and remove triangles. Draw score line vertically along 9/16″ on both sides and remove them. Reserve one of the arms as another pop-up mechanism for later. * Prepare the arm by folding it in half. Retain the long half, but on the other half, trim off and discard the last quarter of the arm. You will need this piece in Step 16 for attaching the die cut Peach Pie no. 7 Deckled Circle. The no. 7 circle covers up all the mechanics of the rotating mechanism.
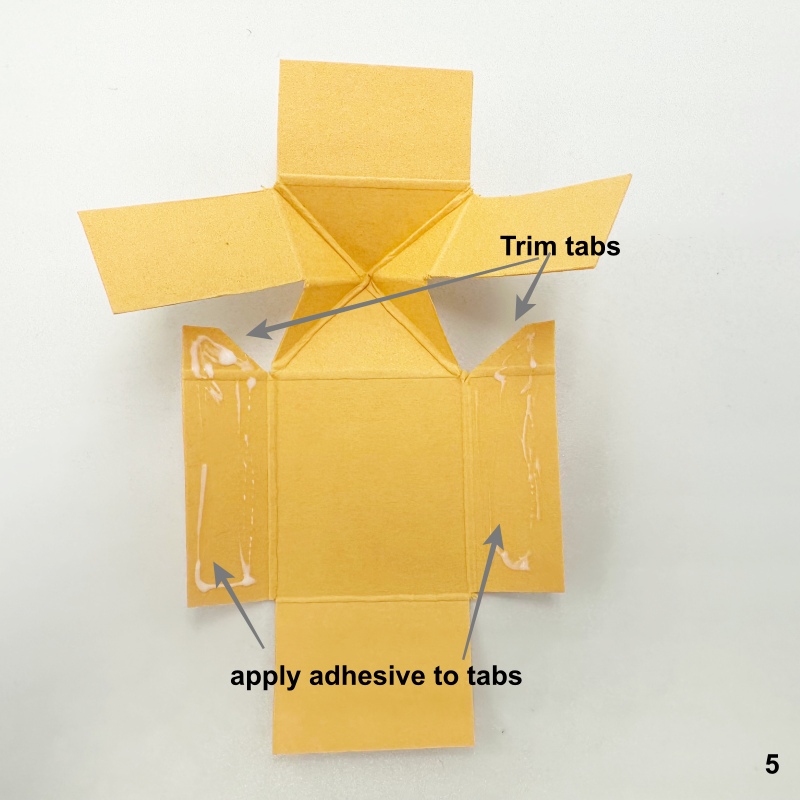
5. Trim tabs so that it doesn’t hinder movement of the tabs above. Apply adhesive on the lower portion of tabs as show in picture number 5.
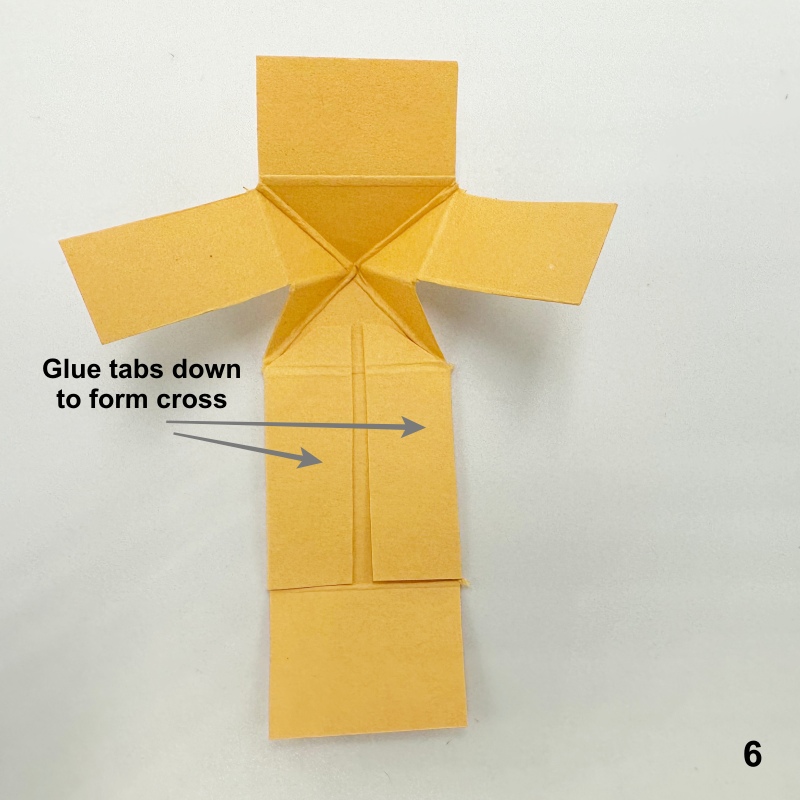
6. Glue tabs down and mechanism now resembles a cross in picture 6.
Steps 7-9
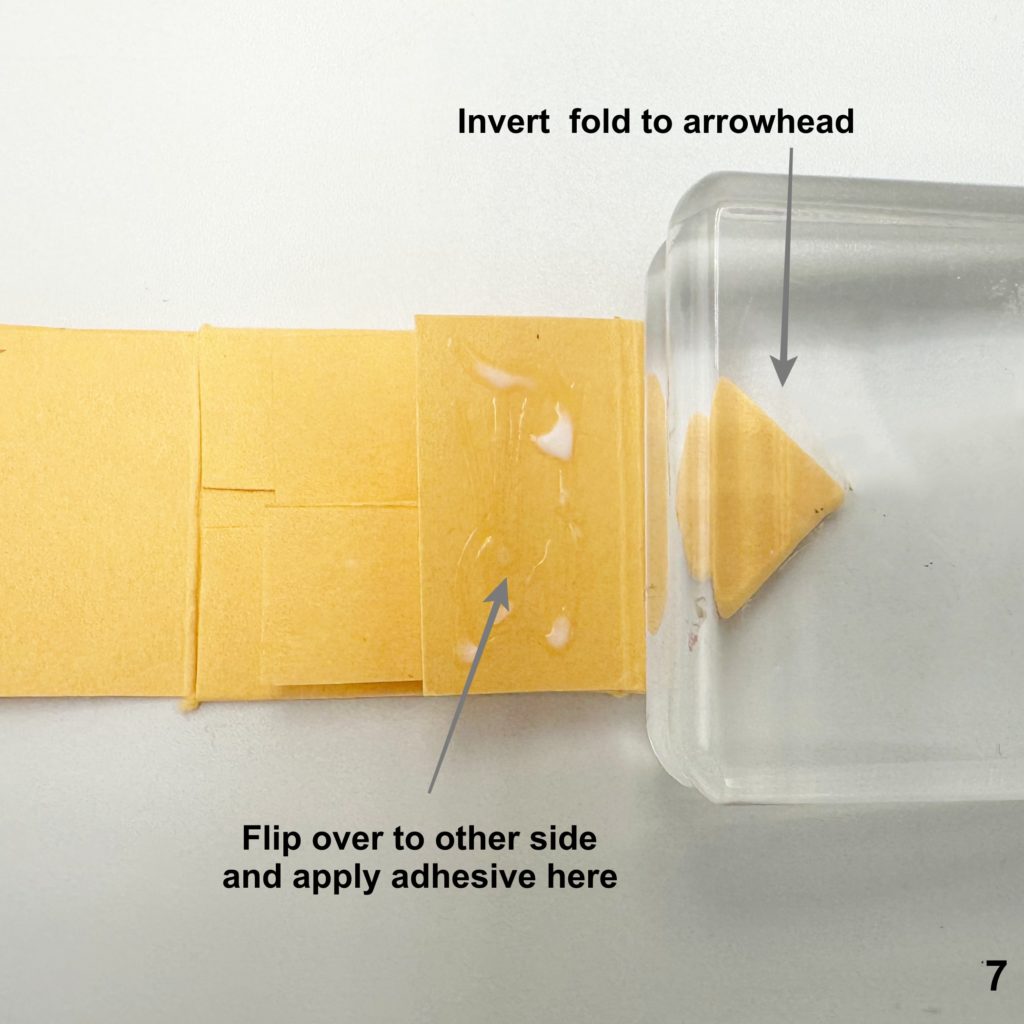
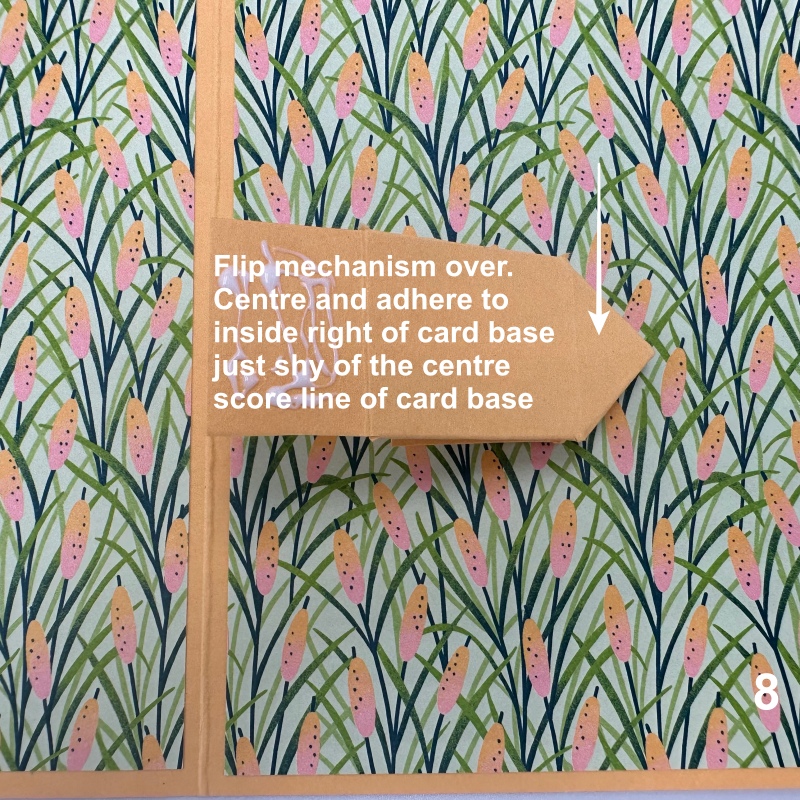
7. Invert fold to form arrowhead. Flip mechanism over and apply adhesive to the rectangle as shown in picture no. 7
8. Flip mechanism to the right side so that the arms are face down. Align left edge of mechanism just shy of the score line on card base equidistant from top and bottom in picture 8 and adhere to right inside of card base.
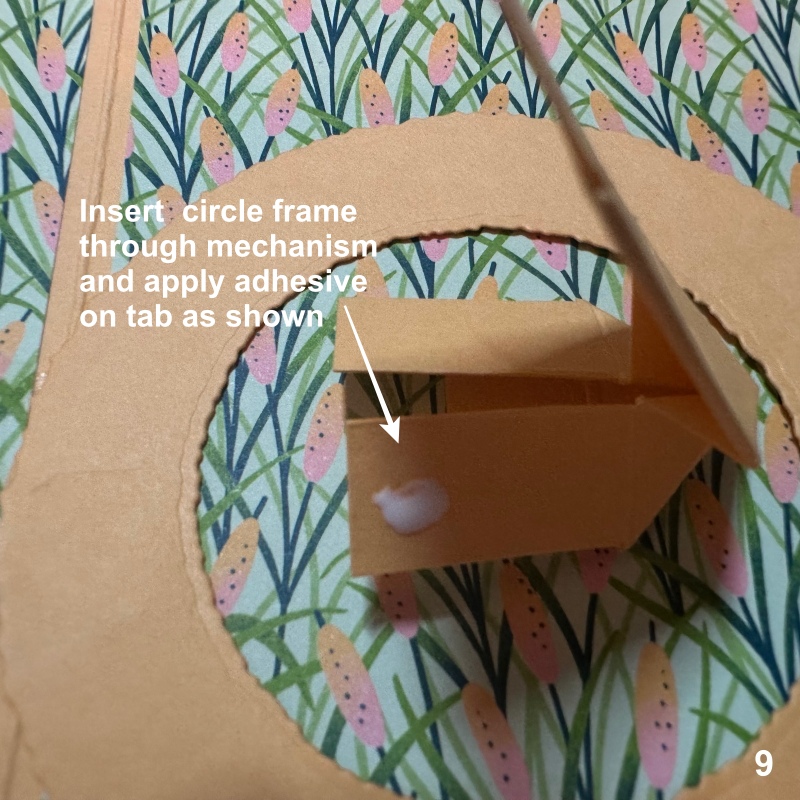
9. Apply a little adhesive to the corner of the bottom arm as shown in picture 9. Do not apply too much adhesive because if it seeps, it will prevent the arm from moving freely.

Steps 10-12
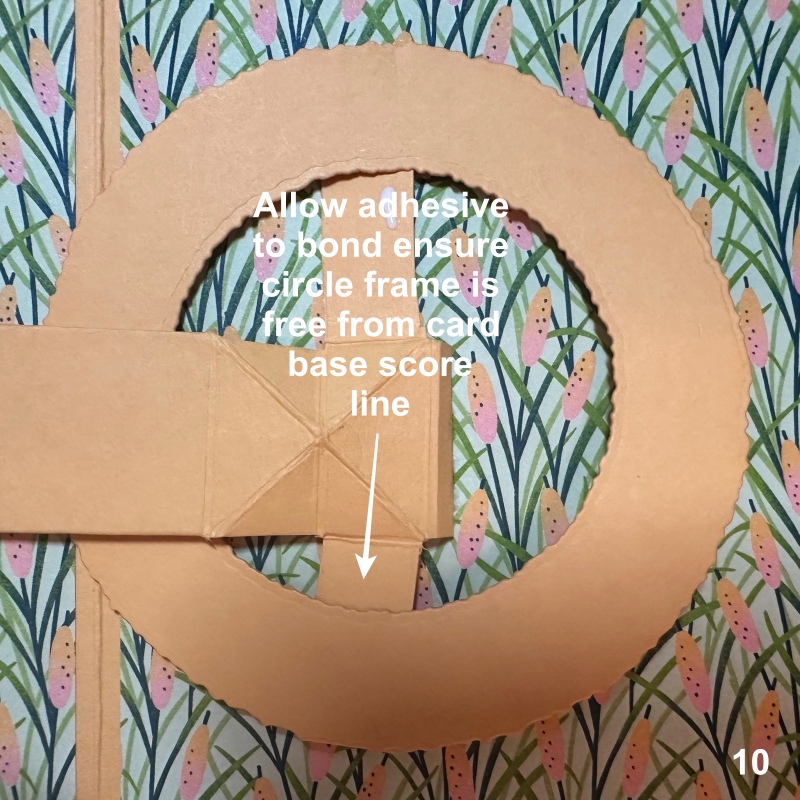
10. Slip no. 9 circle frame through the mechanism. and allow it to bond ensuring arm is still moving freely in picture 10.
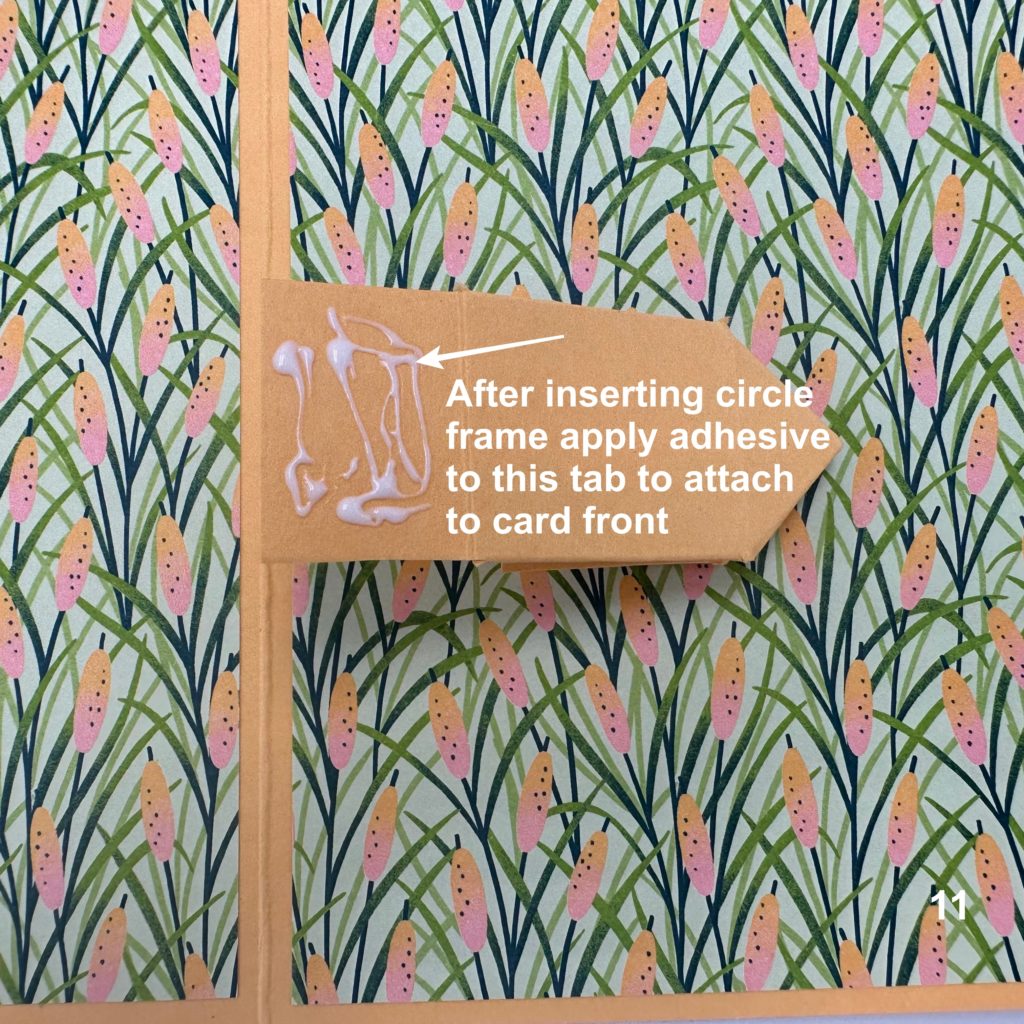
11. I removed the circle frame temporarily in picture 11 so that you can see where to apply the glue next. However, the circle frame needs to be inserted in place once you have applied the glue.
12. Once the circle frame is in situ, close card front on top and allow sufficient time for glue to bond in picture 12.
Steps 13-15
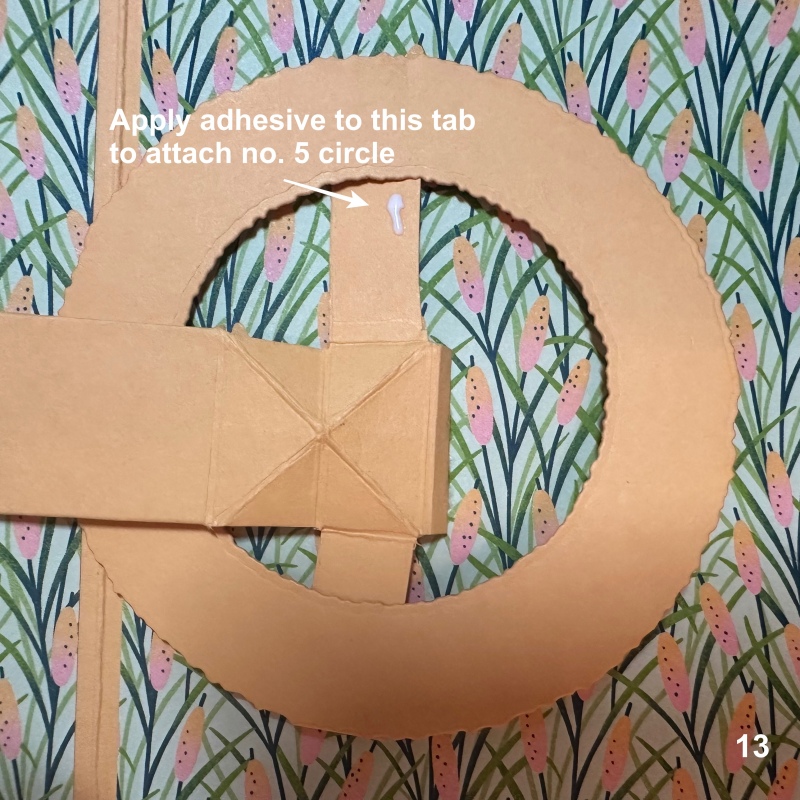
13. Next apply a small amount of glue to the top arm as shown in picture 13
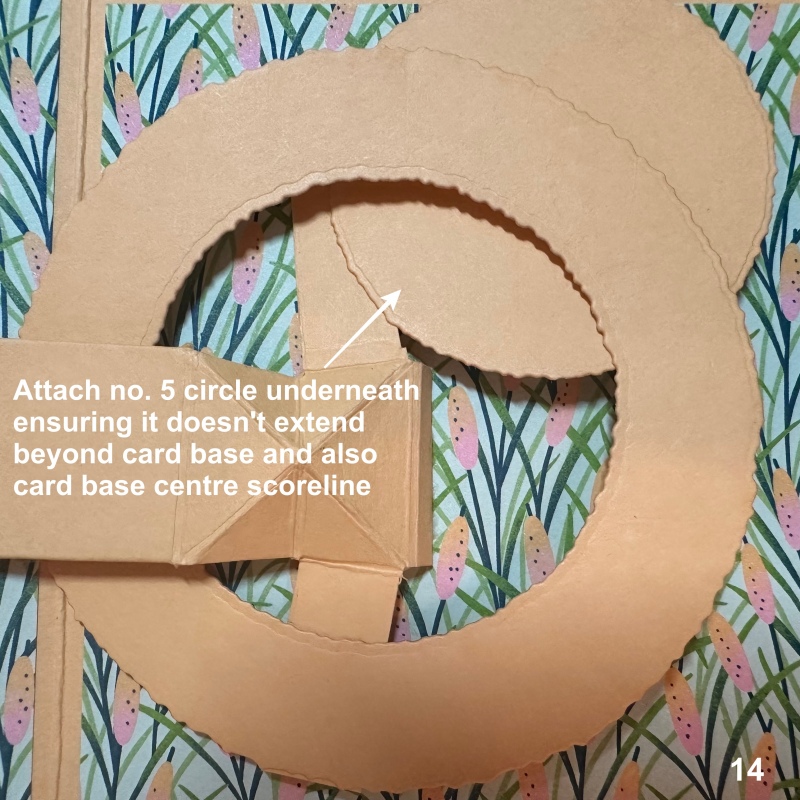
14. Attach the no. 5 circle to this arm and test the rotating action to ensure that the circle is hidden when the card is in the closed position and that it is moving freely.
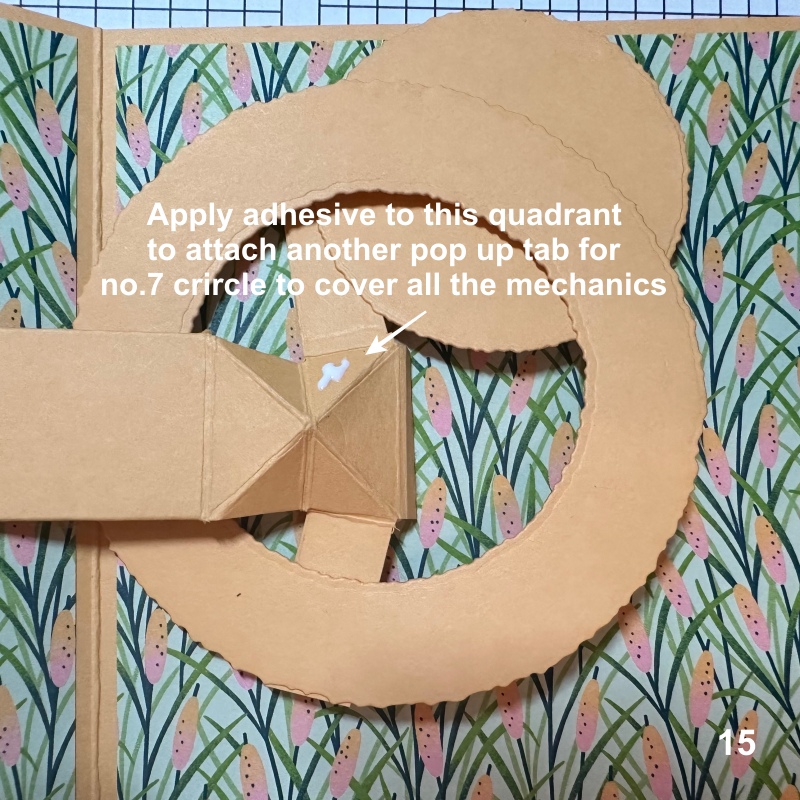
15. Apply adhesive to this quadrant to attach the last pop up mechanism.
Steps 16-17
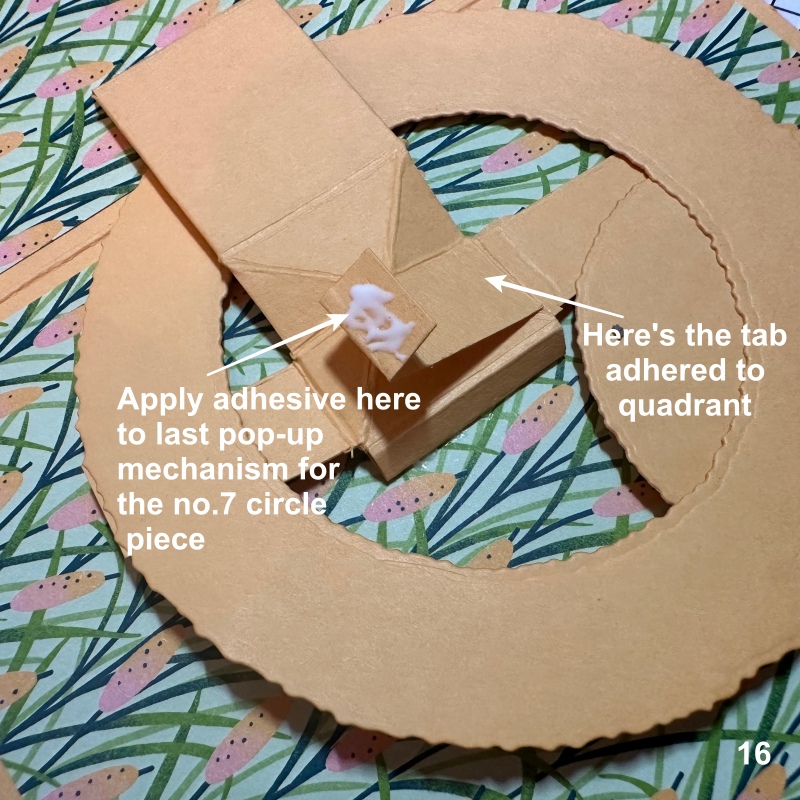
16. Remember the *arm prepared from the leftover piece in picture 4? Attach the longer end to the quadrant leaving the shorter tab exposed. Apply adhesive to this portion as shown in picture 16.
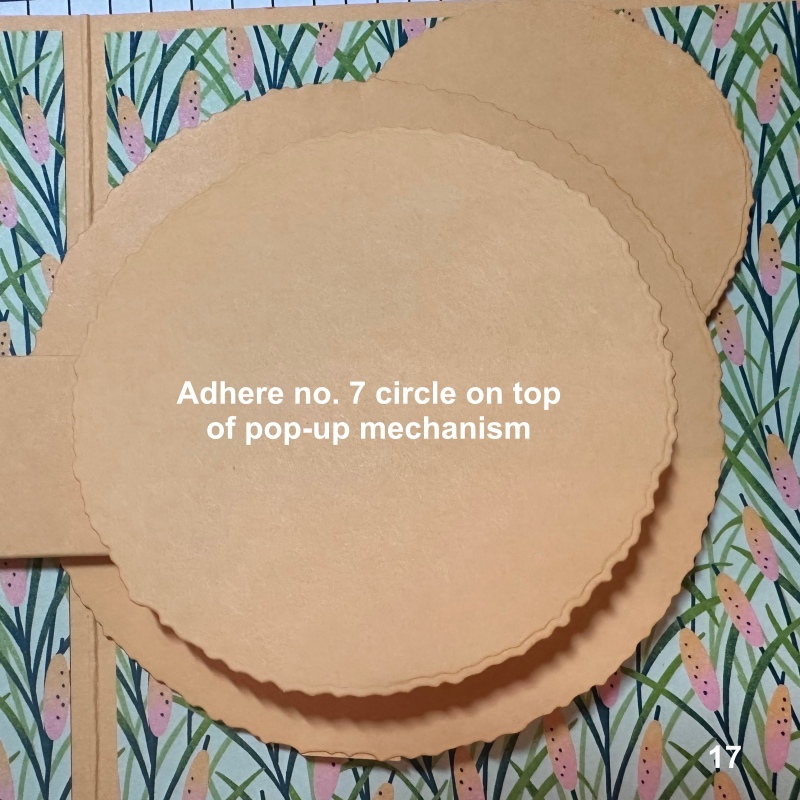
17. Now you can attach your remaining no. 7 circle on top of this tab to hide the rotating mechanism below. Lastly, adhere the patterned paper you cut with the no. 6 Deckled Circle die on top of the no. 7 circle (not pictured).
Once you’ve stamped and cut your images, decorate the card as you wish. Make sure that when you attach your pieces to the no. 9 circle frame that your pieces do not extend beyond card base when card is closed.
Supply list
Listed below is the supply list. Just click on the picture to take you directly to the item in my online store.
Product List")
")


 Designer Series Paper")
 Specialty Paper")


Happy crafting, and thanks for visiting!

- SHOP ONLINE – EARN 10% REWARDS ON ALL PURCHASES OVER £20
- PURCHASE A STARTER KIT : Get £155 worth of products for only £99. Choose from current catalogues and any specials available. Free Shipping. Read more
- Subscribe to my Video Tutorials – click here
Pingback: How to create a Birthday card - Sketched Butterflies - Stamp with Elaine
Pingback: Interactive card with Flying By - Stamp with Elaine
merci pour votre vidéo et explications
Vous êtes les bienvenus
Yours are the best directions for this card mechanism! What are the diameters of the circles you used (I don’t have this die cutting set).
Thank you, Heather. Deckled Circle Dies retired in January 2025 and was an online exclusive product. The diameter of the no. 9 circle is 3 ⅞” (9.8 cm), no. 7 circle 3 ⅛” (7.9 cm) and the no. 5 circle is 2 ⅜” (6 cm). Hope that helps.