
Interactive card with Flying By. This interactive card is a variation of the rotating circles fun fold card I’d created in a previous post which you can see HERE.
I used the Stylish Shapes dies but had to use the Spotlight on Nature dies as well because the next size up on the Stylish Shapes circle set was just too big. However, the 2nd largest of the radiating stitches pattern set in the Spotlight on Nature dies was just a smidge larger which worked better. In addition, I used the Alphabet a la Mode dies to die cut “Hello You”.

Cutting guide
Card base & Mat layers card front
- Card base : Misty Moonlight 4 ⅛” x 11″ (10.5 cm x 28 cm) long side score at 5 ½” (14 cm).
- Adhere Adhesive Sheet to Silver Foil cut at 3 ⅞” x 5 ⅛” (9.8 cm x 13 cm). Gut the inside by cutting a ¼ ” (0.5 cm) frame on all 4 sides. Reserve inside for die cutting letters with Alphabet a la Mode dies to spell “HELLO YOU”. *Tip: Line up your dies and place washi tape on top so you can cut the letters in one go. Only use as much foil as you need because the marks on your cutting plate will mark the foil and render it flawed.
- Boho Blue mat layer 3 ¾” x 5″ (9.5 cm x 12.7 cm) . Adhere this layer on top of silver foil frame with double sided tape.
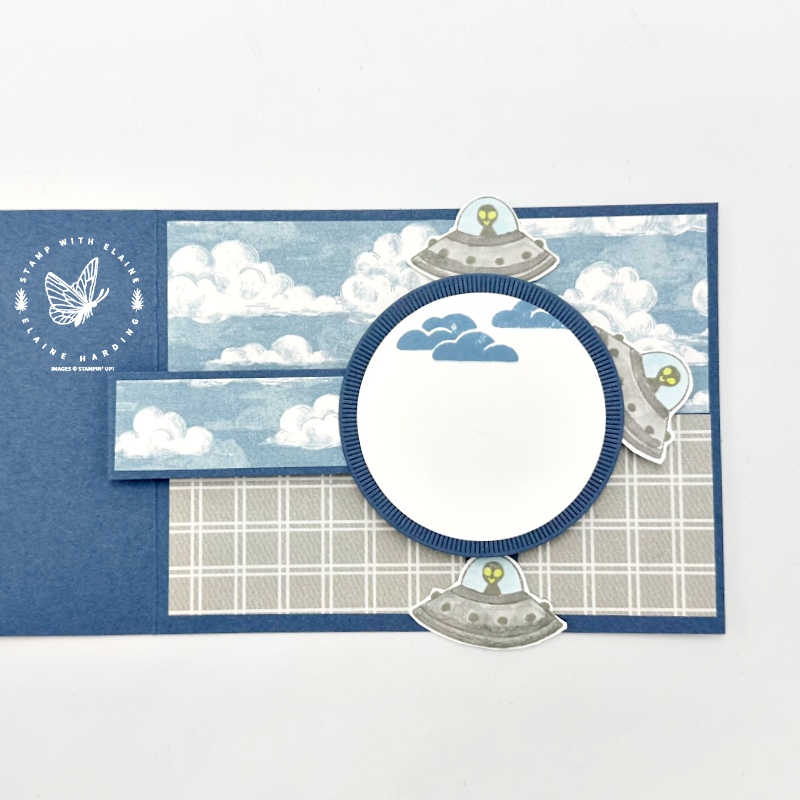
Inside card
- Take to the Sky DSP pattern A : 2″ x 5 ⅜” (5 cm x 13 cm). Adhere to top half inside card leaving an even border on the top and two sides.
- Pattern B Take to the Sky DSP : 2″ x 5 ⅜” (5 cm x 13 cm). Butt this up to bottom of pattern A and adhere to inside card leaving an even border on the bottom and two sides.
- Mechanical Arm DSP pattern A : ⅞” x 2 ⅞” (2 cm x 7 cm). Set aside. Once you’ve assembled the rotating mechanism, you can adhere this to the arm before adhering the circle frame.
Arm sections for adhering space ships to and circle sections
- Misty Moonlight card stock : Cut 1 x ½” x 2″ (1.3 cm x 5 cm); 1 x ½” x 2 ½” (1.3 cm x 6.4 cm); 1 x ½” x 3″ (1.3 cm x 7.5 cm).
- Support arm Misty Moonlight card stock : Cut ⅞” x 2 ⅞” (5 cm x 13 cm). Long side, mark one end at ½”. Find centre point and cut toward ½” on top and bottom sides to form arrow head.
- Stylish Shapes dies – set of 6 circle dies, 1 being smallest and 6 being largest – cut frame in Misty Moonlight with no. 4 & 5 circles in Misty Moonlight.
- Spotlight on Nature dies – separate patterns into the 3 design sets. There are 4 radiating stitches dies, die cut circle in Misty Moonlight with the 2nd largest die.
- Punch Basic White circle with 2 ⅜” circle punch.
Rotating Mechanism
- Misty Moonlight : 1 ½” x 5″ (3.8 cm x 12.7 cm)
- Long side score at ½”, 1″, 1 ½” and 4 ½” (1.3 cm, 2.5 cm, 3.8 cm and 11.4 cm)
- Orient card stock so that the short side with triple score lines is at the top, and single score is at the bottom.
- Align left edge at ¼” (0.6 cm) and cut from bottom third score line to bottom of card stock.
- Repeat on right edge at, align to right of cutting groove at ¼” (0.6 cm)and cut from bottom third score line down to bottom of card stock.
- Cut across 3rd score line and discard the long rectangle on both sides.
- Score diagonally between top left first score line with bottom right 3rd score line on trimmer.
- Repeat in opposite direction between top right down to bottom left to form a cross.
Visual aid
Supply list
Listed below is the supply list. Just click on the picture to take you directly to the item in my online store.
Product List")

 Circle Punch")
 Foil Sheets")


- SHOP ONLINE – EARN 10% REWARDS ON ALL PURCHASES OVER £20
- PURCHASE A STARTER KIT : Get £155 worth of products for only £99. Choose from current catalogues and any specials available. Free Shipping. Read more
- Subscribe to my Video Tutorials – click here