
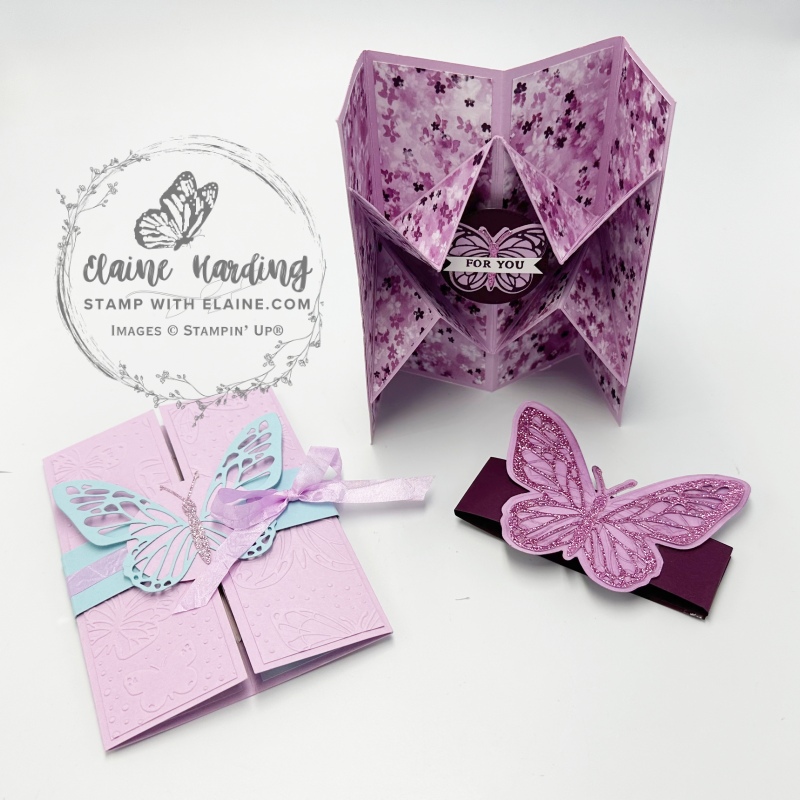
Explosion star card with Beautiful Butterflies. Today’s project is a fun fold Explosion Star card. I made two versions, one with the explosion insert in patterned paper and one that required mat layers. The Beautiful Butterflies bundle is part of the Beautiful Bokeh Suite on pages 38-41. It has a fabulous Hybrid Embossing Folder which also includes the dies.
Be warned! This post is picture heavy.
Sale-a-bration freebie with £55 order
The freebie I got by purchasing this set was Sale-a-bration Fresh Freesia seam binding ribbon (SAB brochure p.9) and it is a perfect match with the Beautfiful Bokeh 6″ x 6″ (15.2 x 15.2 cm) DSP in this Suite.
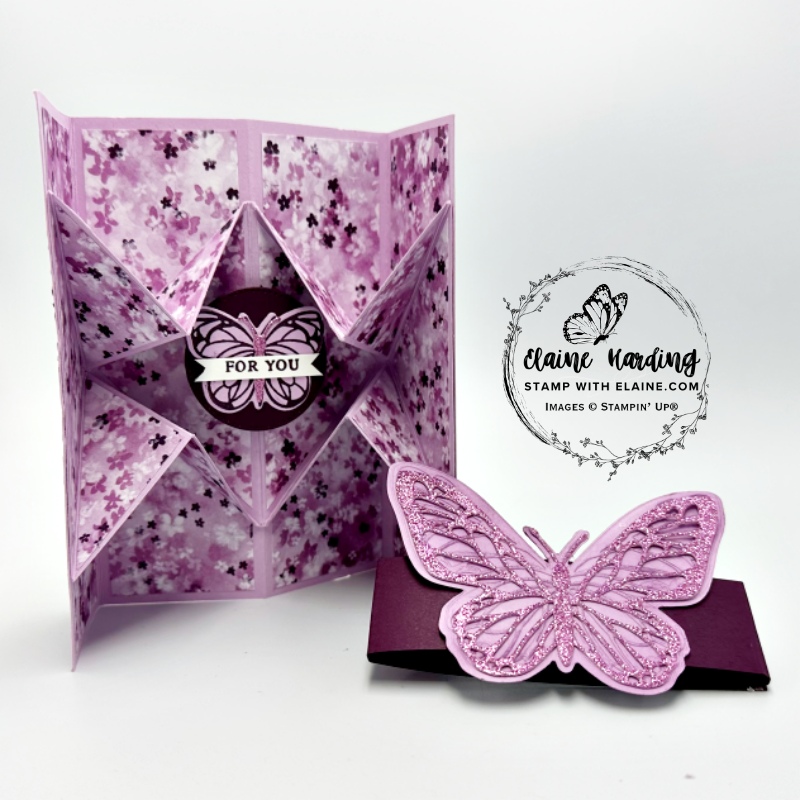
This card has a wow factor – looks complicated, but is really easy to make. However there are numerous little triangular surfaces to cover with pretty paper in my Version 2 sample. For this card I used another Sale-a-bration freebie called Bloom Impressions 12″x 12″ (30.5 x 30.5 cm) DSP.
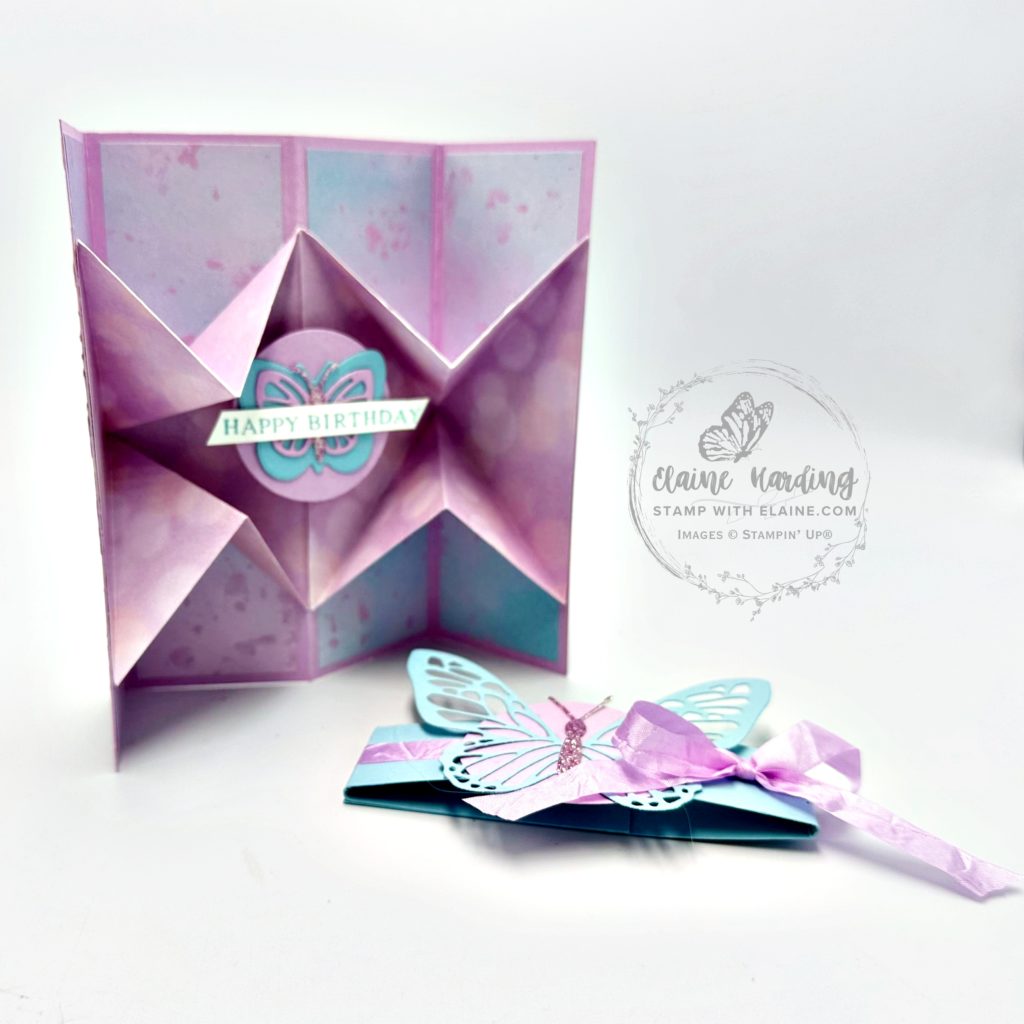
Version 1 without mat layers on the Explosion Star Insert
In the pictures below you can create the same effect but without extra layers simply by making the Explosion Star insert out of patterned paper instead of card stock.

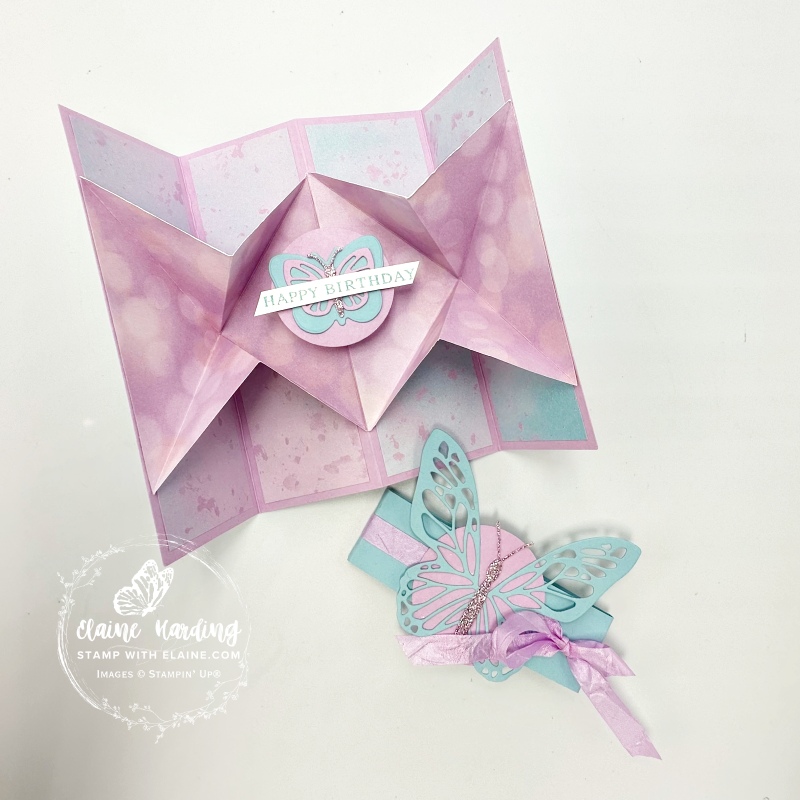
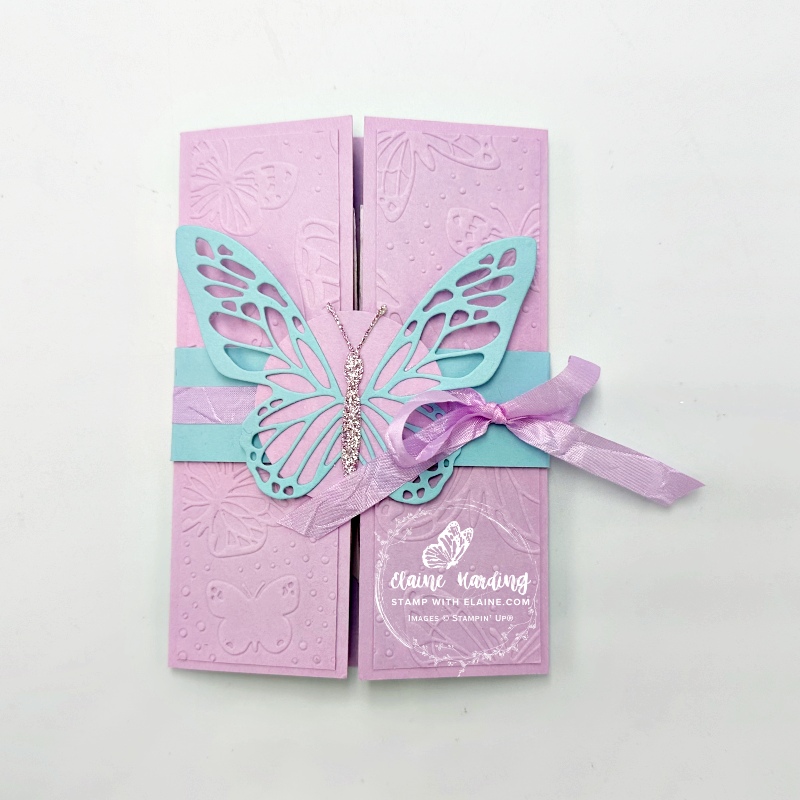
- Left picture shows the card closed. I embossed a 3 ½” x 5 ½” (9 cm x 14 cm) piece of Fresh Freesia card stock with the Beautiful Butterflies Hybrid embossing folder then cut it in half so that each piece measures 1 ¾” x 5 ½” (4.5 cm x 14 cm) to adhere to the two front panels.
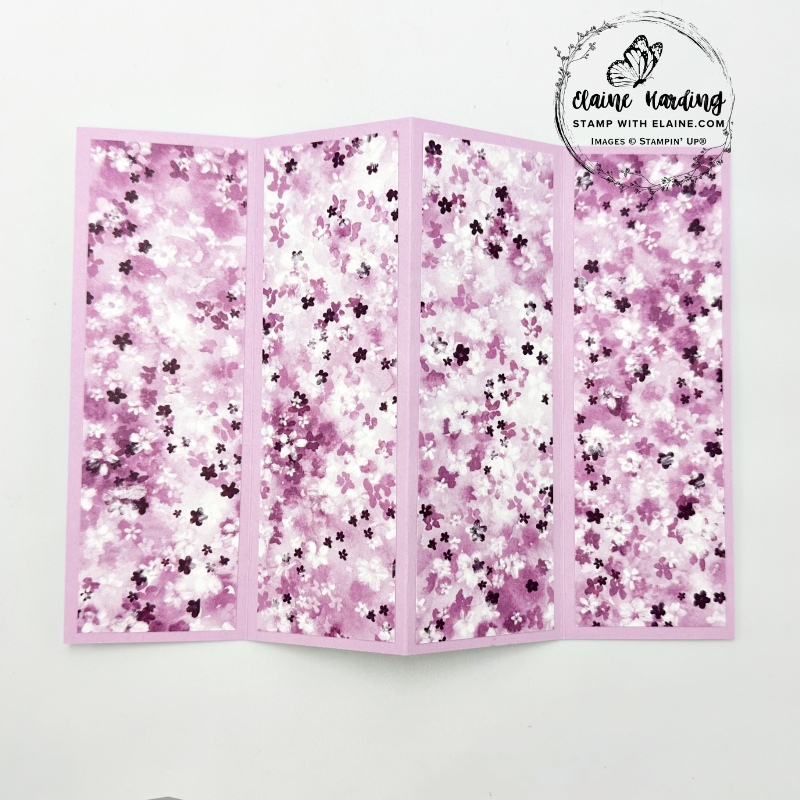
- Flat lay view of card when open. The DSP pack is a 6 x 6 so I had to join the pieces. Cut 1 square 4″x 4″ (10 x 10 cm) and the other square at 4 ¼” x 4″ (10.5 cm x 10 cm). Score the larger square at ¼” (0.5 cm) on long side and join pieces together so that it measures 4″ x 8″ (10 cm x 20 cm)
- Displayed upright. The mat layers on the card base measure 1 ¾” x 5 ½” (4.5 cm x 14 cm) and you need 4 pieces.
How to make card
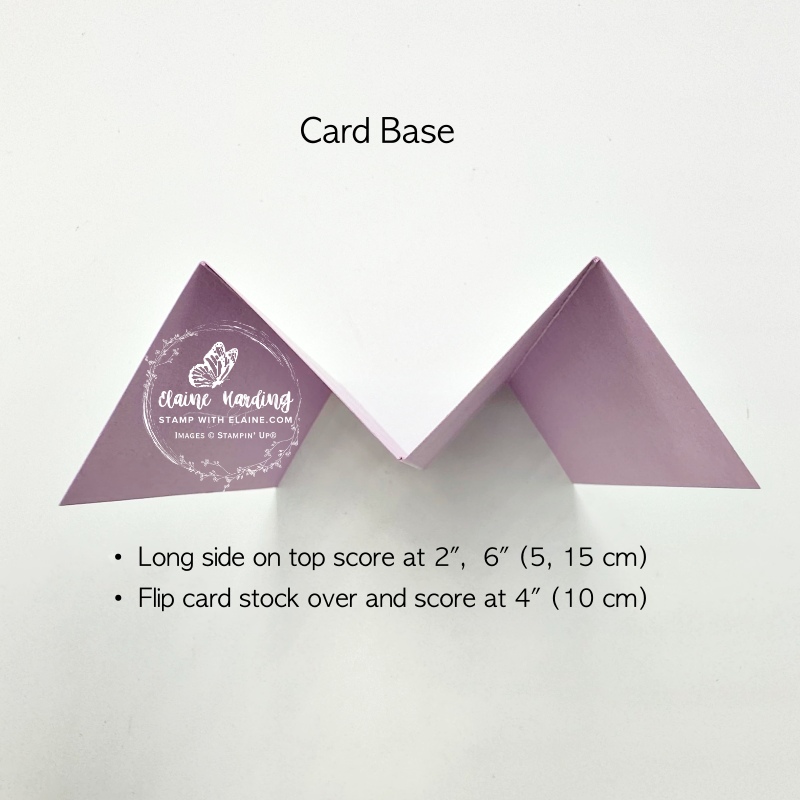
- Card base – same for both Version 1 & 2 : Fresh Freesia 5 ¾” x 8″ (14.5 cm x 20 cm). Long side on top, score at 2″, 6″ (5 cm, 15 cm). Flip card stock over and score at 4″ (10 cm).
- Fold in half on 4″ score line as a Mountain fold, then fold two side panels inwards as Valley folds to form a gatefold card.
- Explosion Star insert – Version 1 follow instructions above as described in Flat Lay picture desciption. Version 2 cut card stock same colour as card base 4″ x 8″ (10 cm x 20 cm). Both versions are 4″x 8″ (10 x 20 cm)
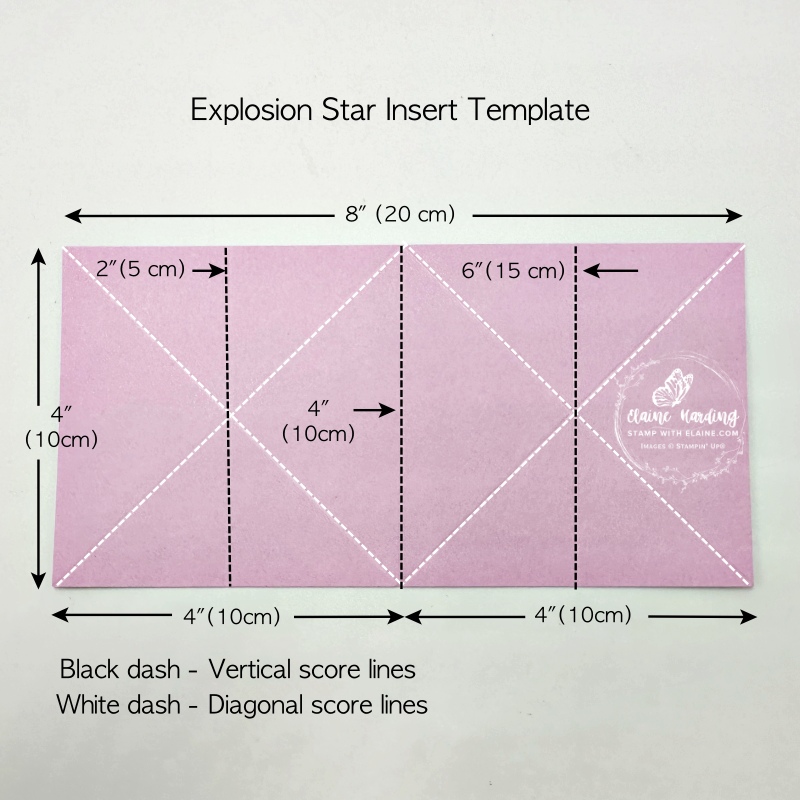
- Scoring instructions are the same for both versions. Long side on top, score at 2″, 4″ and 6″ (5, 10, 15 cm) – black dashed score lines in picture.
- Score diagonally corner to corner on each 4″x 4″ (10 cm x 10 cm) square as depicted by white dashed score lines in picture above.
Explosion Star Insert instructions
The instructions below apply to both versions 1 & 2 – without or with mat layers because the base of the Explosion Star insert is the same.
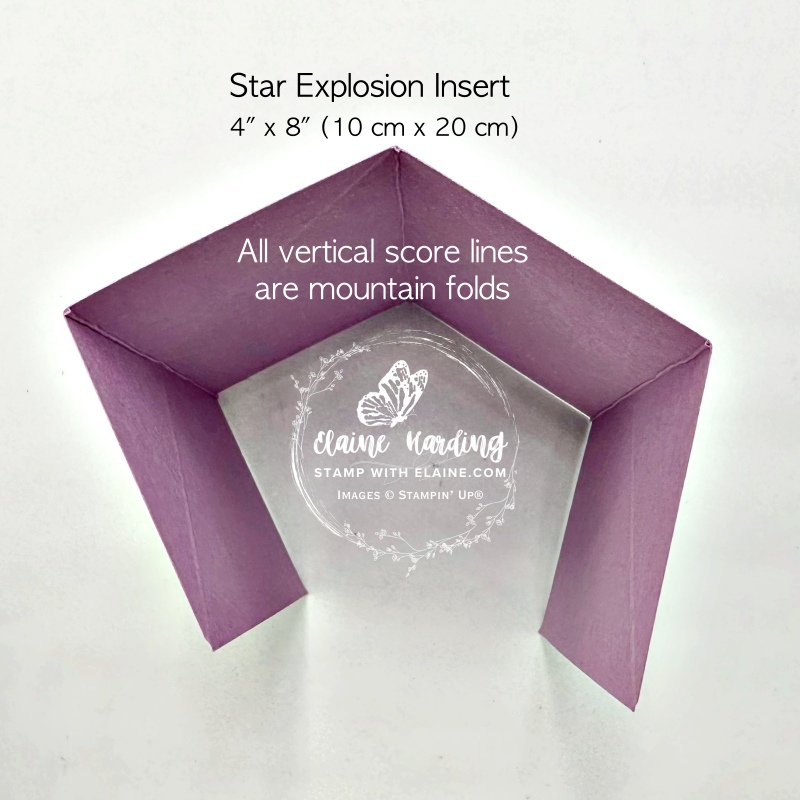
- All the vertical score lines are mountain folds and from the top, it should look like the picture on the left.
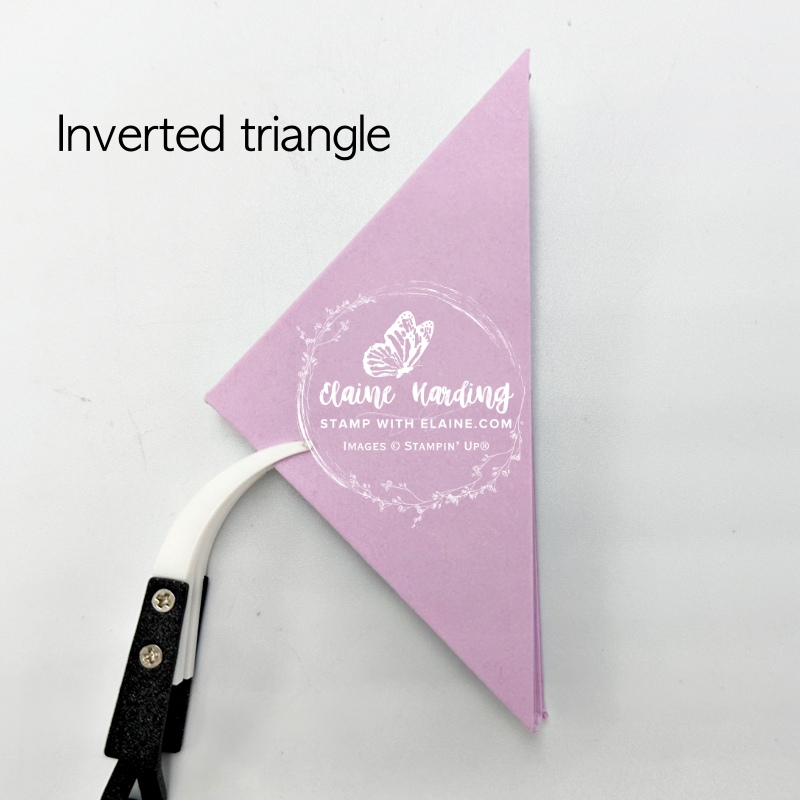
- The diagonal folds are all Valley folds so that when they’re manipulated and pinched together it resembles an inverted triangle.
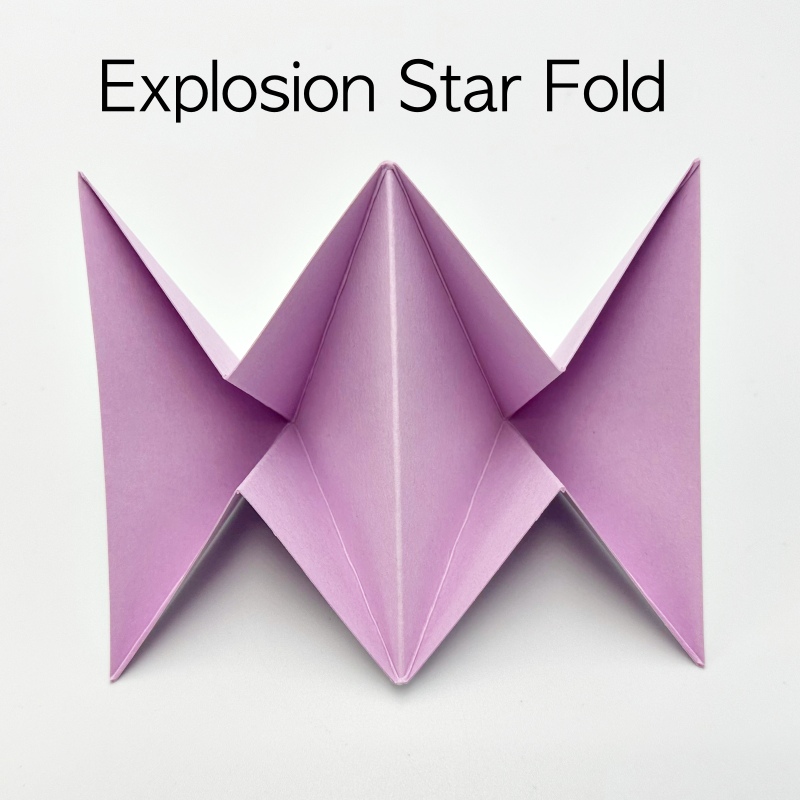
- When you open it up it should look like the picture on the right.
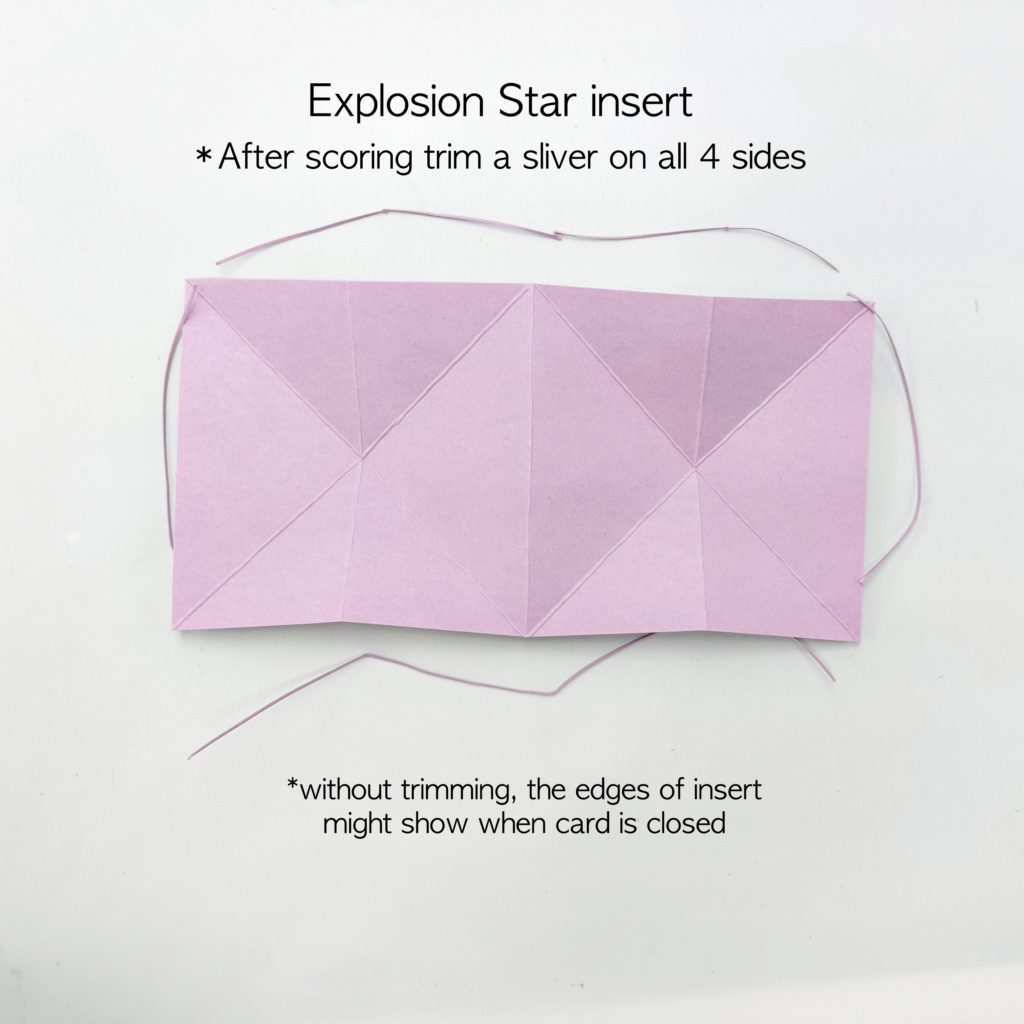
- Once you’ve done all your scoring, it is important to trim a little sliver from all four sides so that once the Explosion Star insert is adhered to card base, there is some movement and if left untrimmed it will show.
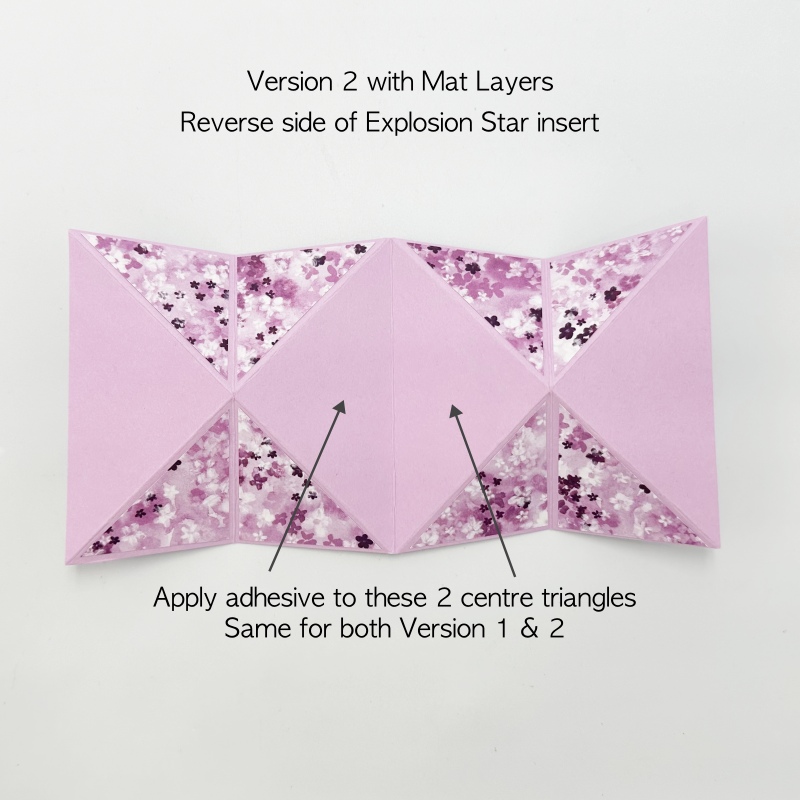
- Apply adhesive to the back of the Explosion Star insert.
- Right side up, align with card base equidistant from top and bottom straddling 4″ (10 cm) score line and adhere.
- Fold back right side of Explosion Star insert, apply adhesive and close end panel of card base over the top and allow to bond. Repeat for left side. (not pictured)
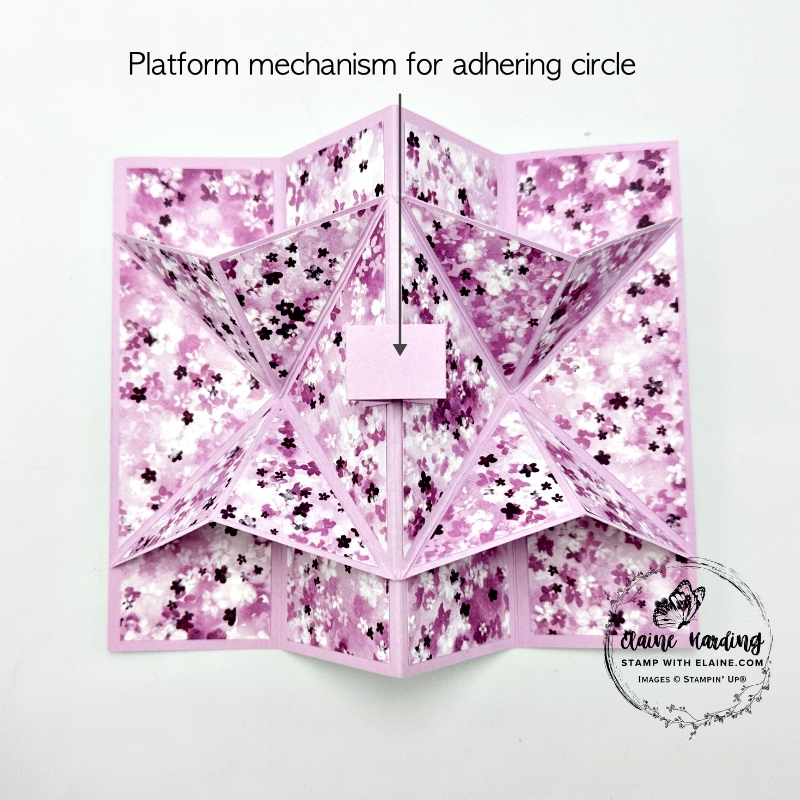
- Cut platform mechanism 3″ x ¾” (6 cm x 2 cm). Long side on top score at ½”, 1″, 2″ and 2 ½” (1 cm, 2 cm, 4 cm, 5 cm).
- First fold “Valley”, second and third “Mountain” fold, last fold Valley fold.
- Apply adhesive to both end panels. If you look at the mechanism from the underside, it resembles a gatefold. Align the centre of the gatefold with the centre scoreline of Card base and Explosion Star insert, adhere and allow it to bond.
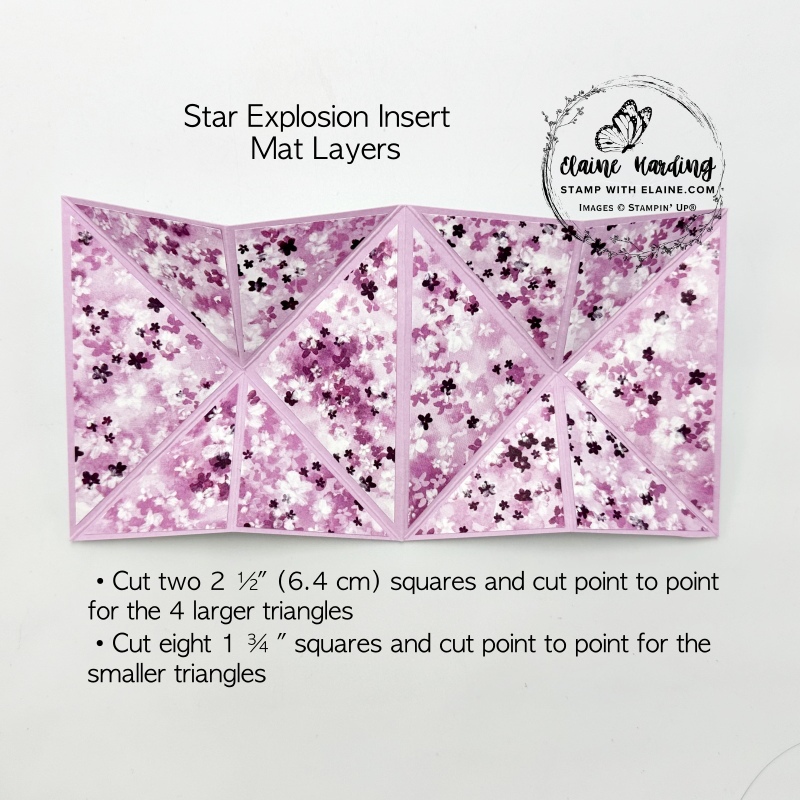
Mat Layers for Version 2
- Front of card (not pictured) Cut DSP 3 ½” x 5 ½” (9 cm x 14 cm) and emboss with Beautiful Butterflies Hybrid Embossing folder. Cut in half so that the pattern is continuous – each half measures 1 ¾” x 5 ½” (4.5 cm x 14 cm)
- Cut 4 pieces DSP (I used Sale-a-bration Freebie Bloom Impressions 12x12DSP) 1 ¾” x 5 ½” (4.5 cm x 14 cm)
- Large triangle pieces – cut two squares 2 ½” x 2 ½” and align opposite corners cutting point to point to yield 4. Adhere as pictured.
- Small triangle pieces – cut eight squares 1 ¾” x 1 ¾”and align opposite corners cutting point to point to yield 16. Adhere as pictured on front of Explosion Star insert.
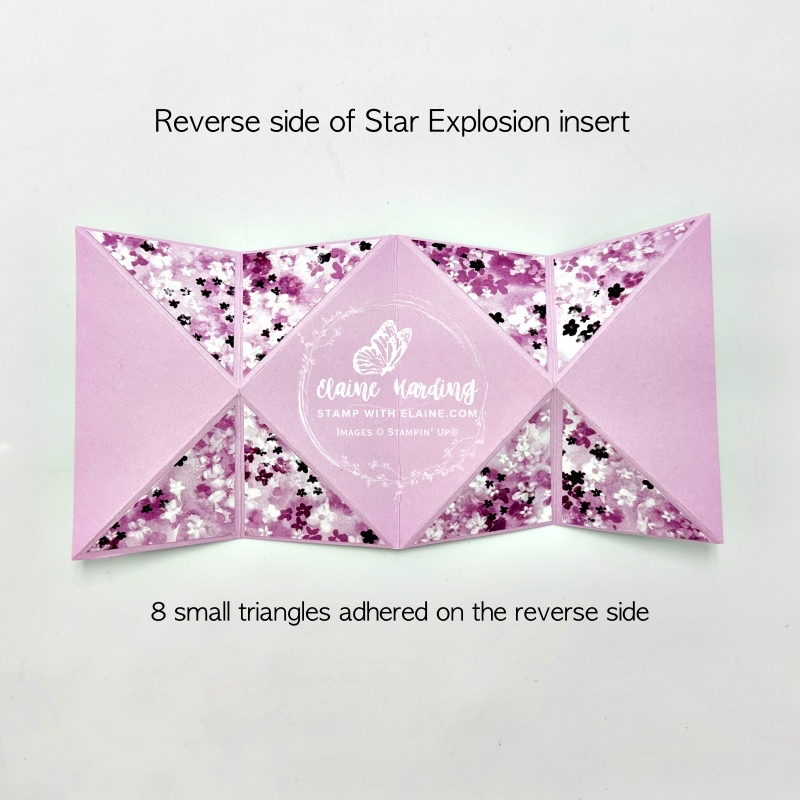
- Adhere the remaining 8 small triangles on the reverse as pictured.
Finishing touches 1
The basics have been covered so these are the other elements

Belly Band Version 1 card
- Card front belly band 1 ¼” (3 cm) x A4 length cut from Balmy Blue card stock. Long side on top score at 3″, 3 ⅛”(7.5 cm, 8 cm).
- Wrap round closed card, butt it up to scoring board and score along edge of right side of closed card and score ⅛”(0.5 cm) next to it. The reason for this is to allow for the bulk of the card. Wrap round remaining card, trim off excess and adhere to belly band.
- Cut off a strip of ribbon and adhere to centre of belly band allowing eough to tie a bow.
- Die cut 1 circle each with the 2nd smallest and 3rd largest Stylish circle dies in Fresh Freesia card stock. Adhere smaller circle to platform inside Explosion Star insert and larger one to the front centre of belly band.
- Tie bow to right of front circle on belly band (left pic)
- Die cut large open work butterfly in Balmy Blue card stock and the largest butterfly body from glimmer paper. Adhere large butterfly to centre of circle and glimmer body on top.
Inside card 1
- Die cut small open work butterfly from Balmy Blue card stock and adhere to middle of small circle on platform.
- Stamp “happy birthday” and trim to size then adhere as shown with glue dots.
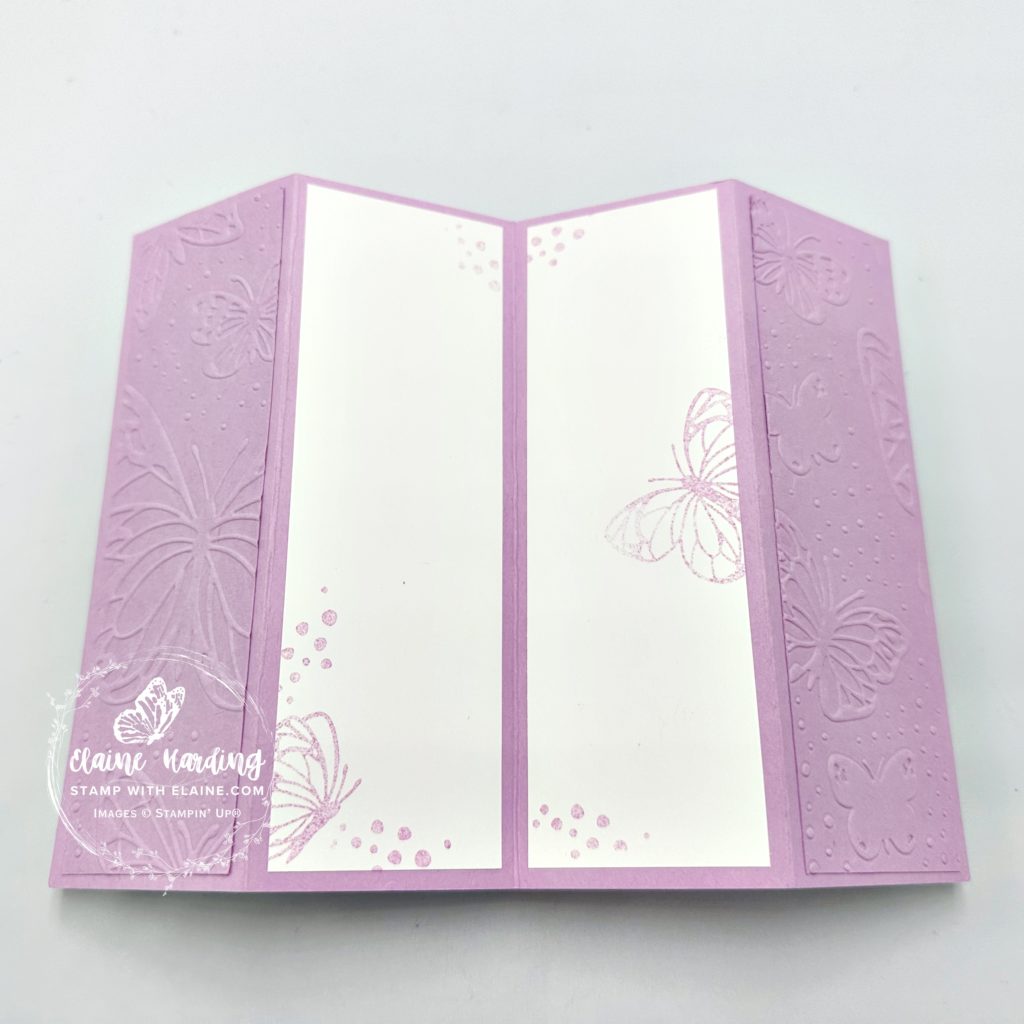
Back of card 1
- Cut 2 pieces Basic White 1 ¾” x 5 ½” (4.5 x 14 cm)
- Stamp as desired in Fresh Freesia Ink and adhere to two centre panels as pictured above.
Finishing touches 2
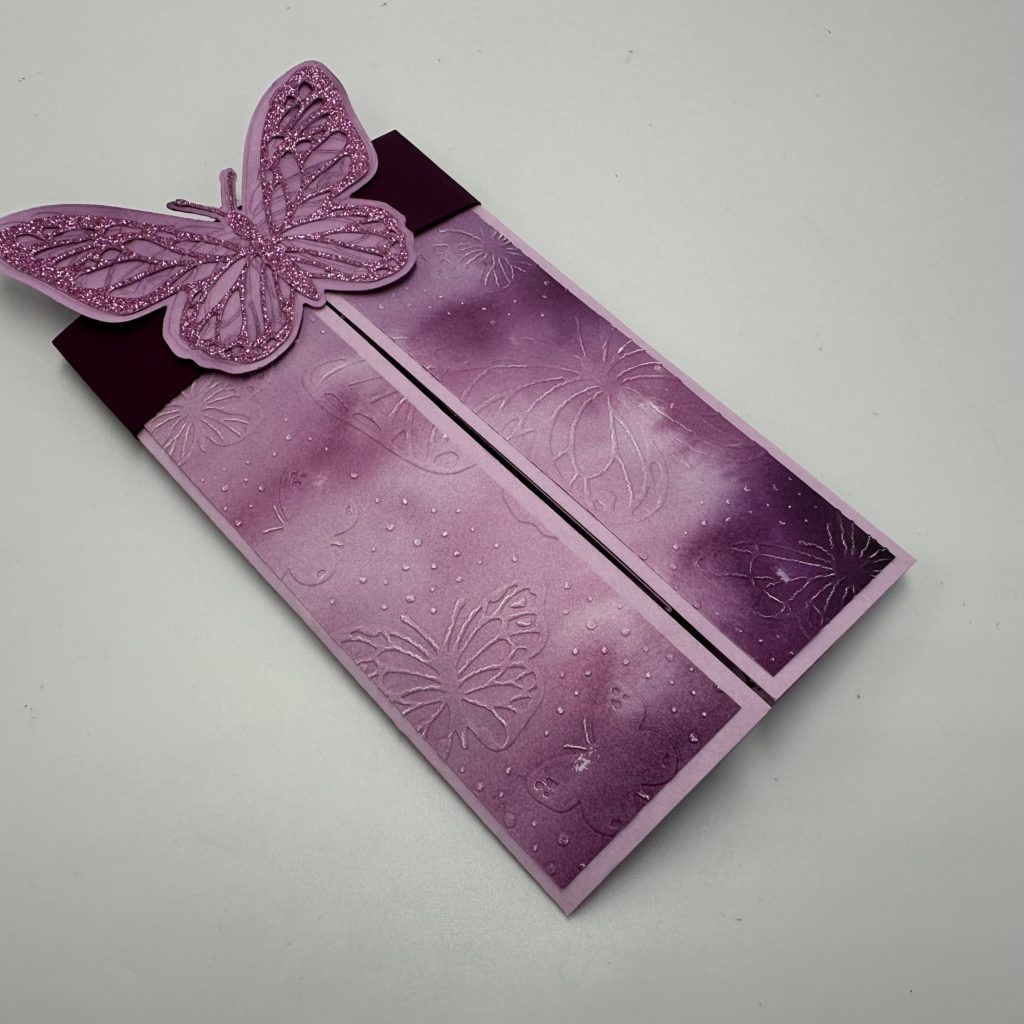
Belly Band Version 2 card
- Card front belly band 1 ¼” x A4 length cut from Blackberry Bliss card stock. Long side on top score at 3″, 3 ⅛”.
- Wrap round closed card, butt it up to scoring board and score along edge of right side of closed card and score ⅛” next to it. The reason for this is to allow for the bulk of the card. Wrap round remaining card, trim off excess and adhere to belly band.
- Die cut and emboss a scrap of Fresh Freesia large enough to cover surface of large butterfly in the Beautiful Butterflies Hybrid embossing folder.
- Use a blending brush to highlight the embossed areas in Blackberry Bliss
- From Petunia pop glimmer paper die cut the largest Beautiful Butterflies body (2024-26 In Color Glimmer Paper) and large open work butterfly
- Adhere embossed butterfly to centre front of belly band and the die cut glimmer butterfly and its body on top.
Inside card 2
- Die cut 2nd smallest Stylish Shapes circle in Blackberry Bliss.
- Petunia Pop glimmer paper – die cut medium size butterfly body and set aside.
- Stamp the small butterfly in Blackberry Bliss on Fresh Freesia card stock.
- Die cut stamped image with corresponding die from Beautiful Butterflies Dies then adhere Petunia Pop glimmer paper butterfly body on top.
- Adhere die cut image to Stylish Shape circle on top of platform mechanism.
- Stamp “for you” in Blackberry Bliss on Basic White card stock and trim with flag ends and adhere to butterfly image with glue dots.
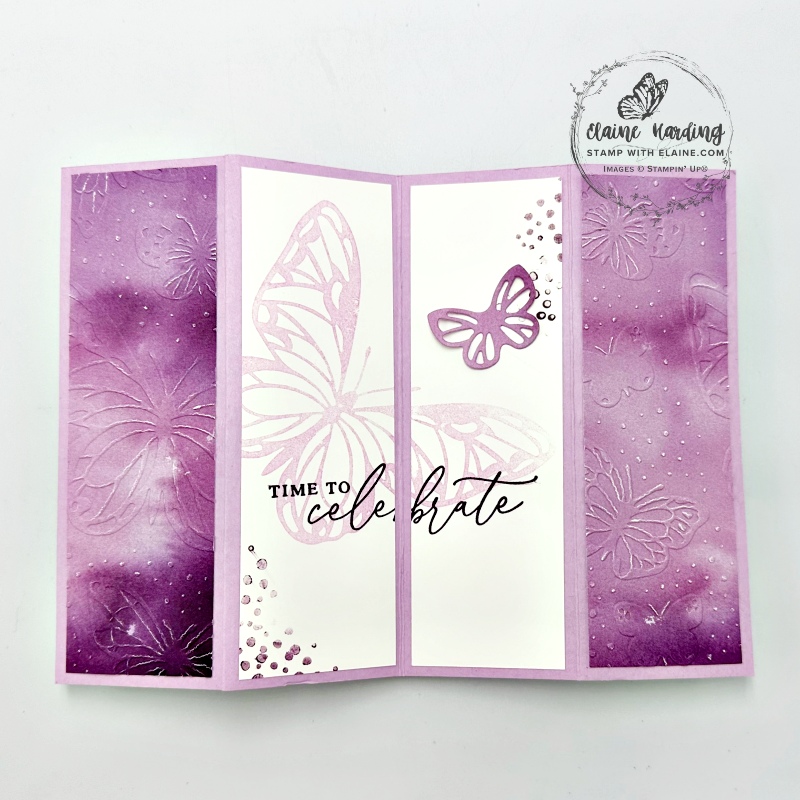
Back of card 2
- Cut 2 pieces Basic White 1 ¾” x 5 ½” (4.5 x 14 cm)
- Stamp as desired in Fresh Freesia and Blackberry Bliss Ink (stamped it 2nd generation for a lighter shade) and adhere to the two centre panels to complete card.
Supply list
Listed below is the supply list. Just click on the picture to take you directly to the item in my online store.
Product List")
 Designer Series Paper")
 Specialty Paper")
 Seam Binding Ribbon")
 Designer Series Paper")


Well, I hope you’ve enjoyed this fun fold card. Enjoy the rest of your weekend! Thanks for stopping by and happy crafting!

- SHOP ONLINE – EARN 10% REWARDS ON ALL PURCHASES OVER £20
- PURCHASE A STARTER KIT : Get £155 worth of products for only £99. Choose from current catalogues and any specials available. Free Shipping. Read more
- Subscribe to my Video Tutorials – click here
Pingback: Sale-a-bration - Beautiful Butterflies - Stamp with Elaine