
Valentine card – Hugs for Love. We’re at the half way point of Sale-a-bration and there’s only 28 days In February to get those freebies and only 2 weeks till Valentine’s Day! This is what I made for my valentine, I think it’s safe to post here because he doesn’t follow my blog. It’s a flip flap card using Hugs for Love bundle and Sale-a-bration’s Heart Shaped bundle.
Sale-a-bration Heart Shaped Bundle
Here’s a suggestion on how to qualify for getting Sale-a-bration’s Heart Shaped Bundle for free.
Purchase the following :
- Hugs for Love Bundle
- Forever Plaid 3D embossing folder
- Timeless Plaid 6″x 6″ (15.2 x 15.2 cm) DSP
- Boho Blue and Basic Beige A4 card stock packs £10.75 per pack
- Basic White (40 sheets) @ £13 per pack
- Ink pads x 2 @ £8.50 each (I used Basic Beige and Boho Blue)
- Adhesive Sheets (optional)
- Two ink pads of your choice
…and you will then qualify for the Heart Shaped Bundle FREE to make this card.
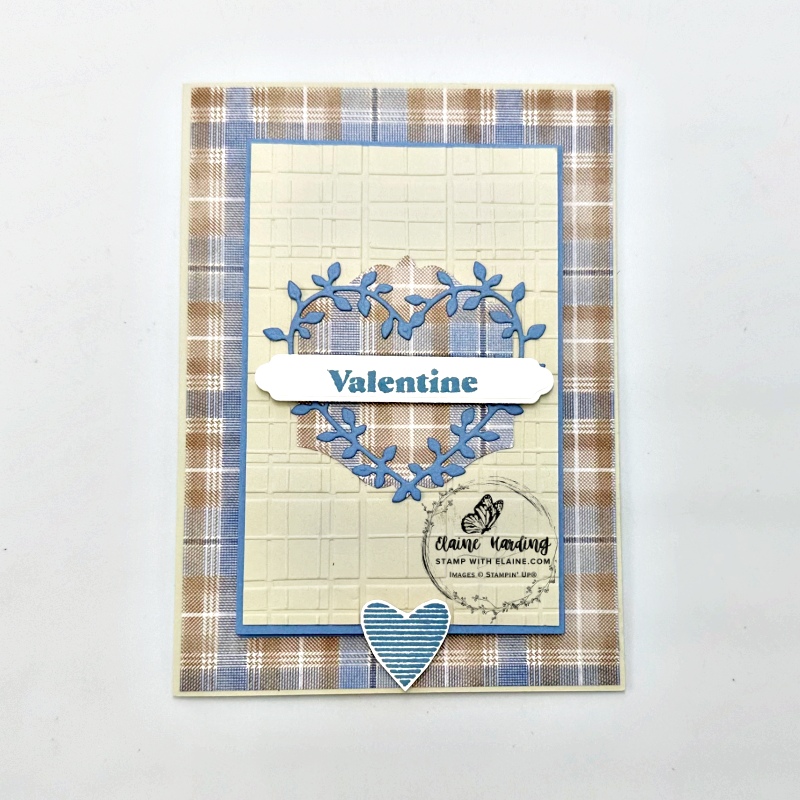

How to make card
Card base cutting guide
- Basic Beige card base 5 ¾” x 8 ¼” (14.5 cm x 21 cm) folded in half.
- Boho Blue mat layer #1 for inside cut at 5 ⅜” x 3 ¾” (13.5 cm x 9.5 cm)
- Basic White layer #2 for inside card : 5 ¼” x 3 ⅝” (13 cm x 9 cm)
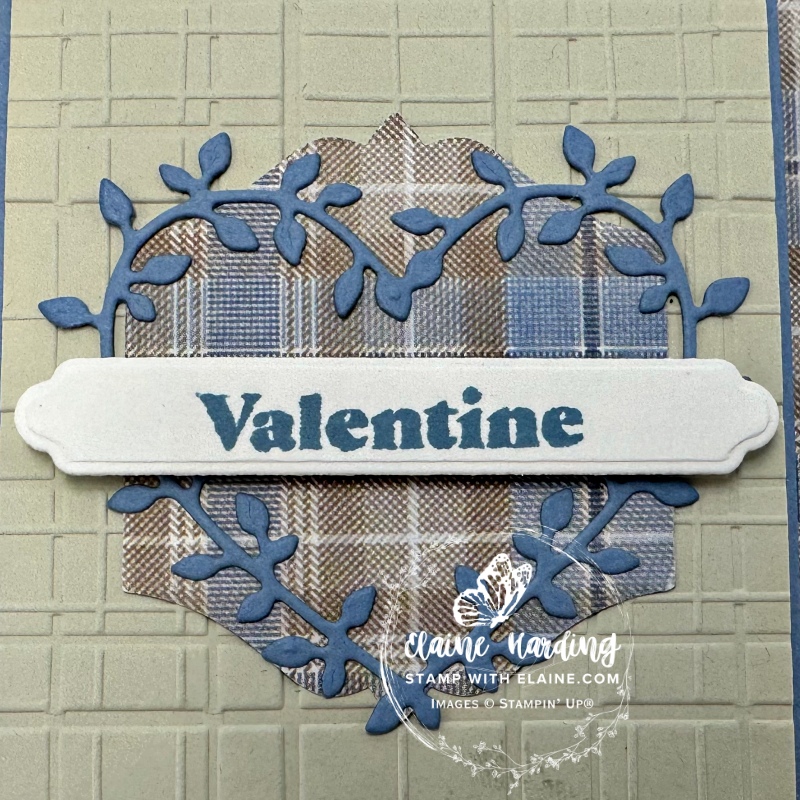
- Cut Timeless Plaid 6″ x 6″ DSP : 4” x 5 ⅝” (10 cm x 14 cm) and adhere to card front on card base leaving an even border on all four sides. Reserve the remnants for punching a label and decorating inside the card base . It’s quite tight and there is very little waste!
- Use the “To the Point Label” Punch to punch a label from the DSP. Be economical and strategic about where to punch the remnant of 6″x 6″ DSP so that you are able to use the rest of the Timeless Plaid DSP to decorate the *inside of main card. Set aside.
- Timeless Plaid remnant trim ¾” x 3 ¼” (2 cm x 8 cm) for adhering to inside bottom of Basic White layer for inside of main card.
- Optional : put adhesive sheet on back of scrap of Boho Blue cardstock before die cutting Heart from SAB’s Heart Shaped die.
- On scrap of Basic White card stock stamp 2 striped hearts in Boho Blue and fussy cut. Set aside.
* Please note that it’s best to punch first otherwise you won’t have anything to hold on to while you punch.
Tip : You can mark ¾” x 3 ¼” on the remnant to ensure you have enough before punching.
How to create Mask template to isolate the word “Valentine” on stamp
The stamp was too large to fit into the label die from the Heart Shaped Dies set so here’s a work around.
- Cut two pieces of Basic White scrap the same size. On one of them stamp the greeting.
- Use a craft knife to cut an aperture around the word “Valentine” to create a mask template as shown on picture below on left.
- Stack and align the other Basic White piece underneath, secure it on your work surface with low tack tape or a post it note so that it doesn’t move.
- Stamp the greeting again in Boho Blue ink – the template will mask the letters you don’t want to show.
- Place the label die on top of the word “Valentine” and die cut label. Set aside.
Flip Flap mini card
- Card base Boho Blue : 3” x 9 ¼” (7.5 cm x 23 cm) long side score at 4 ⅝” (11.5 cm). Adhere to card base on top of Timeless Plaid layer leaving an even border on all four sides.
- Mini card front Basic Beige mat layer : 2 ¾” x 4 ⅜” (7 cm x 11 cm) and emboss with Forever Plaid 3D Embossing Folder. Adhere to front of Flip Flap mini card.
- Centre Timeless Plaid punched label on Basic Beige embossed layer equidistant on the two sides and top and bottom.
- Remove backing paper of adhesive sheet (if using) and adhere on top of Timeless Plaid punched label.
- Apply dimensionals on “Valentine” label and adhere across centre of heart.
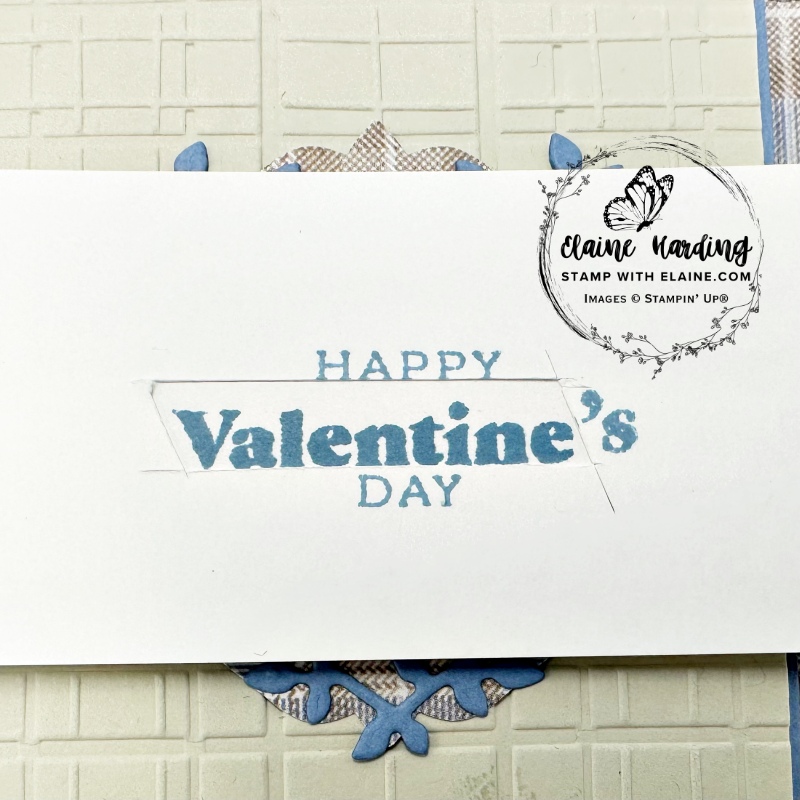
Inside Flip Flap mini card
- Adhere Mini card Basic White layer cut at 2 ⅞” x 4 ½” (7 cm x 11 cm) to inside of mini card.
- Stamp a frame from Hugs for love as shown in Boho Blue.
- Ink up stamp “you & I make the best team” and stamp inside the frame in Basic Beige.
- Apply dimensional to bottom half of a fussy cut striped heart on front of card base so that you can tuck the Mini Flip Flap card front into it to keep it closed.
Inside card base
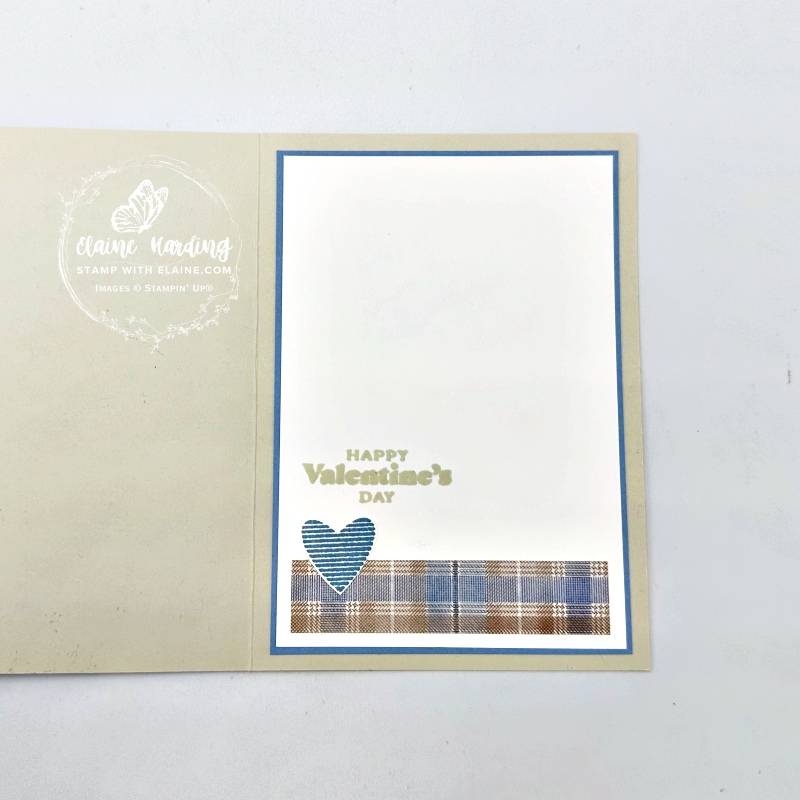
- Adhere Boho Blue 5 ⅜” x 3 ¾” (13.5 cm x 9.5 cm) mat layer #1 to inside of main card base leaving an even border on all four sides.
- Next adhere Basic White Mat layer measuring 5 ¼” x 3 ⅝” (13 cm x 9 cm).
- Apply adhesive to back of Timeless Plaid trimmed remnant ¾” x 3 ¼” (2 cm x 8 cm)
- Adhere remaining fussy cut striped heart on top of Timeless Plaid trim as pictured.
- Stamp “Happy Valentine’s Day” as pictured.
Supply list
Listed below is the supply list. Just click on the picture to take you directly to the item in my online store.
Product List")
")


")
 Designer Series Paper")


I hope you’ve been inspired by today’s card. Thanks for joining me today!

- SHOP ONLINE – EARN 10% REWARDS ON ALL PURCHASES OVER £20
- PURCHASE A STARTER KIT : Get £155 worth of products for only £99. Choose from current catalogues and any specials available. Free Shipping. Read more
- Subscribe to my Video Tutorials – click here