
Fun pop-up Card – Springtime. The theme for February’s Tech 4 Stampers Blog hop is Springtime and here’s my take on it. I’ve used both the Storybook Life photopolymer stamp set from the new January 25 Scrapbooking digital brochure and the Storybook Friends Bundle from the January-April 2025 catalogue.
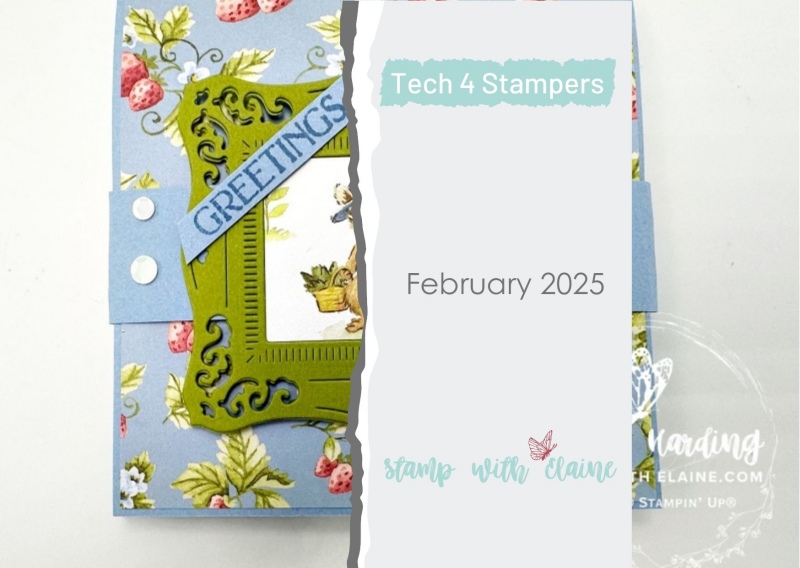
Welcome to February’s springtime themed blog hop!

The Build & Bloom Stampers Blog hop (formerly Tech 4 Stampers)is a monthly subscription group run by Louise Sims. She mentors and enables members to understand IT jargon and equips them with a fountain of Technical knowledge to build or manage their own websites. It takes the mystery out of “tech” and I’ve certainly grown in confidence thanks to her expertise, patience and guidance. Not only that, I’ve met and made new friends with my fellow “Techs” and love the camaraderie within the group.
Storybook Friends Bundle and Storybook Life
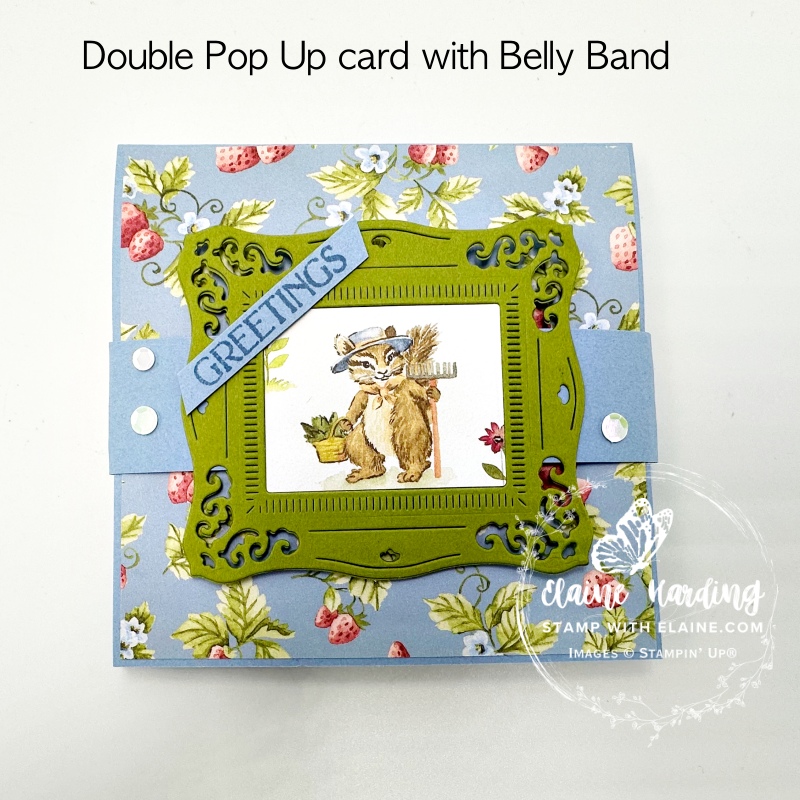
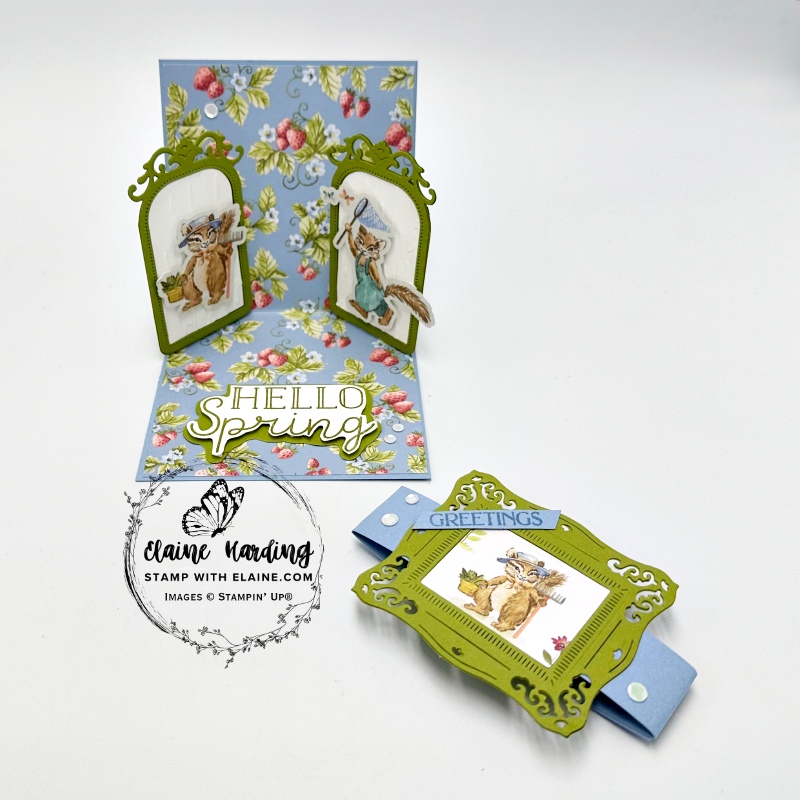
I made a square card with a surprisingly simple pop-up mechanism inside the card!
Cutting Guide
- Card base : Boho Blue 4 ⅛” x 8 ¼” (10.5 cm x 21 cm). On the long side score at 4 ⅛” (10.5 cm)
- Storybook Moments 12″x 12″ (30.5 x 30.5 cm) : cut a piece 4″ x 12″ (10 cm x 30 cm). Be aware of the orientation of your patterned paper design. Long side on top, cut Pop-up mechanism measuring 8″ x 4″ (20 cm x 10 cm). Reserve remaining piece for card front 4″ x 4″ (10 x 10 cm).
- Belly Band : Boho Blue cut at 1″ x A4 length.
- Back of card : Basic White 4″ x 4″ (10 cm x 10 cm)
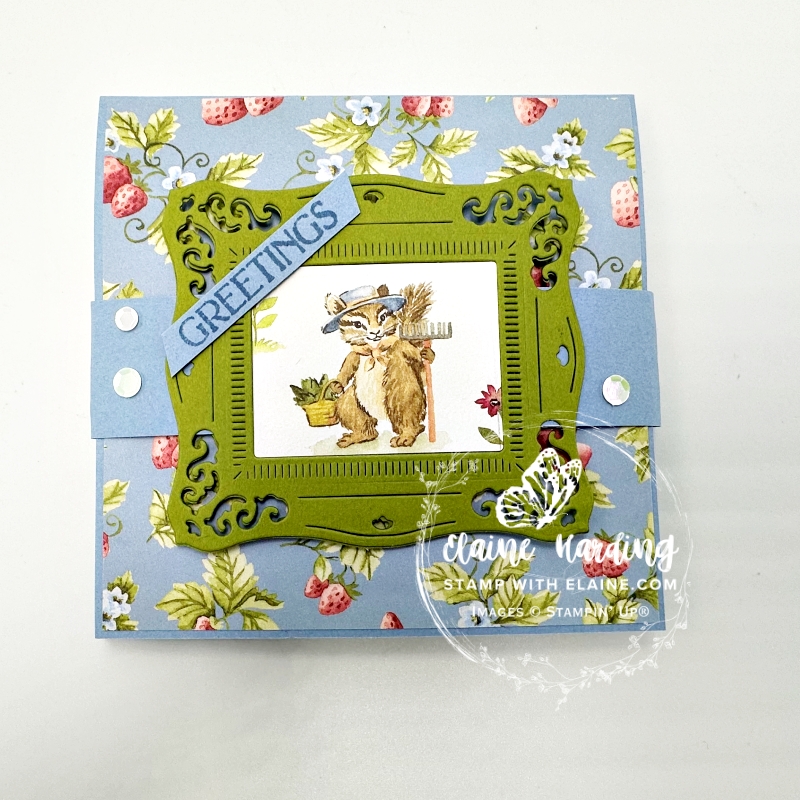
- A4 sheet of Old Olive to die cut 4 frames for inside as pictured, and 2 for card front as pictured.
- Basic White scrap – Die cut 2 inside pop-up mechanism frames. Emboss inside frames with Birch Wood 3D embossing folder.
- Stamp sentiment on Basic White card stock with Old Olive Ink. Fussy cut. Adhere with dimensionals to scrap of Old Olive and fussy cut leaving a ⅛” (0.3 cm) border all round.
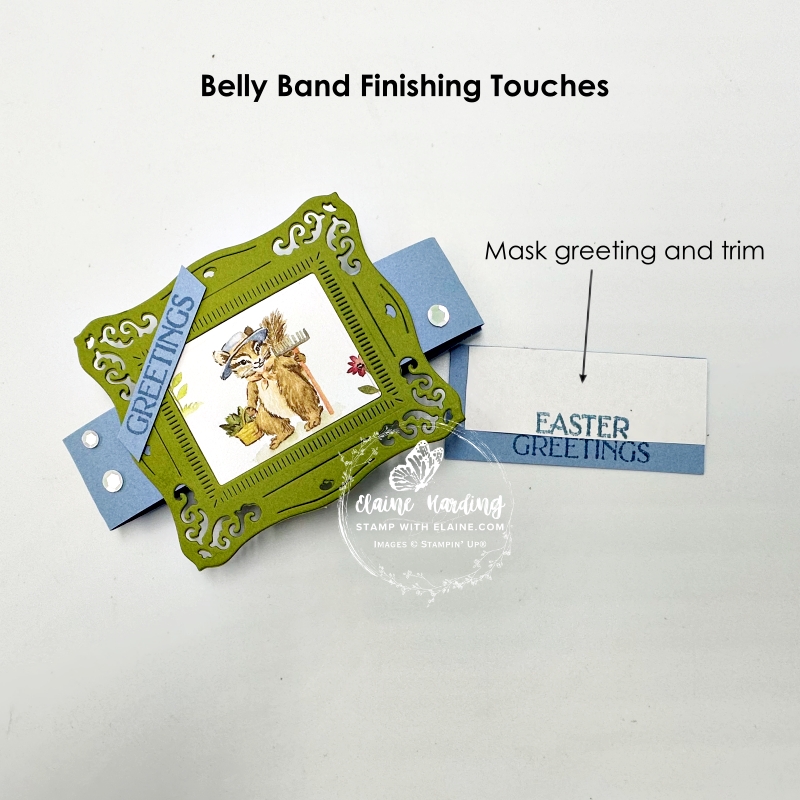
- On a scrap of Boho Blue stamp greeting “Easter Blessings” in Boho Blue ink. Trim to exclude “Easter”.
Scoring and adhering Pop-up Mechanism
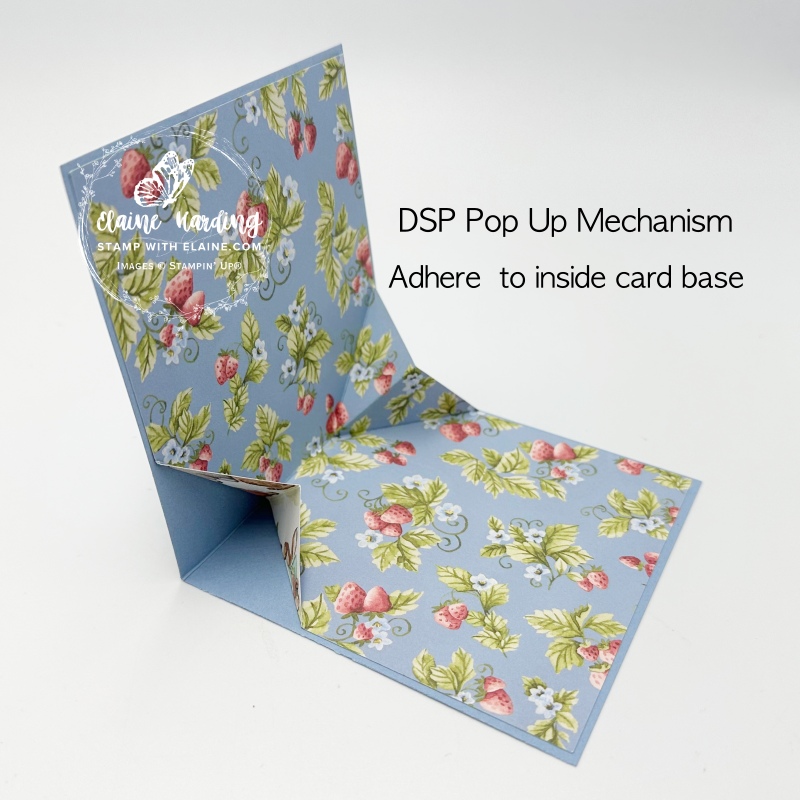
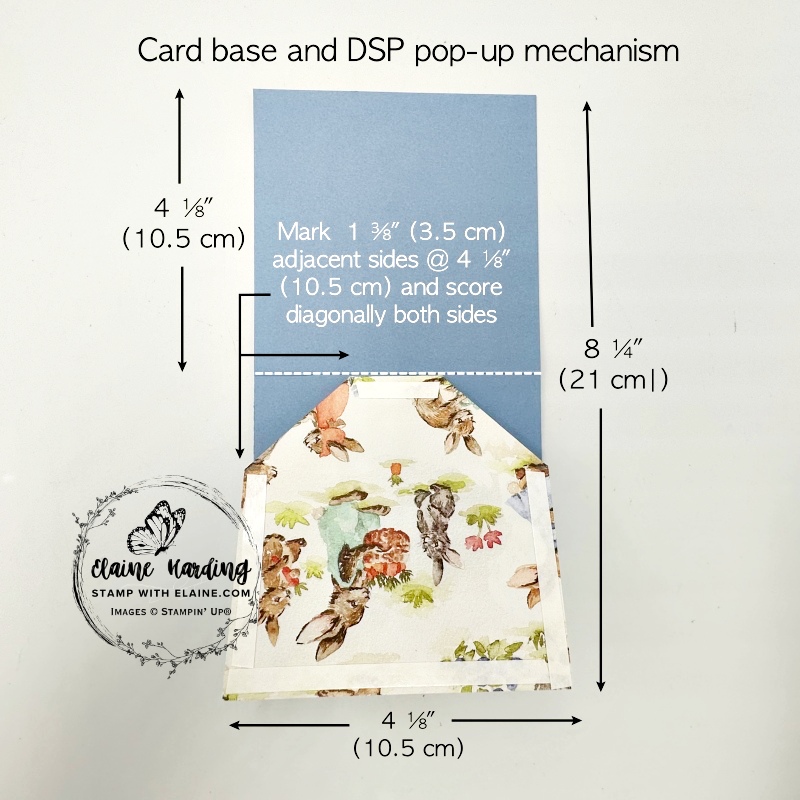
- This is what the Pop-up Mechanism will look like when adhered to inside of card base. To create mechanism, fold the DSP in half. On the fold, measure and mark 1 ⅜” (3.5 cm) on adjacent sides as pictured on the right then score diagonally between two marks.
- Burnish these score lines and pinch and invert triangles. The wrong side is face down, and the pattern you want to display is face up.
- Apply tear n’ tape on the fold, avoid adhesive on the diagonal corners to allow movement. Apply adhesive on the two straight sides and at the bottom.
- Position Pop-up Mechanism butted up to score line just shy of the fold ensuring even border on all 3 sides. Remove backing tape, and close top of card on top to secure it to card base.
- Rotate card base 180o so that the unstuck half is at the top. Repeat as in step 4 to adhere it to card base.
Prepping and adhering other elements
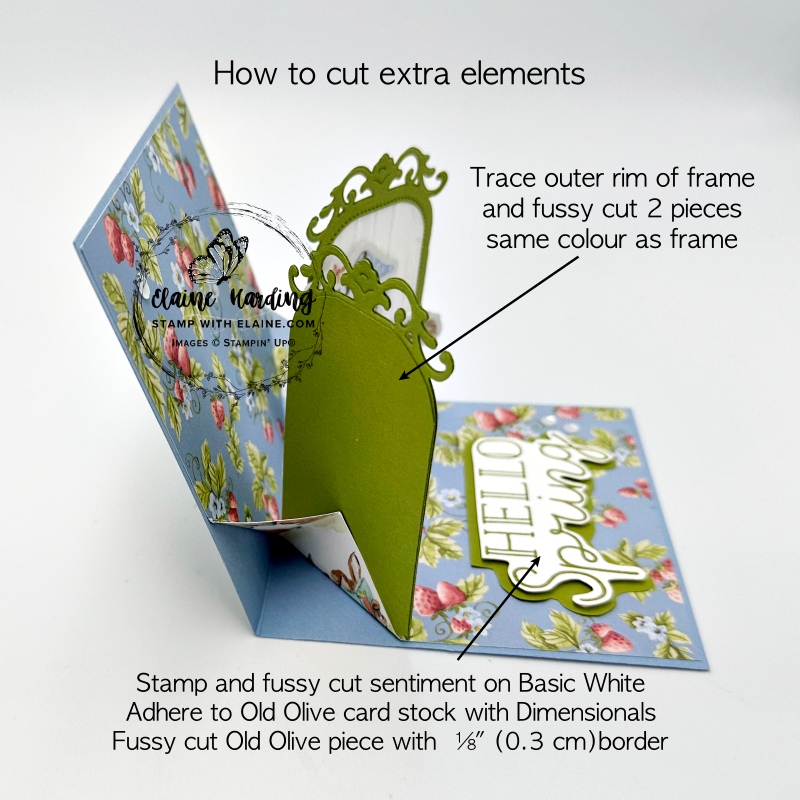
- Backing for Pop-up Mechanism frames : Trim off the filigree on one of the die cut Basic White outer frames by following the pattern and use it as a template. Trace round this template on Old Olive card stock and cut two backing pieces for the frames inside the pencil line. Adhere to back of each frame (picture on the left above).
- Stack and adhere a pair of Old Olive frames together for added strength. Adhere the backing for Pop-up Mechanism frames to the back of each set of frames (picture on left).
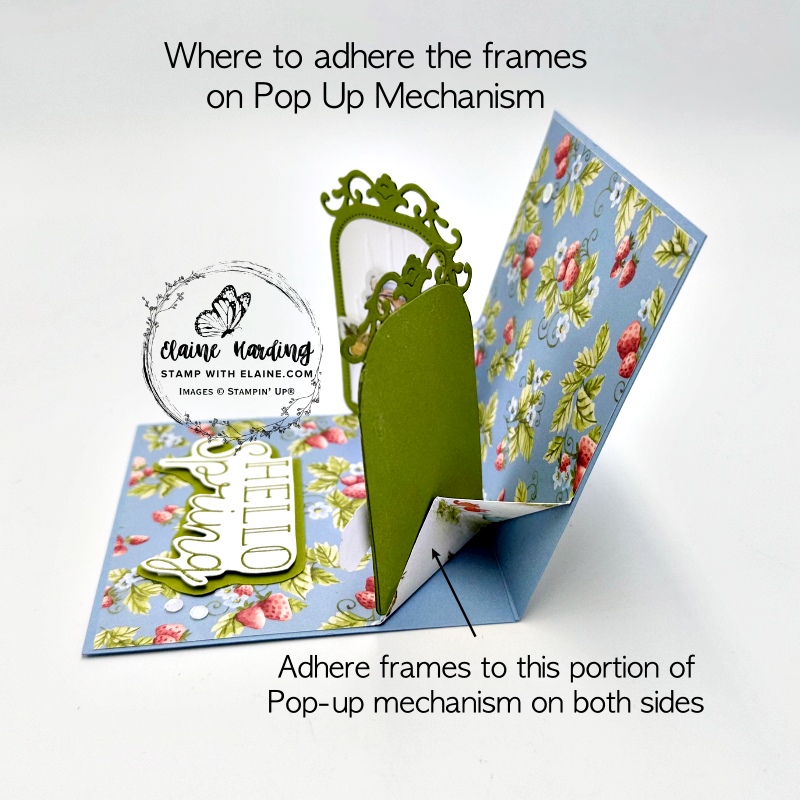
- Apply adhesive to the front triangle on Pop-Up Mechanism on card base (middle picture). Ensure no glue seeps beyond triangle. Butt up frame along score line face down and close card then allow it to bond. Repeat for the other side.
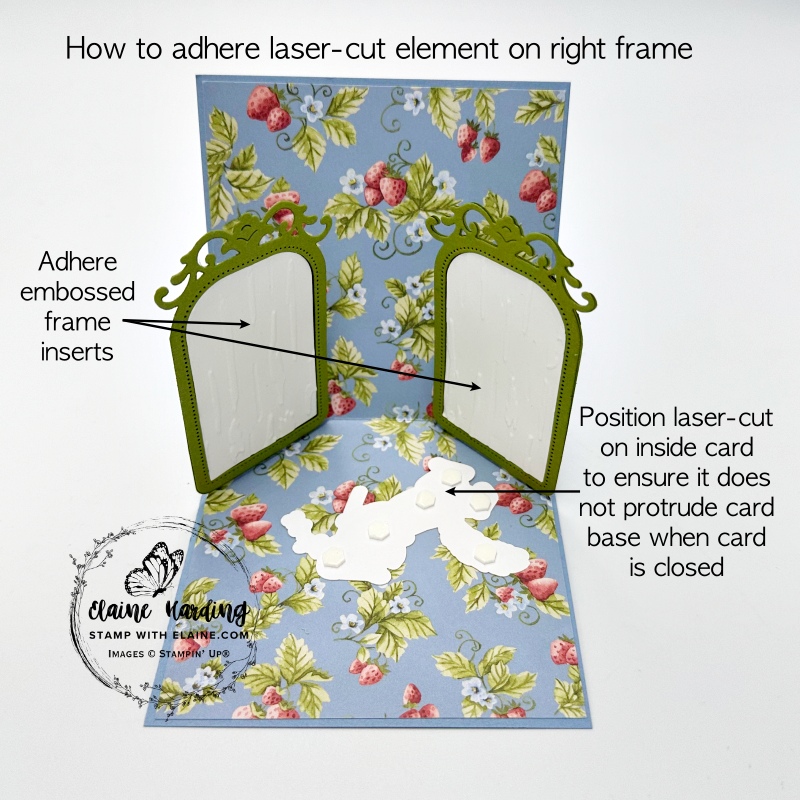
- Adhere the Basic White embossed frame centres to their respective frames (picture on right).
- Select a laser-cut creature from the Storybook Moments Specialty DSP pack.
- Place laser-cut piece face down and ensure it doesn’t protrude from card base.
- Apply mini dimensionals to laser-cut creature and remove backing tape. Close card to secure to inside of mini frame.
- The laser-cut creature for the left frame was smaller so I adhered with dimensionals while frame was upright.
- Lastly adhere the sentiment prepped earlier in Step 7 of the Cutting Guide.
Belly Band
- Take the Boho Blue 1″ x A4 length and wrap around closed card. Ensure it isn’t too snug when you adhere the ends otherwise it will be difficult to slide it on and off the card.
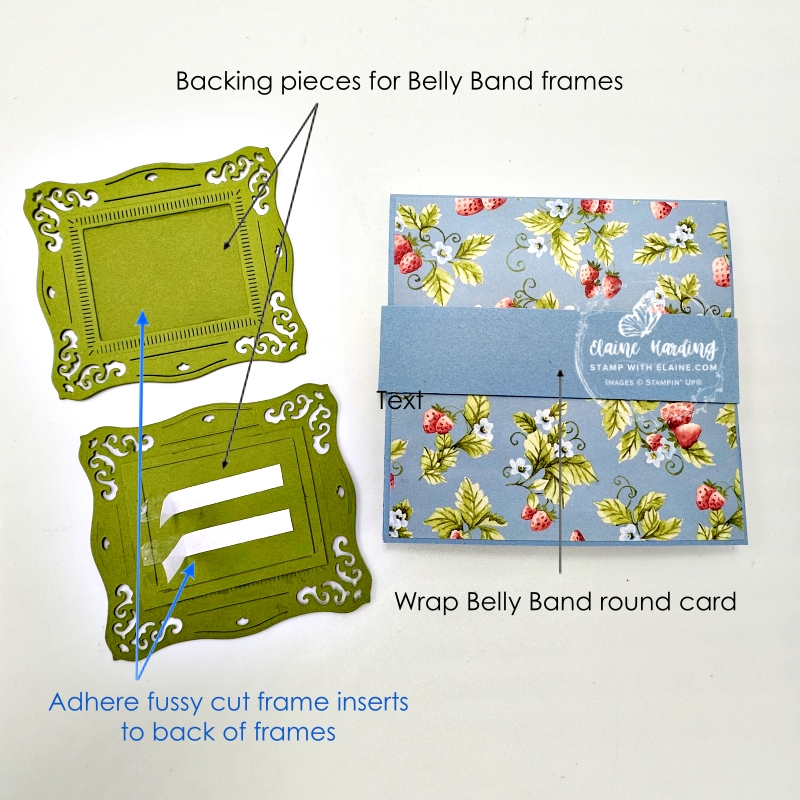
- Use the inside of the frame to trace around one of the images from Storybook Moments Specialty DSP. Cut it a little larger than you need. Place rectangular frame over it and die cut. Set aside.
- Backing piece for the inside frame : Cut 2 pieces. Use the same inside frame, trace around it on a scrap of Old Olive card stock and cut it a little larger than the inside frame then adhere pieces to respective frames.
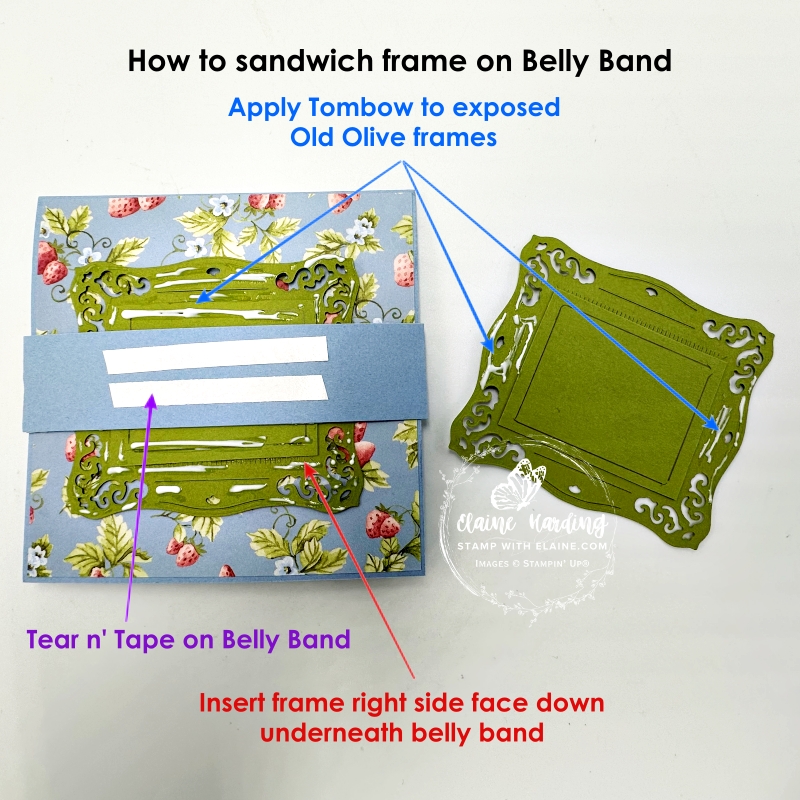
- The belly band should be in situ keeping the whole card closed. Slip one of the frames centred on front of card with right side of frame face down underneath Boho Blue belly band (middle picture). Basically the frames will sandwich the belly band to facilitate sliding it on and off without catching.
- Apply adhesive around the Old Olive frame that is exposed and set aside. Next apply adhesive on the back of the second Old Olive frame and with front of frame face up, adhere on top of the Old Olive frame which was slipped underneath the belly band on the front of the card base (picture on the right).
- Lastly attach “Greeting” with glue dots to top left corner of frame on belly band and embellish as desired.
Back of card
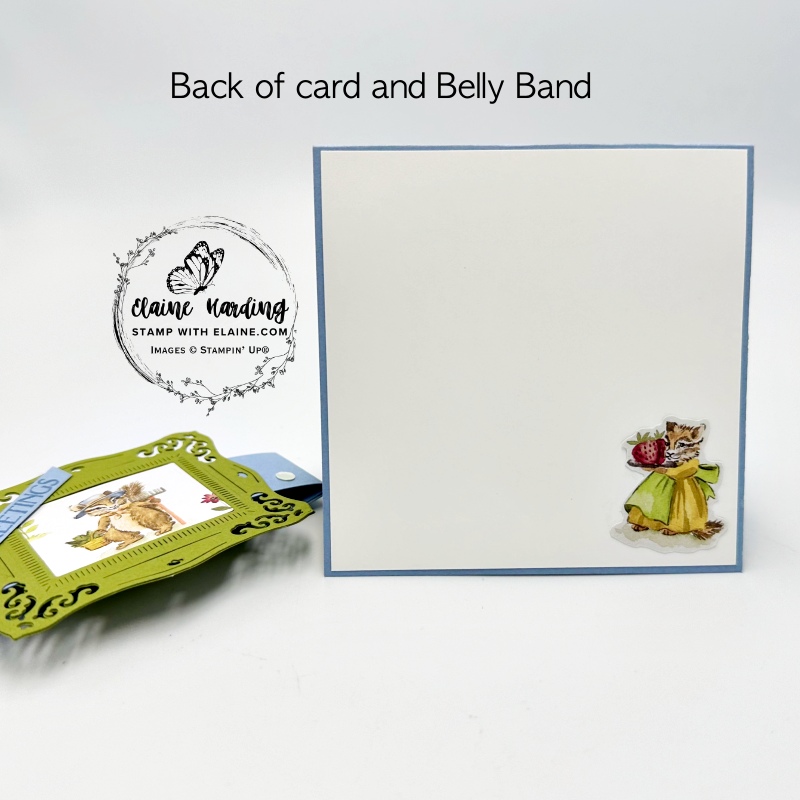
- Back of card : adhere Basic White 4″x 4″ (10 cm x 10 cm) piece and fussy cut one of the DSP images to adhere to bottom right corner.
- Finish with applying SAB Purple Adhesive-Backed Sequins FREE with a £55 order excluding shipping.
Front of card
- Adhere Storybook Moments Specialty DSP 4″x 4″ (10 cm x 10 cm) piece leaving an even border on all 4 sides.
- Close card and slip belly band over to keep card closed.
Supply list
Listed below is the supply list. Just click on the picture to take you directly to the item in my online store.
Product List")
")
")

 Specialty Designer Series Paper")


Thanks for visiting. I would love to know what you think of my project and would appreciate it if you could leave a comment. To visit the next person on the list and see their fabulous creations, simply click on the link below or before my name depending who you visited initially. Happy hopping!

- SHOP ONLINE – EARN 10% REWARDS ON ALL PURCHASES OVER £20
- PURCHASE A STARTER KIT : Get £155 worth of products for only £99. Choose from current catalogues and any specials available. Free Shipping. Read more
- Subscribe to my Video Tutorials – click here
I love a pop-up card! Thank you
Thanks Carol, this template is a keeper! Love its simplicity.
That’s lovely Elaine. I love this set, but have so far resisted!
Thank you. You have a will of steel! I couldn’t help myself because I adored those Beatrix Potter stories as a child and couldn’t resist!
What a beautiful Pop Up card. love it!
Thank you, Helen.
What a beautiful card! I love how you have created this and added the perfect pieces to the pop ups.
Thank you, Leighsa.