
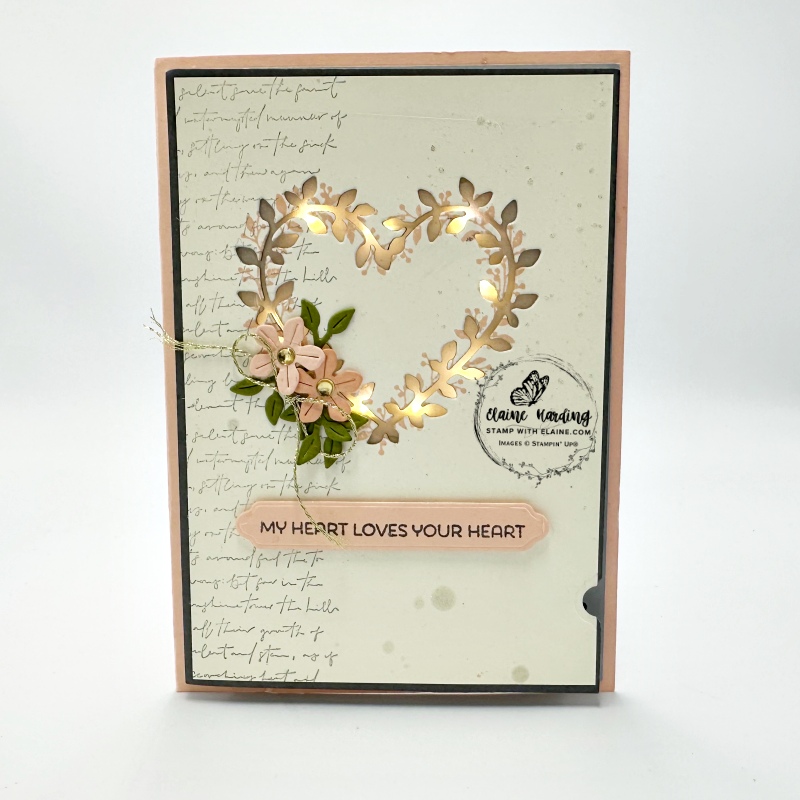
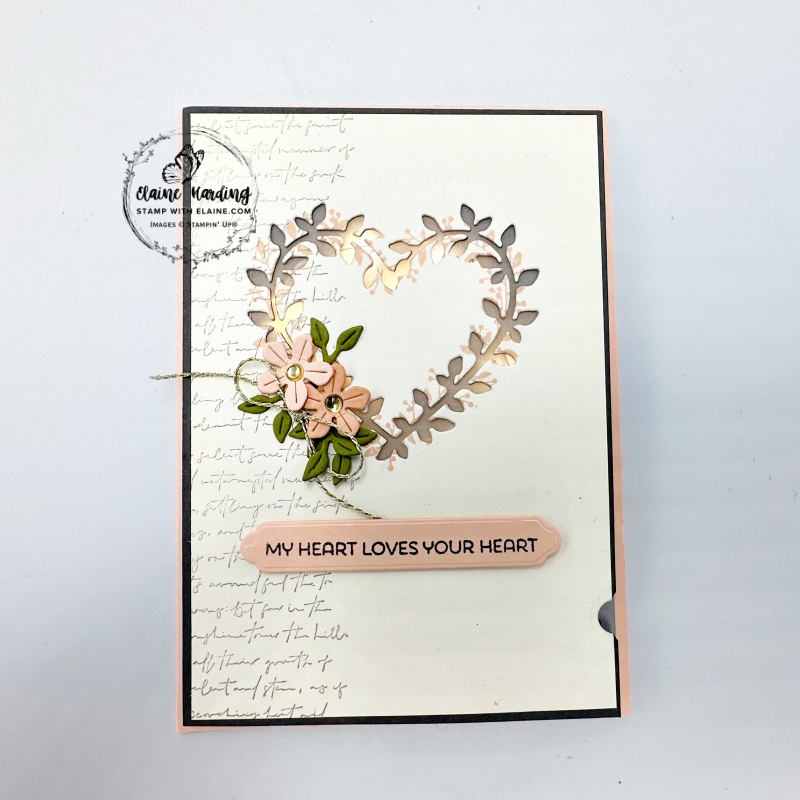
Happy Valentine Day. During Sale-a-bration the Heart Shaped Bundle stamps and dies are FREE subject to a qualifying order of £110 excluding shipping and I’ve used it for today’s card. My card today was inspired by Lisa Stenz who joined Stampin’ Up! from Close to My Heart when its doors closed. The dimensions and colour palette has been adapted for my card.
Back lit Sale-a-brations’s Heart Shaped Bundle
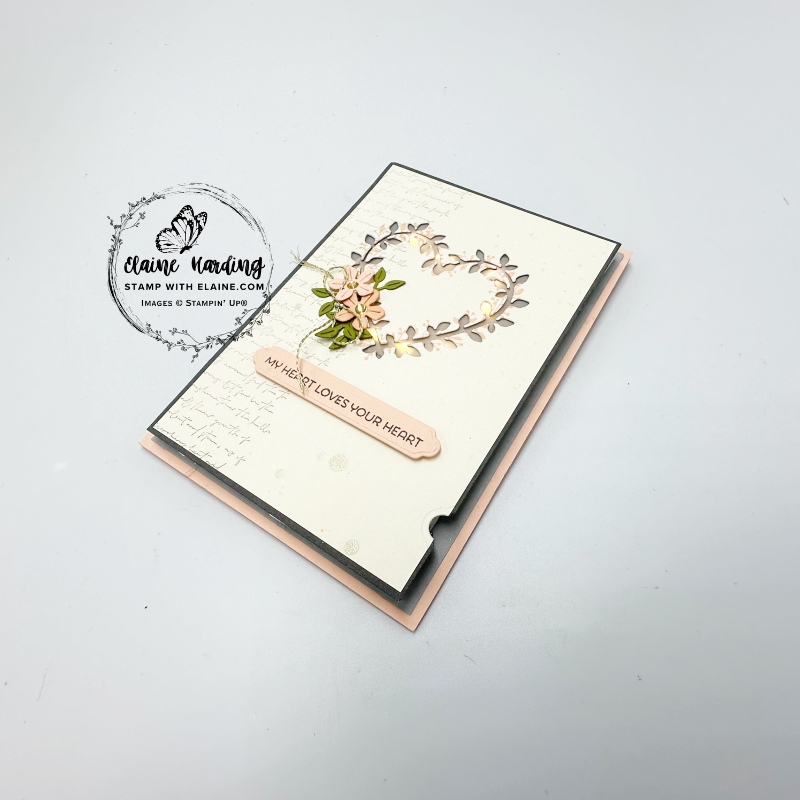
I didn’t actually put “Valentine” on this card so that you can use it for other occasions too. It is rather bulky because it has to house the LED lights and battery pack which is a metre or 3.3 feet long.
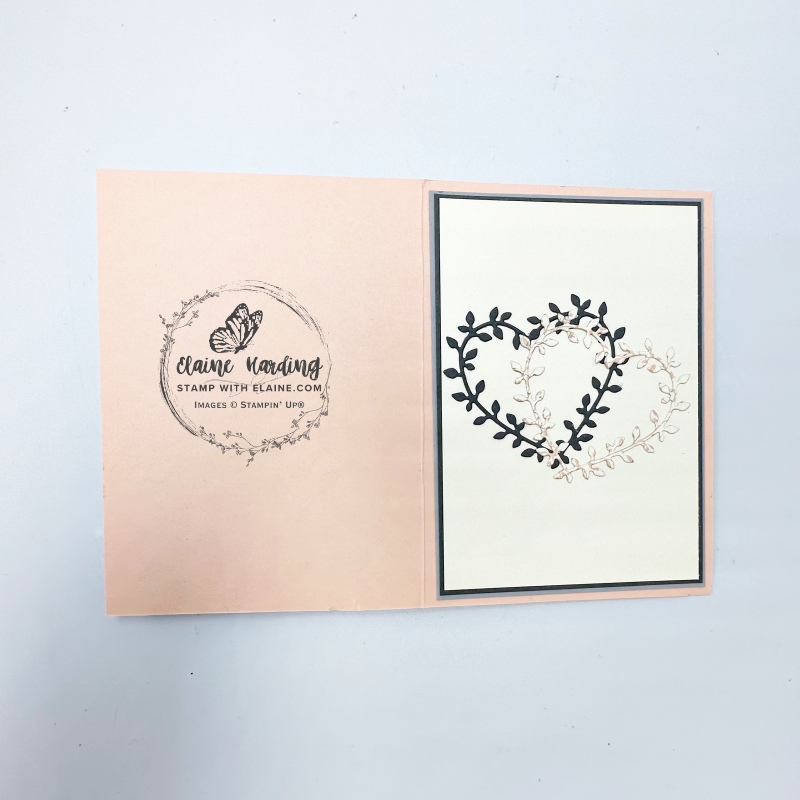
There are a lot of layers too – 3 on the front and 3 on the inside. The layers inside acts as a counter balance in weight otherwise when you stand the card up for display, it will topple over.
How to make the card
Cutting Guide
- Card base Petal Pink cut at 5 ¾” x 8 ¼” (14.5 cm x 21 cm). Long side on top score at 4 ⅛” (10.5 cm)
- Smoky Slate card stock – cut 2 pieces 5 ½” x 3 ⅞” (14 cm x 10 cm)
- Basic Gray card stock – cut 2 pieces 5 ⅜” x 3 ¾” (13.5 cm x 9.5 cm)
- Very Vanilla card stock – cut 2 pieces 5 ¼” x 3 ⅝” (13 cm x 9 cm)
- Vellum card stock (retired) – cut 1 piece 3″ x 3″ (7.5 cm x 7.5 cm)
- Scraps of Petal Pink – Die cut 2 flowers and use a blending brush to add colour to one of the flowers and set aside.
- Die cut 2 sets of leaves in Old Olive.
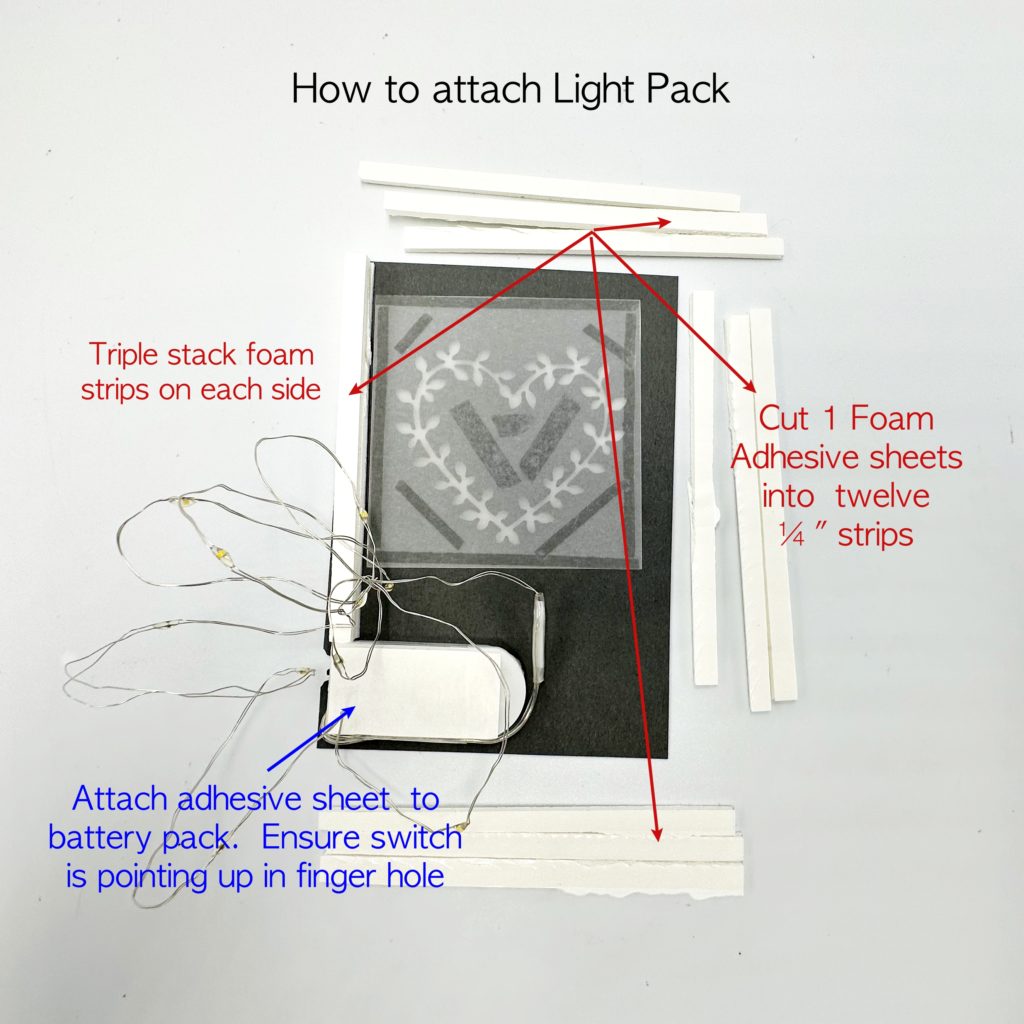
- Cut 2 pieces of adhesive sheets ⅞” x 1 ¾” (2 cm x 4.5 cm)
- Adhesive foam sheet – cut twelve ¼” strips
Assembly Instructions
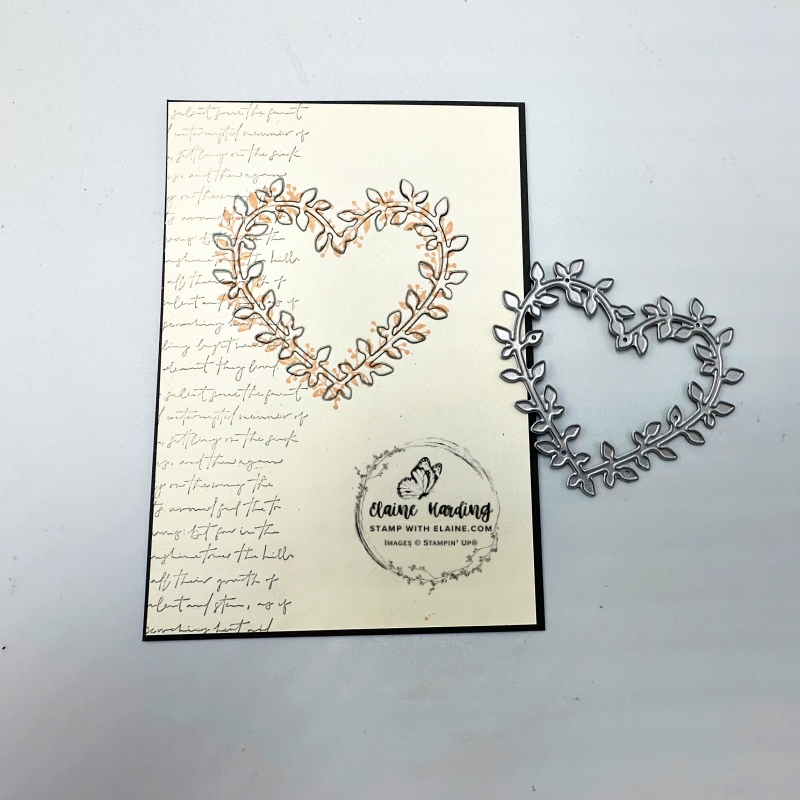
- Stamp in Smoky Slate with the online exclusive “Elements of Text” on the left of the Very Vanilla piece.
- Ink up the Heart in Petal Pink and stamp in the centre slightly above half-way and lay on top of the Basic Gray piece with an even border on all four sides and adhere together but remember to avoid placing adhesive where you position the die for die cutting. After die cutting the hearts will be removed and the layers separated.
- Align heart die with stamped image and die cut through both layers running it through the die cutting machine 2 or 3 times to ensure it cuts through the thicker layers. Remove the die cut hearts and set aside. The die cut hearts will be in two parts – the filigree leaf section and the centres.
Preparing to attach LED lights and battery pack
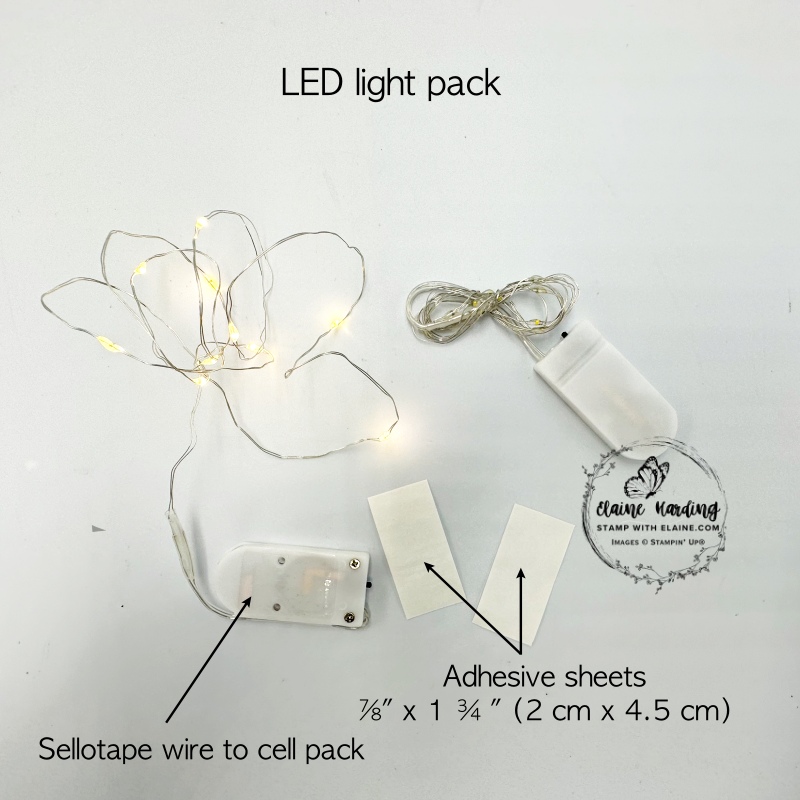

- First sellotape the leading wire snugly to the battery pack and attach the pre-cut adhesive sheet to both sides of battery pack.
- On the back of the Basic Gray piece, adhere the Vellum piece.
- Adhere the both die cut heart centres on top of the vellum as pictured on the left. The Basic Gray heart acts as a blackout behind the Very Vanilla heart to prevent the light from filtering through.
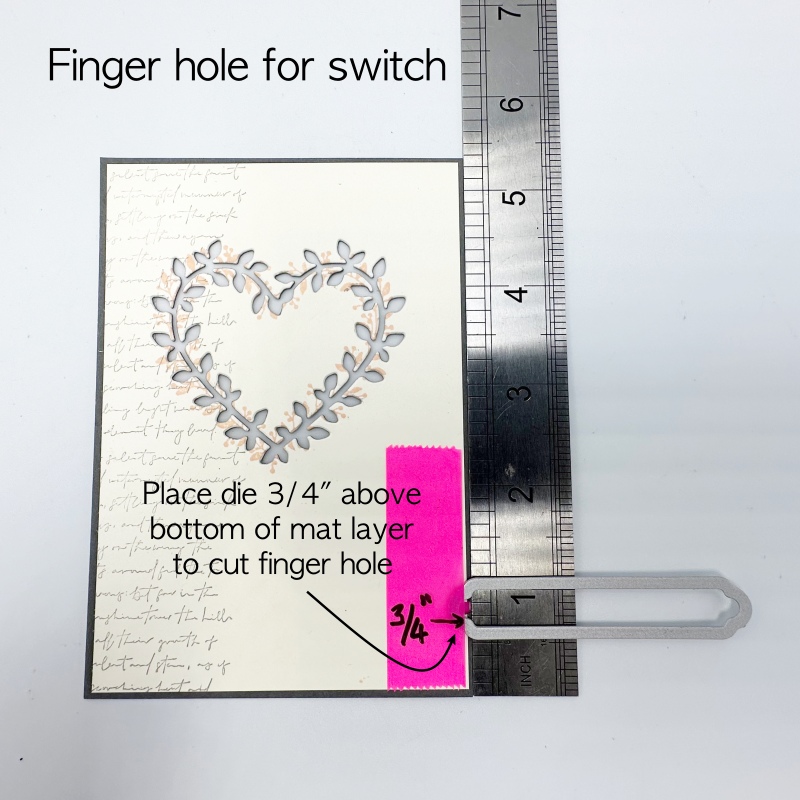
- Cut the finger hole with the label die at least ¾” from bottom edge and also allow sufficient room at the bottom to adhere your triple stack of foam adhesive.
- Remove backing on adhesive sheet on the back of battery pack at the bottom. Ensure switch is *pointing up and is visible in the finger hole from the front of the card. *(In UK, the off position of light switches points up, but I think the ones in the US are installed with it pointing down)
- Triple stack the foam strips and adhere to each side. Trim as necessary to fit inside the sides.
Adhering to front of card and floral elements
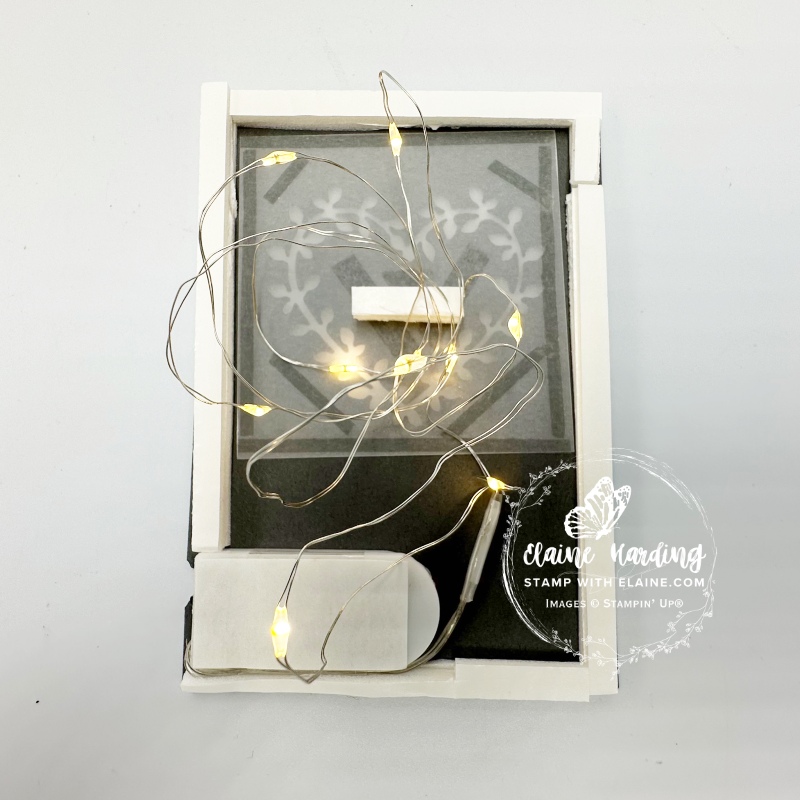
- Remove backing tape on the battery pack and foam adhesive stacks on all 4 sides.
- Arrange where you want your lights to fall and secure with glue dots so they don’t move because this is your last chance to adjust them before adhering to front of card base.
- Adhere the flowers with mini dimensionals and tuck leaves underneath and glue as pictured above.
- Tie gold twisted thread into bow and attach with glue dot as pictured.
- Stamp greeting in Basic Gray ink on Petal Pink card stock and die cut label and adhere underneath heart with dimentionals.
Inside card and Finishing touches

- Inside card – first adhere the Smoky Slate layer leaving an even border on all four sides.
- Next adhere second Basic Gray layer with an even border on all four sides.
- Finally adhere the Very Vanilla layer. Then adhere the Basic grey and Petal Pink stamped filigree hearts as pictured on top.
- On the front of the card, apply the gold coloured low-profile dots to the centre of the flowers.
- Take a Wink of Stella Brush and tap the brush to splatter silver glitter splatters to the front of the card front to complete it.
Supply list
Listed below is the supply list. Just click on the picture to take you directly to the item in my online store.
Product List")


Non Stampin-Up! led lights
The lights I used were Vacoulery Fairy String Lights, 1M 10LEDs Battery Operated String Lights Copper Wire Lights for Jars Holiday Wedding Party Birthday Christmas Halloween Indoor House Decorations (Warm White, 20 Packs) which I purchased from Amazon.
Thanks for visiting.

- SHOP ONLINE – EARN 10% REWARDS ON ALL PURCHASES OVER £20
- PURCHASE A STARTER KIT : Get £155 worth of products for only £99. Choose from current catalogues and any specials available. Free Shipping. Read more
- Subscribe to my Video Tutorials – click here