
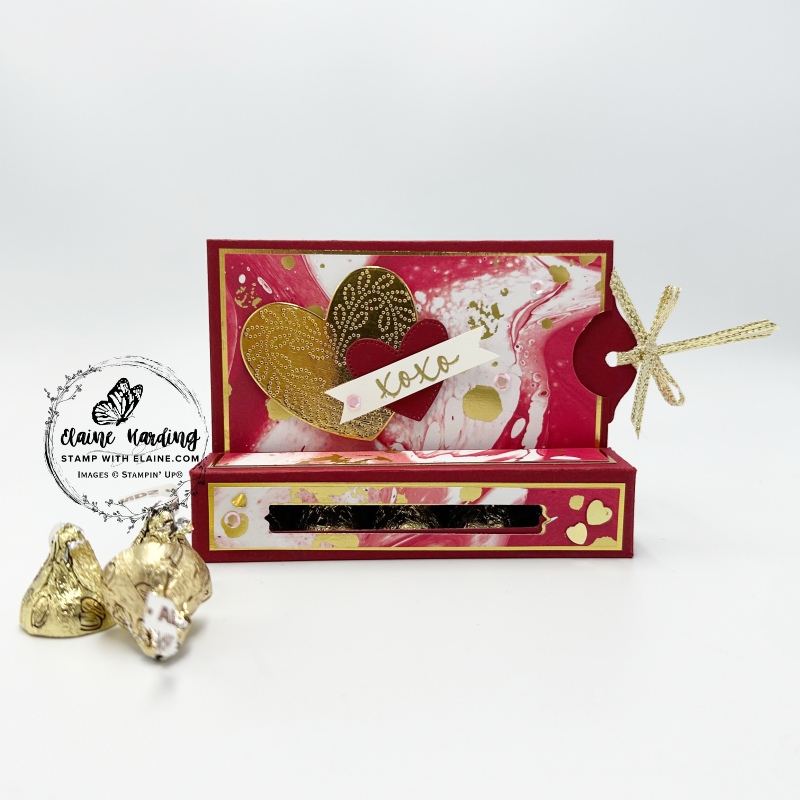
Valentine Gift packaging. The Marbled Elegance Suite collection was released back in November 2024. As Valentine Day is on the horizon, it’s time to break open the suite and have a play. The stamp set is called Hearts of Elegance with coordinating dies. Marbled Elegance 12″x 12″ Specialty DSP has gold foiling and is absolutely gorgeous. The suite also includes heart sequins, gold twisted thread and gift White combo bags in two sizes – 8 of each.
Bespoke Valentine gift packaging
To die cut an aperture on the front of my box, I used the dies from a new bundle called Delightful Wishes in the Delightful Suite Collection in the new January-April 2025 Mini on pages 33-37. I also used the Sale-a-bration Purple Adhesive-backed Sequins which is FREE with a qualifying order of £55 during the Sale-a-bration period which will be ending on 28 February!
Cutting and scoring guide for Box Template
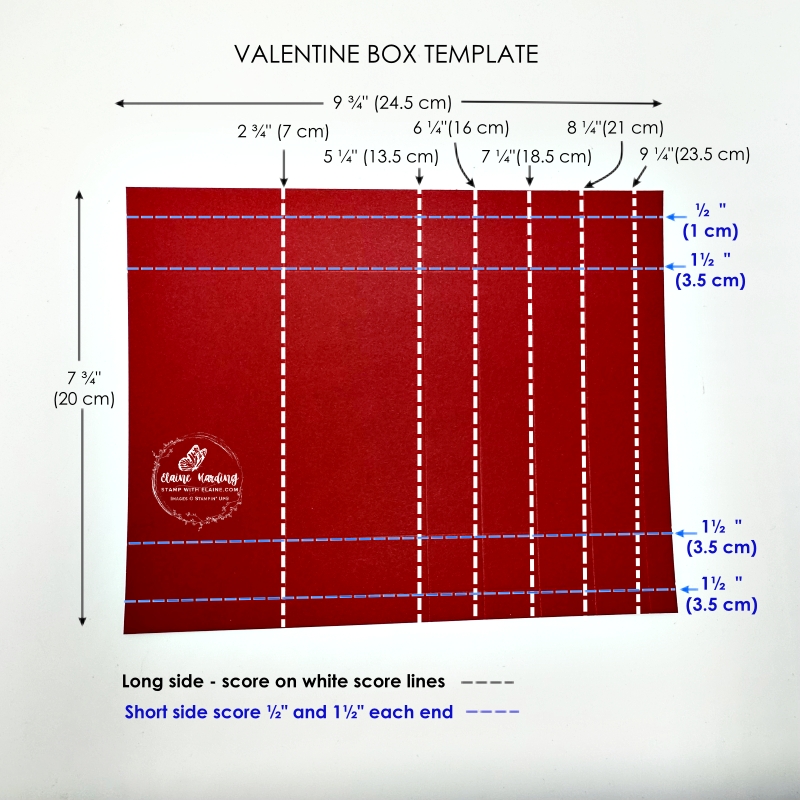
Valentine Box Template
- Cut Cherry Cobbler card stock at 7 ¾” x 9 ¾”. (20 cm x 24.5 cm)
- Long side at the top score at 2 ¾”, 5 ¼”, 6 ¼” , 7 ¼”, 8 ¼”, 9 ¼” (7 cm, 13.5 cm, 16 cm, 18.5 cm, 21 cm, 23.5 cm)
- Orient card stock so that the short side is on top. Score at ½”, 1 ½” (1 cm, 3.5 cm)
- Rotate card stock 180o and repeat scoring other end at ½”, 1 ½” (1 cm, 3.5 cm).
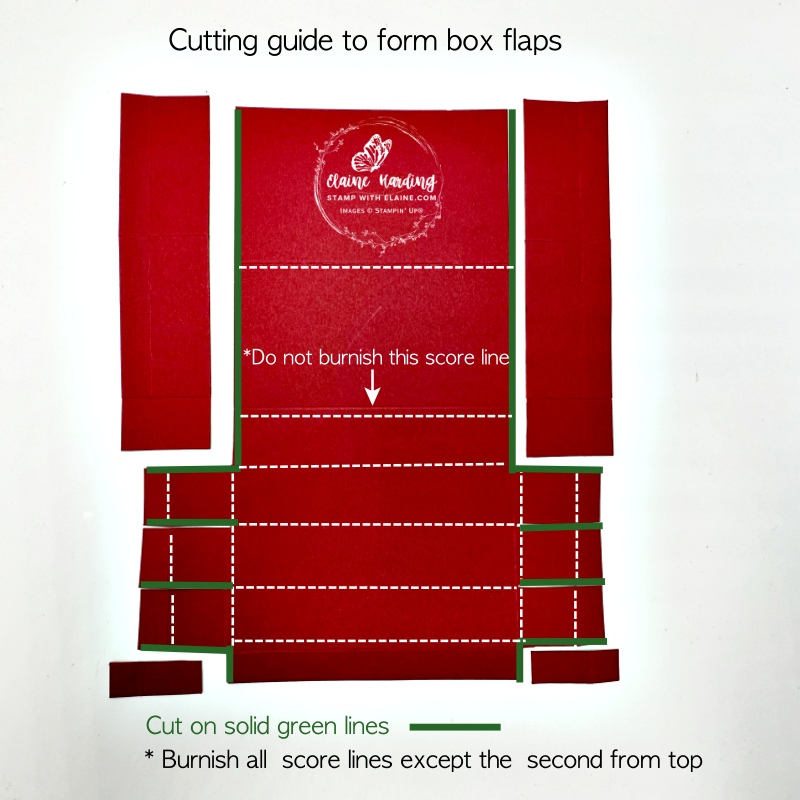
Cutting Guide to create box
- Orient template so that the narrow panels are nearest you and cut away the two rectangles at the bottom left and right corners up to second score line on each side.
- Rotate card stock In portrait with the wider flaps facing you, cut each side up to the 3rd score line.
- On the long side with the 1″ (2.5 cm) score lines toward the right, cut up to 2nd score line (pictured with green solid lines)
- Rotate card stock 180o and repeat on opposite side.
Burnish score lines except for 2nd score line on the large panels as pictured.
Cutting Guide to form Box Flaps
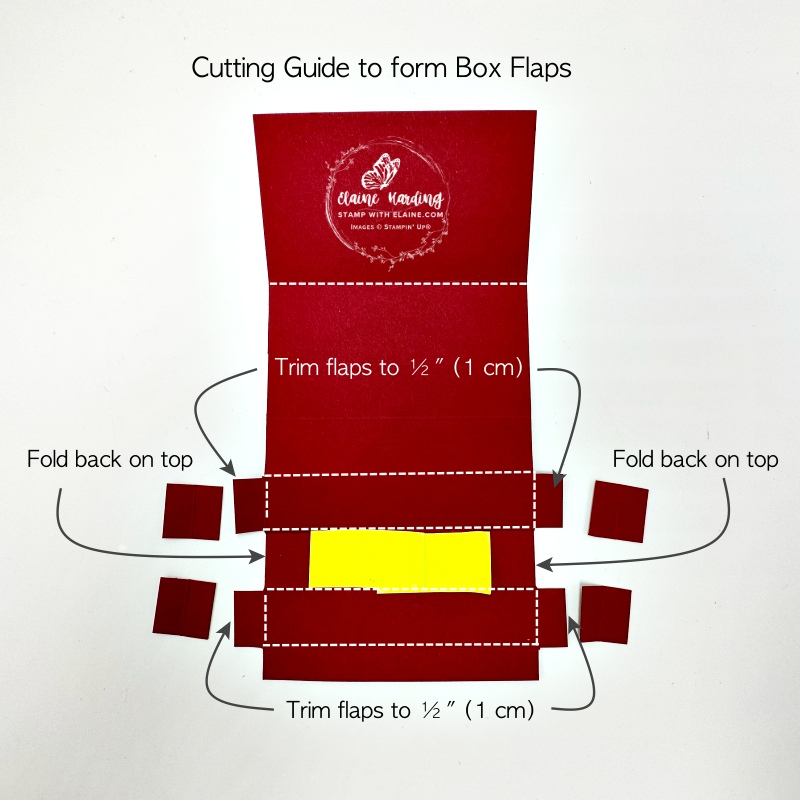
- Fold back middle flaps to the top and secure with low tack tape or sticky post-it notes.
- Trim flaps on either side at ½” (1 cm) as pictured. These will form side flaps on the box.
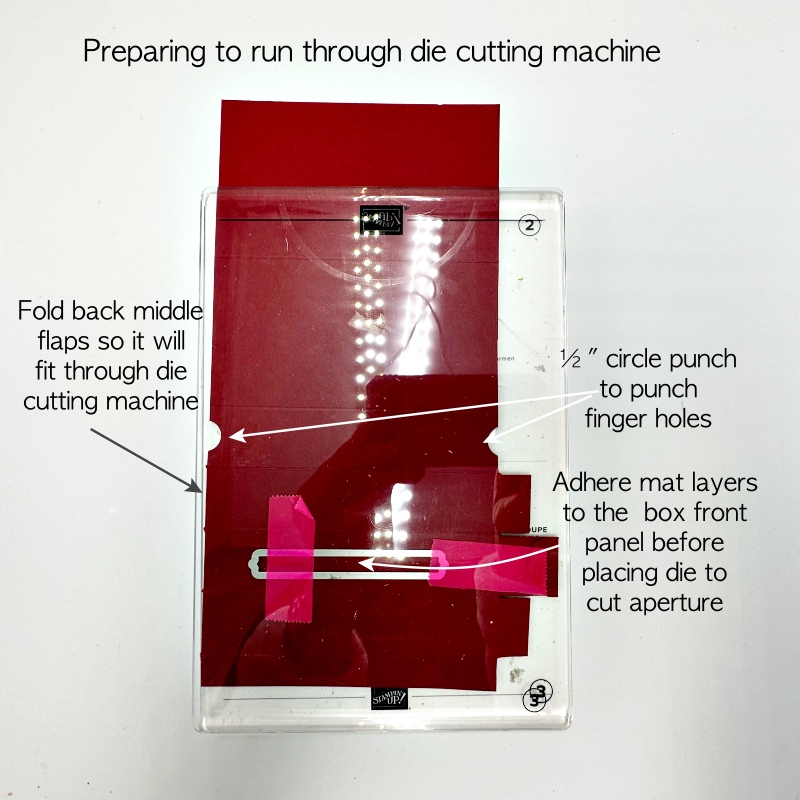
Preparing to run card stock through Die Cutting Machine
- If using mat layers, adhere this first – I only remembered after I had taken the photograph.
- Use a ½” (1.3 cm) circle punch to punch out the integral box finger holes at either end. This is the 1″(2.5 cm) panel next to the 2nd large wide panel.
- Place on cutting plate and fold flaps back one left side the the lid flap on the opposite side as pictured. Place top cutting plate on top and run it through the machine.
Rounding corners on lids and Pocket Finger hole
Please note that in the diagram on the left, (where there is a dot and dash line), this is the line which does not need burnishing as mentioned before.
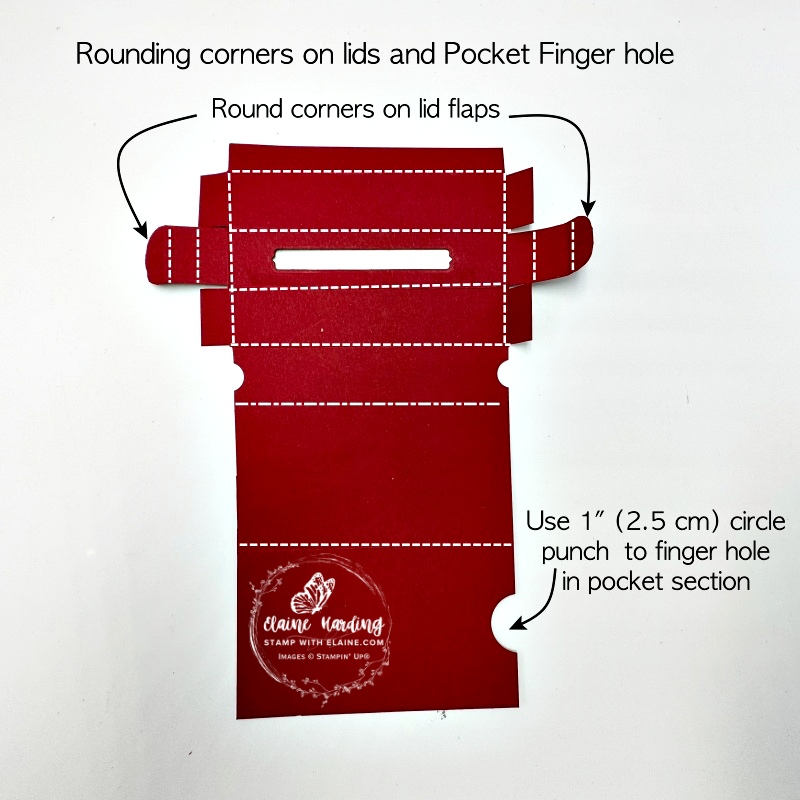
- Use a corner rounder punch (retired) to round corners on both lids.
- Orient card stock so that the wider panels is closest to you and punch a finger hole with a 1″ circle punch.
- On the right side, (not pictured) attach gold foil frame – 4 ½” x 2 ¼” (11.5 cm x 5.7 cm). Gut the gold foil piece by cutting ¼” (0.5 cm) frame on trimmer before adhering. Keep the gutted piece for a future project.
- Adhere 2nd layer (DSP) cut at 4 ⅜” x 2 ⅛” (11 cm x 5.4 cm) on top of Gold foil layer.
- Next turn box template wrong side up and using the previously punched finger hole as a guide – punch through the frame and DSP layers. The reason the finger hole is punched in stages like this is because if the card stock is too thick, the. punch won’t punch cleanly and it may even jam shut.
- Finally repeat and punch finger hole for the back of pocket.
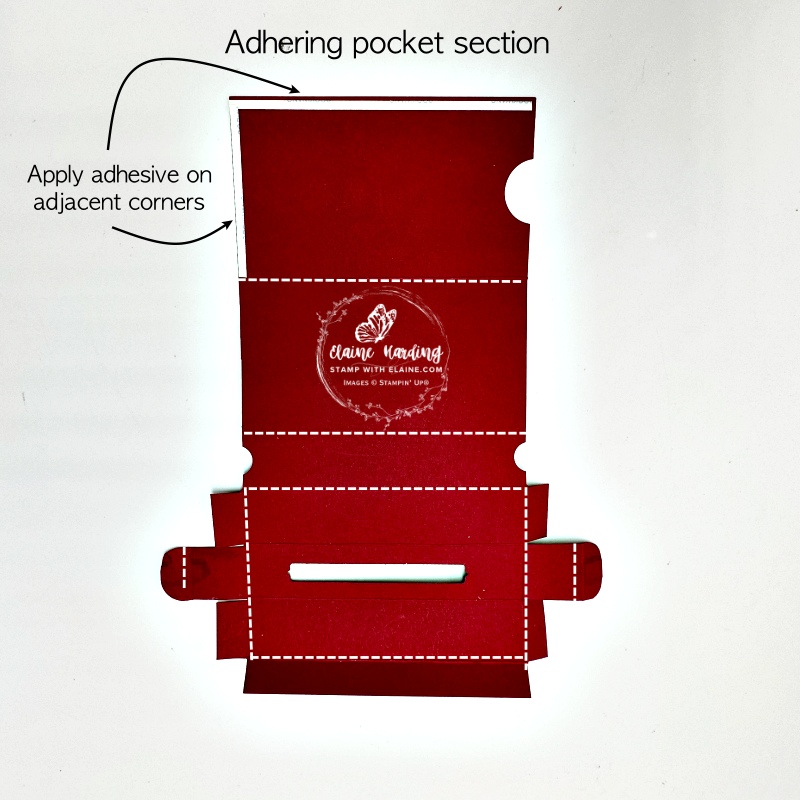
Forming the pocket
- Orient template so that the wider panels are at the top with the finger hole on the right.
- Apply adhesive to the adjacent edges as pictured.
- Remove backing tape and fold on score line to form pocket.
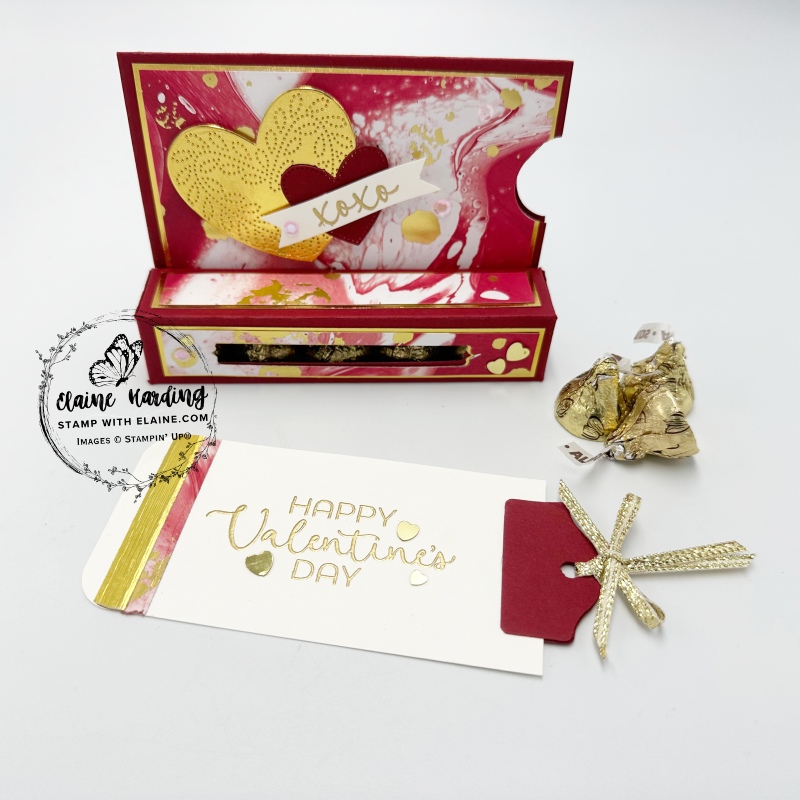
Create the Tag insert
I created a pocket for the tab to put my greeting in, but you can substitute it with a gift cad if you wish.

- Insert Basic White tag cut at 2 ¼” x 4 ⅜” (5.7 cm x 10.8 cm) into pocket section of box.
- Mark the centre of the card on the short side and insert into pocket so that the edge of the card is aligned with edge of pocket and trace round finger hole with pencil. This is where you align the “KeepingTabs” and adhere to tag.
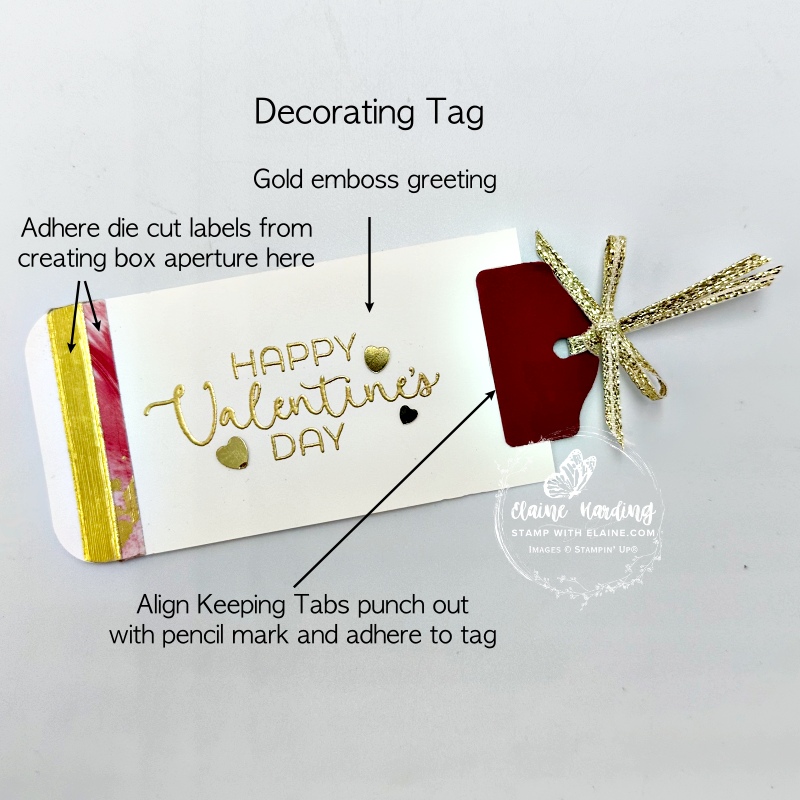
Decorating tag
- Re-purpose the die cut labels created when die cutting the aperture for the front of the box by adhering to the tab. Trim off excess.
- Gold emboss “Happy Valentine’s Day” by stamping in Versamark Ink, sprinkle “Metallics WOW! embossing powder” over it and heat setting the powder.
- Align Cherry Cobbler “Keepers Tab” punch out with pencil mark and adhere to tag.
- Punch hole in “Keepers Tab” and thread through a length of gold ribbon (Gold & Silver ⅛” Trim combo pack) for tag ribbon pull.
Supply list
Listed below is the supply list. Just click on the picture to take you directly to the item in my online store.
Product List")
")

")
")
")
 Specialty Designer Series Paper")

 Trim Combo Pack")


- SHOP ONLINE – EARN 10% REWARDS ON ALL PURCHASES OVER £20
- PURCHASE A STARTER KIT : Get £155 worth of products for only £99. Choose from current catalogues and any specials available. Free Shipping. Read more
- Subscribe to my Video Tutorials – click here