
Wibble Wobble card. In the new online January 25 Scrapbooking brochure there is an adorable new bundle called Meant to Bee. The dies that go with it have nested hexagons along with some script dies, and bee bodies which could double up as speech bubbles, dies shaped like an “m” which are the wings, dies for the antennae and tiny floral dies too.
There is also the Bee My Valentine stamp set and Bee Builder punch in the Annual Catalogue which will coordinate with it too.
The Meant to Bee Scrapbooking Workshop kits are great as well. Kits have easy to follow instructions for three two-page designed 12″x 12″ (30.5 x 30.5 cm) spreads with space for your photos. However, if you’re an experienced Scrapbooker, you can go off piste and do your own thing.
Meant to Bee – not just for scrapbooking
Meant to Bee was designed for scrapbooking but you can also use it for card making. As Valentine’s Day is nearly here, I made a wibble wobble card to suit the occasion. You can pen “Happy Valentine’s Day” yourself because there isn’t a stamp for that in this set. As you can see I omitted putting any greeting inside so that you have the option to use it as an anniversary card in stead.
How to make card
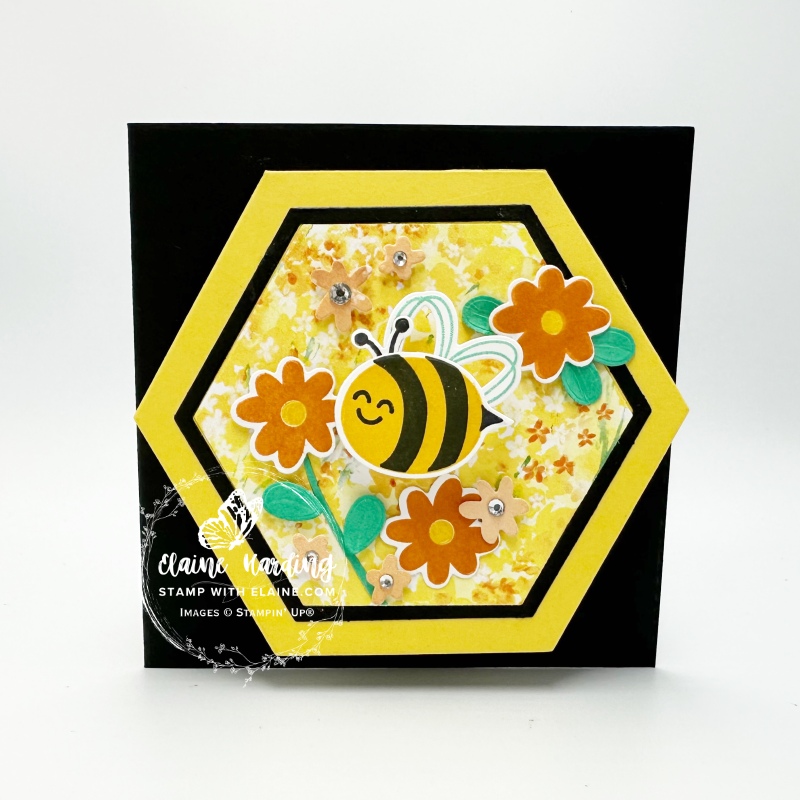
The card is square. On the card front, the Daffodil Delight Hexagon is actually a mini hexagonal card and was die cut from the Meant to Bee dies.
- Card base Basic Black : cut at 4 ¾” x 9 ½” (12 cm x 24 cm)
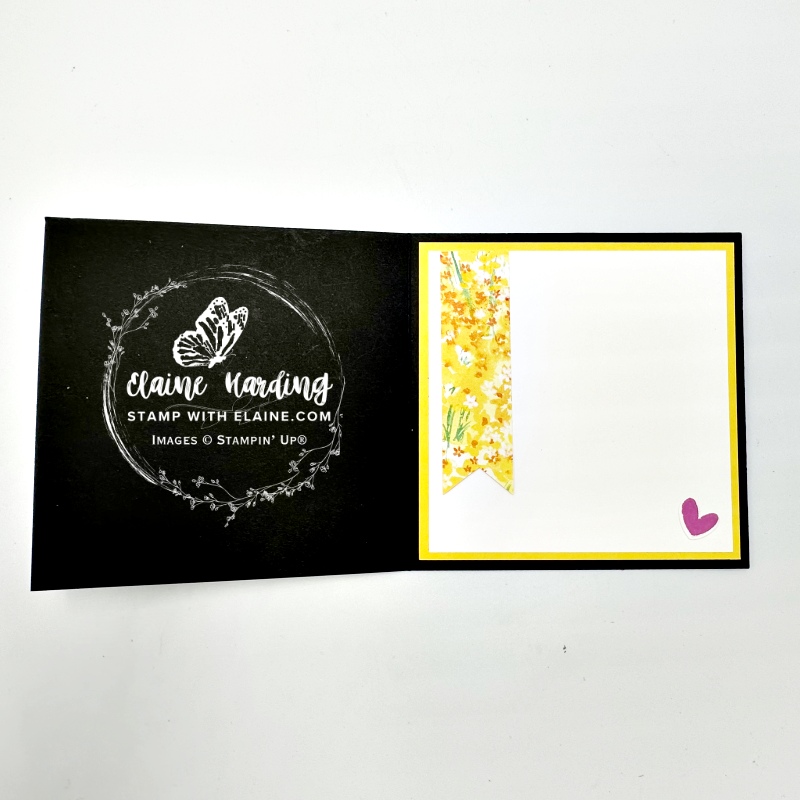
- Mat layer #1 Daffodil Delight inside card : 4 ½” x 4 ½” (11.5 cm x 11.5 cm)
- Layer #3 Basic White inside card : 4 ¼” x 4 ¼” (11 cm x 11 cm)
Meant to Bee dies
There are 5 nested hexagonal dies in the Meant to Bee die set. Number 1 being the smallest, and 5 being the largest. FYI, each die will cut both an outer frame and the inside as separate pieces.
Hexagon Mini card
- Cut a piece of Daffodil Delight card stock 5″ x 10″ (13 cm x 26 cm) and fold in half so that it is square. Position the straight side of the Largest hexagonal die (no. 5) just shy of the fold. Secure it with low tack tape or Post-it note and run it through die-cutting machine. Folded side at the top, adhere to card front ensuring the top and bottom are equidistant from the edges.
- Die cut 2 pieces Basic Black Hexagon with No. 3 Hexagon die. Adhere Basic Black frame to front of Daffodil Delight Hexagon and the inside Basic Black pieces to the inside of the Hexagon Mini card. Reserve the spare frame for another project.
- Sale-a-bration’s Bloom Impressions 12″x 12″ (30.5 x 30.5 cm) DSP Free with £55 order : die cut 2 pieces with No. 3 Hexagon die. Adhere inside to Hexagon Mini card front and the 2 frames to the inside.
- There are 2 each of small, medium and large floral dies – cut 2 of each size with the same pattern DSP. I used the Daffodil Delight sheet for the front of the Hexagon and the reverse for the flowers.
- Shy Shamrock – die cut 5 leaves. Use a stylus to score down the middle of leaves. Set aside for later. At the same time fussy cut a sliver freehand for the stem.
Stamping on Basic White card stock
There’s quite a bit of stamping and die cutting. Remember to leave space between your stamped images in order to die cut them. On half a sheet of A4 Basic White stamp the following :
- Two small bees and one large bee – this is a 2-step stamping method. Stamp the body first in Daffodil Delight, then stamp the stripes for the bee in Basic Black. Also stamp the face – be aware which side the tail is facing when you do this.
- Antennae : Stamp 3 antennae in Tuxedo Black Memento ink
- Wings : Stamp 2 small wings and 1 large wing in Coastal Cabana ink
- Large Flowers : another 2-step stamping method. Stamp 3 large flowers in Pumpkin Pie then the flower centres in Daffodil Delight.
- Hearts : Stamp 3 hearts in Petunia Pop
- Sentiments : Stamp “we are meant to bee” once in Pumpkin Pie and another in Tuxedo Black Memento ink. Trim “we are” with a trimmer and angle the ends. Fussy cut “meant to bee”.
Now you can position the dies over the images and secure with low tack tape before running it through the die cutting machine. You may have to repeat die cutting some of them as there is only one die for them.
Assembly
- Adhere the antennae to the bees followed by the wings. I attached a wibble wobble mechanism on one of the small bees on the front of the Hexagon Mini card.
- First adhere freehand cut Shy Shamrock stem to Hexagon Mini card front.
- Arrange large flowers as pictured. Two of them are adhered with dimensionals but the third one at the bottom has been adhered with glue dots.
- Next adhere two of the leaves with mini dimensionals on the stem, and 3 leaves on the larger flower on the right.
- Arrange the DSP die cut flowers and adhere with mini dimensionals. Attach Rhinestone Basic Jewels in the flower centres.
Inside Hexagon Mini card
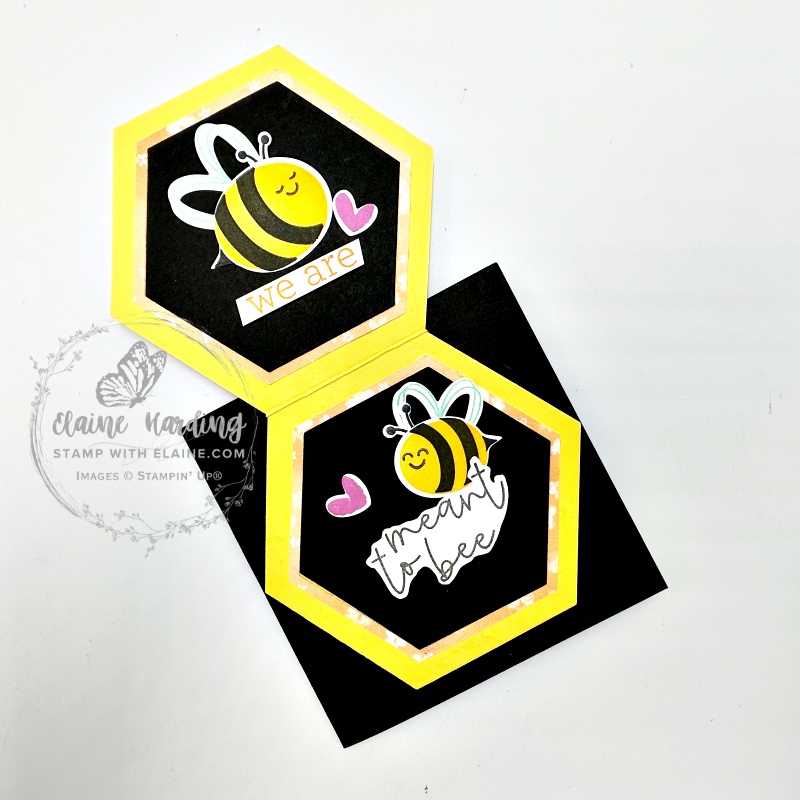

- Adhere the larger bee on the inside front with multi-purpose glue.
- Attach “we are” with a double stack of glue dots.
- Adhere heart as pictured.
- Bottom half of card – adhere with a strip of tear n’ tape on “meant to bee” so that you can partially tuck the small bee inside it.
- Apply adhesive to bee and heart and adhere as pictured.
Inside square card base
- Adhere Daffodil Delight layer with multi-purpose adhesive.
- Next adhere Basic White layer.
- Petunia Pop heart – adhere in bottom right corner.
- Scrap of Bloom Impressions DSP : cut at 1″ x 3 ½” (2.5 cm x 9 cm). In the centre at one end, make a ¼” cut then cut from diagonally from the edge to the centre at each corner to create flag end. Only apply multi-purpose adhesive to the top half so that the flag end is free.
Supply list
Listed below is the supply list. Just click on the picture to take you directly to the item in my online store.
Product List")
")

 Designer Series Paper")


Thanks for visiting. Happy crafting!

- SHOP ONLINE – EARN 10% REWARDS ON ALL PURCHASES OVER £20
- PURCHASE A STARTER KIT : Get £155 worth of products for only £99. Choose from current catalogues and any specials available. Free Shipping. Read more
- Subscribe to my Video Tutorials – click here