
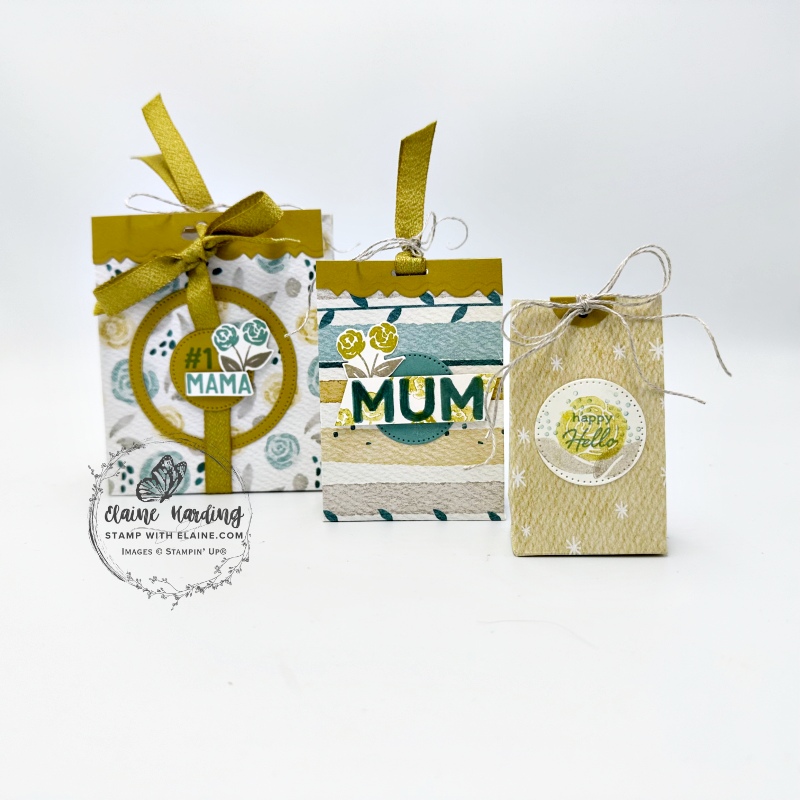
Pinch top flat pack bags. One template, 3 different sizes and being flat pack, they’re a space saver too. Today’s bags have a a Mother’s Day theme. However these bags can be used for any occasion i.e., for Birthdays, Anniversaries, Valentines, Easter, Halloween or Christmas! All you have to do is change the tags and decoration.
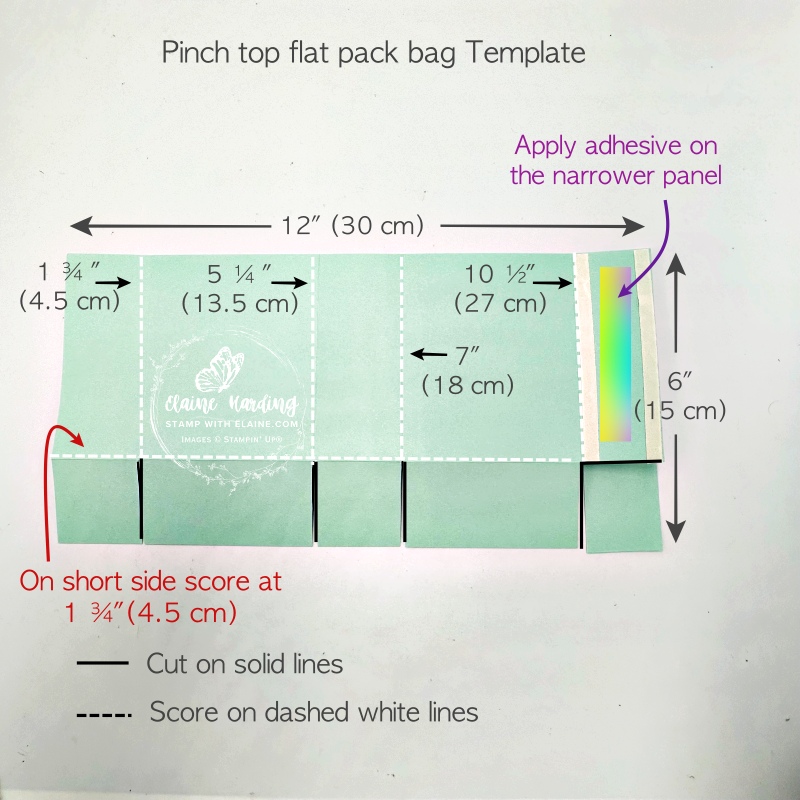
Template for Large pinch top flat pack bag plus how to assemble bags
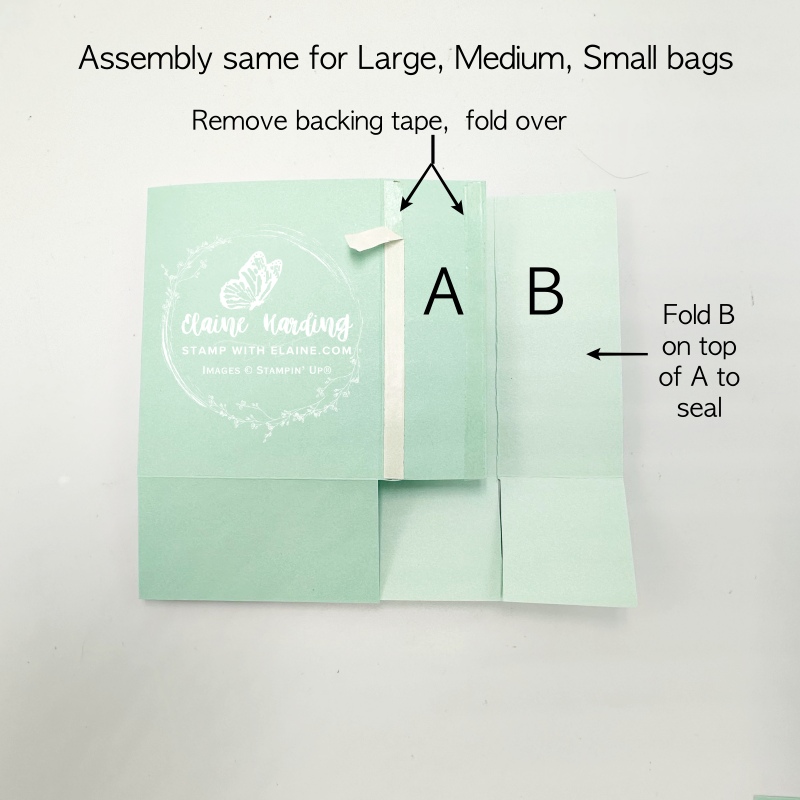
Picture on left shows scoring and cutting template. All the pictures for bag assembly applies to all 3 sizes of bag i.e., Large, Medium and Small. I used Designer Series Paper (patterned paper) to make all the bags. It is lighter in weight so when scoring, use the larger end of the stylus so that you don’t accidentally damage the paper.
Imperial
- Large pinch top bag base : DSP 6″ x 12″. Long side on top score at 1 ¾”, 5 ¼”, 7″ and 10 ½”.
- Orient paper on short side and score at 1 ¾”
- Remove the corner on the narrower panel as pictured
- Cut up to the first score line on all score lines as pictured to form bag base tabs
- Apply adhesive to narrower end flap
- Fold over as shown in picture on the right, and adhere panel B on top of panel A.
Metric
- Large pinch top bag base : Trim DSP 15 cm x 30 cm. Long side on top score at 4.5 cm, 13.5 cm, 18 cm, and 27 cm
- Orient paper on short side and score at 4.5 cm
- Remove the corner on the narrower panel as pictured
- Cut up to the first score line on all score lines as pictured to form bag base tabs
- Apply adhesive to narrower end flap
- Fold over as shown in picture on the right, and adhere panel B on top of panel A.
How to assemble bag
Box assembly is the same for all 3 sizes of bags.
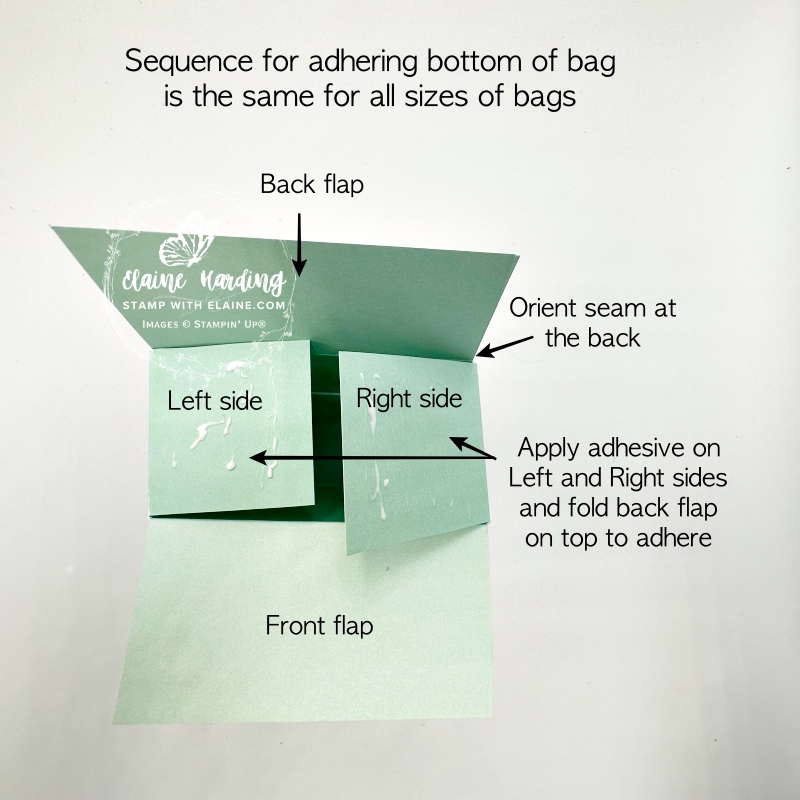
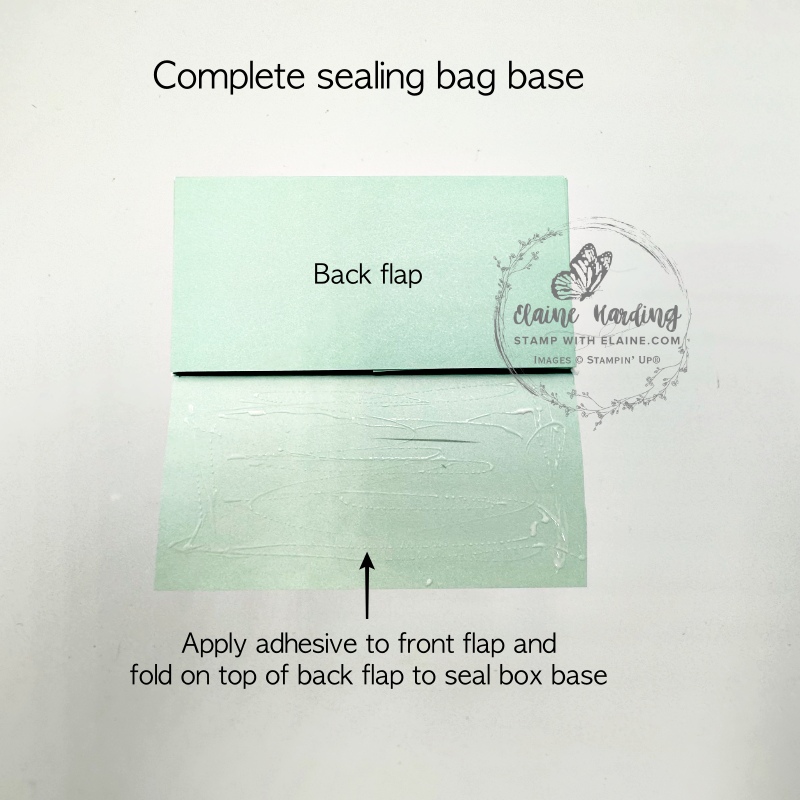
- Ensure the seam is at the back and the front of the bag is facing you
- Apply adhesive to left and right side flaps
- Fold back flap over side flaps and allow to bond
- Apply adhesive to front flap and fold on top of back flap and allow to bond.
- Flip bag over so that open end is at the top – insert bone folder inside bag and apply pressure to base of bag to ensure flaps have bonded securely.
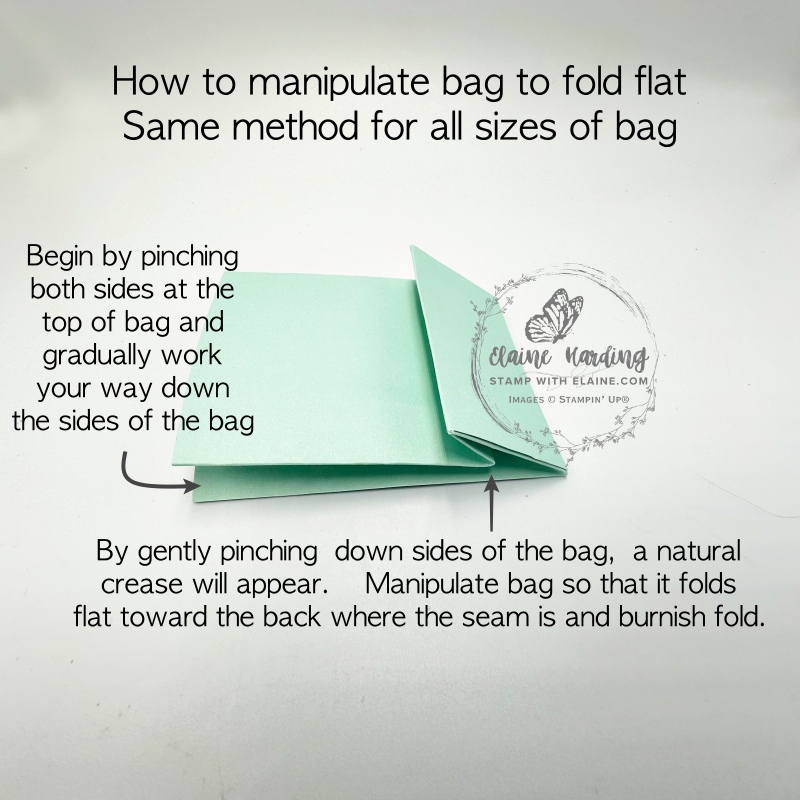
- Finally pinch both sides of bag at the top and gradually work your way down the sides. Gently manipulate bag at bottom when a natural crease starts to appear and fold flat toward the back seam. Burnish with bone folder.
Medium and Small Pinch Top bag templates
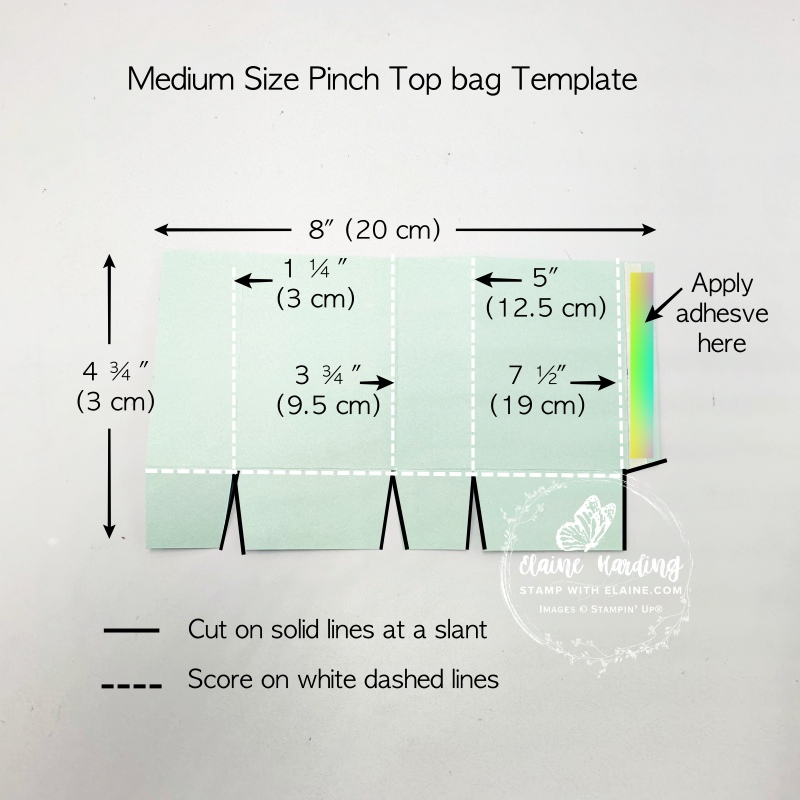
Medium Pinch Top Flat pack bag template
The pictures are self-explanatory.
Imperial
- Bag Base : 4 ¾” x 8″ Long side score at 1 ¼”, 3 ¾”, 5″, and 7 ½”.
- Orient paper on short side and score at 1 ¼”
- Assemble bag per instructions for Large bag above.
Metric
- Bag Base : 12 cm x 20 cm. Long side score at 3 cm, 9.5 cm, 12.5 cm and 19 cm
- Orient paper on short side and score at 3 cm
- Assemble bag per instructions for Large bag above.
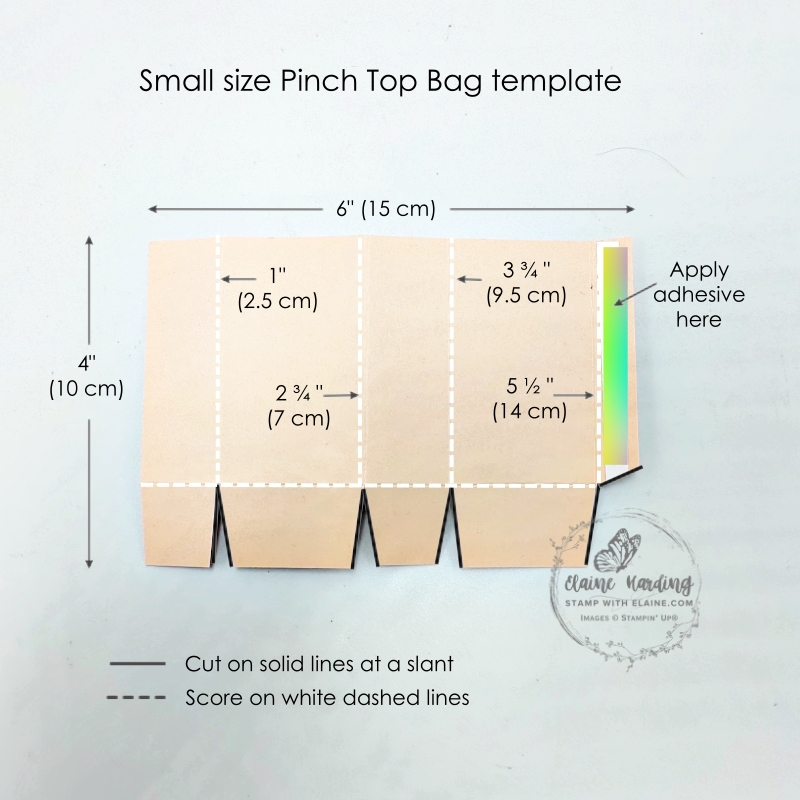
Small Pinch Top Flat pack bag template
Imperial
- Bag Base : 4″ x 6″ Long side score at 1 “, 2 ¾”, 3 ¾” and 5 ½”
- Orient paper on short side and score at 1″
- Assemble bag per instructions for Large bag above.
Metric
- Bag Base : 10 cm x 15 cm. Long side score at 2.5 cm, 7 cm, 9.5 cm, and 14 cm
- Orient paper on short side and score at 2.5 cm
- Assemble bag per instructions for Large bag above.
Decorate bags as you wish.
Supply list
Listed below is the supply list. Just click on the picture to take you directly to the item in my online store.
Product List")

")
")
")

 Designer Series Paper")
 Designer Series Paper & Sticker Sheet (English)")
")
 Textured Ribbon")


Enjoy your weekend!

- SHOP ONLINE – EARN 10% REWARDS ON ALL PURCHASES OVER £20
- PURCHASE A STARTER KIT : Get £155 worth of products for only £99. Choose from current catalogues and any specials available. Free Shipping. Read more
- Subscribe to my Video Tutorials – click here