
Faux Suede technique. Making your own textured paper is so easy, cost effective and creates a great backdrop for your die cut images. I know some of you might find crumpling paper and “bashing” it to bits may go against the grain, but the results are so worth it especially if you like the grungy, distressed look!
How to make the Faux Suede effect
You can use any type of card stock so long as the card stock does not have a white core and has been dyed all the way through.
- Use a bone folder repeatedly to soften the card stock (not pictured).
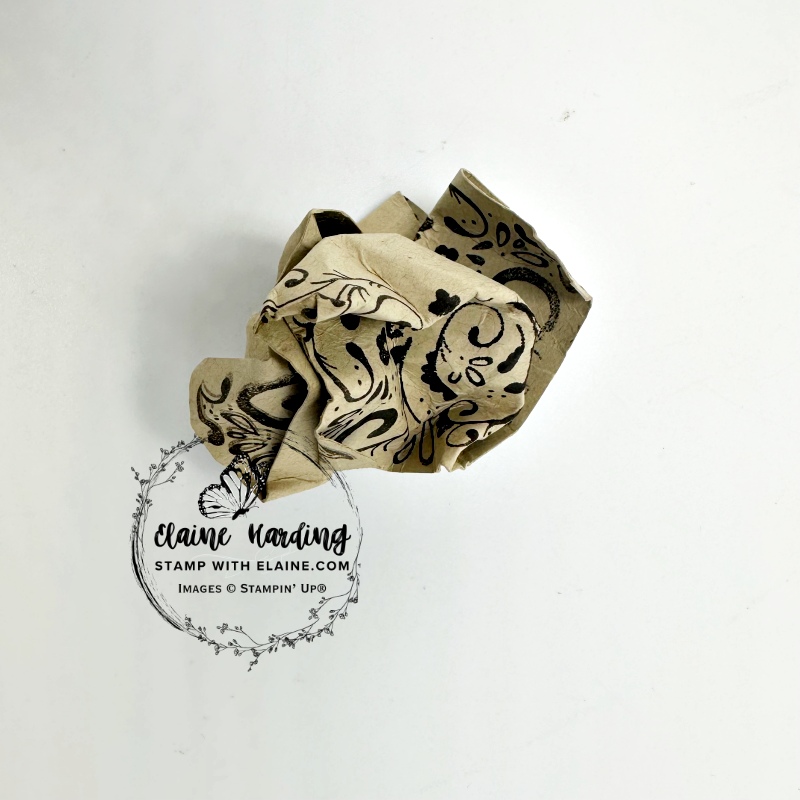
- Crumple the Crumb Cake card stock so that there are plenty of creases.
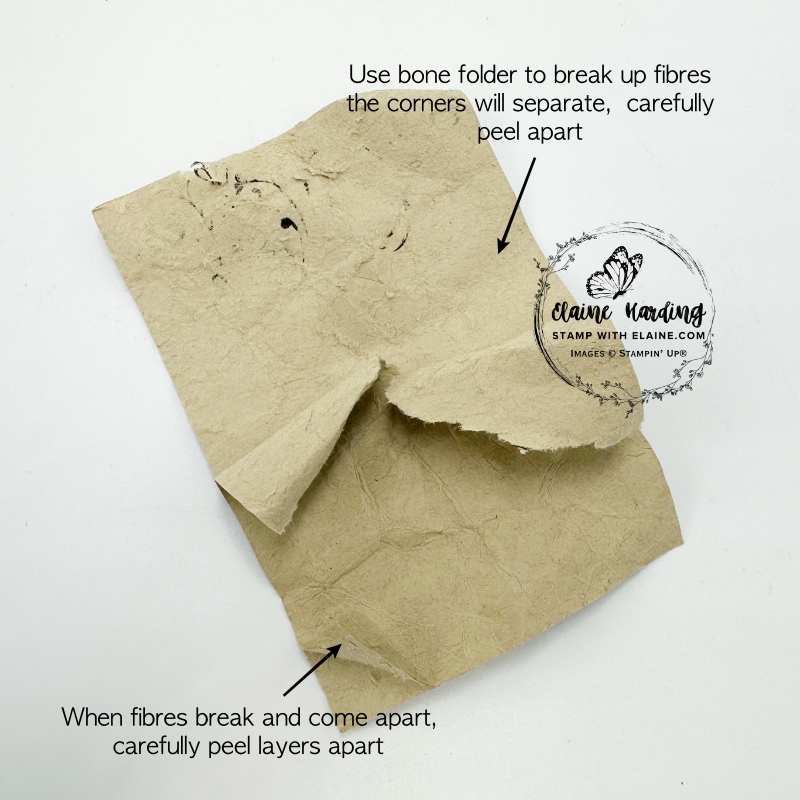
- Straighten card stock out and use a bone folder to further break down the fibres of the paper until the edges split (middle picture).
- Carefully separate the layers to expose the core which will look like suede.
- Crumple it again to re-enforce the creases.
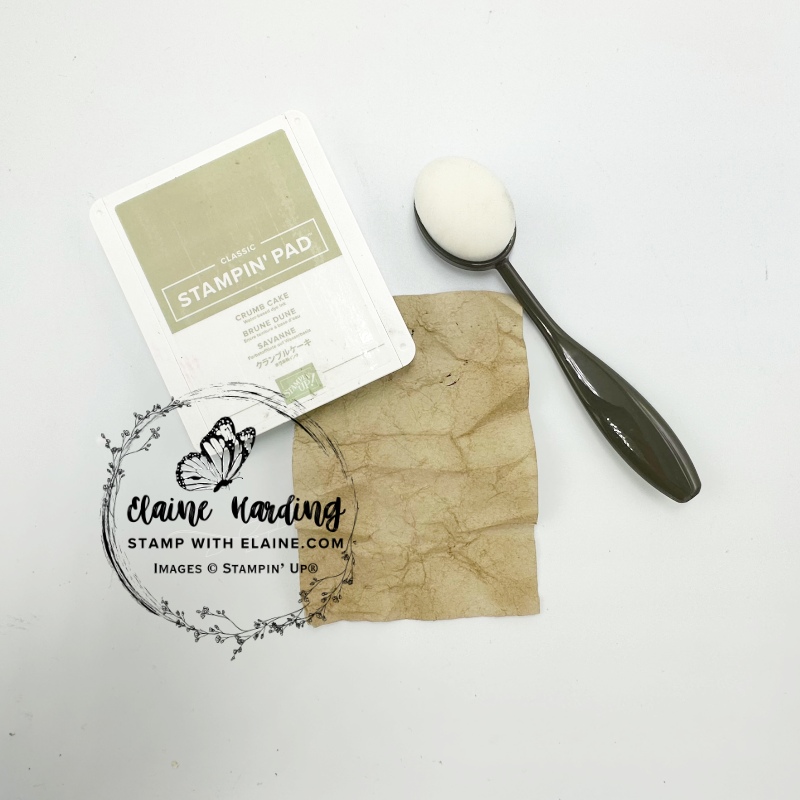
- Use a blending brush to apply the same colour as card stock to accentuate the lines to the desired depth of colour. Voila – you have faux suede!
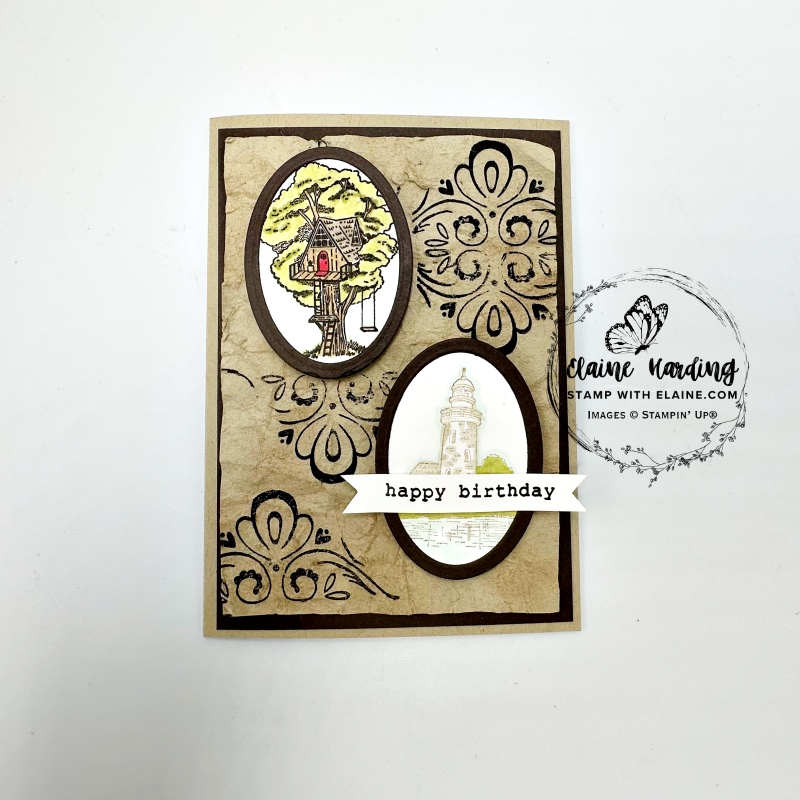
- You can stamp on it – I used the Tiled Techniques Photopolymer stamp set for this.
Tip : Apply adhesive to the card base rather than the back of your faux suede piece because it will be too delicate at this stage and may tear. By the way, It is okay if the edges are slightly torn. It adds to the distressed grungy look.
Cutting guide
- Crumb Cake card base : 5 ¾” x 8 ¼” (14.5 cm x 21 cm) folded in half.
- Early Espresso : cut 2 pieces for mat layers for card front and inside card 3 ⅞” x 5 ½” (9.5 cm x 14 cm).
- Cut 1 x Crumb Cake for Faux Suede piece and 1 in Basic White for inside card at 3 ¾” x 5 ⅜” (9 cm x 13.5 cm)
- Scraps of Basic White and Early Espresso for stamping images and for making oval frames and sentiment.
Assembly instructions
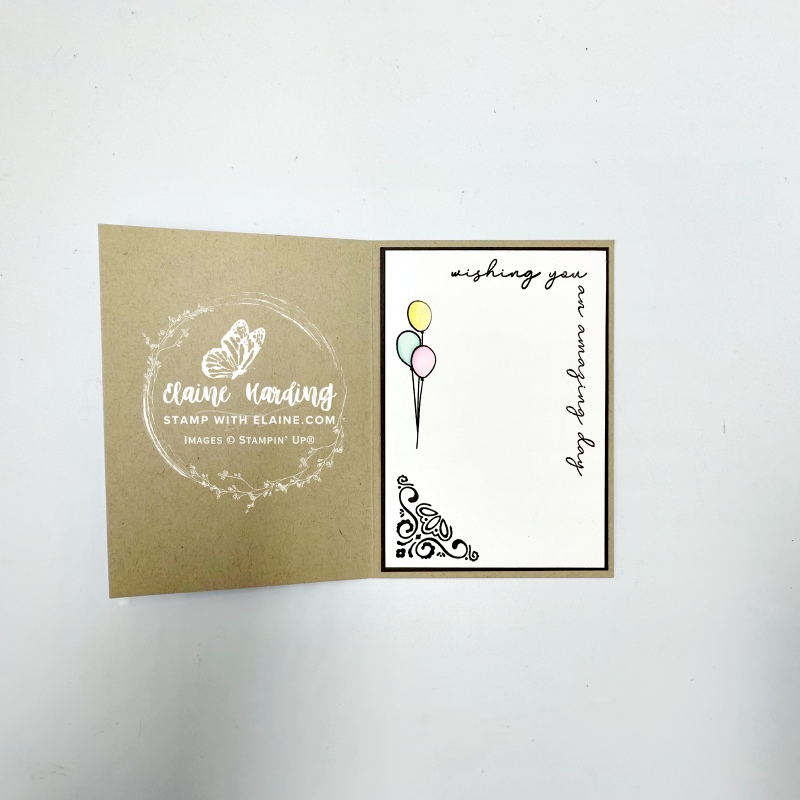
- Adhere the Early Espresso mat layers to card front and inside card.
- Stamp on Basic White piece with Spring Corners stamps, the balloons and the corner stamp from Tiled Technique photopolymer stamp set and glue inside card. Colour balloons with Stampin’ Blends combos in Pool Party, Bubble Bath and Lemon Lolly.
- Create the faux suede layer per instructions above. Stamp with Early Espresso ink with Tiled Technique photopolymer stamp as pictured.
- On Basic White scrap, stamp the tree house and light house and die cut with the larger oval from the Framed Scenes Dies. I used Early Espresso for the tree house, and Crumb Cake for the light house. Colours I used are Old Olive, Crumb Cake, Poppy Parade.
- Die cut two Early Espresso frames and adhere to oval images. Adhere completed frames with dimensionals as pictured.
- Stamp “happy birthday” on scrap of Basic White, trim and cut flag ends and adhere with glue dots over light house to finish card.
Supply list
Listed below is the supply list. Just click on the picture to take you directly to the item in my online store.
Product List![Tiled Techniques Photopolymer Stamp Set [ 164829 ]](https://assets1.tamsnetwork.com/images/EC042017NF/164829s.jpg "Tiled Techniques Photopolymer Stamp Set [ 164829 ]")
![Framed Scenes Bundle [ 165397 ]](https://assets1.tamsnetwork.com/images/EC042017NF/165397s.jpg "Framed Scenes Bundle [ 165397 ]")
![Spring Corners Bundle (English) [ 164743 ]](https://assets1.tamsnetwork.com/images/EC042017NF/164743s.jpg "Spring Corners Bundle (English) [ 164743 ]")
![Spring Corners Dies [ 164742 ]](https://assets1.tamsnetwork.com/images/EC042017NF/164742s.jpg "Spring Corners Dies [ 164742 ]")
![Spring Corners Photopolymer Stamp Set (English) [ 164738 ]](https://assets1.tamsnetwork.com/images/EC042017NF/164738s.jpg "Spring Corners Photopolymer Stamp Set (English) [ 164738 ]")
![Basic White A4 Cardstock [ 166781 ]](https://assets1.tamsnetwork.com/images/EC042017NF/166781s.jpg "Basic White A4 Cardstock [ 166781 ]")
![Crumb Cake A4 Card Stock [ 121685 ]](https://assets1.tamsnetwork.com/images/EC042017NF/121685s.jpg "Crumb Cake A4 Card Stock [ 121685 ]")
![Early Espresso A4 Card Stock [ 121686 ]](https://assets1.tamsnetwork.com/images/EC042017NF/121686s.jpg "Early Espresso A4 Card Stock [ 121686 ]")
![Early Espresso Classic Stampin' Pad [ 147114 ]](https://assets1.tamsnetwork.com/images/EC042017NF/147114s.jpg "Early Espresso Classic Stampin' Pad [ 147114 ]")
![Bubble Bath Stampin’ Blends Combo Pack [ 161675 ]](https://assets1.tamsnetwork.com/images/EC042017NF/161675s.jpg "Bubble Bath Stampin’ Blends Combo Pack [ 161675 ]")
![Lemon Lolly Stampin’ Blends Combo Pack [ 161673 ]](https://assets1.tamsnetwork.com/images/EC042017NF/161673s.jpg "Lemon Lolly Stampin’ Blends Combo Pack [ 161673 ]")
![Old Olive Stampin' Blends Combo Pack [ 154892 ]](https://assets1.tamsnetwork.com/images/EC042017NF/154892s.jpg "Old Olive Stampin' Blends Combo Pack [ 154892 ]")
![Pecan Pie Stampin’ Blends Combo Pack [ 161674 ]](https://assets1.tamsnetwork.com/images/EC042017NF/161674s.jpg "Pecan Pie Stampin’ Blends Combo Pack [ 161674 ]")
![Pool Party Stampin' Blends Combo Pack [ 154894 ]](https://assets1.tamsnetwork.com/images/EC042017NF/154894s.jpg "Pool Party Stampin' Blends Combo Pack [ 154894 ]")
![Poppy Parade Stampin' Blends Combo Pack [ 154958 ]](https://assets1.tamsnetwork.com/images/EC042017NF/154958s.jpg "Poppy Parade Stampin' Blends Combo Pack [ 154958 ]")
Incidentally, the Tiled Techniques stamp set is on the Last Chance Product list in the online store.

- SHOP ONLINE – EARN 10% REWARDS ON ALL PURCHASES OVER £20
- PURCHASE A STARTER KIT : Get £155 worth of products for only £99. Choose from current catalogues and any specials available. Free Shipping. Read more
- Subscribe to my Video Tutorials – click here