
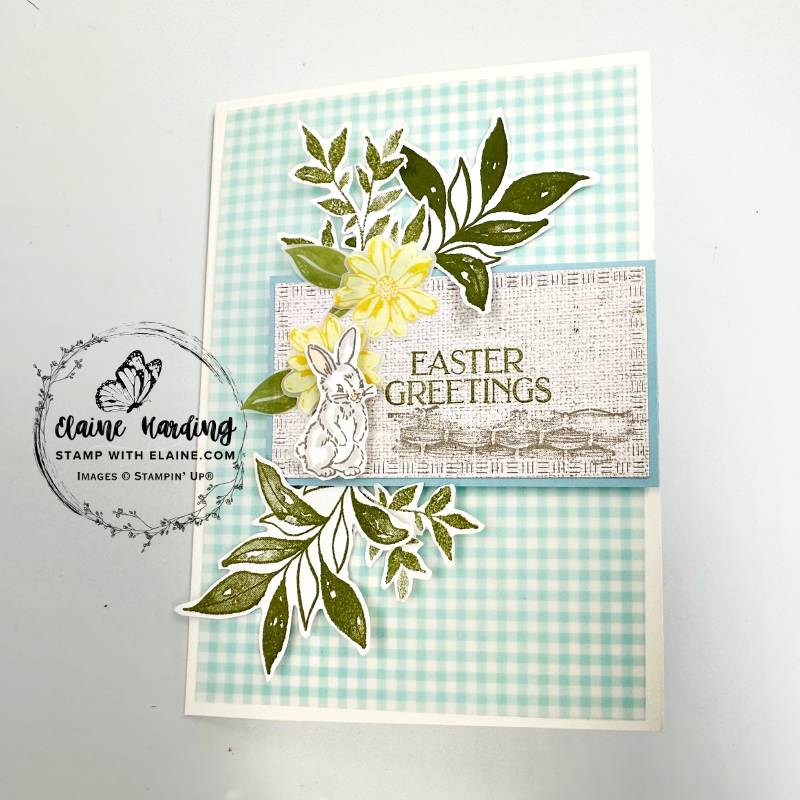
Fun pop-up with Textured Notes. Textured Notes is a new online exclusive introduced in March. It is part of the Botanical Textures Suite Collection which has a neutral colour palette. The product colours are Basic Beige, Basic Black, Crumb Cake, Early Espresso, Gray Granite, Pecan Pie and White.
Textured Notes Dies
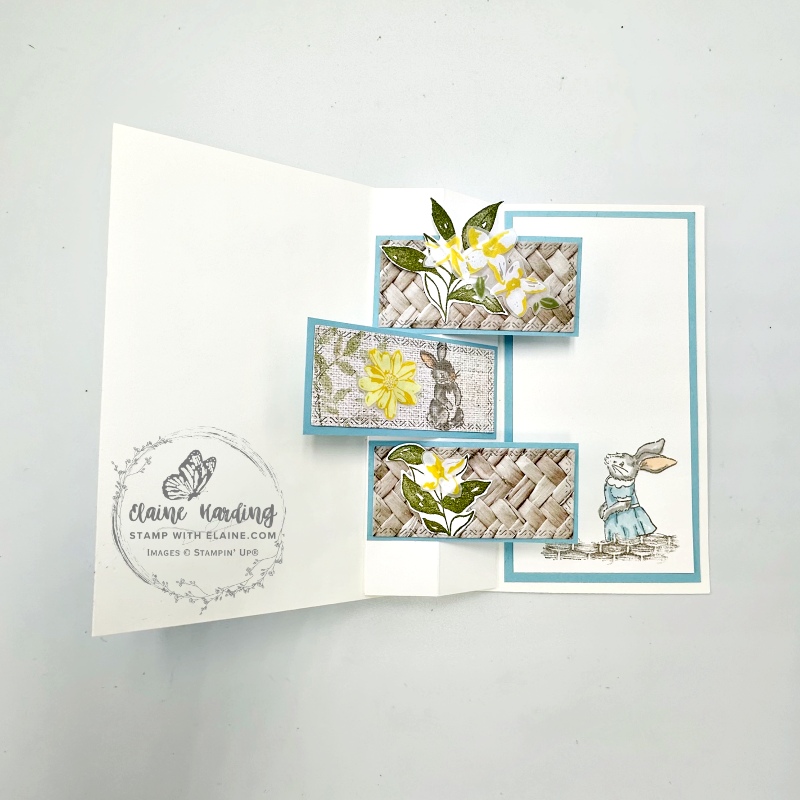
What I love about the Textured Notes bundle are the nested rectangular dies called Textured Notes Dies. Like the Spotlight on Nature dies (which are nested circles with different border patterns), the Textured Notes Dies are too. There are 7 nested dies and an extra long narrow rectangle die on its own making 8 dies in total in the set. Counting from No. 1 being the smallest, and No. 7 being the largest, I used No. 3 for the card front and No. 2 for the inside. The ones for the inside has to be a smaller size due to the pop up mechanism, otherwise it will protrude when the card is closed.
Designer Series Papers
The Botanical Textures Suite has 2 sets of 12″x 12″ (30.5 x 30.5 cm) Designer Series Papers. One is called Botanical Textures combining large and small scale organic designs in grey, black and white tones. The other 12″x 12″ pack is called Woven Textures and depicts photographic backgrounds of natural woven elements and organic textures in different hues. Because both packs are in neutral tones, I challenged myself to see how I could adapt it for creating an Easter card. Let me know whether or not you think I succeeded.
Cutting Guide
Imperial
- Card Base : Basic White Thick 5 ¾” x 8 ¼” folded in half.
- Floral & Gingham 12″x 12″ Vellum Specialty DSP : Gingham pattern cut at 3 ⅞” x 5 ½”.
- Balmy Blue Mat layer for No. 3 Textured Notes Die card front – cut 1 pieces 3 ⅜” x 1 ⅞”.
- Inside card Balmy Blue Mat layers for No. 2 Die – cut 3 pieces 2 ⅞” x 1 ⅜”.
- Die cut Woven Textures DSP Linen pattern – 1 piece with No. 3 Textured Notes Die.
- No. 2 die cut 1 piece with Linen pattern, and 2 on the reverse side of DSP with basket weave pattern.
- Right side Inside card : cut 1 piece Balmy Blue mat layer 2 ⅞” x 5 ⅜” and 1 piece Basic White layer for stamping at 2 ⅝” x 5 ¼”.
Metric
- Card Base : Basic White Thick 14.5 cm x 21 cm folded in half.
- Floral & Gingham 30.5 x 30.5 cm Vellum Specialty DSP : Gingham pattern cut at 9.8 cm x 14 cm.
- Balmy Blue Mat layers for No. 3 Textured Notes Die card front – cut 1 piece 8.6 cm x 4.8 cm.
- Inside card Balmy Blue Mat layers for No. 2 Die – cut 3 pieces 7.3 cm x 3.5 cm.
- Die cut Woven Textures DSP Linen pattern – 1 piece with No. 3 Textured Notes Die.
- No. 2 die cut 1 piece with Linen pattern, and 2 on the reverse side of DSP with basket weave pattern.
- Right side Inside card Balmy Blue mat layer 7.3 cm x 13.7 cm and 1 piece Basic White layer for stamping at 7 cm x 13.3 cm.
Pop up Mechanism
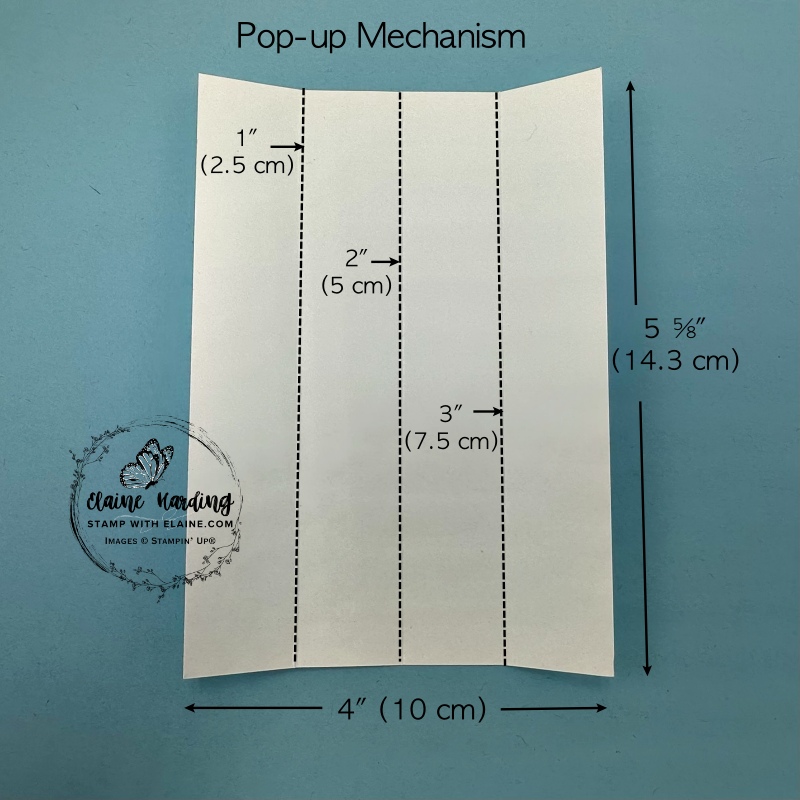
- Cut the Pop-up mechanism the same colour as the card base. In this instance, I used Basic White 4″ x 5 ⅝” (10 cm x 14.3 cm)
- On the short side, score at 1″, 2″ and 3″ (2.5 cm, 5 cm, and 7.5 cm). Burnish score lines really well.
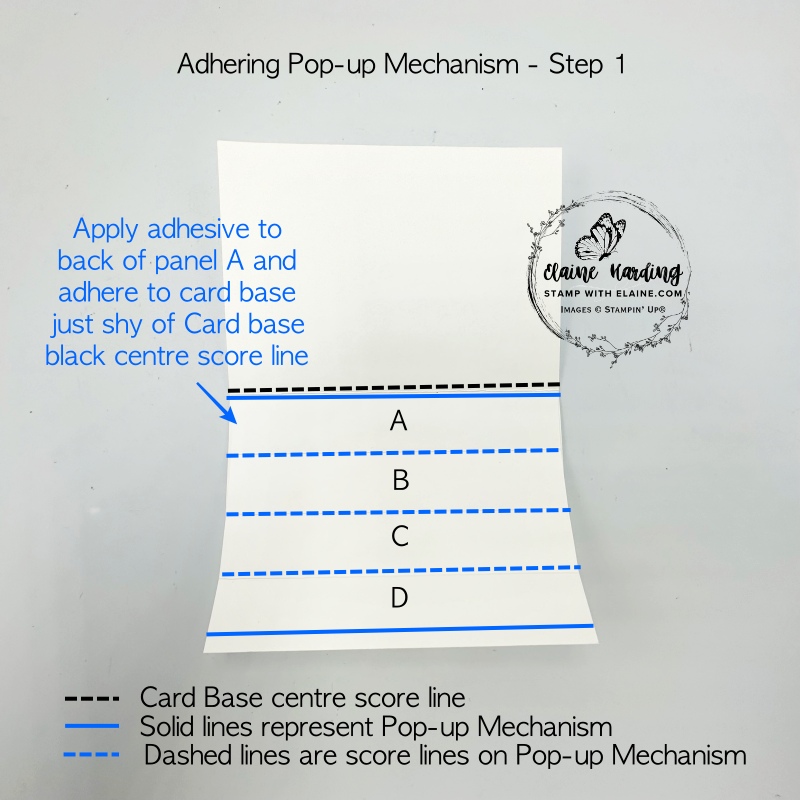
- Apply adhesive to the back of panel A and adhere just shy of the centre score line on the Card Base as pictured above.
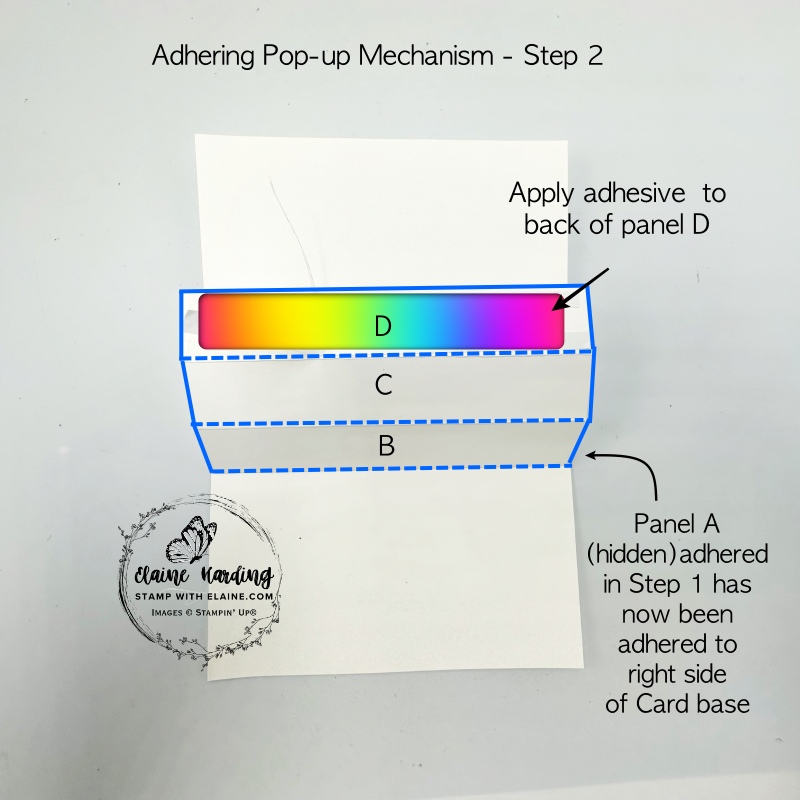
- Apply adhesive to Panel D
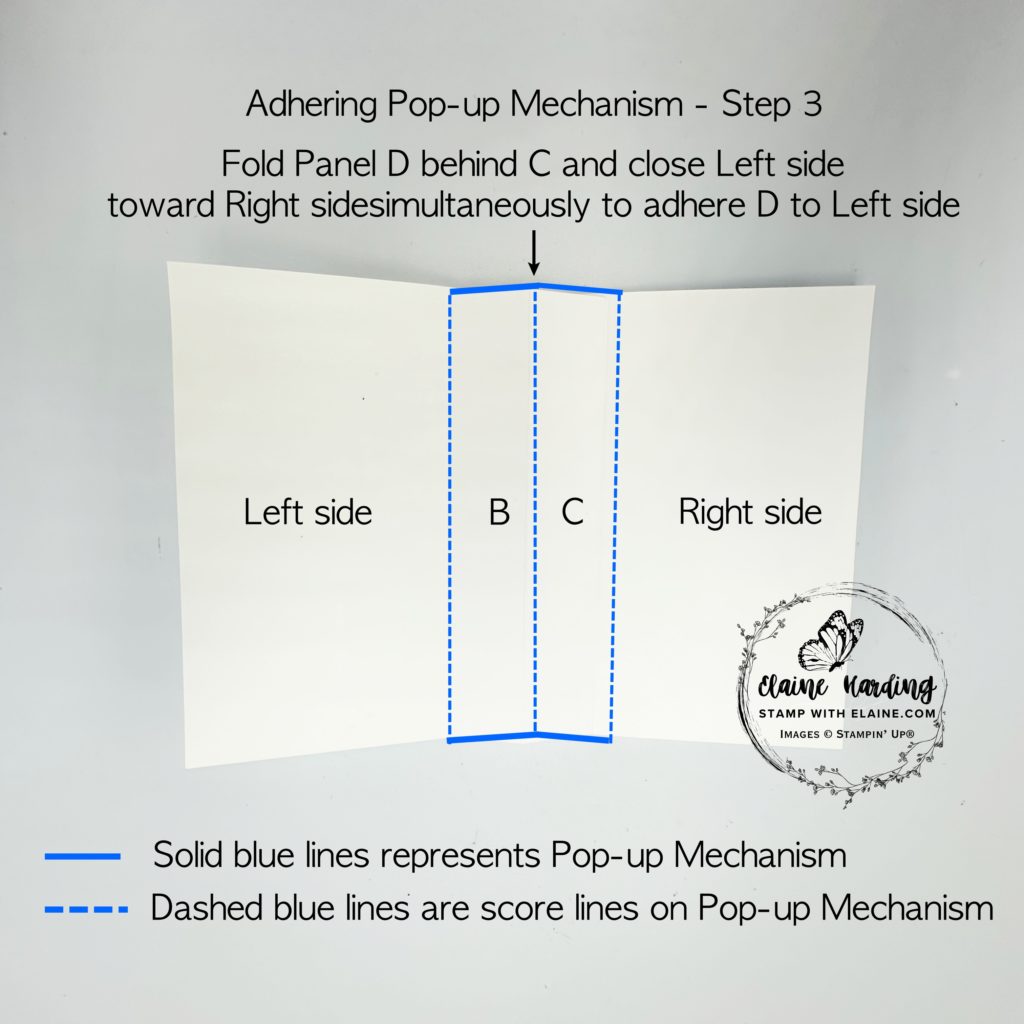
- Fold panel D behind Panel C and close left side of card base on top of right side. By closing the card, the pop-up mechanism will adhere itself to the left side of the card base.
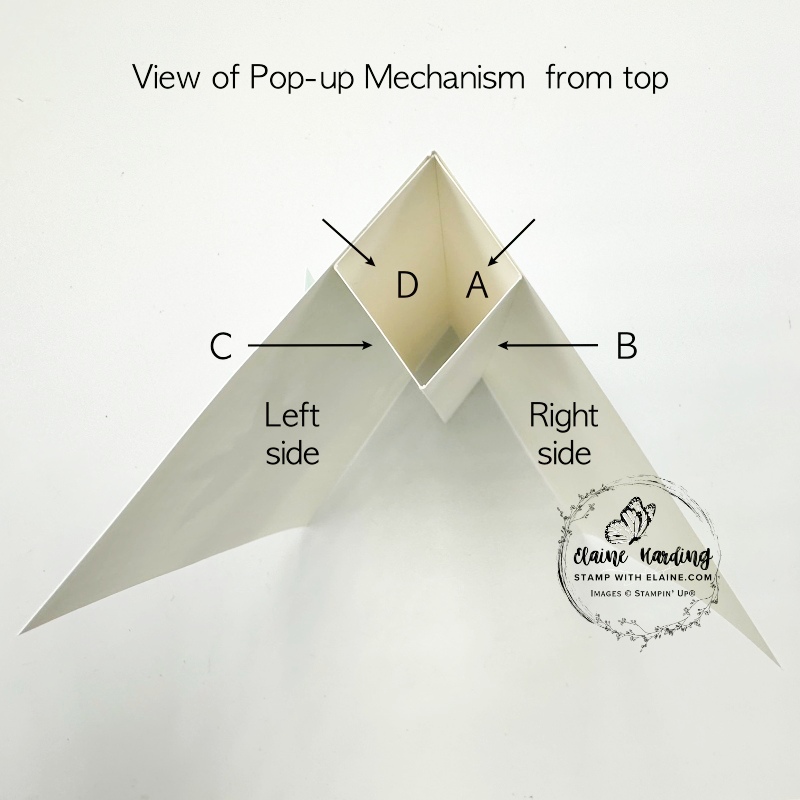
- Once adhered, it should look like picture on the right from the top.
How to attach the Die Cut labels to Pop-up Mechanism
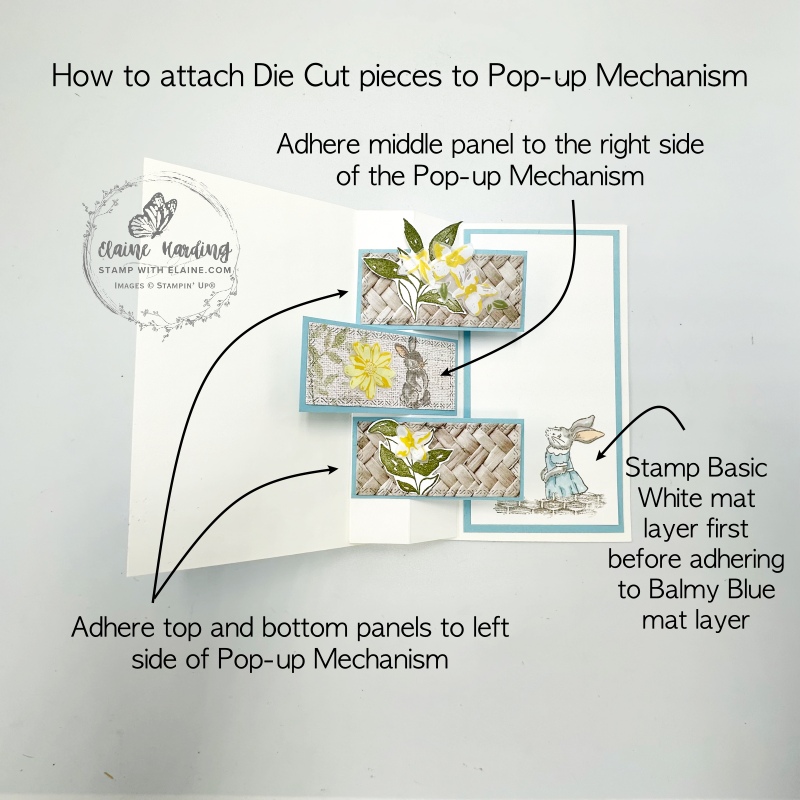
- Adhere the DSP pieces with basket weave pattern die cut from No. 2 Textured Notes Die on to their respective Balmy Blue mat layers.
- Apply adhesive on the back of the woven labels top and bottom. Be sure to apply adhesive only on the width of Pop-up mechanism on the left side so that the mechanism can move freely.
- On scrap of Basic White, stamp 3 large leaf images in Old Olive and fussy cut. Adhere two as shown for the front No. 3 die cut label. Cut the 3rd large leaf in half and adhere as pictured.
- Stamp on the middle panel with the linen pattern as shown.
- Fussy cut flowers and leaves from the Vellum DSP and adhere as pictured on the front and inside.
- The linen pattern should be adhered to the right panel of pop-up mechanism as pictured.
- Adhere Balmy Blue mat layer on right side and stamp and colour images before adhering to mat layer as pictured above.
Supply list
Listed below is the supply list. Just click on the picture to take you directly to the item in my online store.
Product List")
")

")

")
 Designer Series Paper")
 Specialty Designer Series Paper")


Well, now I’ve finished, do you think I succeeded? Let me know in the comment box below! Thanks for stopping by.

- SHOP ONLINE – EARN 10% REWARDS ON ALL PURCHASES OVER £20
- PURCHASE A STARTER KIT : Get £155 worth of products for only £99. Choose from current catalogues and any specials available. Free Shipping. Read more
- Subscribe to my Video Tutorials – click here