
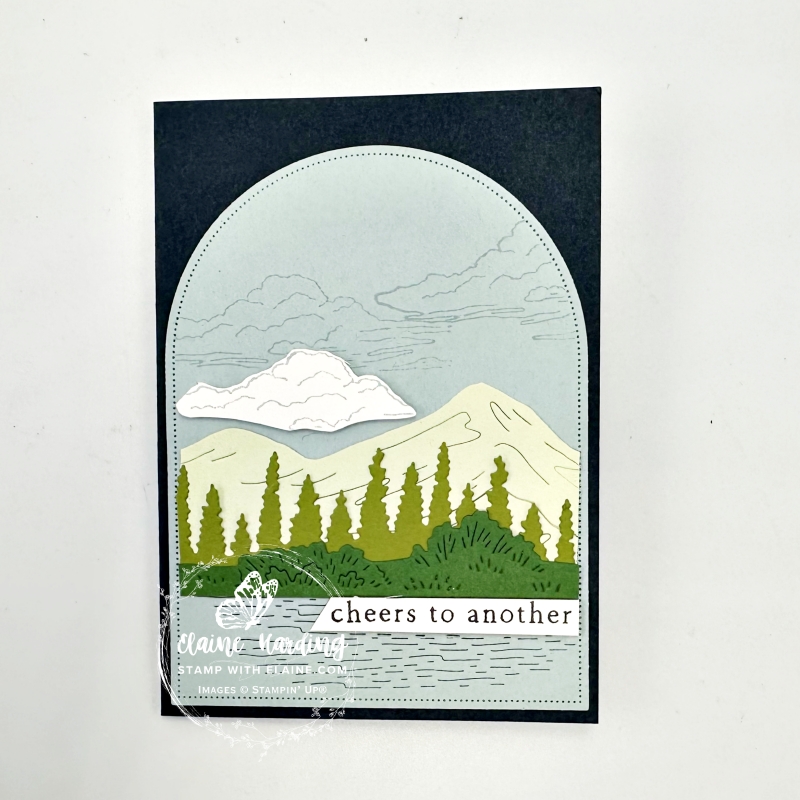
Clean, simple, Birthday card. Today’s card is a birthday card using the Scenic Adventure bundle which is another online exclusive. I created a scene by simply layering the die cut elements. The colours I chose are two of the new 2025-2027 In Colors, Secret Sea and Cloud Cover.
The Scenic Adventure dies adds texture to the water, mountains and shrubbery and I’ve used them to layer on to the card front in different shades of green. The only stamping I did was for the clouds and the sentiments.
Another favourite staple of mine are the Everyday Arches dies. I love how it frames the scene and used it for the inside of the card too. The other stamps and dies I used are the new More Messages Bundle. This is a single stamp with multiple sentiments and the die which coordinates with it will cut them all with just one pass through the die cutting machine!
Cutting guide
Instead of using Basic White mat layers, I used the Everyday Arches dies for my mat layers.
- Card base : Secret Sea cut at 5 ¾” x 8 ¼” (14.5 cm x 21 cm) and folded in half.
- Everyday Arches dies : Die cut 2 pieces in Cloud Cover with the largest Everyday Arches die.
Layering elements
- Place the water die on Cloud Cover arch and run through die cutting machine on both pieces then set aside.
- Garden Green card stock : die cut shrubbery and apply adhesive to the bottom, leaving upper portion free from glue so that you can tuck the trees behind. Trim so that it fits just inside the stitched Everyday Arch frame. Adhere to one of the Cloud Cover arch for the card front.
- Old Olive card stock : die cut the line of fir trees. Apply adhesive to bottom, trim and tuck behind the shrubbery as pictured.
- Soft Sea Foam card stock: die cut the mountain range, trim and apply adhesive to the contour of the mountain range and tuck behind trees and adhere to Everyday Arch piece.
Clouds
- Stamp mountain range as shown with Cloud Cover Stampin’ Spot – I only inked top half so that it would resemble clouds.
- Partially ink up the mountain range stamp with Cloud Cover Stampin’ Spot and stamp on Basic White scrap. Fussy cut cloud and adhere with dimensionals in between the Soft Sea Foam mountain range as pictured.
- Stamp sentiment on scrap of Basic White card stock and adhere as pictured with dimensionals to complete card front and adhere arch to Secret Sea card base.
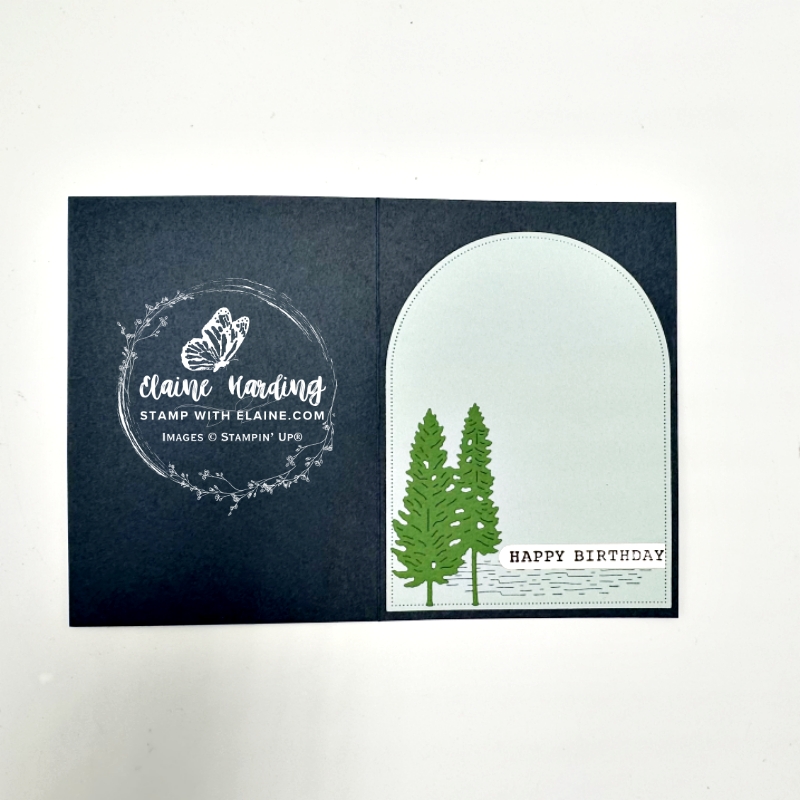
Inside card
- Adhere remaining arch to inside of Secret Sea card base.
- Die cut the pair of Pine trees in Garden Green and adhere to bottom left of Everyday Arch.
- More Messages Bundle – stamp the sentiments in Secret Sea on Basic White card stock and die cut with coordinating die.
- Select the “happy birthday” greeting and reserve the remaining messages for future projects.
- Trim right end of “happy birthday” greeting, apply adhesive and adhere to arch as pictured to complete card.
Supply list
Listed below is the supply list. Just click on the picture to take you directly to the item in my online store.
Product List![Scenic Adventure Bundle (English) [ 165468 ]](https://assets1.tamsnetwork.com/images/EC042017NF/165468s.jpg "Scenic Adventure Bundle (English) [ 165468 ]")
![Scenic Adventure Photopolymer Stamp Set (English) [ 165466 ]](https://assets1.tamsnetwork.com/images/EC042017NF/165466s.jpg "Scenic Adventure Photopolymer Stamp Set (English) [ 165466 ]")
![Scenic Adventure Dies [ 165467 ]](https://assets1.tamsnetwork.com/images/EC042017NF/165467s.jpg "Scenic Adventure Dies [ 165467 ]")
![Everyday Arches Bundle (English) [ 164630 ]](https://assets1.tamsnetwork.com/images/EC042017NF/164630s.jpg "Everyday Arches Bundle (English) [ 164630 ]")
![Everyday Arches Dies [ 164629 ]](https://assets1.tamsnetwork.com/images/EC042017NF/164629s.jpg "Everyday Arches Dies [ 164629 ]")
![Basic White A4 Cardstock [ 159228 ]](https://assets1.tamsnetwork.com/images/EC042017NF/159228s.jpg "Basic White A4 Cardstock [ 159228 ]")
![Cloud Cover A4 Cardstock [ 165293 ]](https://assets1.tamsnetwork.com/images/EC042017NF/165293s.jpg "Cloud Cover A4 Cardstock [ 165293 ]")
![Garden Green A4 Card Stock [ 108605 ]](https://assets1.tamsnetwork.com/images/EC042017NF/108605s.jpg "Garden Green A4 Card Stock [ 108605 ]")
![Old Olive A4 Card Stock [ 106576 ]](https://assets1.tamsnetwork.com/images/EC042017NF/106576s.jpg "Old Olive A4 Card Stock [ 106576 ]")
![Secret Sea A4 Cardstock [ 165296 ]](https://assets1.tamsnetwork.com/images/EC042017NF/165296s.jpg "Secret Sea A4 Cardstock [ 165296 ]")
![Soft Sea Foam A4 Cardstock [ 147012 ]](https://assets1.tamsnetwork.com/images/EC042017NF/147012s.jpg "Soft Sea Foam A4 Cardstock [ 147012 ]")
![Classic Stampin' Spot Small Assortment 1 [ 166716 ]](https://assets1.tamsnetwork.com/images/EC042017NF/166716s.jpg "Classic Stampin' Spot Small Assortment 1 [ 166716 ]")
![Secret Sea Classic Stampin' Pad [ 165285 ]](https://assets1.tamsnetwork.com/images/EC042017NF/165285s.jpg "Secret Sea Classic Stampin' Pad [ 165285 ]")
I hope this has inspired you! Happy stampin’

- SHOP ONLINE – EARN 10% REWARDS ON ALL PURCHASES OVER £20
- PURCHASE A STARTER KIT : Get £155 worth of products for only £99. Choose from current catalogues and any specials available. Free Shipping. Read more
- Subscribe to my Video Tutorials – click here