
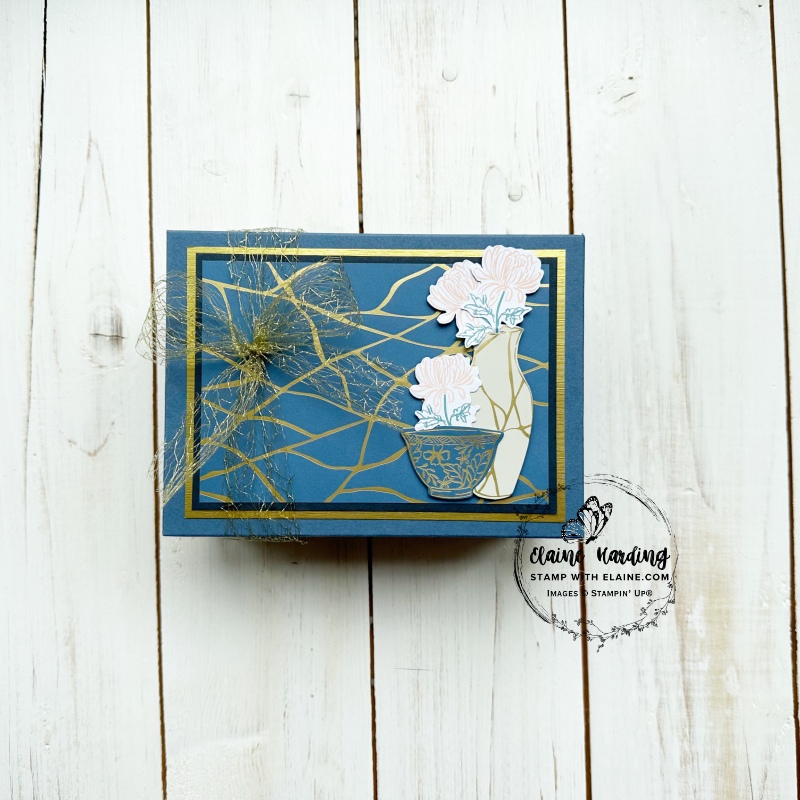
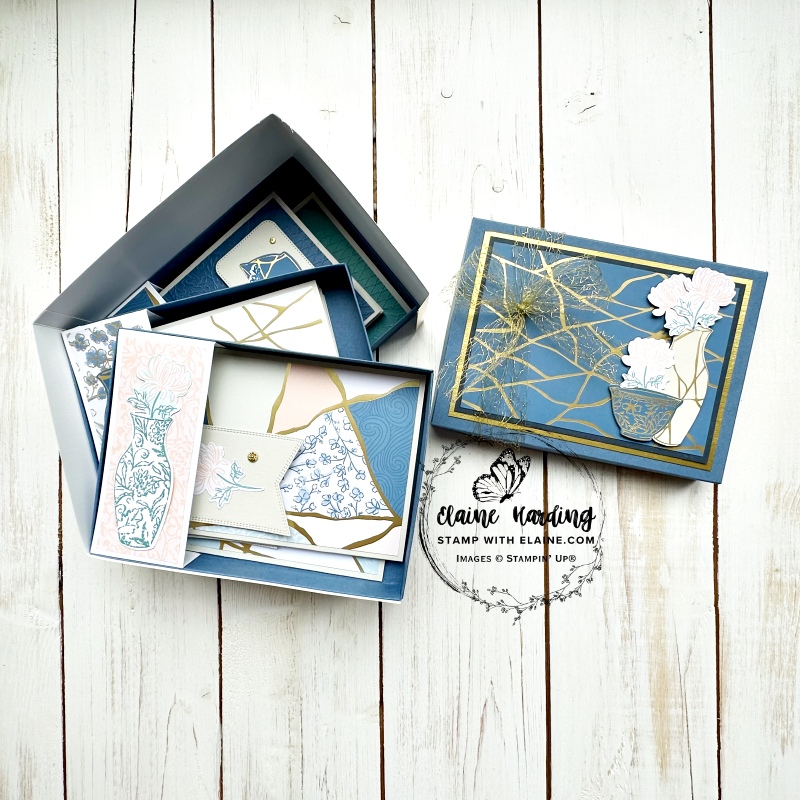
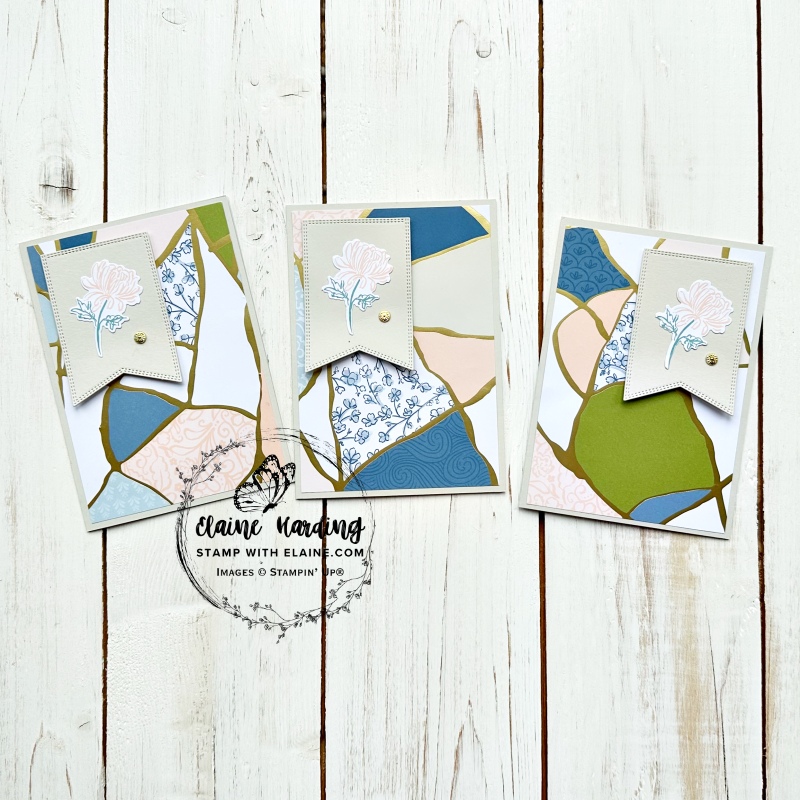
Stepper box – Kintsugi Inspiration. Today’s project is a Stepper box (tiered box) which can hold 9 greeting cards or more. It depends on how many layers and embellishments you incorporate into your card. I kept my cards really quick and simple. It’s more about how to create the box rather than the cards. This tiered box is the brainchild of my team mate, the lovely Liz Shannon from whom I purchased her Kintsugi class. I’ve made some minor adjustments on how to assemble the box and of course the card designs too.
Kintsugi is a Japanese art form which repairs broken pieces of porcelain or china and fills the cracks with gold. It’s more than just a repair technique. The philosophy behind it is to embrace the imperfections and find beauty in what has been broken and mended.
Stepper box
I have made stepper boxes in different shapes before, but never a rectangular one. The rectangular stepper box works on the same principle as the Hexagonal Stepper Box which you can see here. I created the Hexagonal Stepper Box way back in 2022! How time flies!
In order for the trays to stack on top of one another, it is adhered to a different side of the long wrap around piece of card stock which creates the side of the box. In this particular sample, this was constructed with 2 pieces of Gold Foil joined together. Each piece was cut at 12″ x 2 ¾” (30 cm x 7 cm). More on that later.
The white pieces on the left side of each tray are the tray supports. Essentially these are the “shelves” to support each tray. You can decorate this as you wish.
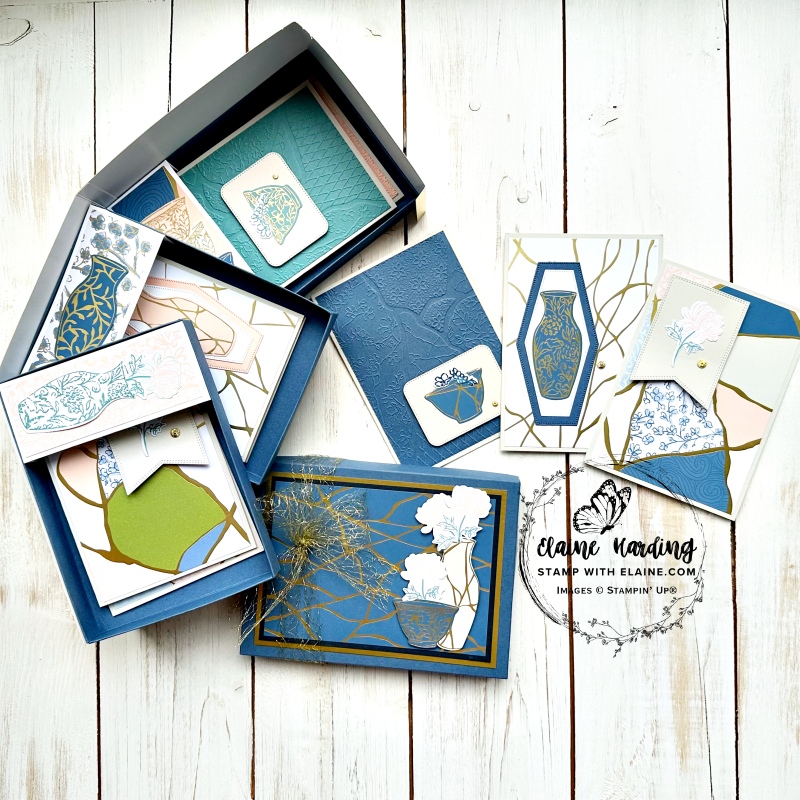
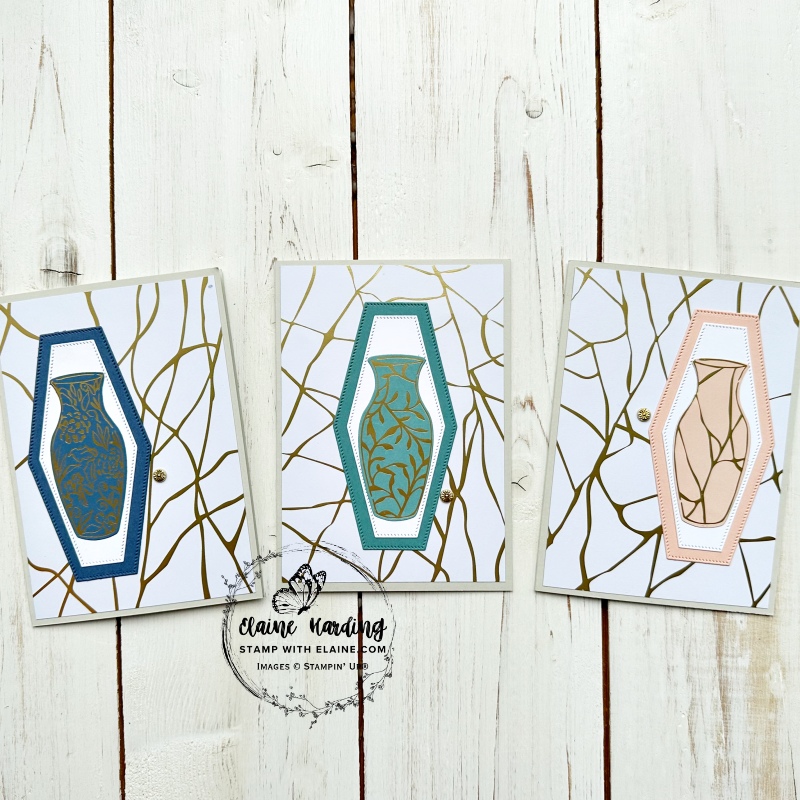
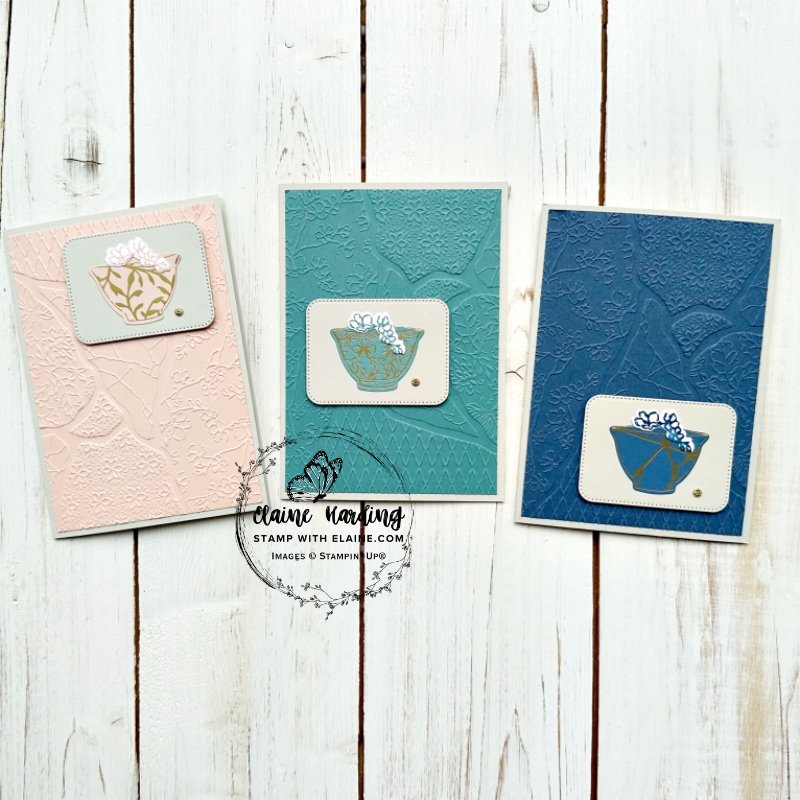
Cards : 3 each of 3 designs to go in tiers
All card bases are Basic Beige cut at 8 ¼” x 5 ¾” (21 cm x 14.5 cm) and folded in half. Each mat layer was cut at 5 ½” x 3 ⅞” (14 cm x 9.8 cm). Other materials used are the Kintsugi Inspirations 12″ x 12″ DSP, Nested Essentials Dies, Petal Pink, Lost Lagoon, Misty Moonlight and Basic White card stock, Flower Accents, and Joined Together 3D embossing folder.
Cutting guide for Stepper Box
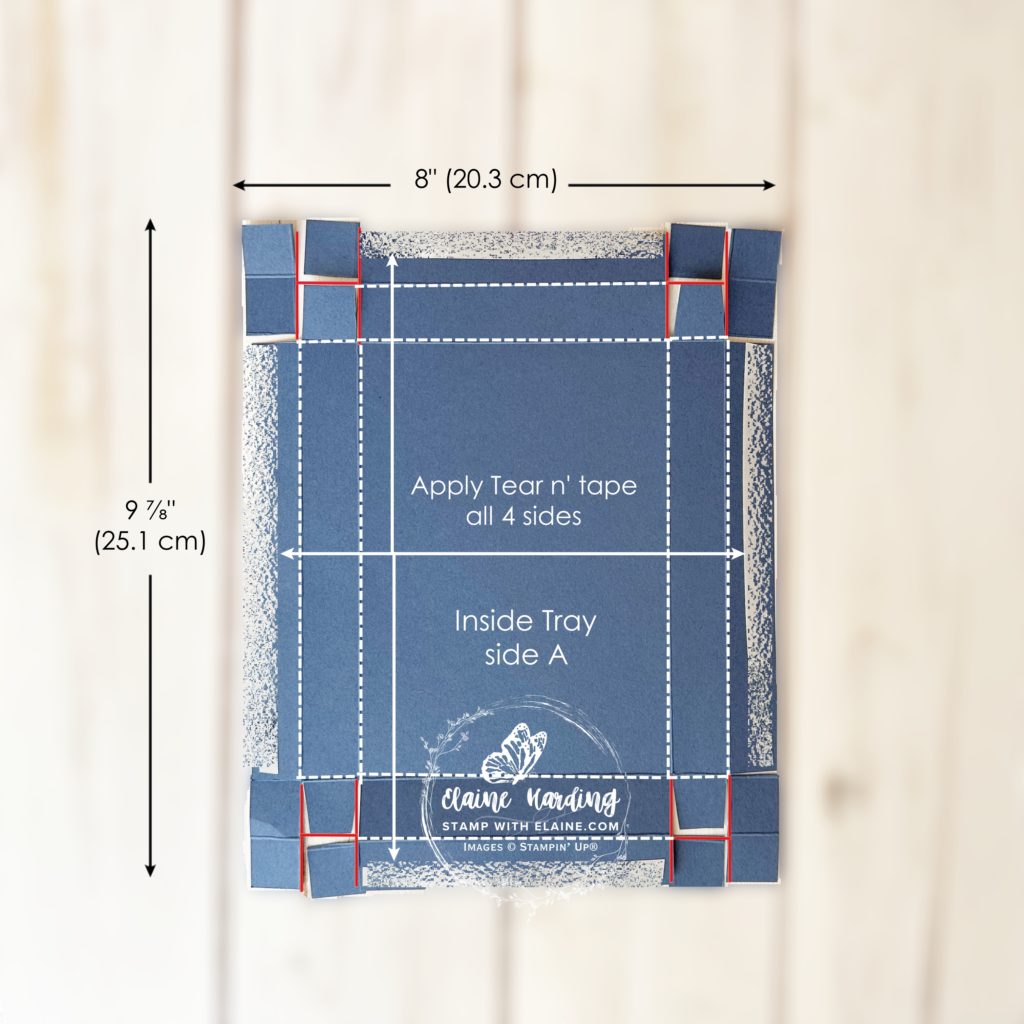
Box Tray
- Misty Moonlight card stock : cut 3 pieces 9 ⅞” x 8” (25.1 cm x 20.3 cm).
- Long side score at ¾”, 1 ⅝”, 8 ¼”, and 9 ⅛” (1.9 cm, 4.1 cm, 21 cm, and 23.2 cm).
- Rotate card stock quarter turn to short side and score at ¾”, 1 ⅝”, 6 ⅜ “ and 7 ¼” (1.9 cm, 4.1 cm, 16.2 cm, and 18.4 cm).
- Refer to picture on the left. Orient card stock on short side and cut on the solid red lines.
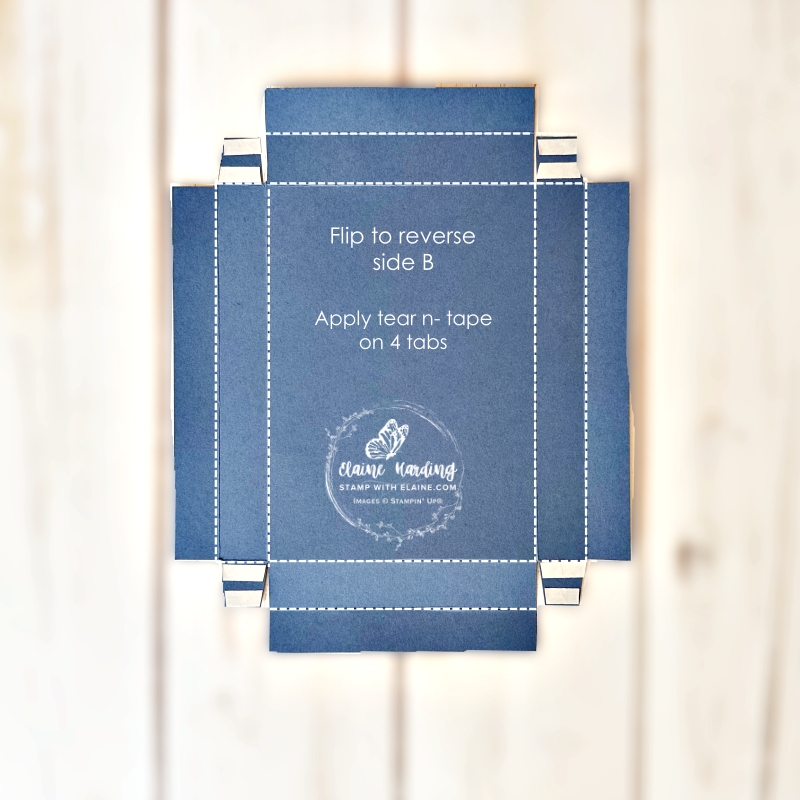
- Apply adhesive on all 4 sides inside the Tray (side A).
- Flip over and apply adhesive on the 4 tabs (side B). Remove backing tape on tabs and assemble box.
- Remove backing tape on the long and short sides and fold over to adhere to box sides for added strength.
Box lid
- Lid : Misty Moonlight card stock cut 1 piece 8 ⅝” x 6 ¾” (21.9 cm x 17.1 cm). Score all 4 sides at ⅞”(2.2 cm).
- Mat layer #1 for top : Gold Foil cut at 6 ¼” x 4 ½” (15.9 cm x 11.4 cm). Place in trimmer and gut inside by cutting ½”(1.3 cm) frame.
- Gutting frame : align short side’s right edge at ½” (1.3 cm) to right of cutting groove and cut from ½” down to 5 ¾”. Align short side’s left edge at ½” to left of cutting groove and cut from ½” (1.3 cm) down to 5 ¾” (14.5 cm).
- Next rotate gold foil on long side – align right edge ½” (1.3 cm) to right of cutting groove and cut between two cut lines. Repeat for left edge. Remove inside and reserve for another project.
- Second Mat Layer : Secret Sea cut 1 piece 6″ x 4 ¼” (15.2 cm x 10.8 cm)
- Third Mat Layer : Kintsugi DSP cut 1 piece 5 ¾” x 4″ (14.5 cm x 10.2 cm)
- Die cut or fussy cut elements from DSP to decorate lid of box.
- Add Gold Open Weave Trim and tie bow to left side of box as pictured. Use tear n’ tape on box lid sides to ensure a snug fit. It will be covered up by lid lining.
- Lid Lining : cut Misty Moonlight 6 ⅜” x 6 ⅞” (16.2 cm x 17.5 cm). Short side score each side at ¾” (1.9 cm). Adhere to inside lid to hide ribbon.
Tray support – 3 pieces
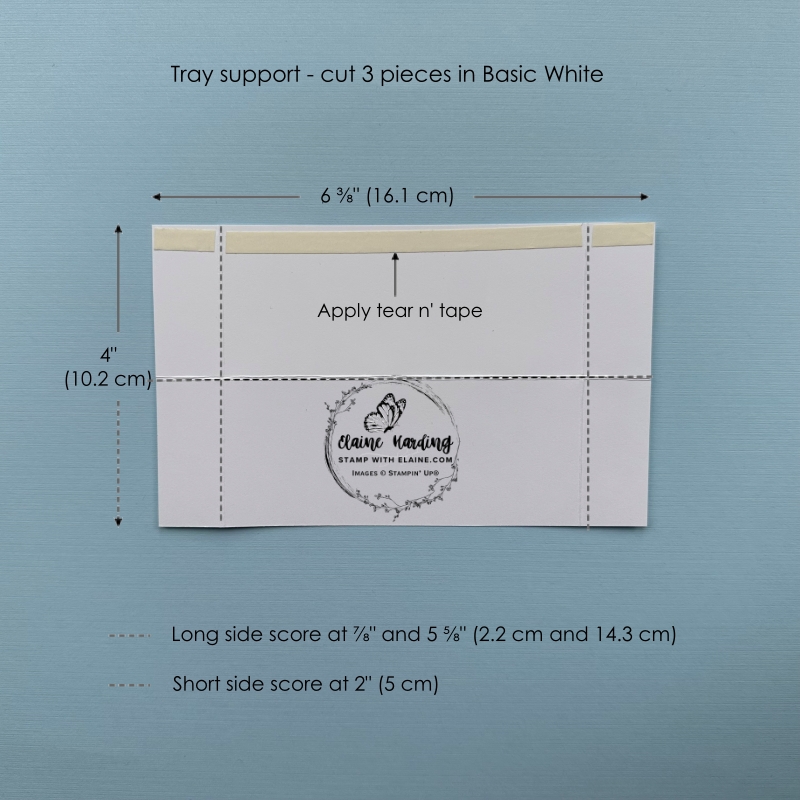
- Basic White : 6 ⅜ ” x 4″ (16.8 cm x 10.2 cm)
- Long side score at ⅞” and 5 ⅝” (2.2 cm and 14.3 cm)
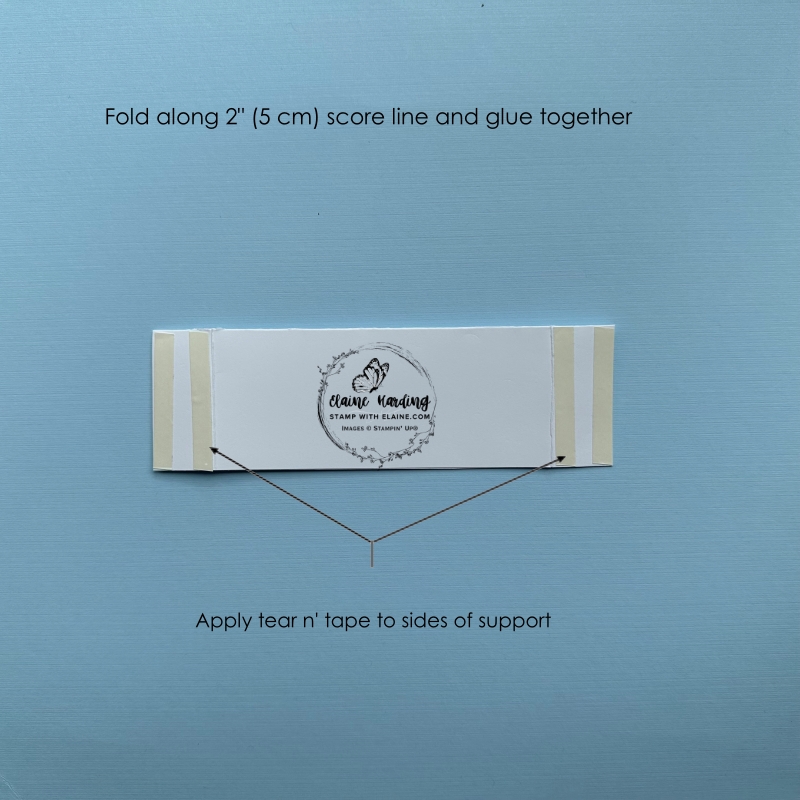
- Short side score at 2″ (5 cm).
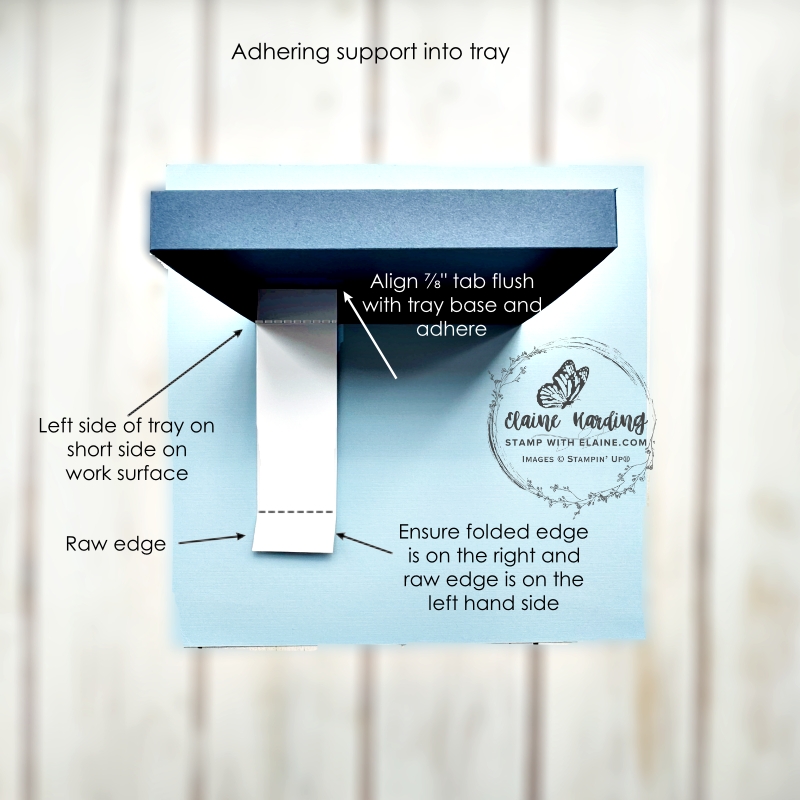
- Ensure folded side is on the right and raw edge on left. Remove backing tape and align with bottom of tray and adhere as pictured below.
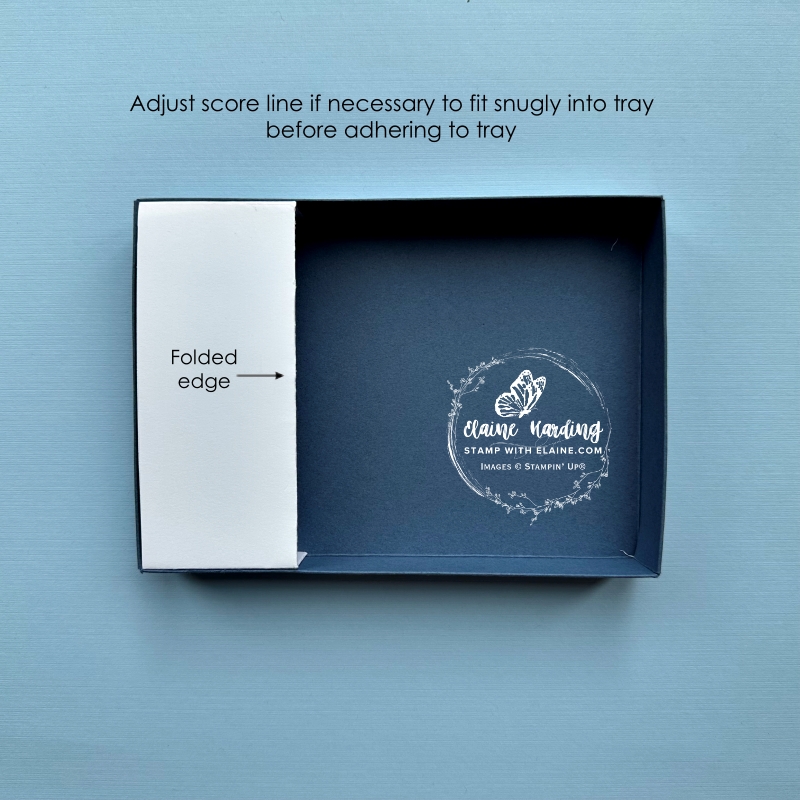
- You may need to make slight adjustment to the scored line before adhering other side to inside of tray.
Tray Support decoration
- Cut 1 each of 3 different DSP patterns at 1 ¾” x 4 ½” (4.4 cm x 11.4 cm) to adhere to each of the stepper tray supports.
- Die cut or fussy cut bowls, vases, floral element from DSP to decorate each tray support as pictured in the completed project at beginning of post.
Stepper Box Side
Do not use wet adhesive near foil – always use tear n’ tape or stamp n’ seal. Wet adhesive can smudge and leave marks on the gold foil which is difficult to remove.
- Gold Foil – cut 2 pieces 12″ x 2 ¾” (30.5 cm x 7 cm)
- Score long side at 6 ⅝” and 11 ⅝”.
- Join both pieces together on the narrow tab. Burnish well.
How to attach trays to gold foil strip
Tip – use simply scoring tool to ensure sides are square and straight especially when you’re adhering the first bottom tray. Take your time to ensure that the first tray is accurately positioned and straight otherwise it will put all the rest of the trays out of kilter.
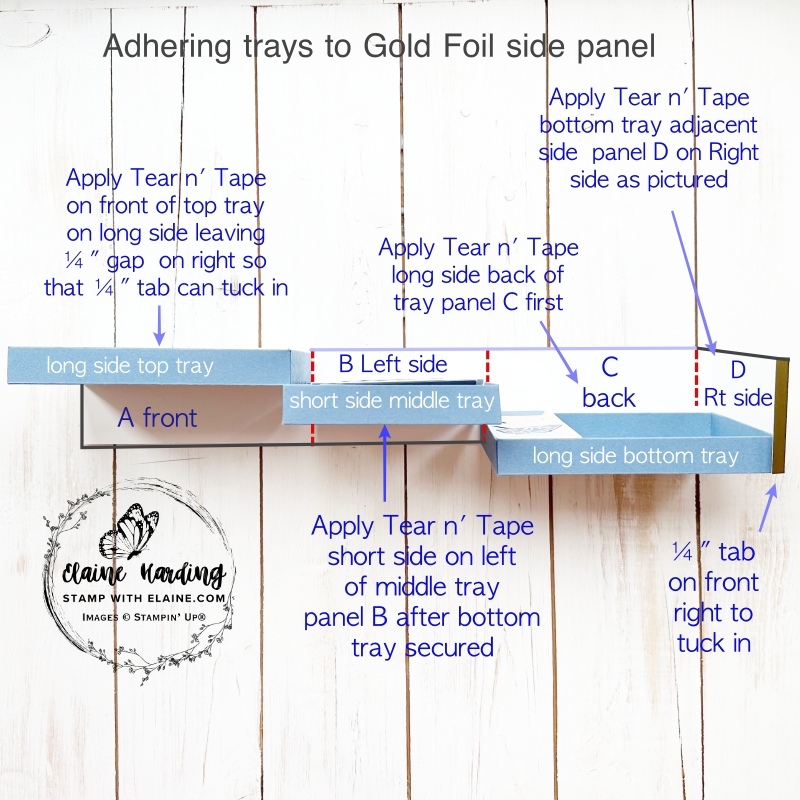
- Apply tear n’ tape to the long side at the back of the tray with the adjacent short side on the right of bottom tray. Remove backing and adhere to panel C first, then remove backing tape on side and adhere to panel D as pictured. The ¼” gold foil at the front should be free and wrap round front of tray.
- Middle tray – apply tear n’ tape on the short side (next to the support piece). Remove backing tape, stack on top of bottom tray and wrap gold foil round it to adhere to gold foil.
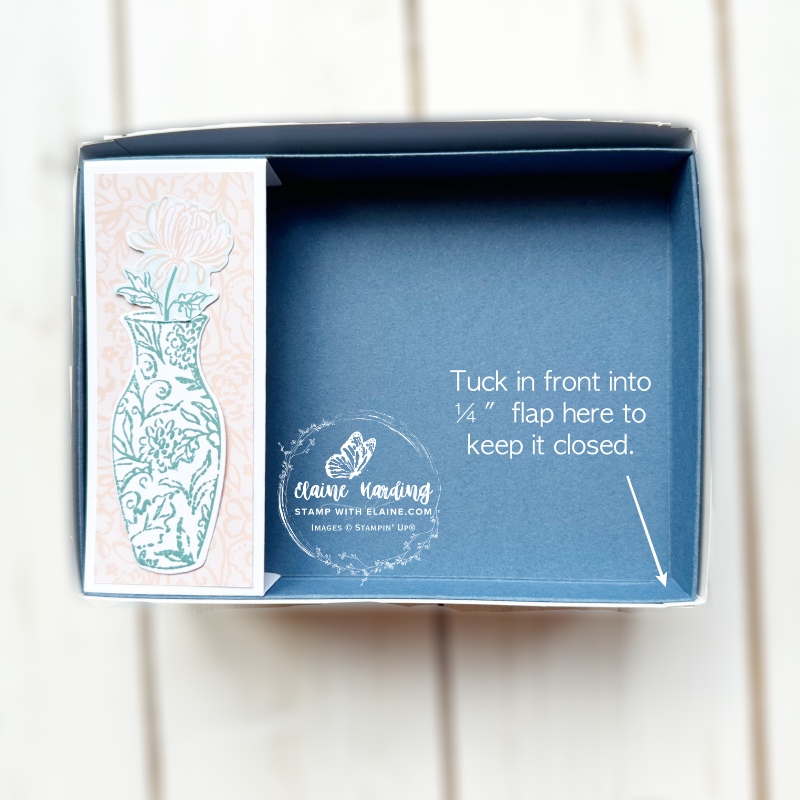
- Top tray – apply tear’ n tape to the front of the tray leaving a ¼” gap on the right so that the ¼” gold foil panel can tuck into the front when closed. Remove backing tape and wrap remaining gold foil panel A to front of box.
Supply list
Listed below is the supply list. Just click on the picture to take you directly to the item in my online store.
Product List![Kintsugi Inspirations Suite Collection (English) [ 165172 ]](https://assets1.tamsnetwork.com/images/EC042017NF/165172s.jpg "Kintsugi Inspirations Suite Collection (English) [ 165172 ]")
![Inspiring Imperfections Bundle (English) [ 165167 ]](https://assets1.tamsnetwork.com/images/EC042017NF/165167s.jpg "Inspiring Imperfections Bundle (English) [ 165167 ]")
![Kintsugi Inspirations 12" X 12" (30.5 X 30.5 Cm) Specialty Designer Series Paper [ 165159 ]](https://assets1.tamsnetwork.com/images/EC042017NF/165159s.jpg "Kintsugi Inspirations 12\" X 12\" (30.5 X 30.5 Cm) Specialty Designer Series Paper [ 165159 ]")
![Joined Together 3 D Embossing Folder [ 165170 ]](https://assets1.tamsnetwork.com/images/EC042017NF/165170s.jpg "Joined Together 3 D Embossing Folder [ 165170 ]")
![Flower Accents [ 165171 ]](https://assets1.tamsnetwork.com/images/EC042017NF/165171s.jpg "Flower Accents [ 165171 ]")
![Gold 1 1/2" (3.8 Cm) Open Weave Trim [ 165715 ]](https://assets1.tamsnetwork.com/images/EC042017NF/165715s.jpg "Gold 1 1/2\" (3.8 Cm) Open Weave Trim [ 165715 ]")
![Nested Essentials Dies [ 161597 ]](https://assets1.tamsnetwork.com/images/EC042017NF/161597s.jpg "Nested Essentials Dies [ 161597 ]")
![Adhesive Sheets [ 152334 ]](https://assets1.tamsnetwork.com/images/EC042017NF/152334s.jpg "Adhesive Sheets [ 152334 ]")
![Gold Foil Sheets [ 132622 ]](https://assets1.tamsnetwork.com/images/EC042017NF/132622s.jpg "Gold Foil Sheets [ 132622 ]")
![Basic Beige A4 Cardstock [ 164512 ]](https://assets1.tamsnetwork.com/images/EC042017NF/164512s.jpg "Basic Beige A4 Cardstock [ 164512 ]")
![Basic White A4 Cardstock [ 166781 ]](https://assets1.tamsnetwork.com/images/EC042017NF/166781s.jpg "Basic White A4 Cardstock [ 166781 ]")
![Lost Lagoon A4 Cardstock [ 133686 ]](https://assets1.tamsnetwork.com/images/EC042017NF/133686s.jpg "Lost Lagoon A4 Cardstock [ 133686 ]")
![Misty Moonlight A4 Cardstock [ 153086 ]](https://assets1.tamsnetwork.com/images/EC042017NF/153086s.jpg "Misty Moonlight A4 Cardstock [ 153086 ]")
![Petal Pink A4 Cardstock [ 147009 ]](https://assets1.tamsnetwork.com/images/EC042017NF/147009s.jpg "Petal Pink A4 Cardstock [ 147009 ]")
![Secret Sea A4 Cardstock [ 165296 ]](https://assets1.tamsnetwork.com/images/EC042017NF/165296s.jpg "Secret Sea A4 Cardstock [ 165296 ]")
![Lost Lagoon Classic Stampin' Pad [ 161678 ]](https://assets1.tamsnetwork.com/images/EC042017NF/161678s.jpg "Lost Lagoon Classic Stampin' Pad [ 161678 ]")
![Misty Moonlight Classic Stampin' Pad [ 153118 ]](https://assets1.tamsnetwork.com/images/EC042017NF/153118s.jpg "Misty Moonlight Classic Stampin' Pad [ 153118 ]")
![Petal Pink Classic Stampin' Pad [ 147108 ]](https://assets1.tamsnetwork.com/images/EC042017NF/147108s.jpg "Petal Pink Classic Stampin' Pad [ 147108 ]")

- SHOP ONLINE – EARN 10% REWARDS ON ALL PURCHASES OVER £20
- PURCHASE A STARTER KIT : Get £155 worth of products for only £99. Choose from current catalogues and any specials available. Free Shipping. Read more
- Subscribe to my Video Tutorials – click here