
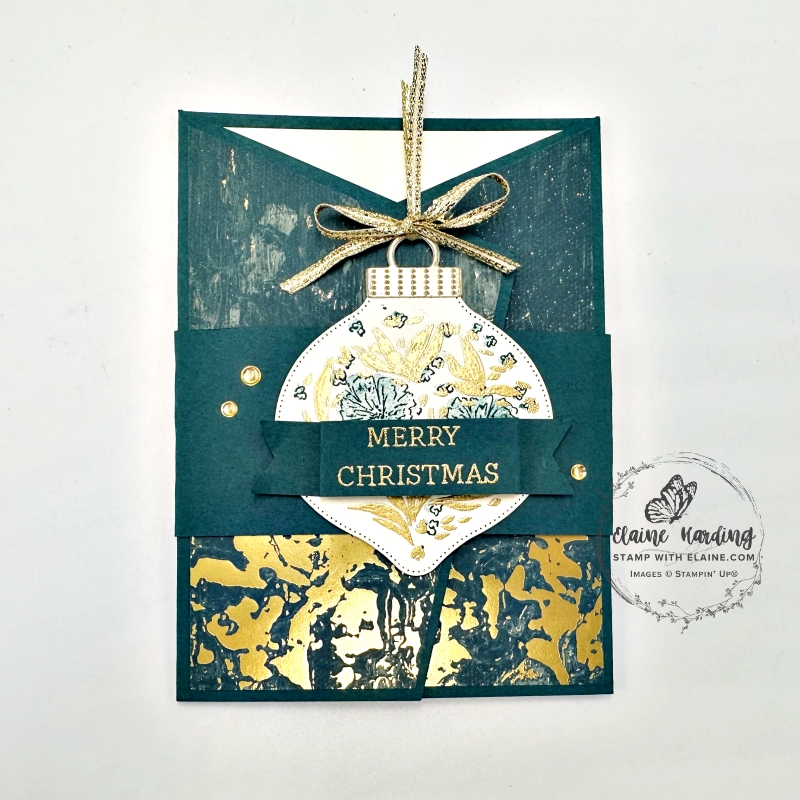
Angled Gatefold – Bauble Blooms. Bauble Blooms is another online exclusive introduced in July. The stamp set has an elegant floral design to make your own Christmas ornament. There are dies to cut out the different elements for the bauble too and can be purchased as a bundle to save 10%.
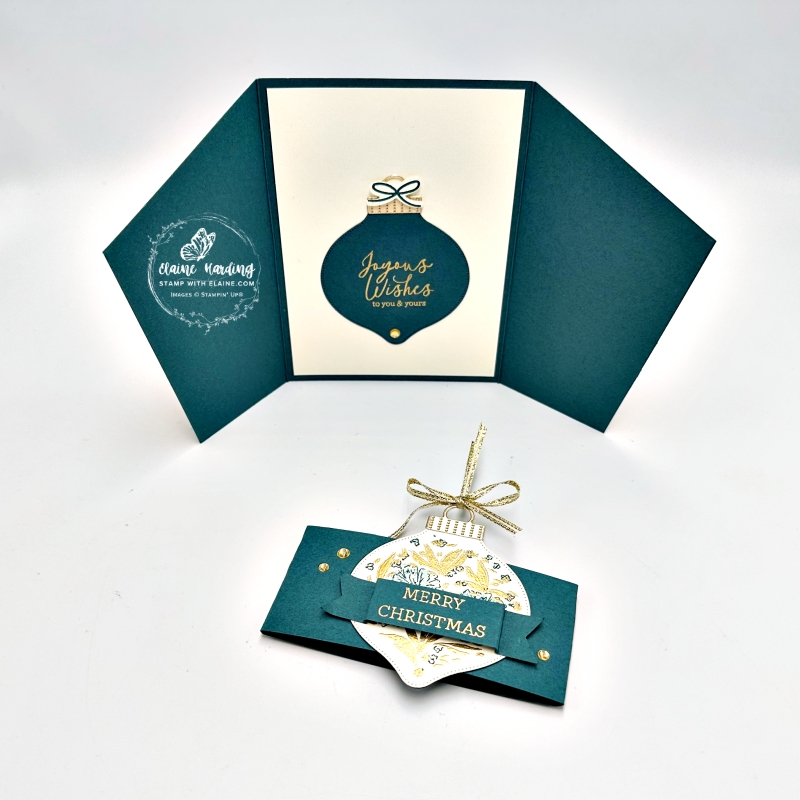
The angled gatefold card overlaps, unlike a traditional gatefold which meets in the middle. I created a belly band to keep the card closed and adorned it with the stamped bauble, and also die cut another for inside the card too.
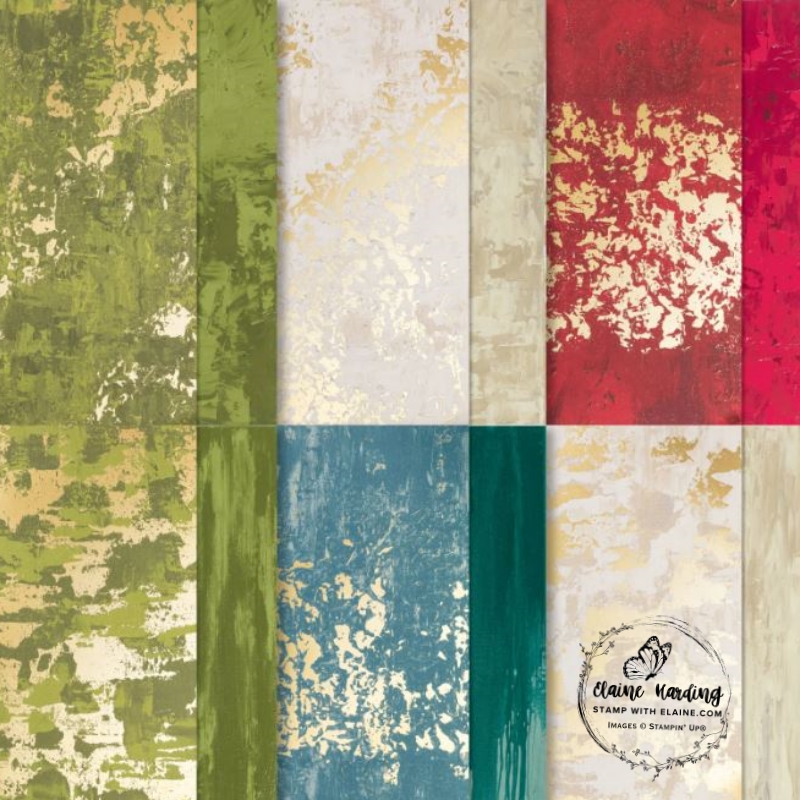
Season of Elegance Specialty Designer Series Paper
Imagine my surprise when I found these gorgeous papers are still available. To find it, click on Menu> Shop Products>Paper Packaging>Specialty Paper. I think these papers really compliment the new online exclusive Bauble Blooms really well!
Angled Gatefold template
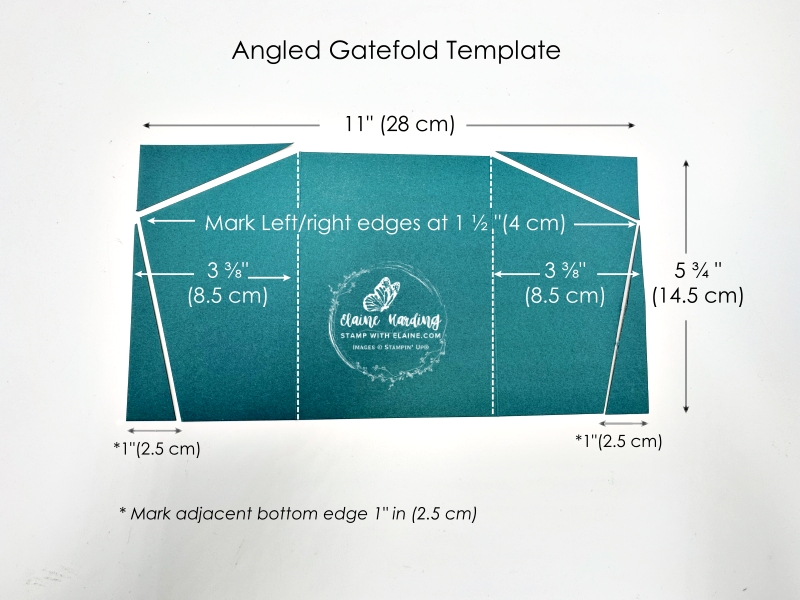
- Pretty Peacock card base : 5 ¾” x 11″ (14.5 cm x 28 cm). On the long side score each end at 3 ⅜” (8.5 cm)
- On the short side mark the top and bottom edge at 1 ½” (4 cm).
- Orient card stock so that the long adjacent side is at the top and mark 1″ in on both sides.
- Align score line in cutting groove on trimmer with the 1 ½” (4 cm) mark and cut. Repeat for other side.
- Next align 1 ½” (4 cm) in cutting groove with the 1″ mark on long side and cut as pictured in diagram and repeat for other side.
Bauble, Belly Band and Label
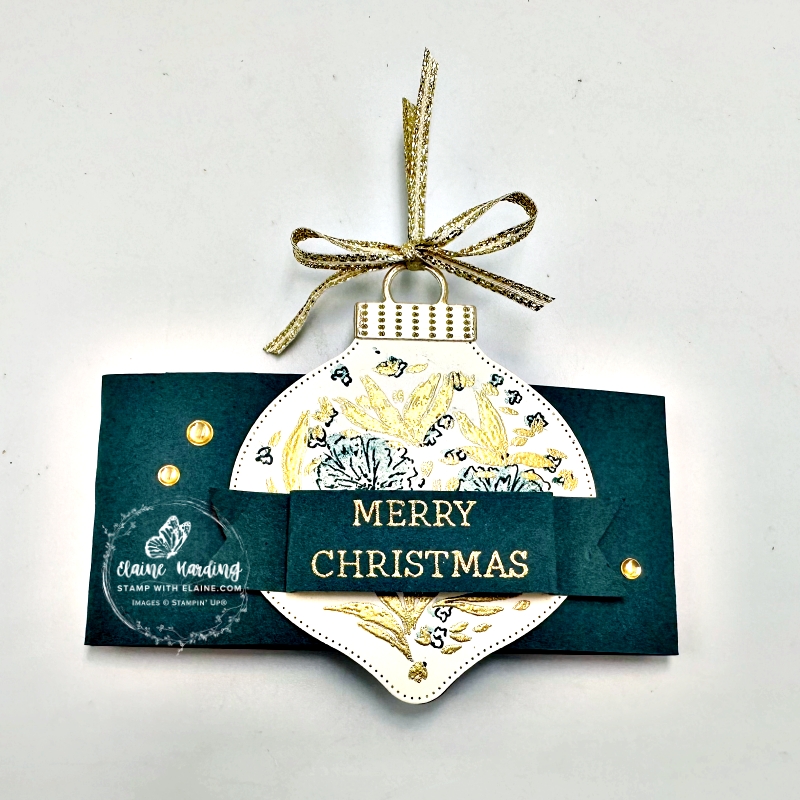

Bauble
- On a scrap of Very Vanilla card stock, stamp the leaves with Versamark and sprinkle Metallics Wow! embossing powder (gold) over it and heat set it.
- Align the outline stamp and stamp first generation Pretty Peacock ink.
- Next, stamp 2nd generation Pretty Peacock ink with the solid stamp, to fill in the flowers as pictured.
- Die cut stamped bauble. Also die cut 1 in Pretty Peacock and adhere to back of stamped bauble to strengthen it.
- Gold foil – die cut 2 caps for the ornaments and adhere one to the Very Vanilla ornament, and the other to the back of the Pretty Peacock ornament as pictured.
Belly Band
- Cut a strip of Pretty Peacock 2″ x 11″ length (5 cm x 28 cm). Wrap around card and adhere ends together. Ensure that the band isn’t too tight so that it will still slide on and off easily.
- Adhere Very Vanilla stamped ornament in the centre of belly band as pictured.
Label
- Cut a strip of Pretty Peacock ¾” x 3 ½” (2 cm x 9 cm).
- Stamp “Merry Christmas” in Versamark ink and gold emboss
- Score on either side of the greeting and score a second score line ⅛” to left, and repeat ⅛” to the right of the greeting to create a banner effect.
- Cut flag ends as pictured, and apply dimensionals on the back to adhere to bauble on the lower half so that you can see a bit of the floral elements.
- Apply gold low profile dots on belly band.
- Thread Gold & Silver ⅛” (3.2 mm) ribbon through cap and tie bow as shown.
Inside card
- Cut Very Vanilla 4″ x 5 ½” (10 cm x 14 cm) and adhere to inside of card.
- On scrap of Pretty Peacock, stamp “Joyous Wishes to you and yours” in Versamark and gold emboss.
- Centre ornament die over greeting and die cut.
- On scrap of Very Vanilla, stamp the bow and die cut.
- Die cut cap in Gold Foil and adhere to top of Pretty Peacock ornament.
- Apply adhesive to Pretty Peacock ornament and adhere to inside or card. Ensure it is not visible when card is closed.
- Adhere die cut bow with dimensionals in the cap hole as pictured.
- Attach a low profile dot to bottom tip of ornament to complete card.
Supply list
Listed below is the supply list. Just click on the picture to take you directly to the item in my online store.
Product List![Bauble Blooms Bundle (English) [ 166096 ]](https://assets1.tamsnetwork.com/images/EC042017NF/166096s.jpg "Bauble Blooms Bundle (English) [ 166096 ]")
![Gold & Silver 1/8" (3.2 Mm) Trim Combo Pack [ 161633 ]](https://assets1.tamsnetwork.com/images/EC042017NF/161633s.jpg "Gold & Silver 1/8\" (3.2 Mm) Trim Combo Pack [ 161633 ]")
![Low Profile Dots [ 164658 ]](https://assets1.tamsnetwork.com/images/EC042017NF/164658s.jpg "Low Profile Dots [ 164658 ]")
![Gold Foil Sheets [ 132622 ]](https://assets1.tamsnetwork.com/images/EC042017NF/132622s.jpg "Gold Foil Sheets [ 132622 ]")
![Pretty Peacock A4 Cardstock [ 150886 ]](https://assets1.tamsnetwork.com/images/EC042017NF/150886s.jpg "Pretty Peacock A4 Cardstock [ 150886 ]")
![Very Vanilla A4 Cardstock [ 166785 ]](https://assets1.tamsnetwork.com/images/EC042017NF/166785s.jpg "Very Vanilla A4 Cardstock [ 166785 ]")
![Pretty Peacock Classic Stampin’ Pad [ 150083 ]](https://assets1.tamsnetwork.com/images/EC042017NF/150083s.jpg "Pretty Peacock Classic Stampin’ Pad [ 150083 ]")
![Versamark Pad [ 102283 ]](https://assets1.tamsnetwork.com/images/EC042017NF/102283s.jpg "Versamark Pad [ 102283 ]")
![Metallics Wow! Embossing Powder [ 165678 ]](https://assets1.tamsnetwork.com/images/EC042017NF/165678s.jpg "Metallics Wow! Embossing Powder [ 165678 ]")
![Embossing Additions Tool Kit [ 159971 ]](https://assets1.tamsnetwork.com/images/EC042017NF/159971s.jpg "Embossing Additions Tool Kit [ 159971 ]")
![Heat Tool - Uk Plug [ 129054 ]](https://assets1.tamsnetwork.com/images/EC042017NF/129054s.jpg "Heat Tool - Uk Plug [ 129054 ]")
![Paper Trimmer [ 152392 ]](https://assets1.tamsnetwork.com/images/EC042017NF/152392s.jpg "Paper Trimmer [ 152392 ]")

- SHOP ONLINE – EARN 10% REWARDS ON ALL PURCHASES OVER £20
- PURCHASE A STARTER KIT : Get £155 worth of products for only £99. Choose from current catalogues and any specials available. Free Shipping. Read more
- Subscribe to my Video Tutorials – click here