
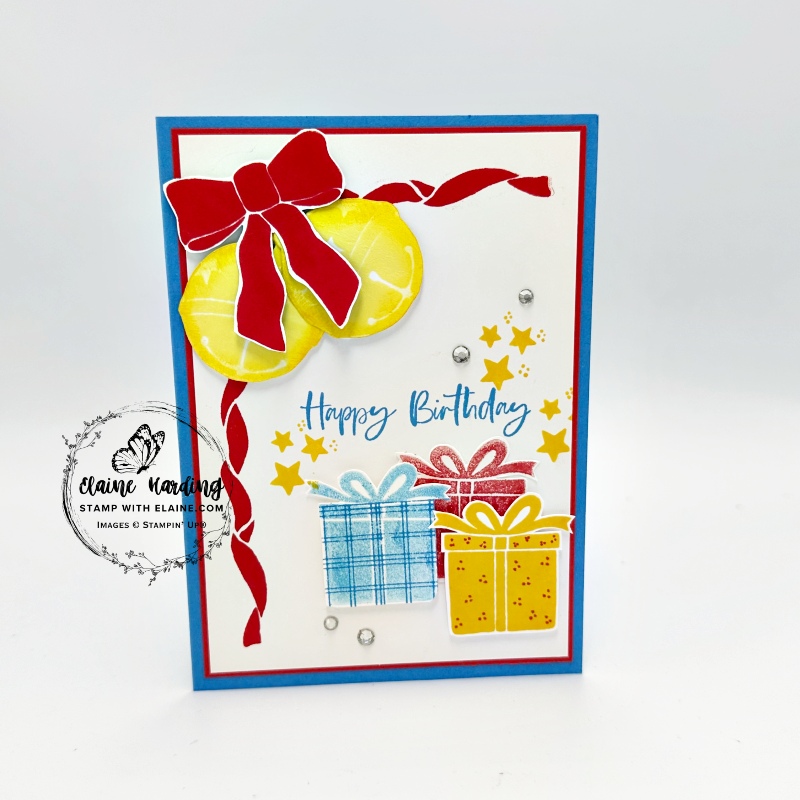
Birthday card – Party Celebrations. This newly released online exclusive is a stand alone photopolymer stamp set. It is so versatile because it has images suitable for Halloween, Christmas, autumn and more. I used the stamps to create a birthday card. The stamp set has images only, so you can raid your stash to add a sentiment of your choosing. My birthday greeting came from the Charming Day stamp set which have dies to match and comes from the Floral Charm Suite Collection, another online exclusive released this July.
Cutting guide
- Card base : Azure Afternoon cut 5 ¾” x 8 ¼” (14.5 cm x 21 cm). Long side score at 4 ⅛” (10.5 cm).
- Mat layer #1 Real Red : cut 2 pieces 5 ½” x 3 ⅞” (14 cm x 9.8 cm)
- Basic White mat layer #2 : cut 2 pieces 5 ¼” x 3 ⅝” (13.3 cm x 13.7 cm)
- Strip of Real Red ⅛” x 3 ⅝” (0.5 cm x 13.7 cm)
- Scrap of Basic White for stamping bells, presents and bow.
Stamping presents
You can simply stamp the presents in different blocks of colour, but I chose to add a pattern to mine. If you wish to go that extra mile, here’s how I created mine.
- Stamp the gift/present 2nd generation Azure Afternoon ink. Mask each section and stamp with plaid stamp in 1st generation Azure Afternoon. Fussy cut and set aside.
- Switch ink pads to Daffodil Delight. Stamp 2nd generation Daffodil Delight. Use bullet end of Poppy Parade Stampin’ Write Marker and create a pattern with a trio of dots over each section. Fussy cut and set aside.
Pair of bells
- Stamp 2 bells first generation in Daffodil Delight.
- Fussy cut both and set aside.
Bow
- Stamp bow in Poppy Parade.
- Fussy cut and set aside.
Assembling the card
Card front
- Adhere Real Red mat layer to front of Azure Afternoon card base.
- Stamp the tail of the bow on Basic White layer as pictured.
- Stagger bells in top left corner and adhere with dimensionals.
- Arrange fussy cut bow on top as pictured in top left corner.
- Stamp gift/present in bottom right corner allowing sufficient room to adhere the other two gifts/presents as pictured.
- Next stamp “Happy birthday” in Azure Afternoon and stamp a cluster of stars in Daffodil Delight as pictured and add Basic Rhinestone gems to finish.
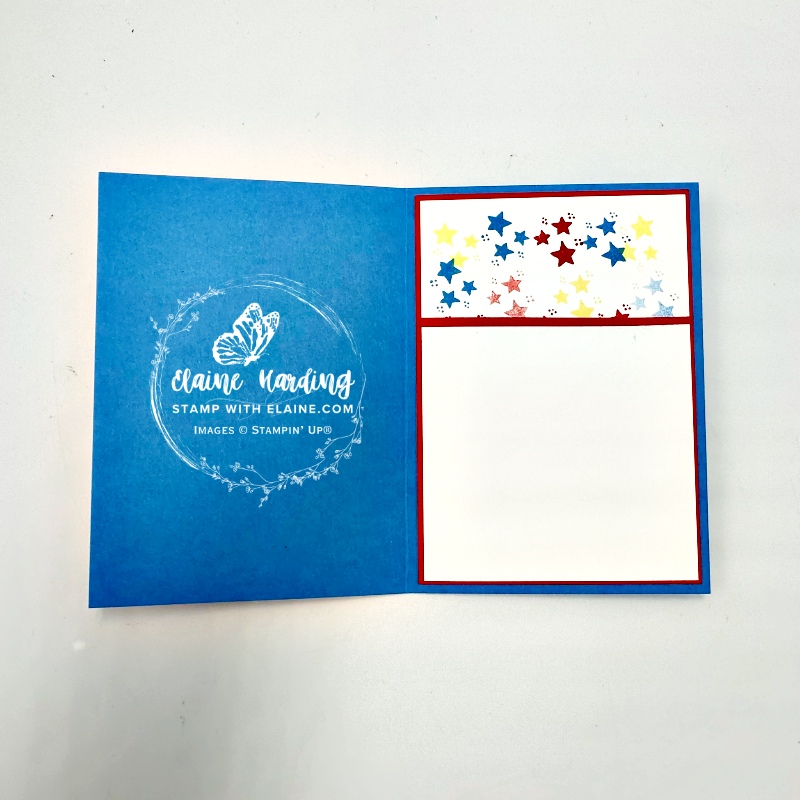
Inside card
- Adhere the remaining Real Red mat layer to inside of card leaving even border on all 4 sides.
- Stamp star clusters in Daffodil Delight, Azure Afternoon and Poppy Parade as pictured.
- Apply adhesive to Real Red ⅛” x 3 ⅝” (0.5 cm x 13.7 cm) strip and adhere as pictured.
- Adhere Basic White piece on top of Real Red mat layer to complete card.
Supply list
Listed below is the supply list. Just click on the picture to take you directly to the item in my online store.
Product List![Party Celebrations Photopolymer Stamp Set [ 166174 ]](https://assets1.tamsnetwork.com/images/EC042017NF/166174s.jpg "Party Celebrations Photopolymer Stamp Set [ 166174 ]")
![Charming Day Bundle (English) [ 166136 ]](https://assets1.tamsnetwork.com/images/EC042017NF/166136s.jpg "Charming Day Bundle (English) [ 166136 ]")
![Charming Day Cling Stamp Set (English) [ 166126 ]](https://assets1.tamsnetwork.com/images/EC042017NF/166126s.jpg "Charming Day Cling Stamp Set (English) [ 166126 ]")
![Charming Day Dies [ 166135 ]](https://assets1.tamsnetwork.com/images/EC042017NF/166135s.jpg "Charming Day Dies [ 166135 ]")
![Azure Afternoon A4 Cardstock [ 161728 ]](https://assets1.tamsnetwork.com/images/EC042017NF/161728s.jpg "Azure Afternoon A4 Cardstock [ 161728 ]")
![Basic White A4 Cardstock [ 166781 ]](https://assets1.tamsnetwork.com/images/EC042017NF/166781s.jpg "Basic White A4 Cardstock [ 166781 ]")
![Poppy Parade A4 Cardstock [ 121694 ]](https://assets1.tamsnetwork.com/images/EC042017NF/121694s.jpg "Poppy Parade A4 Cardstock [ 121694 ]")
![Azure Afternoon Classic Stampin' Pad [ 161663 ]](https://assets1.tamsnetwork.com/images/EC042017NF/161663s.jpg "Azure Afternoon Classic Stampin' Pad [ 161663 ]")
![Daffodil Delight Classic Stampin' Pad [ 147094 ]](https://assets1.tamsnetwork.com/images/EC042017NF/147094s.jpg "Daffodil Delight Classic Stampin' Pad [ 147094 ]")
![Poppy Parade Classic Stampin' Pad [ 147050 ]](https://assets1.tamsnetwork.com/images/EC042017NF/147050s.jpg "Poppy Parade Classic Stampin' Pad [ 147050 ]")
![Rhinestone Basic Jewels [ 144220 ]](https://assets1.tamsnetwork.com/images/EC042017NF/144220s.jpg "Rhinestone Basic Jewels [ 144220 ]")

- SHOP ONLINE – EARN 10% REWARDS ON ALL PURCHASES OVER £20
- PURCHASE A STARTER KIT : Get £155 worth of products for only £99. Choose from current catalogues and any specials available. Free Shipping. Read more
- Subscribe to my Video Tutorials – click here