
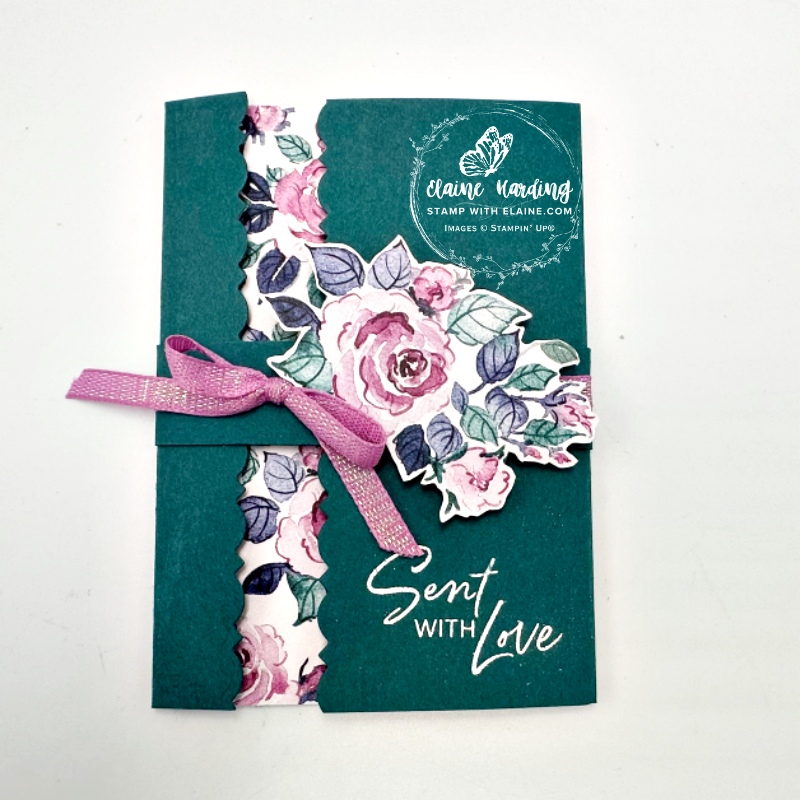
Gatefold card – Fancy borders. Today’s project features an off centre gatefold card using an online exclusive released in March 25 called Fancy Borders. It has been added to the Last Chance list and when purchased separately there is as much as 50% off the original retail price. No discount is reflected on the bundle so be aware!
By using the border dies, you can shorten the gatefold panels to reveal pretty paper inside the card. To keep the card closed, I used a belly band.

Cutting guide
- Gatefold base : Pretty Peacock cut at 5 ¾” x 8″ (14.5 cm x 20 cm)
- Long side score at 1″ and 5″ (2.5 cm and 12.5 cm)
- Align border die right along the edge on each side – secure with non-stick tape to ensure die doesn’t move.
- Basic White inside card : tad under 4″ x 5 ¾” (tad under 10 cm and 14.5 cm)
- DSP strip 1 ¾” x 5 ¾” (4.5 cm x 14.5 cm)
- Belly Band 1″ x A4 length (2.5 cm x A4 length)
How to make card
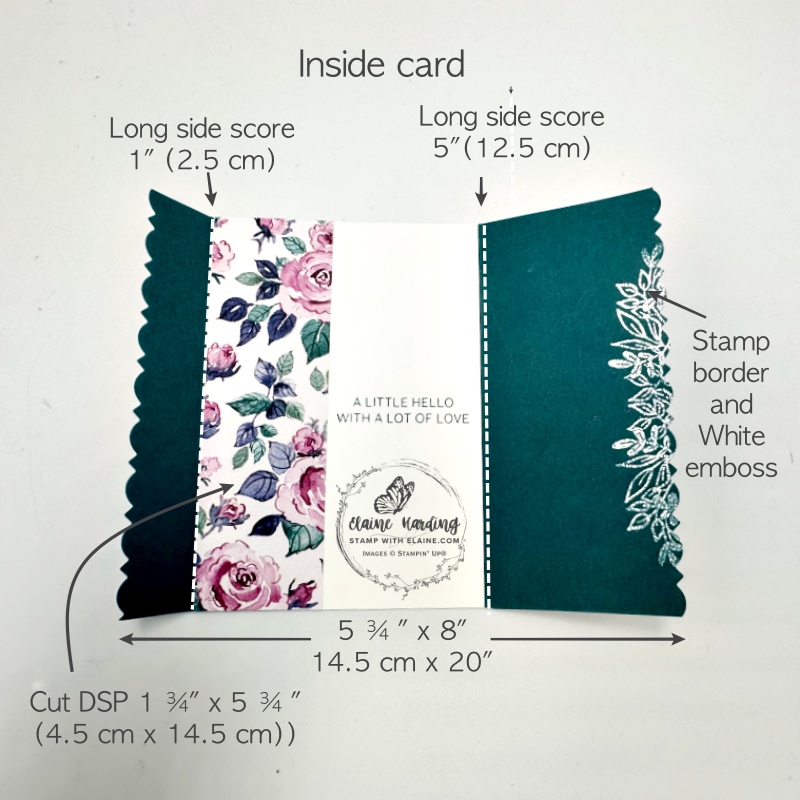
- Card base : long side on top score at 1″ and 5″ (2.5 cm and 12.5 cm). Burnish score lines.
- Align border die at each end and secure it with non tack tape to prevent it from moving before running it through die cutting machine.
- Use Versamark ink to stamp larger panel with border stamp and white emboss.
- Adhere Basic White piece to centre panel as pictured and then adhere DSP piece on the left as pictured.
- Use Pretty Peacock ink to stamp sentiment as pictured.
Making the belly band
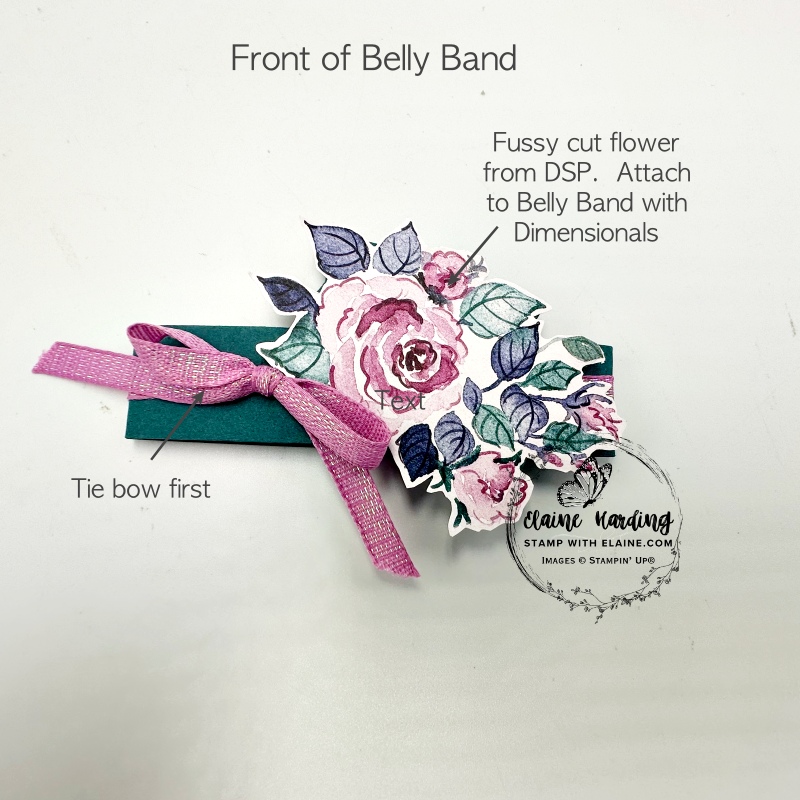
- Wrap belly band round card with room for it to slip on and off easily and secure with tear and tape.
- Attach ribbon with a bit of tear n’ tape on the back and tie bow toward the left as pictured.
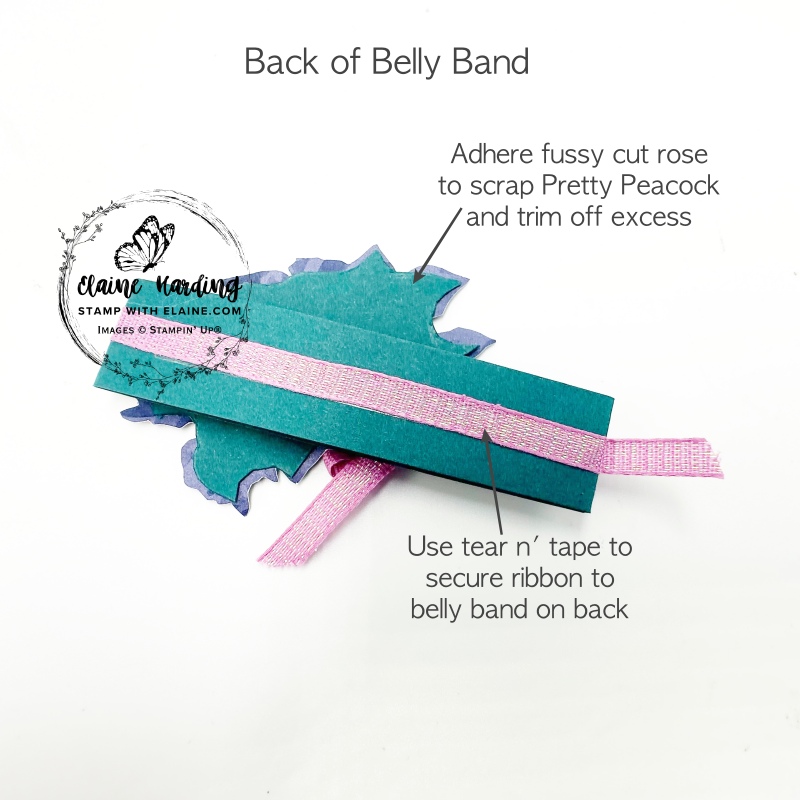
- Fussy cut one of the flower clusters from DSP and adhere to a scrap of Pretty Peacock card stock for added strength. Avoid applying adhesive right to the edges so that you can insert your scissors behind the contour of the fussy cut flower to trim off excess Pretty Peacock card stock. (picture on right)
Front of card wider panel
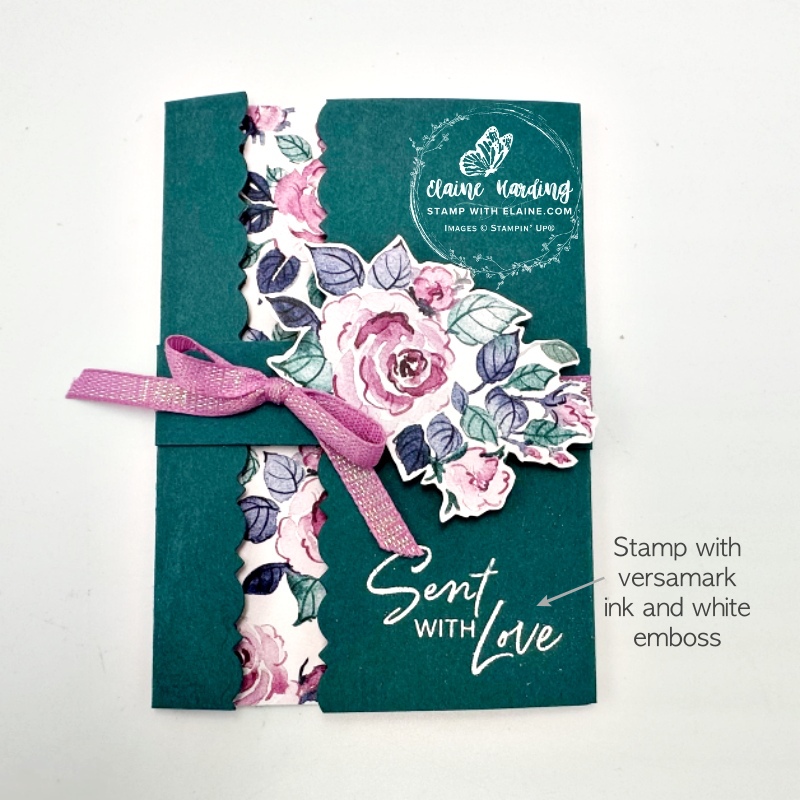
- Stamp front of card on the wider panel side toward the bottom with Versamark Ink.
- Sprinkle with Wow! Basic White powder and heat set to white emboss to complete card.
Enjoy the rest of your weekend, and thanks for stopping by! Happy Sunday!
Supply list
Listed below is the supply list. Just click on the picture to take you directly to the item in my online store.
Product List![Fancy Borders Photopolymer Stamp Set (English) [ 165379 ]](https://assets1.tamsnetwork.com/images/EC042017NF/165379s.jpg "Fancy Borders Photopolymer Stamp Set (English) [ 165379 ]")
![Fancy Borders Dies [ 165380 ]](https://assets1.tamsnetwork.com/images/EC042017NF/165380s.jpg "Fancy Borders Dies [ 165380 ]")
![Floral Charm 12" X 12" (30.5 X 30.5 Cm) Designer Series Paper [ 166125 ]](https://assets1.tamsnetwork.com/images/EC042017NF/166125s.jpg "Floral Charm 12\" X 12\" (30.5 X 30.5 Cm) Designer Series Paper [ 166125 ]")
![Basic White A4 Cardstock [ 166781 ]](https://assets1.tamsnetwork.com/images/EC042017NF/166781s.jpg "Basic White A4 Cardstock [ 166781 ]")
![Pretty Peacock A4 Cardstock [ 150886 ]](https://assets1.tamsnetwork.com/images/EC042017NF/150886s.jpg "Pretty Peacock A4 Cardstock [ 150886 ]")
![Petunia Pop 1/4" (6.4 Mm) Iridescent Ribbon [ 166203 ]](https://assets1.tamsnetwork.com/images/EC042017NF/166203s.jpg "Petunia Pop 1/4\" (6.4 Mm) Iridescent Ribbon [ 166203 ]")
![Paper Trimmer [ 152392 ]](https://assets1.tamsnetwork.com/images/EC042017NF/152392s.jpg "Paper Trimmer [ 152392 ]")
![Embossing Additions Tool Kit [ 159971 ]](https://assets1.tamsnetwork.com/images/EC042017NF/159971s.jpg "Embossing Additions Tool Kit [ 159971 ]")
![Basics Wow! Embossing Powder [ 165679 ]](https://assets1.tamsnetwork.com/images/EC042017NF/165679s.jpg "Basics Wow! Embossing Powder [ 165679 ]")
![Versamark Pad [ 102283 ]](https://assets1.tamsnetwork.com/images/EC042017NF/102283s.jpg "Versamark Pad [ 102283 ]")
![Pretty Peacock Classic Stampin’ Pad [ 150083 ]](https://assets1.tamsnetwork.com/images/EC042017NF/150083s.jpg "Pretty Peacock Classic Stampin’ Pad [ 150083 ]")

- SHOP ONLINE – EARN 10% REWARDS ON ALL PURCHASES OVER £20
- PURCHASE A STARTER KIT : Get £155 worth of products for only £99. Choose from current catalogues and any specials available. Free Shipping. Read more
- Subscribe to my Video Tutorials – click here
This is a cute little card. Fast to make, yet a change from the usual.
The only thing I would change is the fussy cut piece. I think I would take it all the way
down to the colored part of the flower, so there was not a white ‘ring’ around it.
And where there is white in the background, maybe a very muted wash of similar
colors on the flower bunch to make it look like there are background flowers in a blur.
That might take away from the starkness of the white with the flowers and soften the whole piece somewhat. But I for sure will be trying this card design. It has so much potential.
Do you mean the backing piece? It won’t be seen and it was put there to strengthen the DSP. Good idea about adding colour to the rim. I didn’t do it so that it would match the inside piece of DSP. Tks for taking the time to comment.