
Joy fold card – A Little Cheer. A Little Cheer bundle comprises a stamp set with festive images including a teeny star, tree and stocking and A Little Cheer Mini punch pack. Combine the two and they make festive cards and tags for the festive season. It is an online exclusive released in July but the punches didn’t arrive till the middle of July!
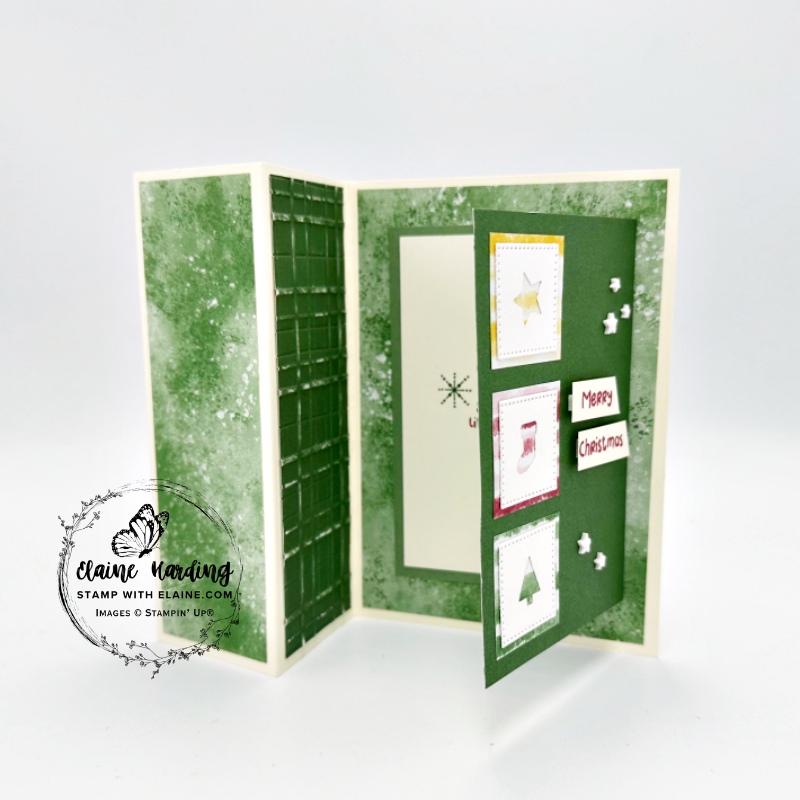
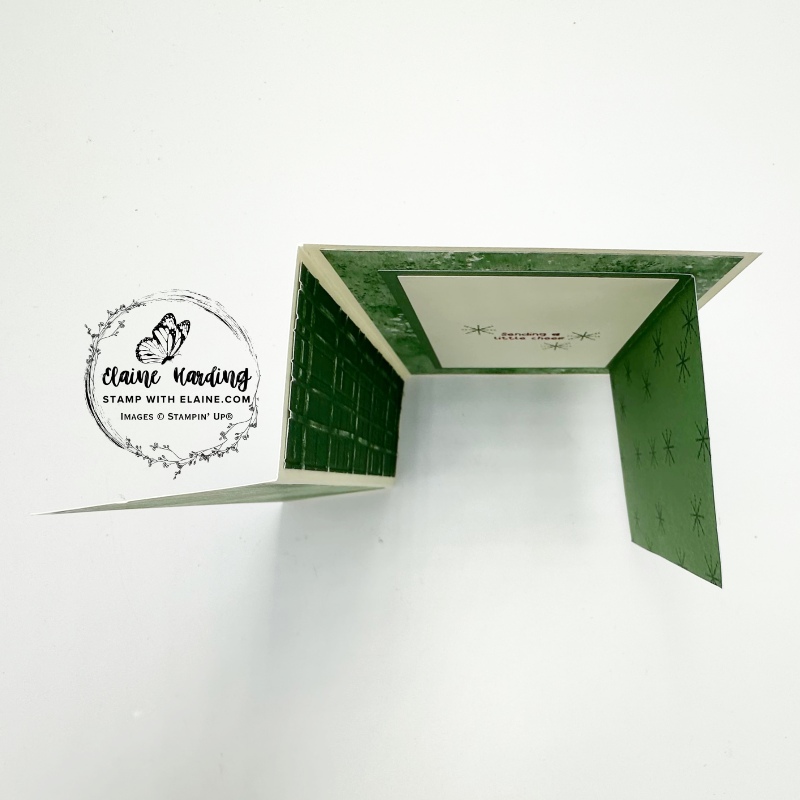
I haven’t made a joy fold card in ages. The joy fold is a card within a card. You fold the front of the card base back and insert another smaller card to the card base which opens in the opposite direction.
Cutting guide
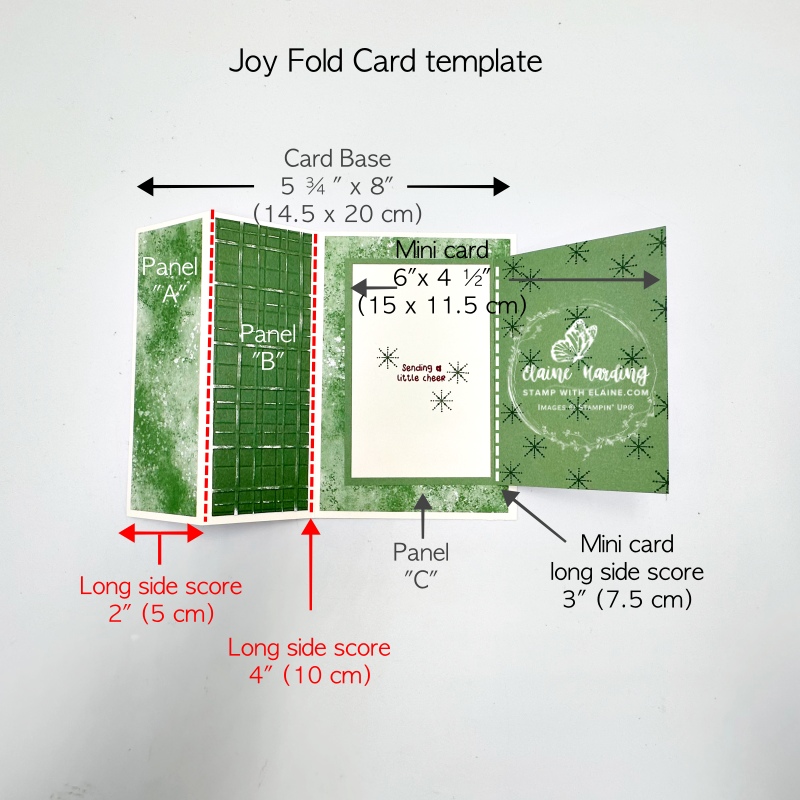
Card base
- Very Vanilla cut at 5 ¾” x 8″ (14.5 cm x 20 cm). Long side on top score at 2″ and 4″ (2.5 cm and 5 cm).
- Regals 6″x 6″ (15.2 x 15.2 cm) Designer Series Paper (DSP) cut 1 piece for panel “A” 1 ¾” x 5 ½” (4.5 cm x 14 cm) and 1 piece for panel”C” at 3 ¾” x 5 ½” (9.5 cm x 14 cm).
- Adhere “A” to front 2″ (5 cm) panel leaving an even border on all 4 sides and adhere “C” to inside of Very Vanilla card base also leaving an even border on all 4 sides.
- Two-Tone card stock Garden Green : cut a piece for “B” 1 ¾” x 5 ½” (4.5 cm x 14 cm). Emboss darker side with Forever Plaid 3D embossing folder. Lightly run fine sanding block over it then adhere to panel B on Very Vanilla card base.
Joy fold mini card
- Two-tone Garden Green card stock : cut at 6″ x 4 ½” (15 cm x 11.5 cm). Long side score at 3″ (7.5 cm)
- Centre mini card with score line on right and adhere to inside of Very Vanilla card base. Ensure top and bottom is equi-distant as well as the two sides.
- Cut Very Vanilla mat layer at 2 ¾” x 4 ¼” (7 cm x 11 cm). Stamp greeting in Cherry Cobbler and snowflakes in Garden Green then adhere to left side of mini card.
- Stamp snowflakes in Garden Green on opposite side as pictured.
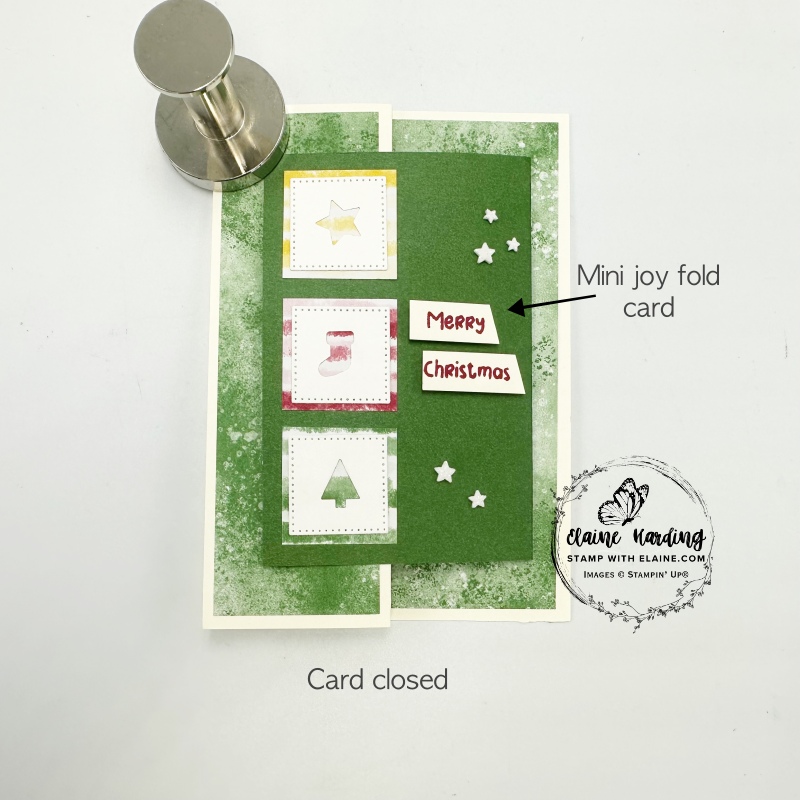
Card front of Joy Fold card
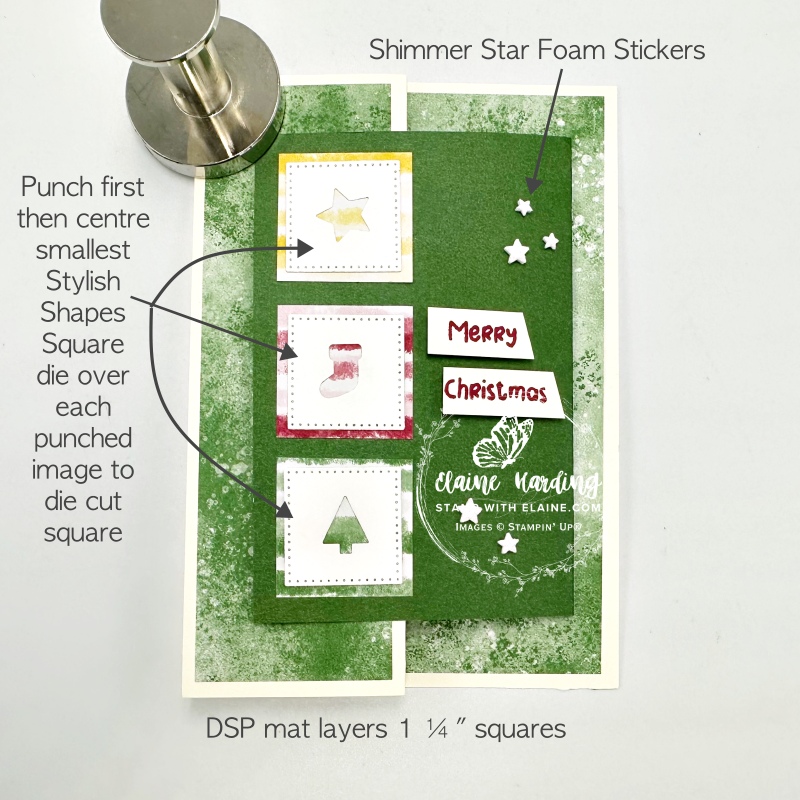
- On a scrap of Basic White, insert A Little Cheer Mini punches as far as it will go and punch out a star, tree and stocking. Leave plenty of space in between. Then centre the smallest Stylish Shapes square die over the star, tree and stocking to die cut a square for each.
- Cut a 1 ¼” (3.2 cm) square with the stripe patter in Crushed Curry, Cherry Cobbler and Garden Green from the Regals 6″x 6″ (15.2 x 15.2 cm) Designer Series Paper pack.
- Centre and adhere the star to Crushed Curry, Stocking to Cherry Cobbler and Tree to Garden Green squares.
- Adhere squares to left of Joy fold mini card as pictured.
- Stamp Merry Christmas and trim. Apply dimensionals on back and adhere to card front as pictured.
- Embellish with Shimmer Star Foam Stickers
Supply list
Listed below is the supply list. Just click on the picture to take you directly to the item in my online store.
Product List![A Little Cheer Bundle (English) [ 166124 ]](https://assets1.tamsnetwork.com/images/EC042017NF/166124s.jpg "A Little Cheer Bundle (English) [ 166124 ]")
![A Little Cheer Mini Punch Pack [ 166123 ]](https://assets1.tamsnetwork.com/images/EC042017NF/166123s.jpg "A Little Cheer Mini Punch Pack [ 166123 ]")
![A Little Cheer Photopolymer Stamp Set (English) [ 166121 ]](https://assets1.tamsnetwork.com/images/EC042017NF/166121s.jpg "A Little Cheer Photopolymer Stamp Set (English) [ 166121 ]")
![Shimmer Star Foam Stickers [ 166202 ]](https://assets1.tamsnetwork.com/images/EC042017NF/166202s.jpg "Shimmer Star Foam Stickers [ 166202 ]")
![Stylish Shapes Dies [ 159183 ]](https://assets1.tamsnetwork.com/images/EC042017NF/159183s.jpg "Stylish Shapes Dies [ 159183 ]")
![Regals 6" X 6" (15.2 X 15.2 Cm) Designer Series Paper [ 165304 ]](https://assets1.tamsnetwork.com/images/EC042017NF/165304s.jpg "Regals 6\" X 6\" (15.2 X 15.2 Cm) Designer Series Paper [ 165304 ]")
![Garden Green 12" X 12" (30.5 X 30.5 Cm) Two Tone Cardstock [ 166665 ]](https://assets1.tamsnetwork.com/images/EC042017NF/166665s.jpg "Garden Green 12\" X 12\" (30.5 X 30.5 Cm) Two Tone Cardstock [ 166665 ]")
![Basic White A4 Cardstock [ 166781 ]](https://assets1.tamsnetwork.com/images/EC042017NF/166781s.jpg "Basic White A4 Cardstock [ 166781 ]")
![Very Vanilla A4 Cardstock [ 166785 ]](https://assets1.tamsnetwork.com/images/EC042017NF/166785s.jpg "Very Vanilla A4 Cardstock [ 166785 ]")
![Garden Green Classic Stampin' Pad [ 147089 ]](https://assets1.tamsnetwork.com/images/EC042017NF/147089s.jpg "Garden Green Classic Stampin' Pad [ 147089 ]")
![Cherry Cobbler Classic Stampin' Pad [ 147083 ]](https://assets1.tamsnetwork.com/images/EC042017NF/147083s.jpg "Cherry Cobbler Classic Stampin' Pad [ 147083 ]")
![Paper Trimmer [ 152392 ]](https://assets1.tamsnetwork.com/images/EC042017NF/152392s.jpg "Paper Trimmer [ 152392 ]")

- SHOP ONLINE – EARN 10% REWARDS ON ALL PURCHASES OVER £20
- PURCHASE A STARTER KIT : Get £155 worth of products for only £99. Choose from current catalogues and any specials available. Free Shipping. Read more
- Subscribe to my Video Tutorials – click here