
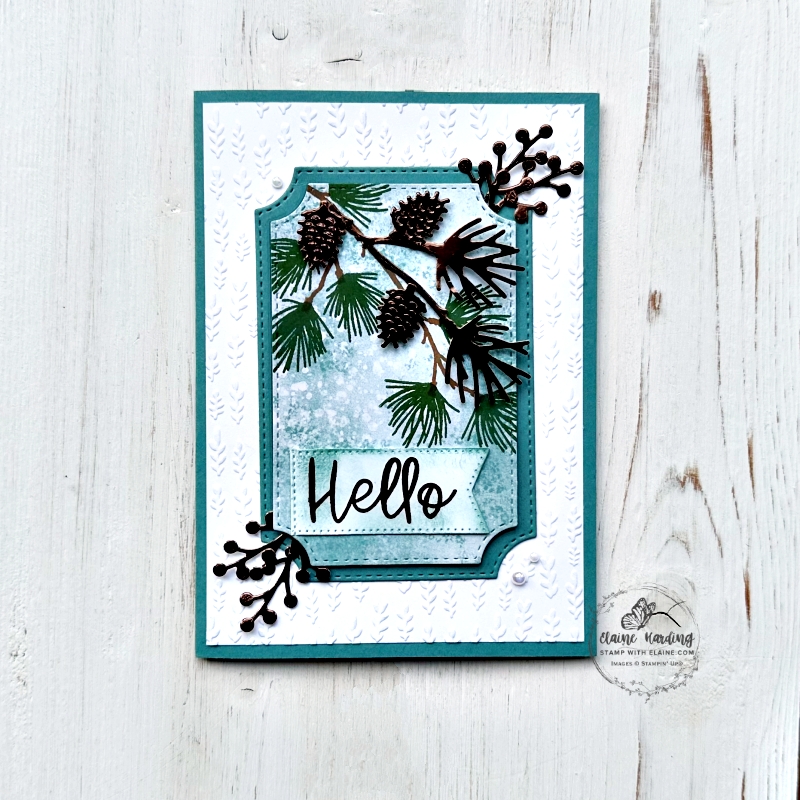
Any occasion card – Branching Out. Branching Out is a gem of a stamp set because you can use it all year round or make it festive to suit the Christmas Season. The coordinating dies has a nest of rectangular stitched dies with the corners “cropped” off, a small pine branch, fir cone, and a couple of berry sprigs. The sentiments in the Branching out stamp set are generic ones including a birthday greeting.
My first “play” was a card for any occasion. The papers I used are from the Subtles 6″x 6″ (15.2 x 15.2 cm) Designer Series Paper pack. However, simply by switching different patterned papers you’d have a completely different vibe. For a more festive feel, just use Christmas Papers and so on.
I’m loving the new Earthen Toned Metallic 12″x 12″ Specialty paper too (read foil) and last, but not least, one of the new online exclusive Gathering Leaves embossing folder.

Cutting guide
- Card base : Lost Lagoon 5 ¾” x 8 ¼” (14.5 cm x 21 cm) and folded in half.
- Basic White : Cut 2 pieces 5 ½” x 3 ⅞” (14 cm x 9.8 cm). Emboss one of the white pieces with the Gathering Leaves embossing folder. Reserve the other piece for inside card.
Branching Out Dies
The Branching Out dies have 6 nested dies. Number 1 being the smallest and number 6 being the largest.
- Die cut a frame with Lost Lagoon card stock with the 3rd and 4th dies. Reserve the inside for step 2.
- Subtles DSP – die cut 1 piece with number 3 die. Adhere this to the Lost Lagoon remnant from the frame. Set aside.
- Earthen Toned Metallic Specialty Paper – die cut 3 fir cones, 4 small berry sprigs, and one pine branch
How to make card
Card front
- Adhere Basic White embossed layer on to the card front leaving an even border on all 4 sides.
- Apply adhesive to back of Lost Lagoon frame and centre and adhere to Basic White embossed layer.
- Stamp “Hello” on scrap of Basic White card stock with Early Espresso ink. Die cut with Stylish Shapes die. Reposition die and cut off the flag end on left side as pictured. Use a blending brush to add Lost Lagoon colour around the edges of the label. Set aside.
- Stamp the pine branch in Pecan Pie and the pine needles with Garden Green ink on DSP die cut piece. Adhere Earthen Tone Metallic pine branch as pictured directly on top of stamped branch. Apply dimensionals on the back of the fir cones and adhere to die cut Earthen Toned Metallic branch as shown.
- Use glue dots to adhere “hello” below pine branch as pictured.
- Arrange and adhere berry sprigs in opposite corners. Then lastly, adhere a trio of Iridescent Pearl Basic Jewels in the other two opposite corners.
Inside card
- Stamp pine branch in top right corner with Pecan Pie ink.
- Align stamp and fill in the pine needles on the branch with Garden Green ink.
- Stamp sentiment with Lost Lagoon Ink.
- Adhere to inside of card leaving an even border on all 4 sides.
Supply list
Listed below is the supply list. Just click on the picture to take you directly to the item in my online store.
Product List![Branching Out Bundle (English) [ 165776 ]](https://assets1.tamsnetwork.com/images/EC042017NF/165776s.jpg "Branching Out Bundle (English) [ 165776 ]")
![Stylish Shapes Dies [ 159183 ]](https://assets1.tamsnetwork.com/images/EC042017NF/159183s.jpg "Stylish Shapes Dies [ 159183 ]")
![Basic White A4 Cardstock [ 166781 ]](https://assets1.tamsnetwork.com/images/EC042017NF/166781s.jpg "Basic White A4 Cardstock [ 166781 ]")
![Earthen Toned Metallic 12" X 12" (30.5 X 30.5 Cm) Specialty Paper [ 165901 ]](https://assets1.tamsnetwork.com/images/EC042017NF/165901s.jpg "Earthen Toned Metallic 12\" X 12\" (30.5 X 30.5 Cm) Specialty Paper [ 165901 ]")
![Gathering Leaves Embossing Folder [ 165983 ]](https://assets1.tamsnetwork.com/images/EC042017NF/165983s.jpg "Gathering Leaves Embossing Folder [ 165983 ]")
![Iridescent Pearl Basic Jewels [ 158987 ]](https://assets1.tamsnetwork.com/images/EC042017NF/158987s.jpg "Iridescent Pearl Basic Jewels [ 158987 ]")
![Lost Lagoon A4 Cardstock [ 133686 ]](https://assets1.tamsnetwork.com/images/EC042017NF/133686s.jpg "Lost Lagoon A4 Cardstock [ 133686 ]")
![Subtles 6" X 6" (15.2 X 15.2 Cm) Designer Series Paper [ 165306 ]](https://assets1.tamsnetwork.com/images/EC042017NF/165306s.jpg "Subtles 6\" X 6\" (15.2 X 15.2 Cm) Designer Series Paper [ 165306 ]")
![Early Espresso Classic Stampin' Pad [ 147114 ]](https://assets1.tamsnetwork.com/images/EC042017NF/147114s.jpg "Early Espresso Classic Stampin' Pad [ 147114 ]")
![Garden Green Classic Stampin' Pad [ 147089 ]](https://assets1.tamsnetwork.com/images/EC042017NF/147089s.jpg "Garden Green Classic Stampin' Pad [ 147089 ]")
![Lost Lagoon Classic Stampin' Pad [ 161678 ]](https://assets1.tamsnetwork.com/images/EC042017NF/161678s.jpg "Lost Lagoon Classic Stampin' Pad [ 161678 ]")
![Pecan Pie Classic Stampin' Pad [ 161665 ]](https://assets1.tamsnetwork.com/images/EC042017NF/161665s.jpg "Pecan Pie Classic Stampin' Pad [ 161665 ]")
![Small Blending Brushes [ 160518 ]](https://assets1.tamsnetwork.com/images/EC042017NF/160518s.jpg "Small Blending Brushes [ 160518 ]")

- SHOP ONLINE – EARN 10% REWARDS ON ALL PURCHASES OVER £20
- PURCHASE A STARTER KIT : Get £155 worth of products for only £99. Choose from current catalogues and any specials available. Free Shipping. Read more
- Subscribe to my Video Tutorials – click here