
New Mini & Online Exclusives is live! The new September-December 2025 Mini Catalogue goes live today and catalogue sales period is from 3 September 2025 – 5 January 2026. There’s more! Also released are new Online Exclusives for September 2025.
See the September Online Exclusives pdf HERE.
There’s so much to choose from, where to begin? There’s lots of Christmassy fayre, but here’s something that is a little out of the ordinary.
Lights of Aurora
I thought I’d start with the lovely Lights of Aurora Suite Collection which you’ll find on pages 36-37 in the new September – December 2025 Mini catalogue. The suite have these lovely Lights of Aurora 6″x 6″ (15.2 x 15.2 cm) Designer Series Papers which reflect the artist’s artwork – I remember my own attempt creating my aurora borealis HERE. That was way back in March 2021! It took me ages to get it just right so I much prefer Stampin’ Up!’s offering today!
Factoid about DL size envelops
In the UK, a DL envelop measures approximate 4.33 x 8.66 inches which is 110 x 200 mm. The envelops are specifically designed to fold an A4 sheet in thirds, so I’ve cut my long slim card base at 8 ¼” x 7″ (21 cm x 18 cm), scored on the 7″ side at 3 ½” (18 cm side at 9 cm) and folded in half. The folded card size therefore measures 3 ½” x 8 ¼” (9 cm x 21 cm). This is the perfect size for using with 6 x 6 Designer Series Papers (DSP) because there is no waste.
Cutting Guide
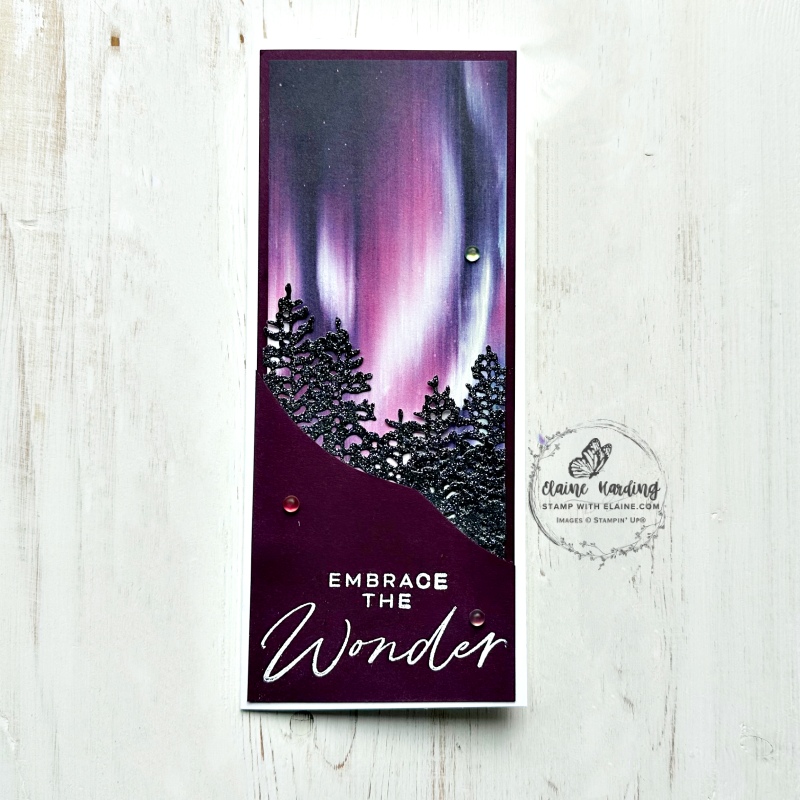
Card 1
- Card base : Basic White Thick 7″ x 8 ¼” (18 cm x 21 cm). Short side on top, score at 3 ½” (9 cm).
- Mat layer 1 : Blackberry Bliss 3 ¼” x 8″ (8.5 cm x 20.5 cm). Adhere to front of card base
- Lights of Aurora 6″x 6″ (15.2 x 15.2 cm) DSP : cut at 3″ x 6″ (7.6 cm x 15.2 cm). Adhere on top of Blackberry Bliss mat layer with even border on both sides and top. Reserve the other half for the second card.
- Peaceful Garden 12″ x 12″ (30.5 x 30.5 cm) Glimmer Paper – die cut the Light & Wonder Die larger mountain range die. Trim off excess and reserve. Reserve the remnant to adhere on top as a second layer in between the valley of trees.
- Scrap of Blackberry Bliss approximately 4″ x 3 ¼” (10 cm x 8.5 cm). Cut free hand diagonally. Stamp sentiment in Versamark and white emboss as pictured. Use this piece as a guide to arrange and adhere the trees behind before adhering the white embossed Blackberry piece to card front.
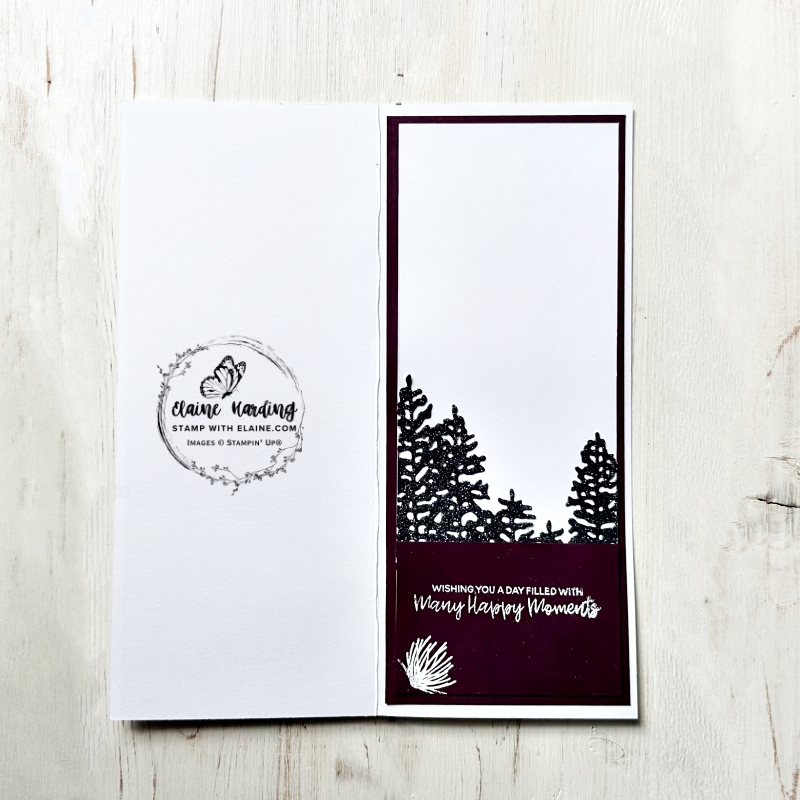
Inside card
- Blackberry Bliss Mat layer – cut at 3 ¼” x 8″ (8.5 cm x 20.5 cm). Adhere to inside of card.
- Basic White Mat layer – cut at 3” x 7 ¾” (8 cm x 20 cm)
- Cut a Blackberry Bliss piece 2″ x 3″ (5 cm x 8 cm). Apply Tear n’ Tape to bottom and 2 sides.
- Stamp greeting from Branching Out (new – page 50 in Sep/Dec 25 Mini) and pine with Versamark ink and white emboss. Set aside.
- Die cut larger mountain range with Peaceful Garden 12″ x 12″ (30.5 x 30.5 cm) Glimmer Paper. Apply tear n’ tape to bottom. Remove backing tape. Tuck and arrange inside Blackberry Bliss piece and when you’re happy with position, adhere to Basic White layer. Flip Basic White mat layer over and trim off excess.
- Remove backing tape on Blackberry Bliss section, align with bottom and two sides and adhere to Basic White mat layer ensuring even border on all 4 sides.
Card 2
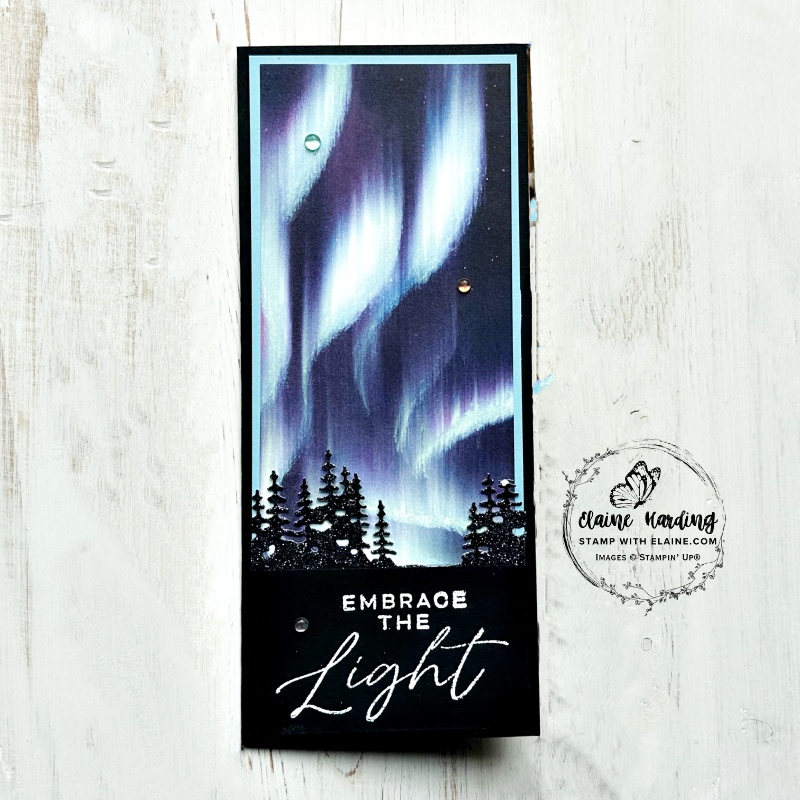
- Card base : Basic Black Thick 7″ x 8 ¼” (18 cm x 21 cm). Short side on top, score at 3 ½” (9 cm).
- Mat layer 1 : Balmy Blue 3 ¼” x 8″ (8.5 cm x 20.5 cm). Adhere to front of card.
- Lights of Aurora 6″x 6″ (15.2 x 15.2 cm) DSP : use other half of 6″ x 6″ (15.2 x 15.2 cm) sheet to adhere to Balmy Blue mat layer leaving an even border at top and both sides.
- Peaceful Garden 12″ x 12″ (30.5 x 30.5 cm) Glimmer Paper – die cut with Light & Wonder small mountain range die and adhere at bottom of DSP.
- Cut a Basic Black piece 1 ⅞” x 3 ¼” (4.8.cm x 8.5 cm). Stamp sentiment in Versamark and white emboss. Adhere with dimensionals overlapping the bottom of the die cut glimmer mountains slightly.
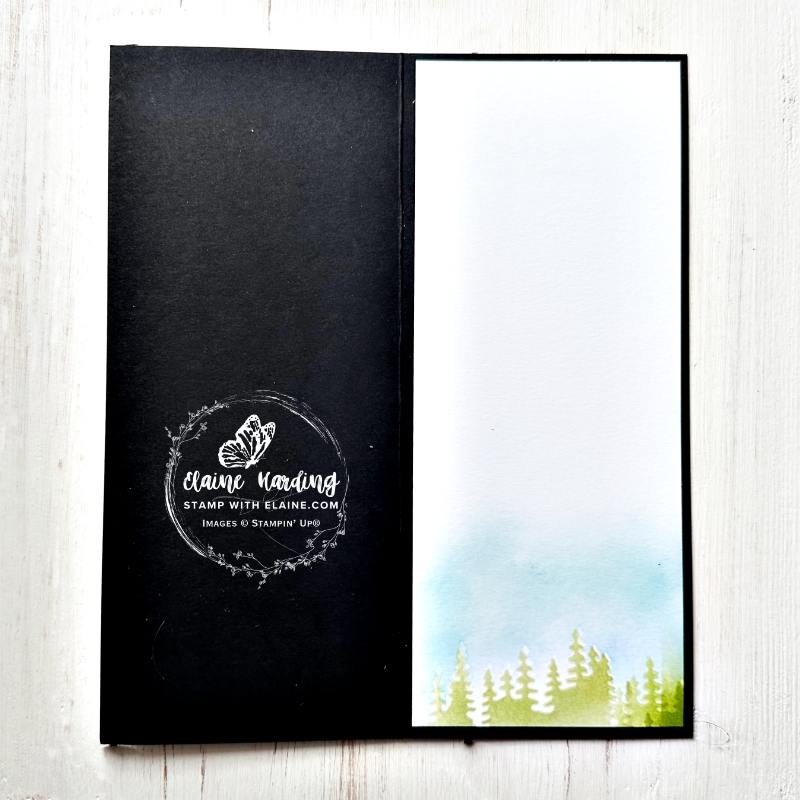
Inside card
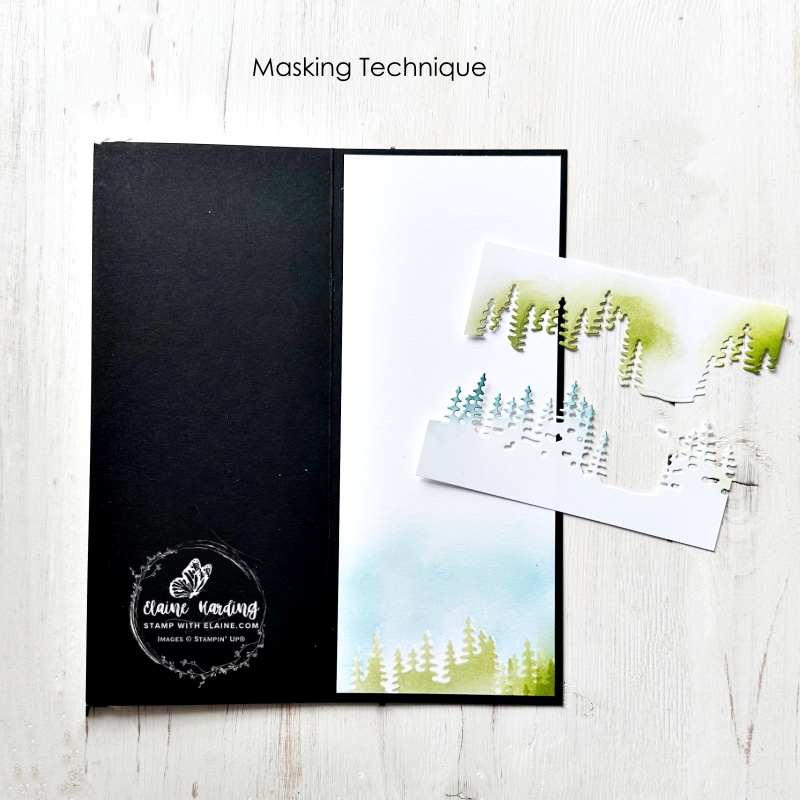
- Cut Basic White layer 3 ¼” x 8” (8.5 cm x 20.5 cm) for inside card.
- Die cut small mountain range die from a scrap of Basic White to use as a mask.
- Position top section of mountain range at bottom of Basic White mat layer. Use blending brush to apply Granny Apple Green ink for the trees.
- Place bottom section of mountain range aligned with trees and use another blending brush to apply Balmy Blue ink for the sky.
- Adhere Basic White layer to inside of card leaving an even border on all 4 sides.
Supply list
Listed below is the supply list. Just click on the picture to take you directly to the item in my online store.
Product List![Lights Of Aurora Suite Collection (English) [ 165768 ]](https://assets1.tamsnetwork.com/images/EC042017NF/165768s.jpg "Lights Of Aurora Suite Collection (English) [ 165768 ]")
![Light & Wonder Bundle (English) [ 165763 ]](https://assets1.tamsnetwork.com/images/EC042017NF/165763s.jpg "Light & Wonder Bundle (English) [ 165763 ]")
![Light & Wonder Photopolymer Stamp Set (English) [ 165756 ]](https://assets1.tamsnetwork.com/images/EC042017NF/165756s.jpg "Light & Wonder Photopolymer Stamp Set (English) [ 165756 ]")
![Light & Wonder Dies [ 165762 ]](https://assets1.tamsnetwork.com/images/EC042017NF/165762s.jpg "Light & Wonder Dies [ 165762 ]")
![Lights Of Aurora 6" X 6" (15.2 X 15.2 Cm) Designer Series Paper [ 165755 ]](https://assets1.tamsnetwork.com/images/EC042017NF/165755s.jpg "Lights Of Aurora 6\" X 6\" (15.2 X 15.2 Cm) Designer Series Paper [ 165755 ]")
![Branching Out Photopolymer Stamp Set (English) [ 165771 ]](https://assets1.tamsnetwork.com/images/EC042017NF/165771s.jpg "Branching Out Photopolymer Stamp Set (English) [ 165771 ]")
![Basic White A4 Thick Cardstock [ 159230 ]](https://assets1.tamsnetwork.com/images/EC042017NF/159230s.jpg "Basic White A4 Thick Cardstock [ 159230 ]")
![Basic White A4 Cardstock [ 166781 ]](https://assets1.tamsnetwork.com/images/EC042017NF/166781s.jpg "Basic White A4 Cardstock [ 166781 ]")
![Blackberry Bliss A4 Cardstock [ 133682 ]](https://assets1.tamsnetwork.com/images/EC042017NF/133682s.jpg "Blackberry Bliss A4 Cardstock [ 133682 ]")
![Basic Black A4 Card Stock [ 121688 ]](https://assets1.tamsnetwork.com/images/EC042017NF/121688s.jpg "Basic Black A4 Card Stock [ 121688 ]")
![Blending Brushes [ 153611 ]](https://assets1.tamsnetwork.com/images/EC042017NF/153611s.jpg "Blending Brushes [ 153611 ]")
![Balmy Blue Classic Stampin' Pad [ 147105 ]](https://assets1.tamsnetwork.com/images/EC042017NF/147105s.jpg "Balmy Blue Classic Stampin' Pad [ 147105 ]")
![Granny Apple Green Stampin' Pad [ 147095 ]](https://assets1.tamsnetwork.com/images/EC042017NF/147095s.jpg "Granny Apple Green Stampin' Pad [ 147095 ]")
![Versamark Pad [ 102283 ]](https://assets1.tamsnetwork.com/images/EC042017NF/102283s.jpg "Versamark Pad [ 102283 ]")
![Embossing Additions Tool Kit [ 159971 ]](https://assets1.tamsnetwork.com/images/EC042017NF/159971s.jpg "Embossing Additions Tool Kit [ 159971 ]")
![Basics Wow! Embossing Powder [ 165679 ]](https://assets1.tamsnetwork.com/images/EC042017NF/165679s.jpg "Basics Wow! Embossing Powder [ 165679 ]")
![Heat Tool - Uk Plug [ 129054 ]](https://assets1.tamsnetwork.com/images/EC042017NF/129054s.jpg "Heat Tool - Uk Plug [ 129054 ]")
![Frosted Iridescent Dots [ 165766 ]](https://assets1.tamsnetwork.com/images/EC042017NF/165766s.jpg "Frosted Iridescent Dots [ 165766 ]")

- SHOP ONLINE – EARN 10% REWARDS ON ALL PURCHASES OVER £20
- PURCHASE A STARTER KIT : Get £155 worth of products for only £99. Choose from current catalogues and any specials available. Free Shipping. Read more
- Subscribe to my Video Tutorials – click here