
Quick Easy card – Jolly Delivery. Jolly Delivery might not be everyone’s cup of tea, but I was drawn to the Jolly Delivery Bundle because of its dies. I’m a sucker for gift packaging dies, and this one has a die to die cut a mini envelop box with interesting closures. I’ll save the gift packaging project for another day, but will show you how you can make a non-Christmassy card using this very Christmas oriented set.
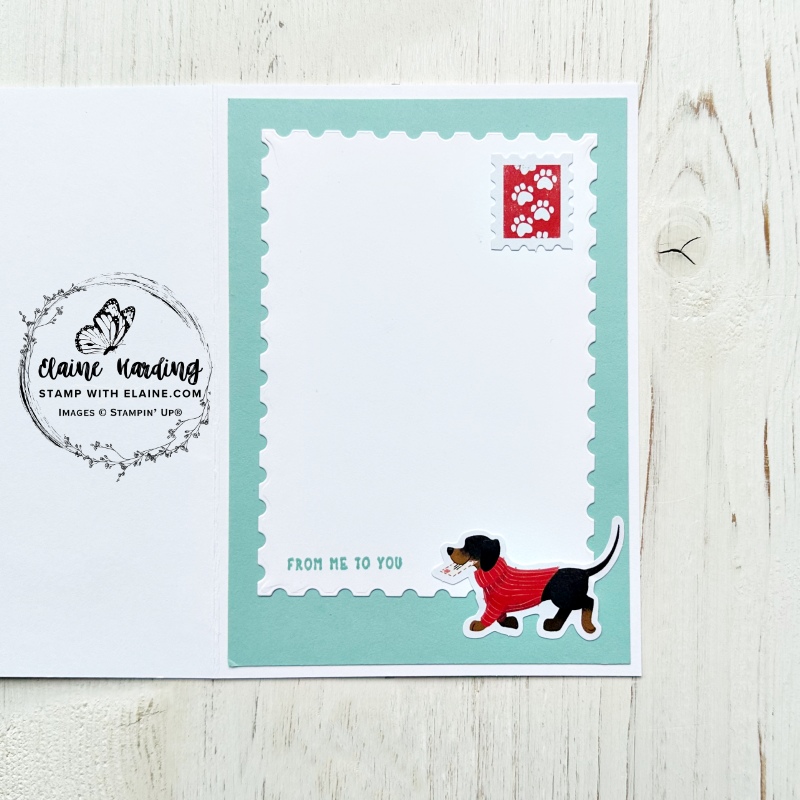
The additional die set I used is the Perennial Postage Dies which you can find in the 2025-26 Annual Catalogue on page 107. It was carried over from the January-April 2024 Mini catalogue so it’s been around for some time. Here’s the card I made.

North Pole Delivery Specialty paper
This pack of 12″x 12″ (30.5 x 30.5 cm) Specialty Designer Series Papers is more expensive because it has 2 sheets of pre-cut images. It contains 12 sheets in total with 2 sheets each of 5 double-sided designs and 1 sheet each of 2 single sided pre-cut designs.
These are the pre-cut design sheets. I used the pre-cuts to decorate my card in lieu of stamping.


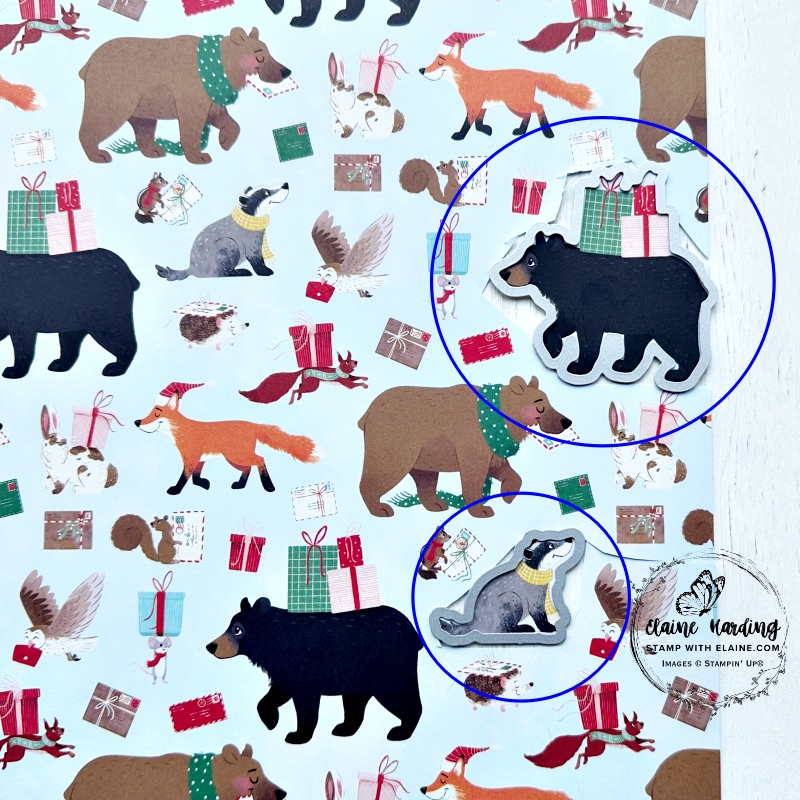
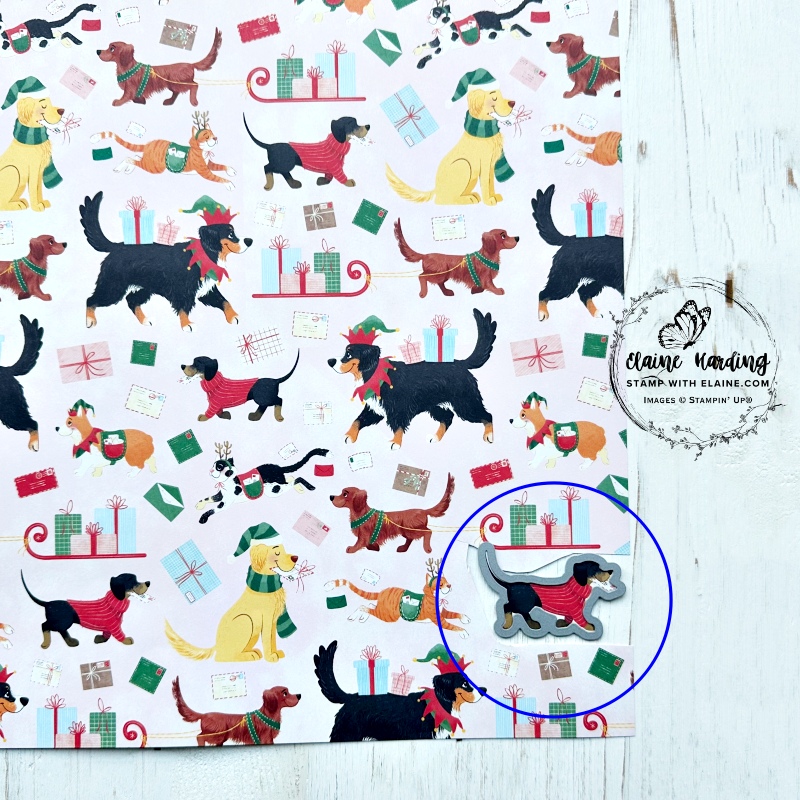
There are 3 dies which will die cut images from 2 of the DSP sheets pictured below. One is the brown bear with presents on his back and a badger on the sheet on the left and the other is possibly a dachshund (not sure of the breed) carrying a letter in his mouth on the sheet on the right.
How to make the card
Card front
- Cut a Basic White Thick card stock 5 ¾” x 8 ¼” (14.5 cm x 21 cm) and fold in half. Stamp the cluster of envelops in Pool Party ink around the edges of the card front.
- Use the 2nd largest Perennial Postage Die to die cut 2 pieces, 1 in Pool Party and the other in Basic White card stock. (The latter is for the inside of the card.) Adhere the Pool Party one to the front of the card centred on card front. Set aside the Basic White one.
- Select your choice pre-cut images, arrange and adhere to Pool Party die cut Perennial Postage layer. Remember to leave sufficient space at the bottom to attach the label.
- Stamp “Special Delivery” on a scrap of Basic White card stock and die cut with Perennial Postage die. Trim if necessary to make it narrower and adhere below images.
Inside card
- Cut Pool Party mat layer at 5 ½” x 3 ⅞” (14 cm x 9.8 cm). Adhere this to the inside of the card.
- Now you can adhere the Basic White Perennial Postage piece on top of the Pool Party layer. Ensure the top and 2 sides have even borders. This will mean that the bottom will have a wider border so that you can attach one of the pre-cut images if so desired.
- Stamp “from me to you” in the bottom left corner with Pool Party ink. I chose a stamp so I adhered mine in the top right corner.
That’s how you can make a card for any occasion with this very Christmas set! It’s been a challenge trying to use mostly Christmas sets in a different way because it’s WAY too early for me to get geared up for Christmas in the height of summer!
Supply list
Listed below is the supply list. Just click on the picture to take you directly to the item in my online store.
Product List![Jolly Delivery Bundle (English) [ 165845 ]](https://assets1.tamsnetwork.com/images/EC042017NF/165845s.jpg "Jolly Delivery Bundle (English) [ 165845 ]")
![Perennial Postage Bundle (English) [ 162608 ]](https://assets1.tamsnetwork.com/images/EC042017NF/162608s.jpg "Perennial Postage Bundle (English) [ 162608 ]")
![Perennial Postage Dies [ 162607 ]](https://assets1.tamsnetwork.com/images/EC042017NF/162607s.jpg "Perennial Postage Dies [ 162607 ]")
![Perennial Postage Cling Stamp Set (English) [ 162598 ]](https://assets1.tamsnetwork.com/images/EC042017NF/162598s.jpg "Perennial Postage Cling Stamp Set (English) [ 162598 ]")
![North Pole Delivery 12" X 12" (30.5 X 30.5 Cm) Specialty Designer Series Paper [ 165837 ]](https://assets1.tamsnetwork.com/images/EC042017NF/165837s.jpg "North Pole Delivery 12\" X 12\" (30.5 X 30.5 Cm) Specialty Designer Series Paper [ 165837 ]")
![Basic White A4 Thick Cardstock [ 159230 ]](https://assets1.tamsnetwork.com/images/EC042017NF/159230s.jpg "Basic White A4 Thick Cardstock [ 159230 ]")
![Pool Party A4 Card Stock [ 124391 ]](https://assets1.tamsnetwork.com/images/EC042017NF/124391s.jpg "Pool Party A4 Card Stock [ 124391 ]")
![Pool Party Classic Stampin' Pad [ 147107 ]](https://assets1.tamsnetwork.com/images/EC042017NF/147107s.jpg "Pool Party Classic Stampin' Pad [ 147107 ]")

- SHOP ONLINE – EARN 10% REWARDS ON ALL PURCHASES OVER £20
- PURCHASE A STARTER KIT : Get £155 worth of products for only £99. Choose from current catalogues and any specials available. Free Shipping. Read more
- Subscribe to my Video Tutorials – click here
Pingback: Matching card and gift box - Stamp with Elaine