
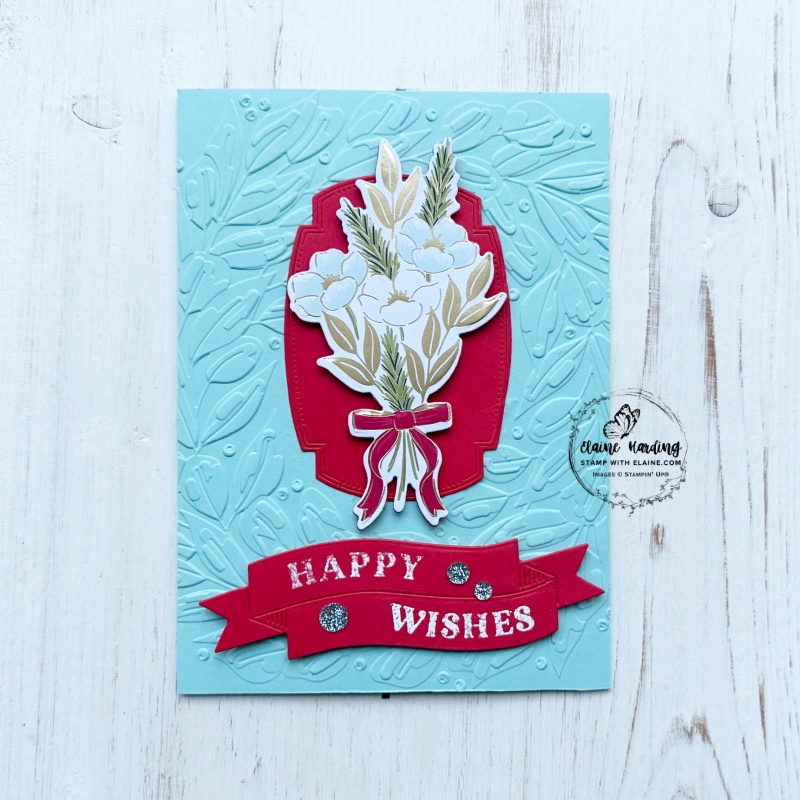
Traditions of Christmas – Part 2. Following on from Traditions of Christmas – Part 1, I wanted to create another card which would illustrate how you could use it in a non-Christmassy context. It involves using almost all of the product in the suite except for the ribbon. I wanted to feature the second DSP bouquet which you can die cut from the other Christmas Greenery die set so that you know which 2 bouquets can be cut from this Specialty Designer Series pack.
These are the Traditional Labels Bundle and Christmas Greenery Bundle, Traditional Wreath 3D embossing folder, Traditions of Christmas 12″x 12″ (30.5 x 30.5 cm) Specialty Designer Series Paper (DSP) and Traditional Sparkling Sequins.

Cutting Guide
- Card base Pool Party : 5 ¾” x 8 ¼” (14.5 cm x 21 cm) and folded in half.
- Pool Party mat layer cut at 5 ¾” x 4 ⅛” (14.5 cm x 10.5 cm) Emboss with Traditional Wreath 3D embossing folder.
- Die cut the largest label from Traditional Label dies in Poppy Parade.
- Inside card : Basic White layer 5 ½” x 3 ⅞” (14 cm x 9.8 cm).
Preparing card front elements
- Adhere embossed Pool Party mat layer directly on to front of card base.
- Apply adhesive to the back of the die cut Poppy Parade label and adhere toward the top of the embossed Pool Party card front layer.
- Select the corresponding die from Christmas Greenery Dies and die cut from the corresponding image from the sheet of DSP and another out of Poppy Parade card stock. Adhere die cut DSP bouquet to Poppy Parade one ensuring it is aligned. Set aside.
- Die cut double banner with Traditions Labels die in Poppy Parade card stock.
- Stamp “happy” in upper banner with Versamark ink and lower banner with “wishes” following curvature of banner. White Emboss with Wow Basics embossing powder and heat set. Set aside.
Inside card
- Partially stamp with Tuxedo Black Memento Ink the larger floral bouquet as shown in picture in bottom left of Basic White mat layer. Then partially stamp opposite corner in the top right corner as pictured.
- Select the corresponding two-step solid stamps to fill in colour for the flowers and leaves. First generation Old Olive ink for the pine needles, second generation ink for the leaves. Pool party for the helibores and Poppy Parade for the Pointsettia and berries.
Assembling card
Card front
- Apply dimensionals to back of re-inforced DSP die cut floral bouquet and centre and adhere it the die cut Poppy Parade label.
- Also apply dimensionals to back of double banner and adhere below bouquet as pictured above.
Inside card
- Adhere stamped Basic White layer inside card leaving an even border on all 4 sides.
- Once adhered, stamp “just for you” in Pool Party ink as shown in picture.
Incidentally, the DSP floral bouquets features both Poppy Parade and Pool Party ribbon, so you can use either. I don’t know about you, but I still find it hard to properly get in the Christmas spirit while we’re experiencing a heat wave. So this is my alternative, although the stamps scream Christmas!
Supply list
Listed below is the supply list. Just click on the picture to take you directly to the item in my online store.
Product List![Christmas Greenery Bundle [ 165873 ]](https://assets1.tamsnetwork.com/images/EC042017NF/165873s.jpg "Christmas Greenery Bundle [ 165873 ]")
![Traditional Wreath 3 D Embossing Folder [ 165874 ]](https://assets1.tamsnetwork.com/images/EC042017NF/165874s.jpg "Traditional Wreath 3 D Embossing Folder [ 165874 ]")
![Traditional Labels Bundle (English) [ 165865 ]](https://assets1.tamsnetwork.com/images/EC042017NF/165865s.jpg "Traditional Labels Bundle (English) [ 165865 ]")
![Basic White A4 Cardstock [ 166781 ]](https://assets1.tamsnetwork.com/images/EC042017NF/166781s.jpg "Basic White A4 Cardstock [ 166781 ]")
![Pool Party A4 Card Stock [ 124391 ]](https://assets1.tamsnetwork.com/images/EC042017NF/124391s.jpg "Pool Party A4 Card Stock [ 124391 ]")
![Poppy Parade A4 Cardstock [ 121694 ]](https://assets1.tamsnetwork.com/images/EC042017NF/121694s.jpg "Poppy Parade A4 Cardstock [ 121694 ]")
![Tuxedo Black Memento Ink Pad [ 132708 ]](https://assets1.tamsnetwork.com/images/EC042017NF/132708s.jpg "Tuxedo Black Memento Ink Pad [ 132708 ]")
![Old Olive Classic Stampin' Pad [ 147090 ]](https://assets1.tamsnetwork.com/images/EC042017NF/147090s.jpg "Old Olive Classic Stampin' Pad [ 147090 ]")
![Pool Party Classic Stampin' Pad [ 147107 ]](https://assets1.tamsnetwork.com/images/EC042017NF/147107s.jpg "Pool Party Classic Stampin' Pad [ 147107 ]")
![Poppy Parade Classic Stampin' Pad [ 147050 ]](https://assets1.tamsnetwork.com/images/EC042017NF/147050s.jpg "Poppy Parade Classic Stampin' Pad [ 147050 ]")
![Versamark Pad [ 102283 ]](https://assets1.tamsnetwork.com/images/EC042017NF/102283s.jpg "Versamark Pad [ 102283 ]")
![Embossing Additions Tool Kit [ 159971 ]](https://assets1.tamsnetwork.com/images/EC042017NF/159971s.jpg "Embossing Additions Tool Kit [ 159971 ]")
![Basics Wow! Embossing Powder [ 165679 ]](https://assets1.tamsnetwork.com/images/EC042017NF/165679s.jpg "Basics Wow! Embossing Powder [ 165679 ]")
![Heat Tool - Uk Plug [ 129054 ]](https://assets1.tamsnetwork.com/images/EC042017NF/129054s.jpg "Heat Tool - Uk Plug [ 129054 ]")

- SHOP ONLINE – EARN 10% REWARDS ON ALL PURCHASES OVER £20
- PURCHASE A STARTER KIT : Get £155 worth of products for only £99. Choose from current catalogues and any specials available. Free Shipping. Read more
- Subscribe to my Video Tutorials – click here