
Joyful Tidings Christmas card and Halloween Greetings. We’re across the half way mark in Week 7 of 12 in my Christmas Countdown Series and it also happens to be Halloween today. So we have Christmas as well as Halloween in today’s post.
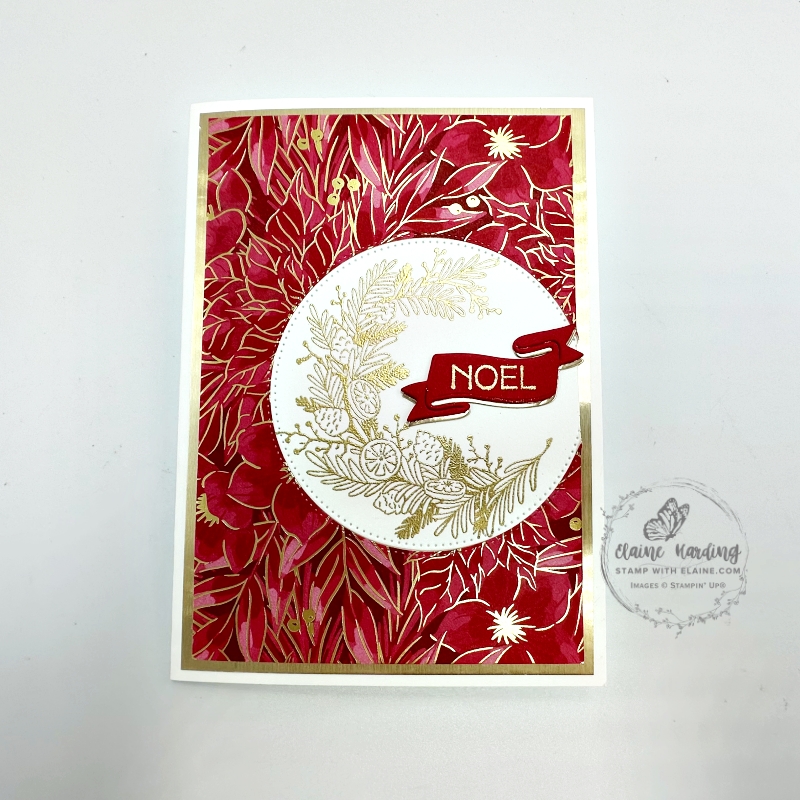
Christmas wouldn’t be Christmas without a wreath of two. The stamp set is called Joyful Tidings, a stand alone stamp set which features two designs of wreath. One with pine cones and orange slices and the other simply with berries. It’s not a complete wreath, I suppose it’s more like a “swag”.
Joyful Tidings Christmas Card
You can make quick 1 layer cards with these simply stamped images which would be economical to post, keeping the layers and thickness to a minimum. The Joyful Tidings stamp set is on page 58 of the September-December 2025 mini.
Cutting guide
- Card base Basic White thick cut at 5 ¾” x 8 ¼” (14.5 cm x 21 cm) and folded in half.
- Gold foil : 3 ⅞” x 5 ½” (9.8 cm x 14 cm). Place in trimmer to cut a ½” (1 cm) frame to gut inside. Reserve for another project.
- Traditions of Christmas 12 x 12 (30.5 x 30.5 cm) Specialty Designer Series Paper : cut at 3 ¾” x 5 ⅜” (9.5 cm x 13.7 cm)
- Die cut largest circle from Stylish Shapes dies in Basic White for stamping.
- Gold foil – die cut banner from Paper Tags dies and also one in Real Red card stock.
Assembly
Card front
- Use embossing buddy to prevent static on Basic White circle. Stamp wreath with Versamark as shown. Sprinkle with Metallics Wow! embossing powder in gold and heat set.
- Repeat embossing but this time on the Real Red die cut banner with the word “NOEL”. Then apply tear n’ tape on back and adhere to gold foil banner staggered to leave a gold shadow below.
- Adhere gold embossed wreath on to DSP with the right side of circle partially overhanging straight edge of DSP. Flip over and cut off excess.
- Apply adhesive to back of DSP and adhere to Gold Frame then adhere this to the card front leaving an even border on all 4 sides.
- Lastly apply adhesive on back of banner and adhere to circle as pictured.
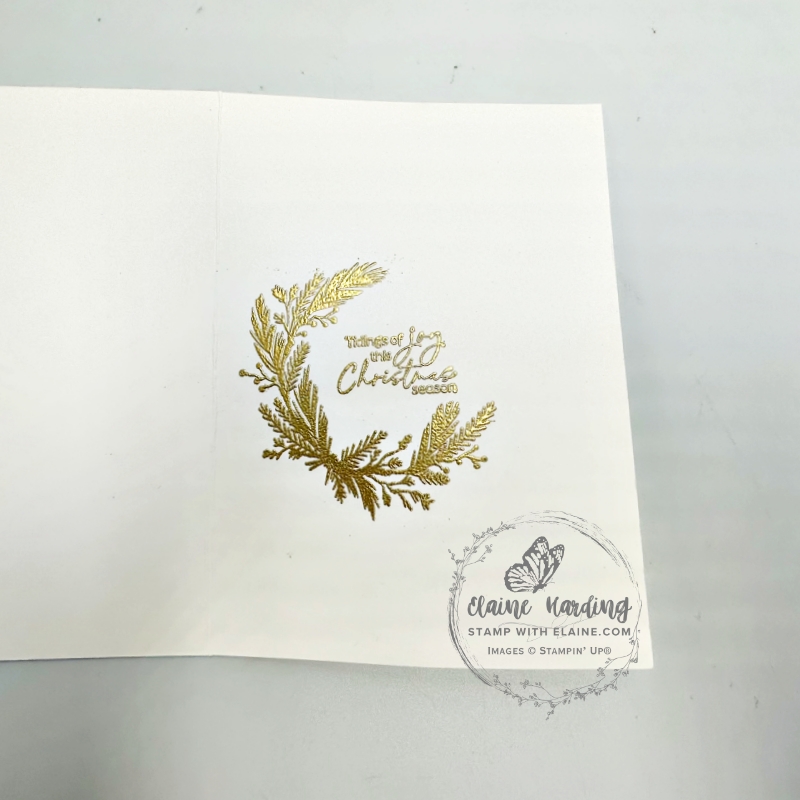
Inside card
- Rub embossing buddy over inside of card to prevent static. Ink up the other wreath image with versamark and stamp directly inside card.
- Sprinkle Metallics Wow! embossing powder in gold and heat set. Then repeat embossing process this time with the greeting and heat set. I omitted adding an extra layer for inside the card.
Supply list
Listed below is the supply list. Just click on the picture to take you directly to the item in my online store.
Product List![Joyful Tidings Cling Stamp Set (English) [ 165944 ]](https://assets1.tamsnetwork.com/images/EC042017NF/165944s.jpg "Joyful Tidings Cling Stamp Set (English) [ 165944 ]")
![Stylish Shapes Dies [ 159183 ]](https://assets1.tamsnetwork.com/images/EC042017NF/159183s.jpg "Stylish Shapes Dies [ 159183 ]")
![Paper Tags Bundle (English) [ 165462 ]](https://assets1.tamsnetwork.com/images/EC042017NF/165462s.jpg "Paper Tags Bundle (English) [ 165462 ]")
![Paper Tags Cling Stamp Set (English) [ 165454 ]](https://assets1.tamsnetwork.com/images/EC042017NF/165454s.jpg "Paper Tags Cling Stamp Set (English) [ 165454 ]")
![Paper Tags Dies [ 165461 ]](https://assets1.tamsnetwork.com/images/EC042017NF/165461s.jpg "Paper Tags Dies [ 165461 ]")
![Traditions Of Christmas 12" X 12" (30.5 X 30.5 Cm) Specialty Designer Series Paper [ 165853 ]](https://assets1.tamsnetwork.com/images/EC042017NF/165853s.jpg "Traditions Of Christmas 12\" X 12\" (30.5 X 30.5 Cm) Specialty Designer Series Paper [ 165853 ]")
![Brushed Silver And Gold Foil 12" X 12" (30.5 X 30.5 Cm) Specialty Paper [ 164861 ]](https://assets1.tamsnetwork.com/images/EC042017NF/164861s.jpg "Brushed Silver And Gold Foil 12\" X 12\" (30.5 X 30.5 Cm) Specialty Paper [ 164861 ]")
![Basic White A4 Thick Cardstock [ 159230 ]](https://assets1.tamsnetwork.com/images/EC042017NF/159230s.jpg "Basic White A4 Thick Cardstock [ 159230 ]")
![Versamark Pad [ 102283 ]](https://assets1.tamsnetwork.com/images/EC042017NF/102283s.jpg "Versamark Pad [ 102283 ]")
![Embossing Additions Tool Kit [ 159971 ]](https://assets1.tamsnetwork.com/images/EC042017NF/159971s.jpg "Embossing Additions Tool Kit [ 159971 ]")
![Metallics Wow! Embossing Powder [ 165678 ]](https://assets1.tamsnetwork.com/images/EC042017NF/165678s.jpg "Metallics Wow! Embossing Powder [ 165678 ]")
![Heat Tool - Uk Plug [ 129054 ]](https://assets1.tamsnetwork.com/images/EC042017NF/129054s.jpg "Heat Tool - Uk Plug [ 129054 ]")
Happy Halloween
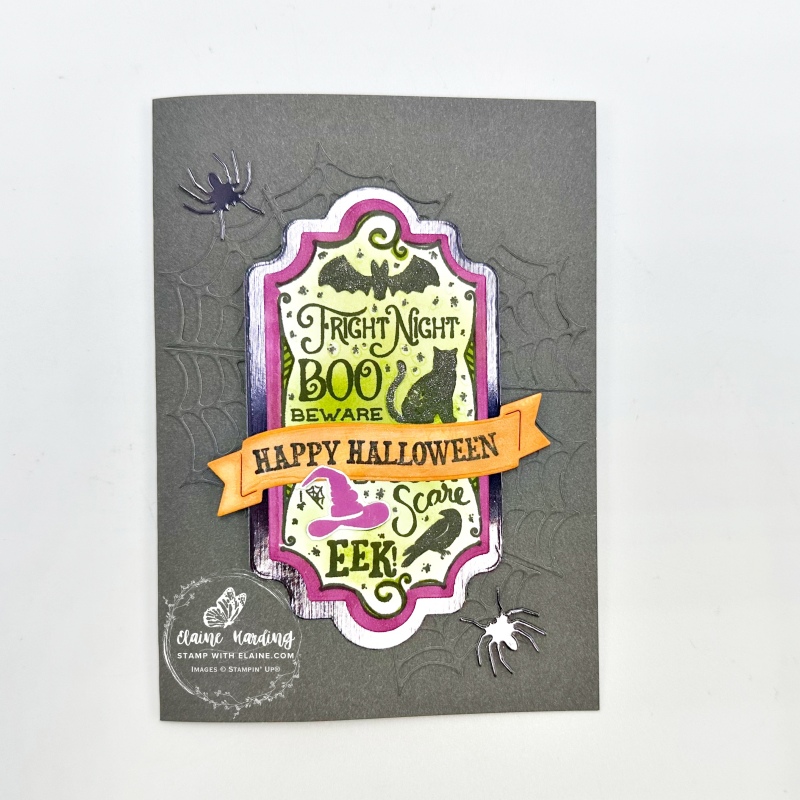
Today also happens to be Halloween, so may I take the opportunity to wish you Happy Halloween for those who mark this Halloween day. A quick card using Basic Gray two-tone card stock. By adding layers, this makes the card stronger because it is lighter in weight than ordinary A4 card stock.
Cutting guide
- Cut card base from Basic Gray two-tone card stock 5 ¾” x 8 ¼” (14.5 cm x 21 cm) folded in half.
- Basic White card stock inside layer : 3 ⅞” x 5 ½” (9.8 cm x 14 cm). Set aside.
- Back 5 ¾” x 4 ⅛” Basic Gray two-tone card stock with adhesive sheet on the lighter side and die cut 8 cobwebs using the darker side.
- Die cut 3 spiders and the larger of the two frames in Fright Night dies from the Tungsten coloured Metallic Textured paper from the Textured Metallic 12″x 12″ (30.5 x 30.5 cm) Specialty Paper.
Preparing elements
- Stamp detailed image once in Tuxedo Black and once in Petunia Pop on Basic White card stock.
- Die cut Tuxedo Black one with smaller Fright Night die. Use a blending brush to apply Granny Apple Green to the middle of the image and Petunia Pop Stampin’ Blend to colour the outer edge as shown.
- Fussy cut the witch’s hat from the Petunia pop image. Set aside.
- Next stamp “Happy Halloween” in Tuxedo Black Memento Ink on Basic White card stock. Die cut with banner die from Fright Night. Use a blending brush to add Timid Tiger ink to banner. Set aside.
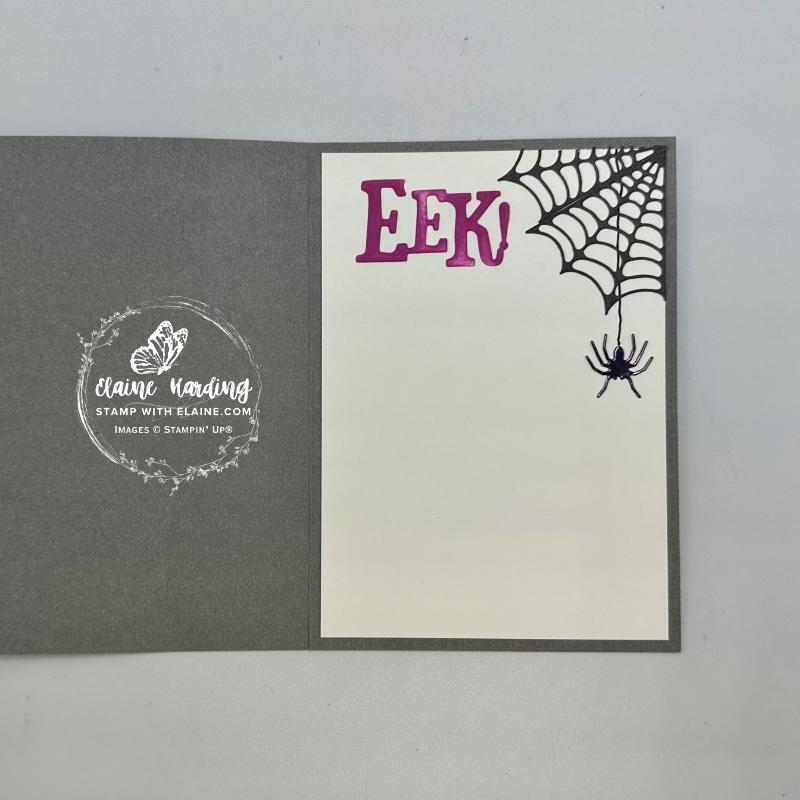
- Die cut EEK! out of Basic White card stock. Use blending brush to add Petunia Pop colour to the word.
Assembly
Card front
- Remove backing paper and adhere 6 cobwebs as pictured above on card front.
- Adhere Tungsten die cut frame centred on top.
- Put dimensionals on back of stamped image and adhere on top of Tungsten frame.
- Apply adhesive to back of “Happy Halloween” banner and adhere as shown.
- Adhere fussy cut Petunia Pop on top of the black hat as shown.
- Lastly adhere Tungsten spiders – one in the top left and one in the bottom right corner.
Inside card
- On Basic White layer draw a black line free hand and adhere one of the Tungsten spiders at the end.
- Remove backing paper and adhere two cobwebs in top right corner. Trim off excess.
- Apply adhesive to back of EEK! and adhere in top left as shown.
- Adhere Basic White layer to inside of card base.
Supply list
Listed below is the supply list. Just click on the picture to take you directly to the item in my online store.
Product List![Fright Night Bundle (English) [ 166107 ]](https://assets1.tamsnetwork.com/images/EC042017NF/166107s.jpg "Fright Night Bundle (English) [ 166107 ]")
![Basic Gray 12" X 12" (30.5 X 30.5 Cm) Two Tone Cardstock [ 166680 ]](https://assets1.tamsnetwork.com/images/EC042017NF/166680s.jpg "Basic Gray 12\" X 12\" (30.5 X 30.5 Cm) Two Tone Cardstock [ 166680 ]")
![Textured Metallic 12" X 12" (30.5 X 30.5 Cm) Specialty Paper [ 163772 ]](https://assets1.tamsnetwork.com/images/EC042017NF/163772s.jpg "Textured Metallic 12\" X 12\" (30.5 X 30.5 Cm) Specialty Paper [ 163772 ]")
![Adhesive Sheets [ 152334 ]](https://assets1.tamsnetwork.com/images/EC042017NF/152334s.jpg "Adhesive Sheets [ 152334 ]")
![Basic White A4 Cardstock [ 166781 ]](https://assets1.tamsnetwork.com/images/EC042017NF/166781s.jpg "Basic White A4 Cardstock [ 166781 ]")
![Petunia Pop Classic Stampin Pad [ 163811 ]](https://assets1.tamsnetwork.com/images/EC042017NF/163811s.jpg "Petunia Pop Classic Stampin Pad [ 163811 ]")
![Granny Apple Green Stampin' Pad [ 147095 ]](https://assets1.tamsnetwork.com/images/EC042017NF/147095s.jpg "Granny Apple Green Stampin' Pad [ 147095 ]")
![Timid Tiger Classic Stampin' Pad [ 165278 ]](https://assets1.tamsnetwork.com/images/EC042017NF/165278s.jpg "Timid Tiger Classic Stampin' Pad [ 165278 ]")
![Tuxedo Black Memento Ink Pad [ 132708 ]](https://assets1.tamsnetwork.com/images/EC042017NF/132708s.jpg "Tuxedo Black Memento Ink Pad [ 132708 ]")
![Blending Brushes [ 153611 ]](https://assets1.tamsnetwork.com/images/EC042017NF/153611s.jpg "Blending Brushes [ 153611 ]")

- SHOP ONLINE – EARN 10% REWARDS ON ALL PURCHASES OVER £20
- PURCHASE A STARTER KIT : Get £155 worth of products for only £99. Choose from current catalogues and any specials available. Free Shipping. Read more
- Subscribe to my Video Tutorials – click here