
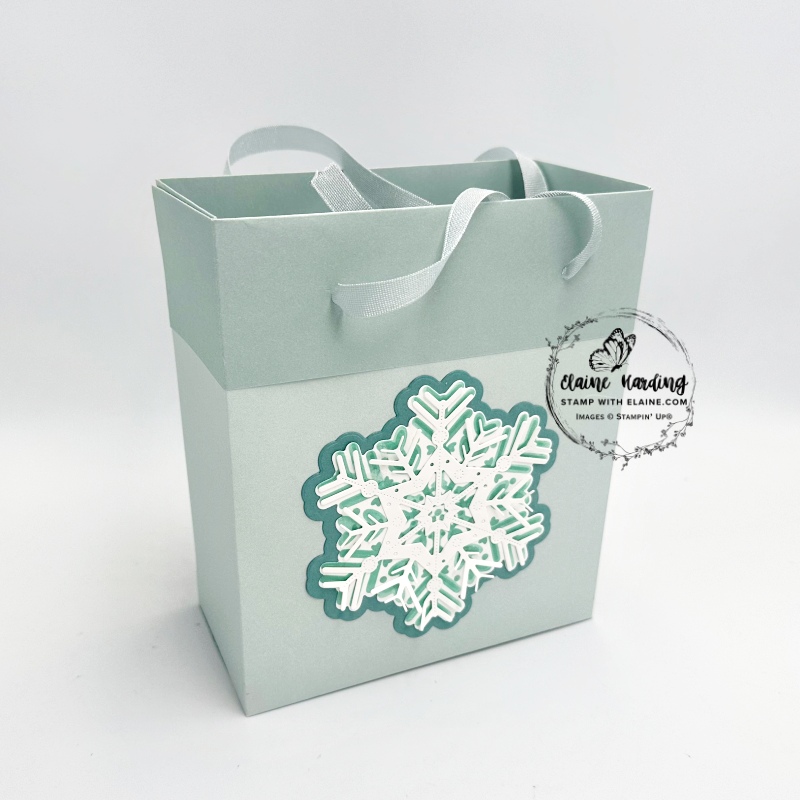
Embossing with Snowy Delight. The Snowy Delight Bundle in the September-December 2025 mini on page includes a stamp set, decorative masks as well as dies. The Snowflakes are rather on the large side, so instead of using it on a card I used it to decorate the side of a gift bag.
Gift bag
This is made from 2 sheets of 12″x 12″ (30.5 x 30.5 cm) Two-Tone Cloud Cover card stock. If you’re using paper without a pattern, it is easy peasy. However if you are using patterned paper, orient pattern so that it is on its side along the left edge of your simply Scoring board because you will be folding this section down. When you stand the bag up, the pattern should then be upright.
Bag base
You need 2 sheets of 12″x 12″ two-tone Cloud Cover card stock.
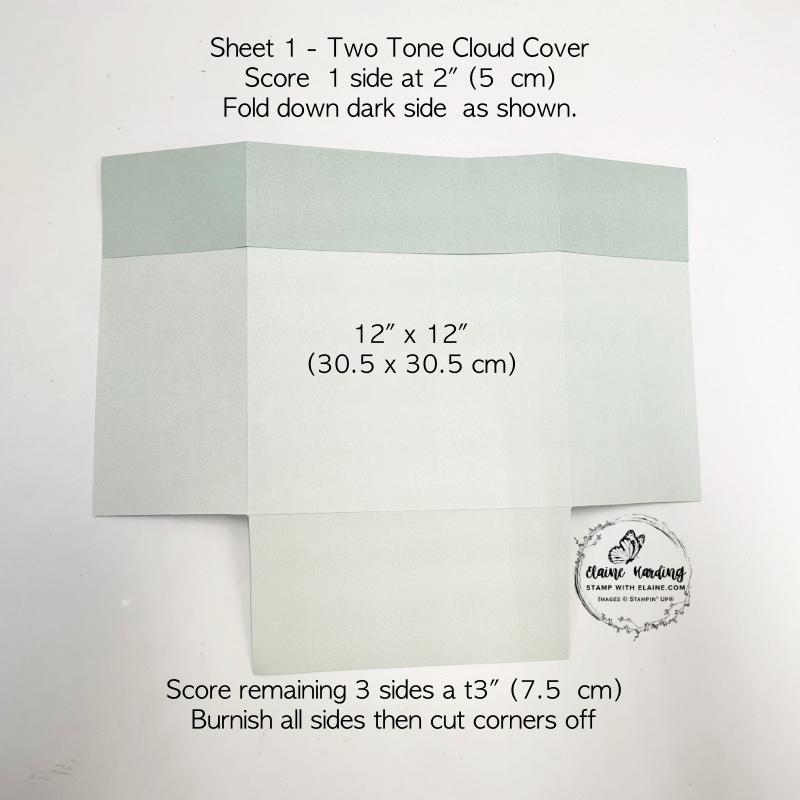
- Score 1 side at 2″ (5 cm) and fold it down and secure with adhesive
- Remaining 3 sides score at 3″ (7.5 cm).
- Bottom panel opposite folded edge at the top, cut and discard 2 corners as shown.
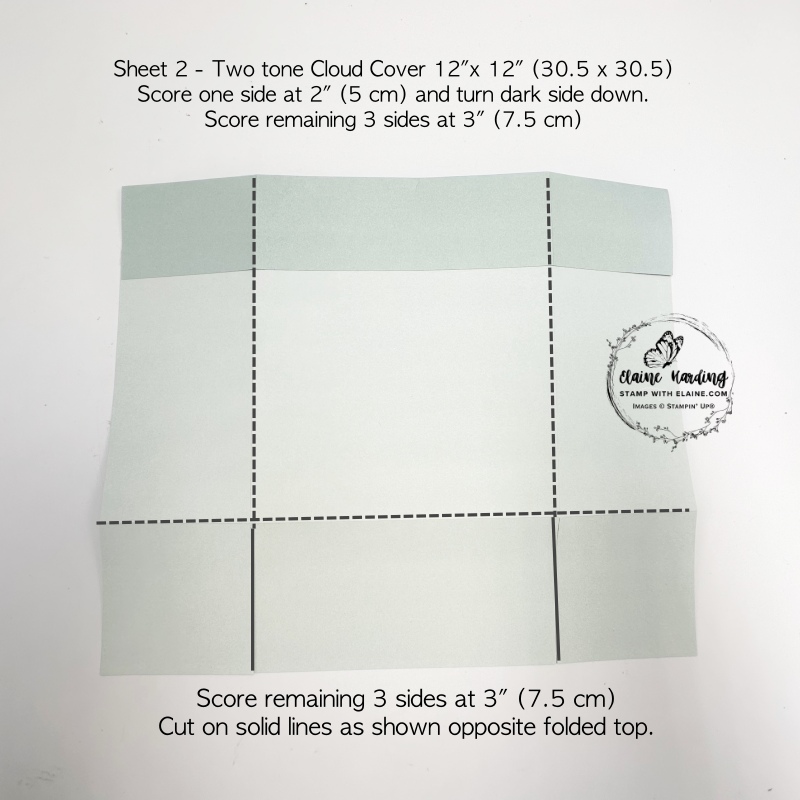
- Sheet 2 – score one side at 2″ (5 cm), fold it down and secure with adhesive.
- Score remaining 3 sides at 3″ (7.5 cm) then opposite folded top, cut tabs in 2 corners up to score on solid lines.
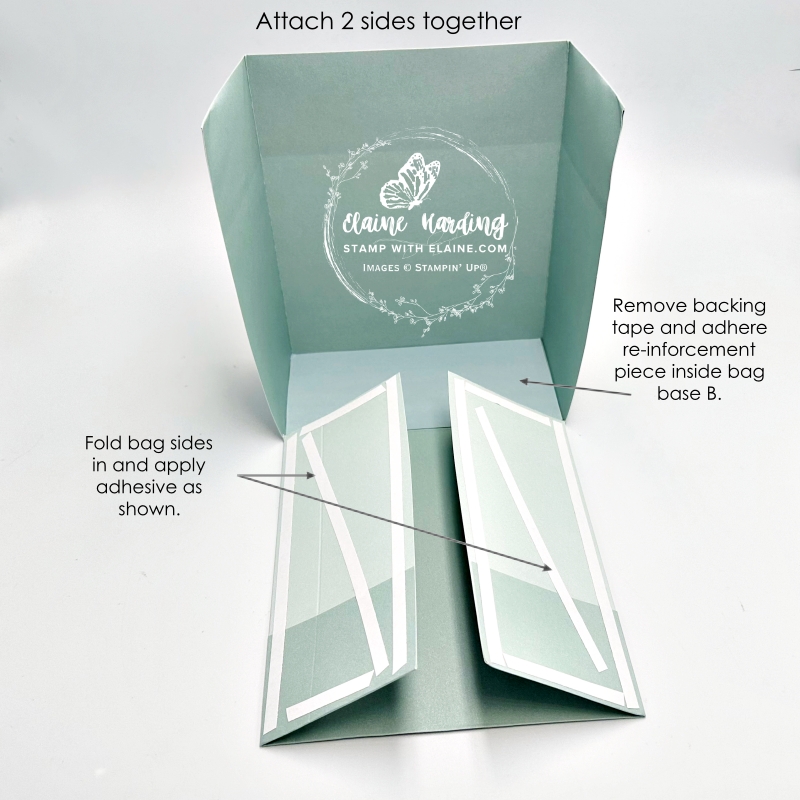
Reinforcement piece
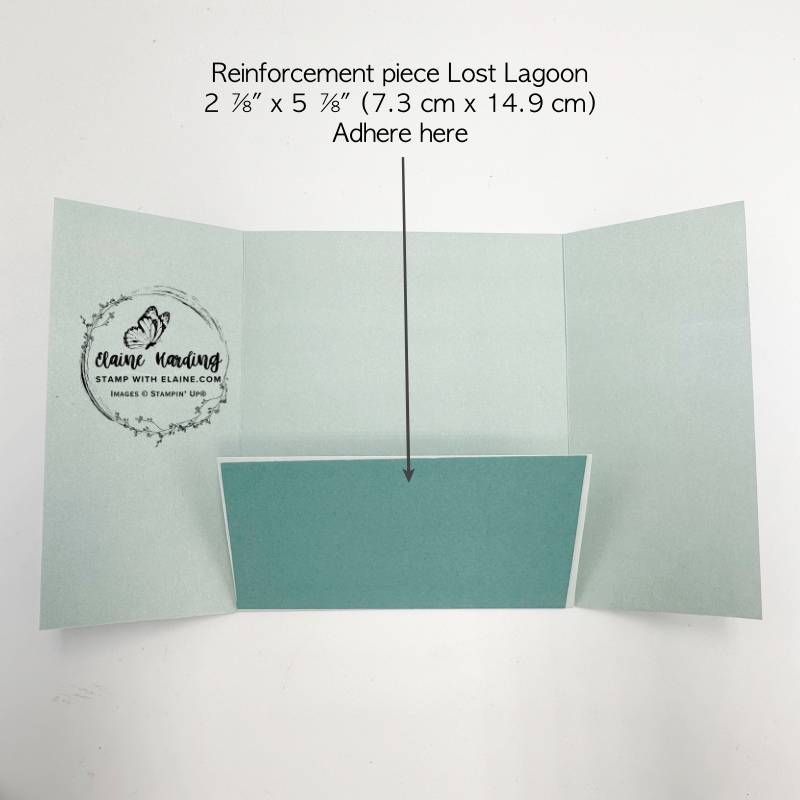
- Cut a scrap of Lost Lagoon to reinforce bag base measuring 2 ⅞” x 5 ⅞” (7.3 cm x 14.9 cm)
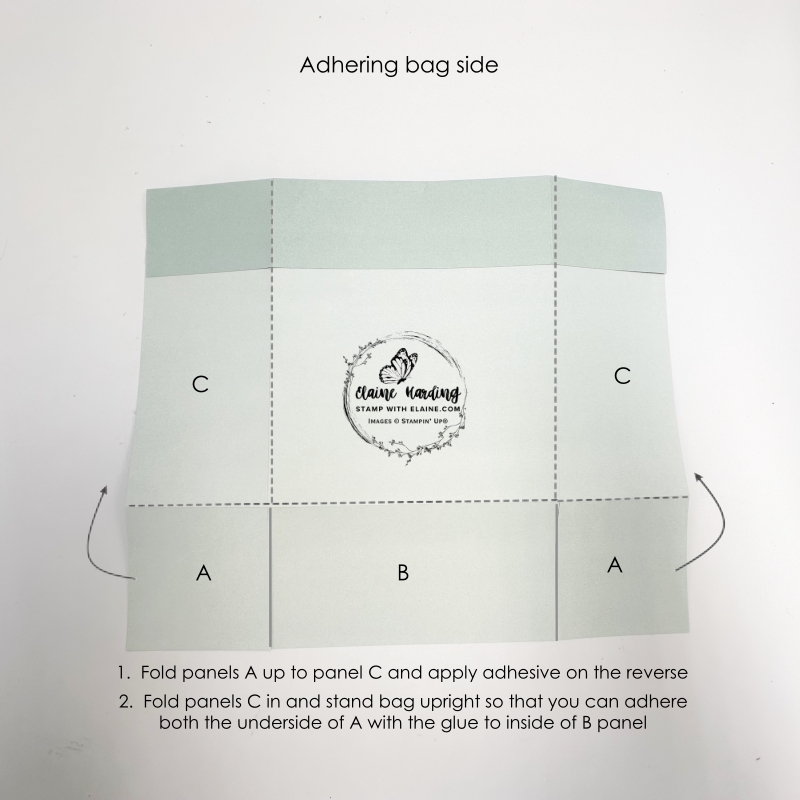
- On the other sheet, fold panels A up over panels C and apply adhesive to corner flaps. Stand the bag upright and fold along score lines, then adhere the underside of A to B to form one side of bag.
Assembling bag
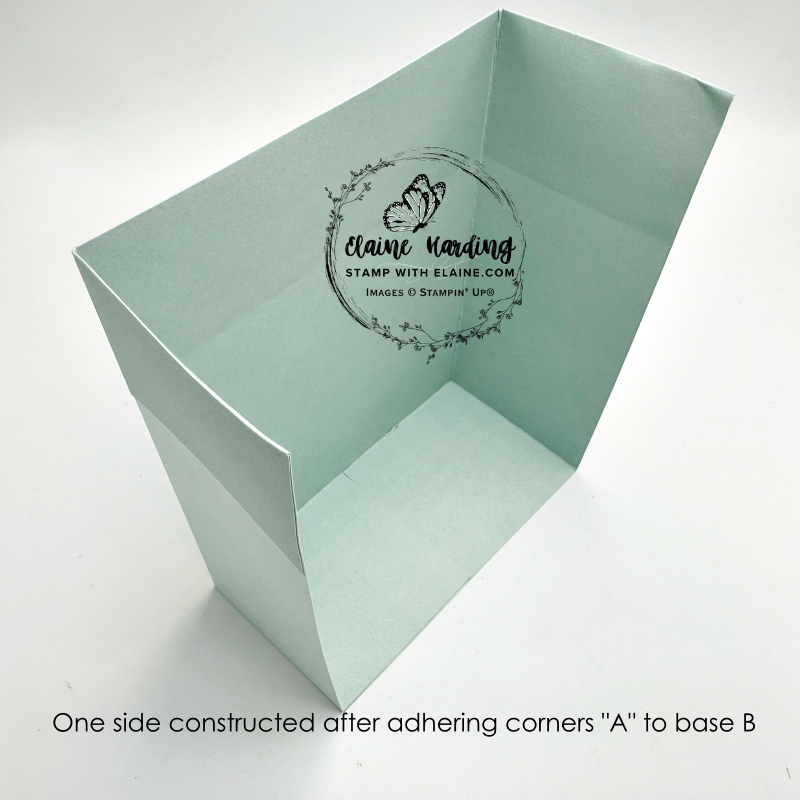
- Picture on left, this is what it should look like once you’ve adhere “A” corner panels to base “B”.
- Next apply adhesive to re-inforcement panel on Lost Lagoon piece – it won’t be seen once adhered.
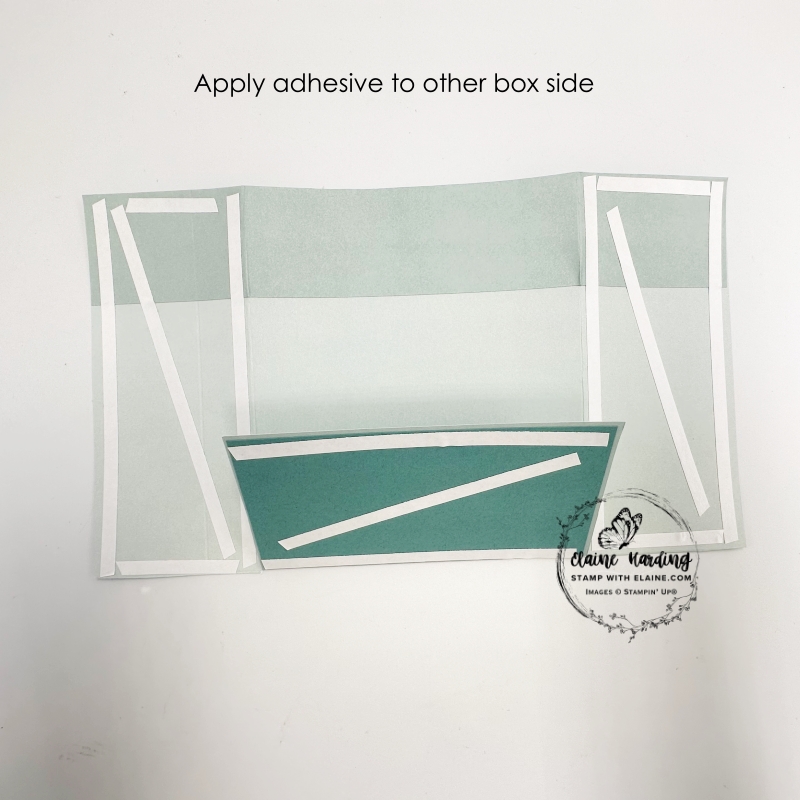
- You can see where adhesive has to be applied on the two sides.
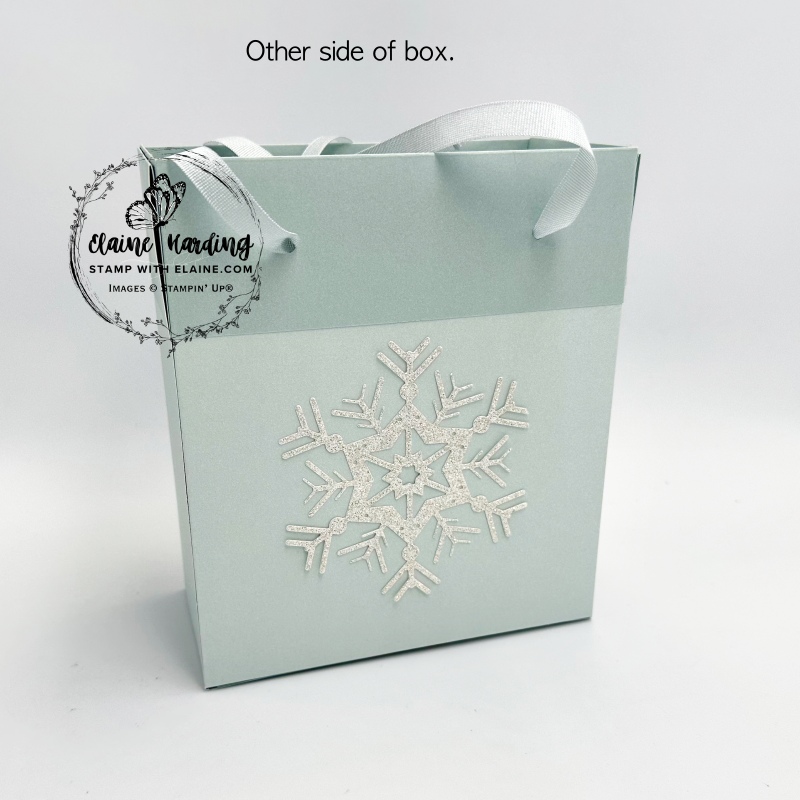
Attaching other side of box
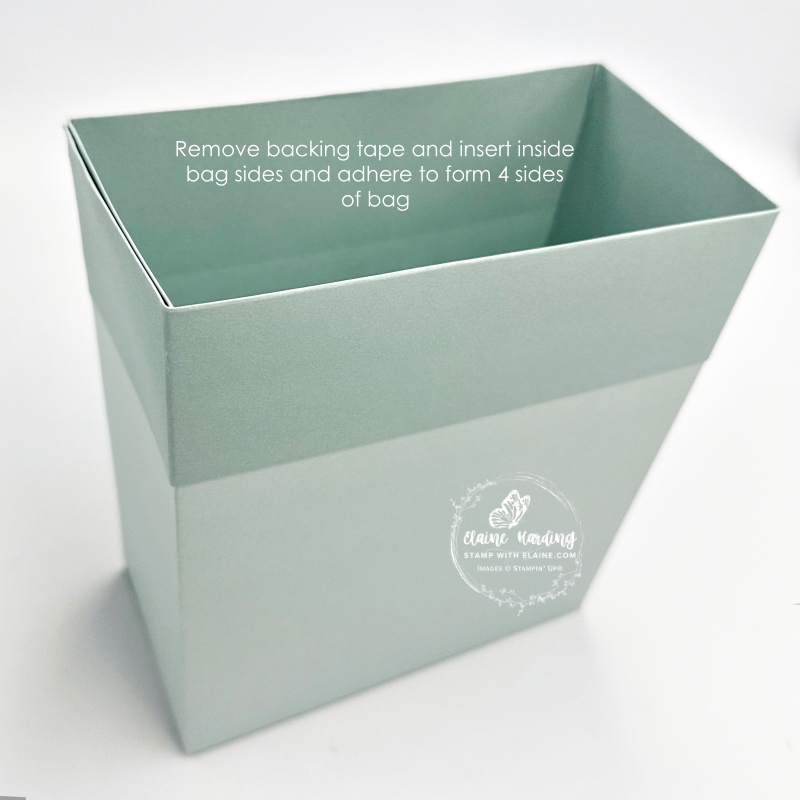
- Remove backing tape from reinforcement panel, insert into bag base as far as it will go and adhere.
- Internal bag sides – remove adhesive backing strips and adhere to inside of bag sides. It should not resemble picture on right.
- To complete project, simply punch holes on either side, thread ribbon through for the handles and tie a flat bow inside to secure it.
Snowy Delights Bundle


- Use a blending brush with Pool Party ink and a series of 4 Snowy Delights Decorative masks to create the large snowflake. Die cut it. Also die cut background mat layer snowflake with Lost Lagoon card stock.
- Select more intricate snowflake die to die cut one in Silver glimmer paper and one in Basic White card stock. Adhere Basic White one on top of the blended effect snowflake and add Clear Wink of Stella.
- On other side of bag, adhere the silver glimmer paper snowflake.
- Punch holes in bag with Crop-a-dile (retired) and thread Cloud Cover ribbon for the handles.
Supply list
Listed below is the supply list. Just click on the picture to take you directly to the item in my online store.
Product List![Snowy Delights Bundle (English) [ 165809 ]](https://assets1.tamsnetwork.com/images/EC042017NF/165809s.jpg "Snowy Delights Bundle (English) [ 165809 ]")
![Cloud Cover 12" X 12" (30.5 X 30.5 Cm) Two Tone Cardstock [ 166708 ]](https://assets1.tamsnetwork.com/images/EC042017NF/166708s.jpg "Cloud Cover 12\" X 12\" (30.5 X 30.5 Cm) Two Tone Cardstock [ 166708 ]")
![Lost Lagoon A4 Cardstock [ 133686 ]](https://assets1.tamsnetwork.com/images/EC042017NF/133686s.jpg "Lost Lagoon A4 Cardstock [ 133686 ]")
![Basic White A4 Cardstock [ 166781 ]](https://assets1.tamsnetwork.com/images/EC042017NF/166781s.jpg "Basic White A4 Cardstock [ 166781 ]")
![Berry Burst, Old Olive & White 12" X 12" (30.5 X 30.5 Cm) Glimmer Specialty Paper [ 163769 ]](https://assets1.tamsnetwork.com/images/EC042017NF/163769s.jpg "Berry Burst, Old Olive & White 12\" X 12\" (30.5 X 30.5 Cm) Glimmer Specialty Paper [ 163769 ]")
![Cloud Cover 3/8" (1 Cm) Faux Linen Ribbon [ 165271 ]](https://assets1.tamsnetwork.com/images/EC042017NF/165271s.jpg "Cloud Cover 3/8\" (1 Cm) Faux Linen Ribbon [ 165271 ]")
![Blending Brushes [ 153611 ]](https://assets1.tamsnetwork.com/images/EC042017NF/153611s.jpg "Blending Brushes [ 153611 ]")
![Pool Party Classic Stampin' Pad [ 147107 ]](https://assets1.tamsnetwork.com/images/EC042017NF/147107s.jpg "Pool Party Classic Stampin' Pad [ 147107 ]")
![Clear Wink Of Stella Glitter Brush [ 141897 ]](https://assets1.tamsnetwork.com/images/EC042017NF/141897s.jpg "Clear Wink Of Stella Glitter Brush [ 141897 ]")

- SHOP ONLINE – EARN 10% REWARDS ON ALL PURCHASES OVER £20
- PURCHASE A STARTER KIT : Get £155 worth of products for only £99. Choose from current catalogues and any specials available. Free Shipping. Read more
- Subscribe to my Video Tutorials – click here