
One Sheet Wonder Part 2 – Autumn Toile. Ready for part 2? Today, we will look at Cards 4 to 6. I will be replicating the cutting guide and card templates for easy reference.
Cards 4, 5 & 6
Additional items in part 2 is the So Swirly Embossing folder. I departed from what was recommended for card 4 because I wasn’t keen on using the largesy die in the die set to cut a tree from the Designer Series Paper. In lieu of cutting the tree, I simply fussy cut the paper to create a scene and used the largest Tree die to stamp and cut a proper tree which I coloured in with Stampin’ Blends (card 4 on the left).

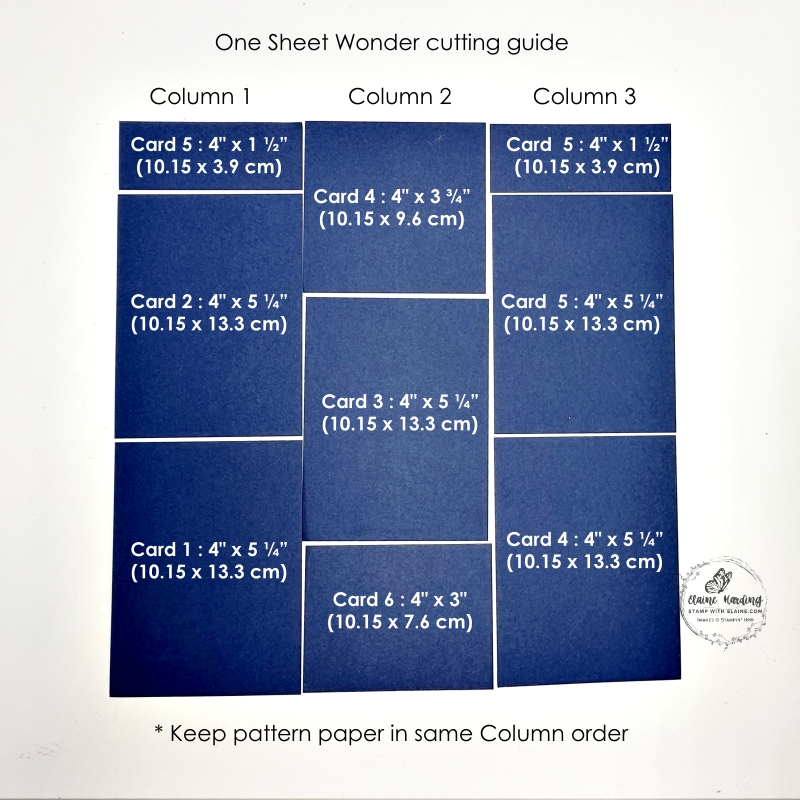
Cutting guide 12″x 12″ (30.5 x 30.5 cm) paper
Be aware of orientation of patterned paper if you’ve selected a directional pattern. However, if you select a non-directional pattern, it will make life easier. Another tip – prepare 6 card bases first. You can pick out card base colours according to those reflected in the patterned paper you are using, or you can stick to neutral colours like Basic White or Very Vanilla. Number each card on a post-it note and adhere to the cards so you can “file” them accordingly as you cut each column.
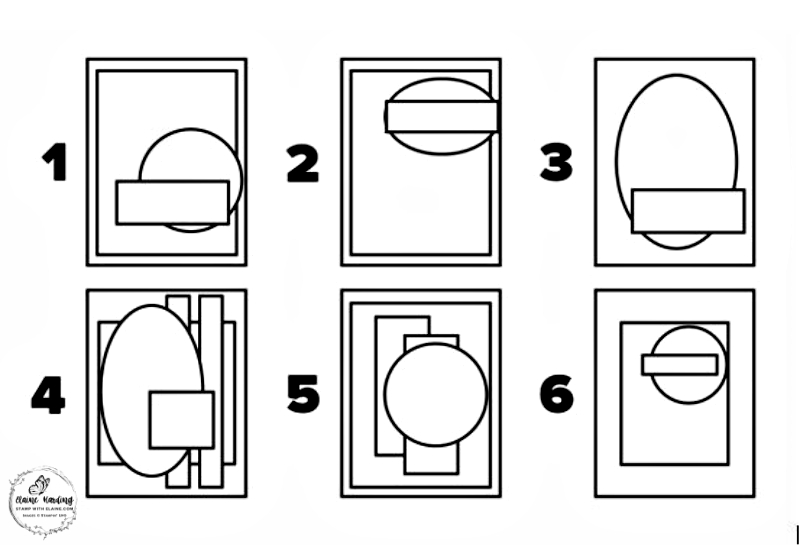
Card Templates
These were the card templates provided by Stampin’ Up! for all 6 cards. Today in Part 2 – we’re referring to Cards 4 to 6.
Fourth card
Use the largest die to die cut from this piece of DSP. I went off piste here, because I didn’t like the trees within a tree effect. If you like the effect, go ahead and follow the sample as illustrated in the catalogue on page 42.

- Cut Pecan Pie card base at 5 ¾” x 8 ¼” (14.5 cm x 21 cm).
- Inside layer : Very Vanilla cut at 5 ½” x 3 ⅞” (14 cm x 9.8 cm).
- Stamp tree in Pecan Pie from the Autumn Trees stamp set on a scrap of Very Vanilla card stock. Colour the trunk and branches with light Pecan Pie Stampin’ Blend and Mossy Meadow Stampin Blends. Die cut tree with Autumn Trees die. Also stamp deer, colour and die cut. Set aside.
- Fussy cut elements of the DSP to create a scene for the card front.
- Adhere reverse side of DSP directly on to card front, followed by tree, and fussy cut pieces.
Assembling pieces for card front
- Cut two strips of Earthen Toned Metallic Specialty paper and adhere to left of card as pictured and adhere to left of card front on top of DSP.
- Stamp greeting from Amber Autumn stamp set in Mossy Meadow ink on Very Vanilla card stock. Trim and stagger greeting as shown in top left corner.
- Adhere large stamped tree first, then arrange and adhere fussy cut pieces to create the scene.
- Finally adhere stamped and die cut deer on the front and add streaky dots embellishments.
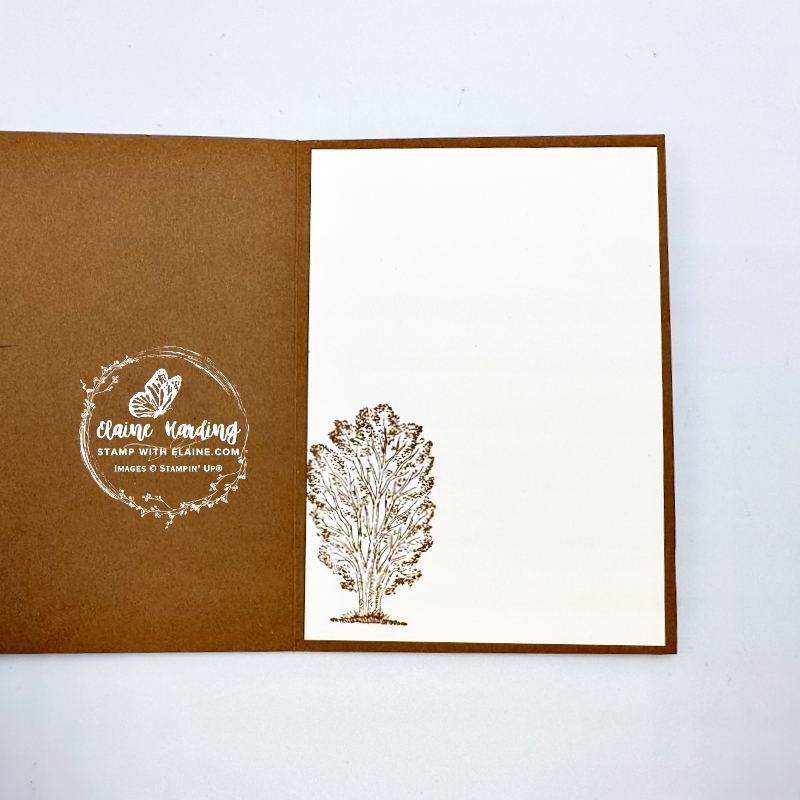
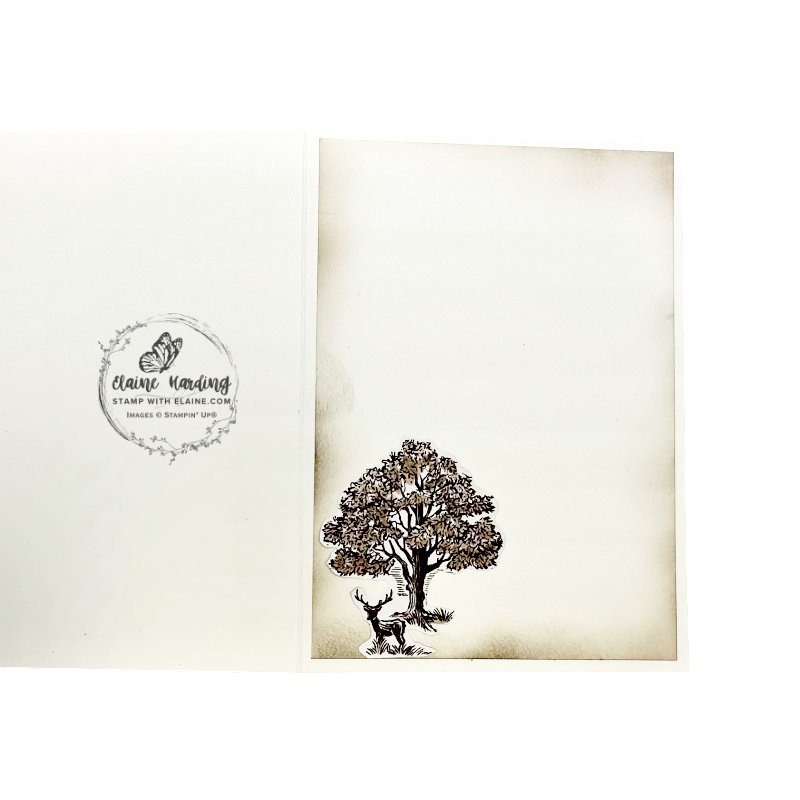
Inside card
- Stamp tree in bottom left corner of Very Vanilla piece.
- Adhere Very Vanilla layer to inside of card base leaving an even border on all 4 sides.
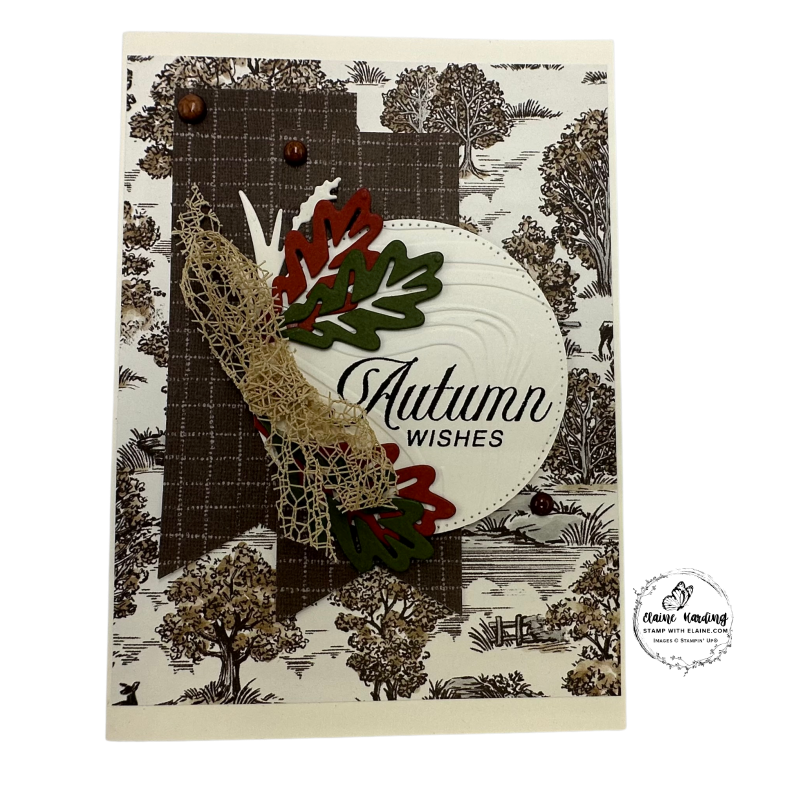
Fifth Card
Use the reverse side of DSP as accent pieces.
- Cut Very Vanilla card base at 5 ¾” x 8 ¼” (14.5 cm x 21 cm).
- Inside layer : Very Vanilla cut at 5 ½” x 3 ⅞” (14 cm x 9.8 cm).
- Stack both DSP pieces on top of one another and cut a flag end at the bottom as shown.
- Die cut a pair each of leaves with Cajun Craze and Mossy Meadow card stock, and a sprig from Very Vanilla card stock.
Label
- Stamp “Autumn Wishes” on a scrap of Very Vanilla and die cut with 2nd largest circle from Stylish Shapes dies.
- Run it through with the So Swirly Embossing folder to add texture.
Assembly
- Stagger and adhere flag end pieces as shown.
- Arrange leaves and sprig along left side of circle and adhere with glue dots.
- Apply dimensionals to back of circle and adhere overlapping flag end pieces.
- Tie bow and secure with strong adhesive to cover up gap between leaves.
Inside card
- Adhere fussy cut tree and deer in bottom left corner.
- Use a blending brush to apply a touch of Early Espresso ink on the edges.
- Then adhere Very Vanilla layer to inside of card base leaving an even border on all 4 sides.
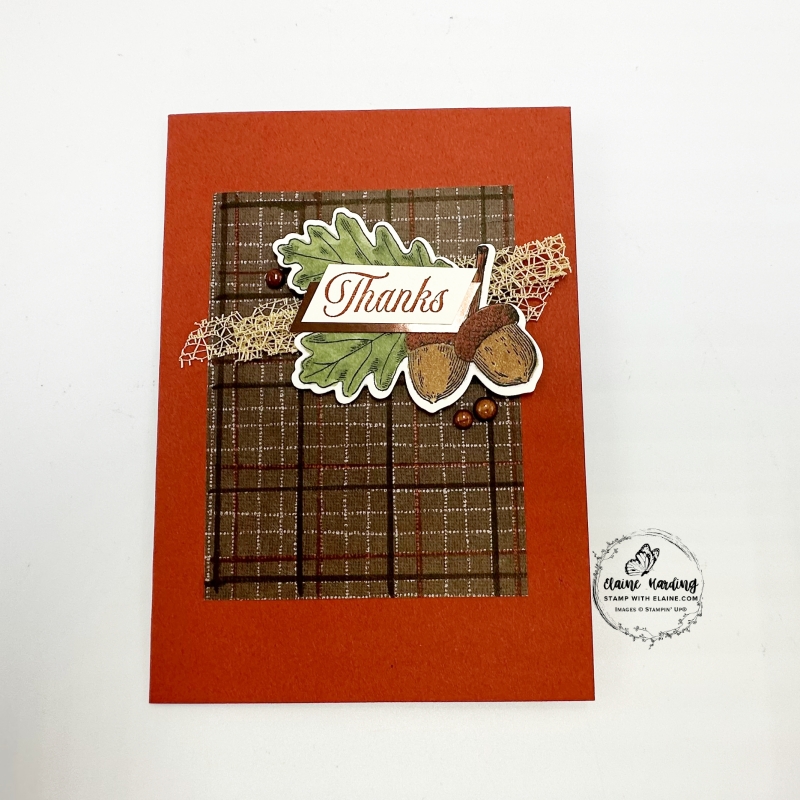
Sixth card
Use marker pens to create a plaid effect on the reverse of the DSP. I used Early Espresso marker followed by a Cajun Craze one to create the plaid effect. Unfortunately, Stampin’ Up! are discontinuing supplying Stampin’ Write Markers so the Regals Stampin’ Write Markers are no longer available. You can substitute Cajun Craze I used with an alternative colour.

- Cut Cajun Craze card base at 5 ¾” x 8 ¼” (14.5 cm x 21 cm).
- Inside layer : Very Vanilla cut at 5 ½” x 3 ⅞” (14 cm x 9.8 cm).
- Adhere doctored piece of DSP to front of card.
- Stamp the acorn and leaf image on a scrap of Very Vanilla card stock. Colour with Mossy Meadow, Pecan Pie, Cajun Craze Stampin’ Blends. Die cut with Amber Autumn Die.
- Stamp “Thanks” on Very Vanilla card stock and trim at an angle. Also cut a larger piece out of Earthen Toned Metallic Specialty paper.
- Cut a length of Irregular Weave ⅜” (1 cm) ribbon and set aside.
Assembly
- Apply Stamp n Seal where you want ribbon to go. Adhere ribbon looping back and forth applying adhesive on each layer to secure it.
- Straddle dimensionals on either side of ribbon and attach die cut acorns and leaves piece.
- Attach tear n’ tape to back of Very Vanilla sentiment and adhere to Earthen Toned Metallic piece.
- Adhere a trio of Streaky dots as pictured.
Inside card
- Partially stamp the acorn and leave in upper right corner with Cajun Craze ink.
- Adhere Very Vanilla layer to inside of card leaving an even border on all 4 sides.
Voila! All six cards complete – 3 from the previous Sunday and 3 today! Hope you enjoyed it as much as I did.
New Online Exclusives now available
As of 4 November, Stampin’ Up! has released several new online exclusives, so do check it out.
Incidentally, we are actually moving house today and I have no access to internet or my computer which has been packed away. This post has been scheduled in advance as are several posts in the future to prepare for this. Hopefully in the not too distant future we will be back online at our new home.
Supply list
Listed below is the supply list. Just click on the picture to take you directly to the item in my online store.
Product List![Autumn Toile Suite Collection (English) [ 165904 ]](https://assets1.tamsnetwork.com/images/EC042017NF/165904s.jpg "Autumn Toile Suite Collection (English) [ 165904 ]")
![Amber Autumn Bundle (English) [ 165893 ]](https://assets1.tamsnetwork.com/images/EC042017NF/165893s.jpg "Amber Autumn Bundle (English) [ 165893 ]")
![Amber Autumn Cling Stamp Set (English) [ 165883 ]](https://assets1.tamsnetwork.com/images/EC042017NF/165883s.jpg "Amber Autumn Cling Stamp Set (English) [ 165883 ]")
![Amber Autumn Dies [ 165892 ]](https://assets1.tamsnetwork.com/images/EC042017NF/165892s.jpg "Amber Autumn Dies [ 165892 ]")
![Autumn Trees Bundle [ 165900 ]](https://assets1.tamsnetwork.com/images/EC042017NF/165900s.jpg "Autumn Trees Bundle [ 165900 ]")
![Autumn Trees Cling Stamp Set [ 165896 ]](https://assets1.tamsnetwork.com/images/EC042017NF/165896s.jpg "Autumn Trees Cling Stamp Set [ 165896 ]")
![Autumn Trees Dies [ 165899 ]](https://assets1.tamsnetwork.com/images/EC042017NF/165899s.jpg "Autumn Trees Dies [ 165899 ]")
![Stylish Shapes Dies [ 159183 ]](https://assets1.tamsnetwork.com/images/EC042017NF/159183s.jpg "Stylish Shapes Dies [ 159183 ]")
![So Swirly Embossing Folder [ 163791 ]](https://assets1.tamsnetwork.com/images/EC042017NF/163791s.jpg "So Swirly Embossing Folder [ 163791 ]")
![Irregular Weave 3/8" (1 Cm) Trim [ 165903 ]](https://assets1.tamsnetwork.com/images/EC042017NF/165903s.jpg "Irregular Weave 3/8\" (1 Cm) Trim [ 165903 ]")
![Streaked Dots [ 165902 ]](https://assets1.tamsnetwork.com/images/EC042017NF/165902s.jpg "Streaked Dots [ 165902 ]")
![Autumn Toile 12" X 12" (30.5 X 30.5 Cm) Designer Series Paper [ 165882 ]](https://assets1.tamsnetwork.com/images/EC042017NF/165882s.jpg "Autumn Toile 12\" X 12\" (30.5 X 30.5 Cm) Designer Series Paper [ 165882 ]")
![Earthen Toned Metallic 12" X 12" (30.5 X 30.5 Cm) Specialty Paper [ 165901 ]](https://assets1.tamsnetwork.com/images/EC042017NF/165901s.jpg "Earthen Toned Metallic 12\" X 12\" (30.5 X 30.5 Cm) Specialty Paper [ 165901 ]")
![Cajun Craze A4 Card Stock [ 121683 ]](https://assets1.tamsnetwork.com/images/EC042017NF/121683s.jpg "Cajun Craze A4 Card Stock [ 121683 ]")
![Pecan Pie A4 Cardstock [ 161726 ]](https://assets1.tamsnetwork.com/images/EC042017NF/161726s.jpg "Pecan Pie A4 Cardstock [ 161726 ]")
![Very Vanilla A4 Cardstock [ 166785 ]](https://assets1.tamsnetwork.com/images/EC042017NF/166785s.jpg "Very Vanilla A4 Cardstock [ 166785 ]")
![Early Espresso Classic Stampin' Pad [ 147114 ]](https://assets1.tamsnetwork.com/images/EC042017NF/147114s.jpg "Early Espresso Classic Stampin' Pad [ 147114 ]")
![Mossy Meadow Classic Stampin' Pad [ 147111 ]](https://assets1.tamsnetwork.com/images/EC042017NF/147111s.jpg "Mossy Meadow Classic Stampin' Pad [ 147111 ]")
![Cajun Craze Stampin' Blends Combo Pack [ 154879 ]](https://assets1.tamsnetwork.com/images/EC042017NF/154879s.jpg "Cajun Craze Stampin' Blends Combo Pack [ 154879 ]")
![Pecan Pie Stampin’ Blends Combo Pack [ 161674 ]](https://assets1.tamsnetwork.com/images/EC042017NF/161674s.jpg "Pecan Pie Stampin’ Blends Combo Pack [ 161674 ]")
![Mossy Meadow Stampin' Blends Combo Pack [ 154890 ]](https://assets1.tamsnetwork.com/images/EC042017NF/154890s.jpg "Mossy Meadow Stampin' Blends Combo Pack [ 154890 ]")
![Neutrals Stampin' Write Markers [ 147158 ]](https://assets1.tamsnetwork.com/images/EC042017NF/147158s.jpg "Neutrals Stampin' Write Markers [ 147158 ]")

- SHOP ONLINE – EARN 10% REWARDS ON ALL PURCHASES OVER £20
- PURCHASE A STARTER KIT : Get £155 worth of products for only £99. Choose from current catalogues and any specials available. Free Shipping. Read more
- Subscribe to my Video Tutorials – click here