
Free shipping
- All order types qualify for this promotion.
- Free shipping is for three days only. Orders must be opened and closed between 10 and 12 December.
- Free shipping automatically applies to your basket after the qualifying amount has been met, which is 75 € | £60 (before shipping and handling).
- Coupon codes and Stampin’ Rewards will lower your order’s retail amount. Orders must meet the qualifying amount to be eligible for free shipping.
- The additional cost for expedited shipping is not covered by this promotion.
- Please keep in mind that due to the high volume of orders and the Christmas season, the distribution centre may fall behind our typical shipping timeframes. We will do all we can to return to our regular service levels as quickly as possible. Any orders placed during this promotion are not guaranteed to arrive before or by 25 December.
Please note that, due to the time difference, this promotion will start on 9 December at 11:00 p.m., for Ireland and the United Kingdom.
Twelve Days of Crafting Advent project
Twelve Days of Crafting Advent. I wondered why it was only a 12 day Advent Calendar. The philosophy behind this is that The Christmas feast spans over twelve days from December 25 to January 6 into the new year. So if you gift this as a present to yourself, or someone near and dear, they can open it on Christmas day and can look forward during the holiday period to find out what is behind each door to unleash their creativity!
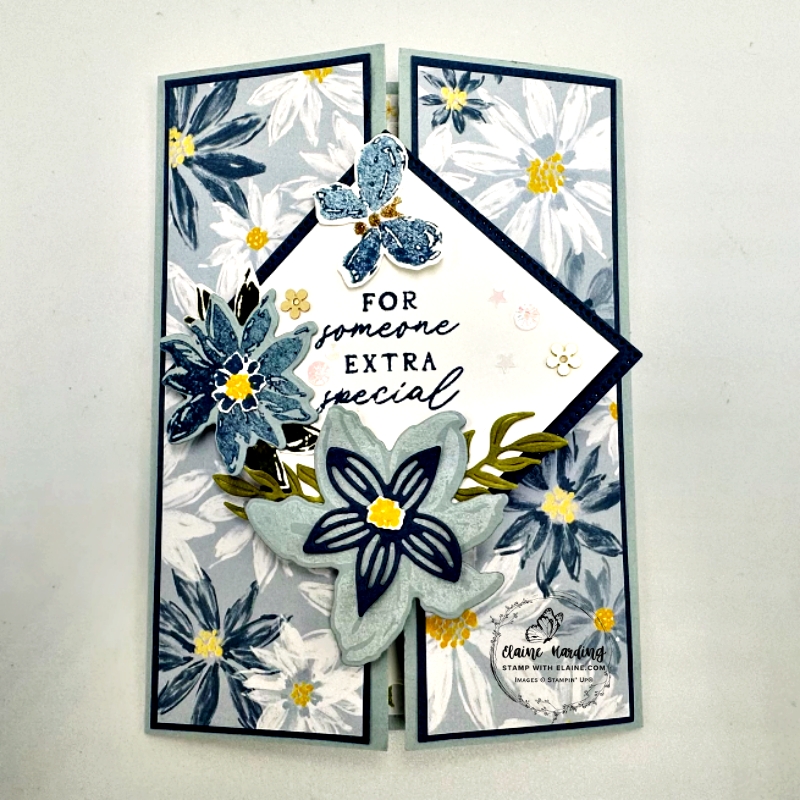
Shutter card
I’ve chosen to make a shutter card with mine. Needless to say, I didn’t wait for Christmas to open mine. Not known for my patience! lol!
Cutting guide
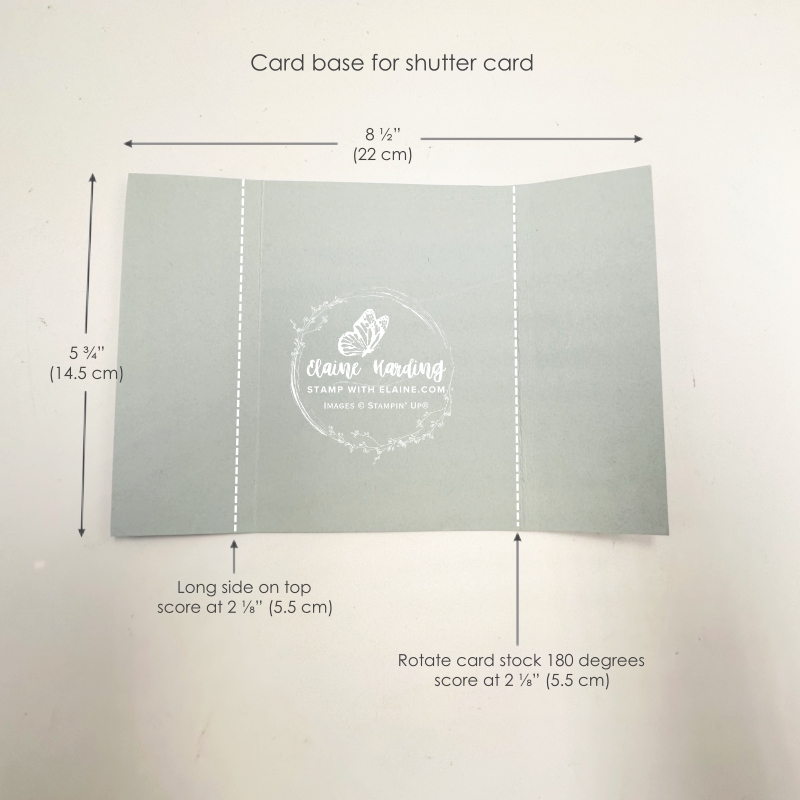
- Cloud Cover card stock card base : 5 ¾” x 8 ½” (14.5 cm x 22 cm). Long side on top score at 2 ⅛” (5.5 cm).
- Rotate card stock 180o and score opposite side at 2 ⅛” (5.5 cm).
- Misty Moonlight Mat layer #1 front panels : cut 2 pieces 1 ⅞ “ x 5 ⅝ “ (4.5 cm x 14 cm)
- DSP cut 2 pieces 1 ¾ “ x 5 ½ “ (4 cm x 13.5 cm).
- Adhere DSP to each mat layer then adhere to front panels.
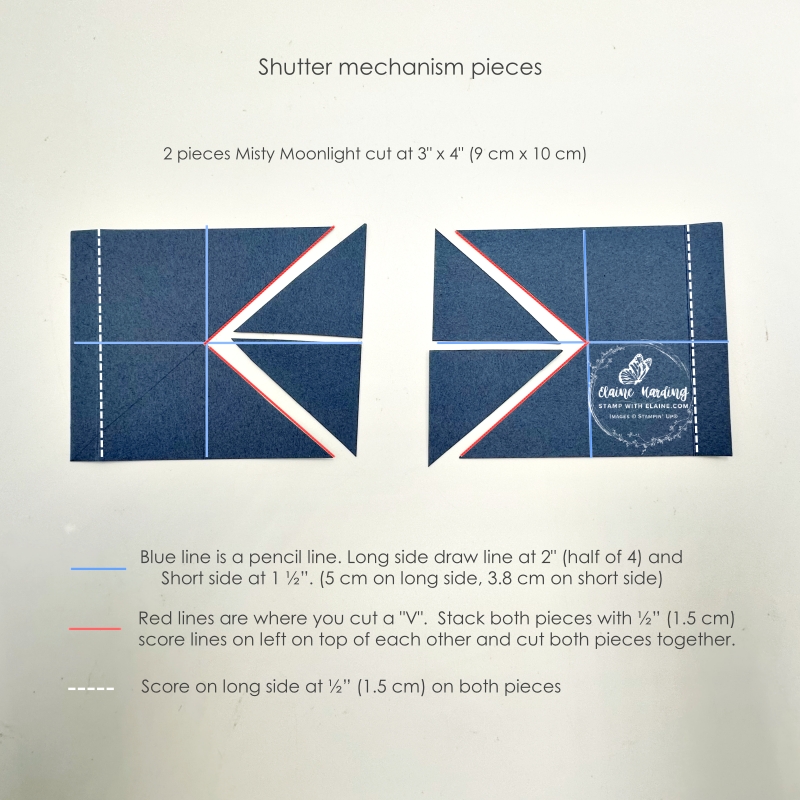
Shutter mechanism
- Cut 2 pieces Misty Moonlight pieces 3 ½” x 4” (7.5 cm x 10.2 cm). On long side, score each piece at ½” (1.5 cm)
- Short side, draw a line at 1 ½” (3.8 cm) and on long side at 2″ (5 cm).
- With ½” (1.5 cm) score line on left, stack pieces on top of one another. Cut from left corner to where the diagonal lines intersect. Tip: I only cut to the intersecting point, then cut straight up to form a 90o triangle to make it easier to cut on the diagonal for the other side as shown in picture on the right.
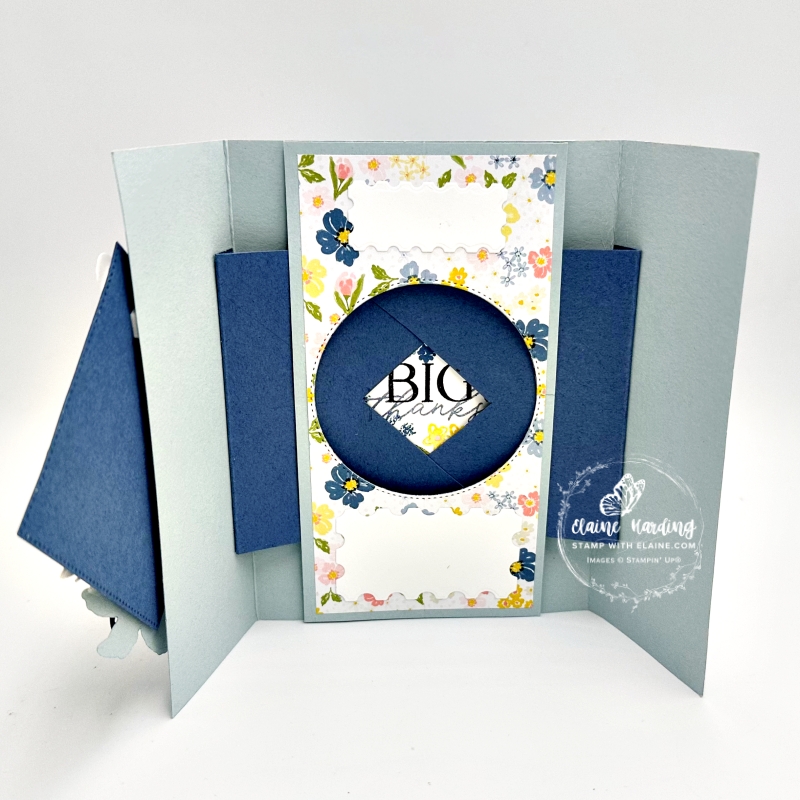
Inside Centre panel
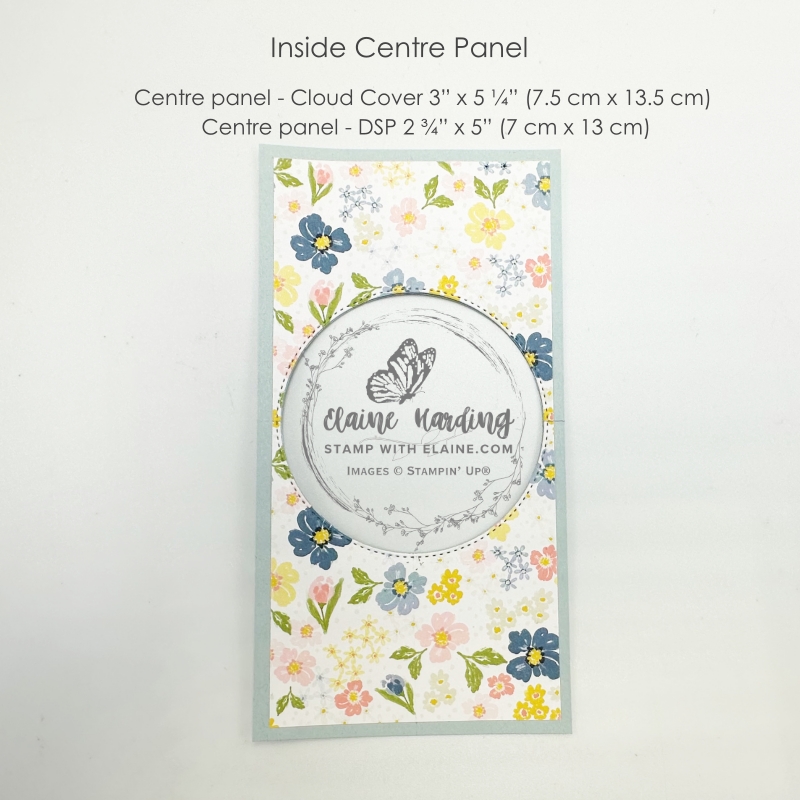
- Cut Cloud Cover card stock at 3″ x 5 ¾” (7.5 cm x 14.5 cm)
- Adhere DSP cut at 2 ¾” x 5 ½” (7 cm x 14 cm) to Cloud Cover layer.
- Use 2nd largest Stylish Shapes circle die to die cut an aperture in the middle.
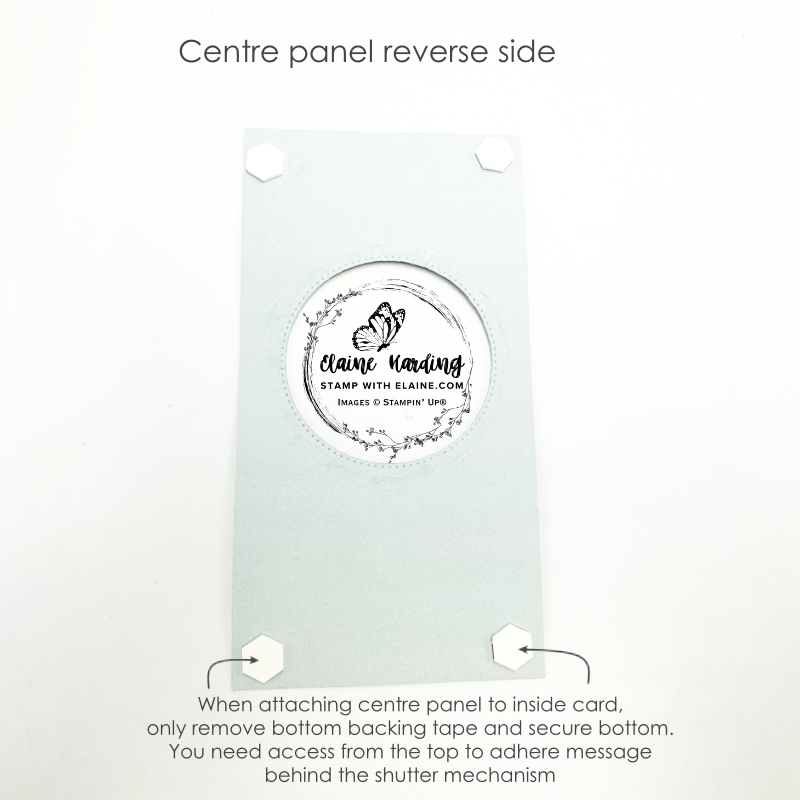
- Flip over and and apply dimensionals on all 4 corners.
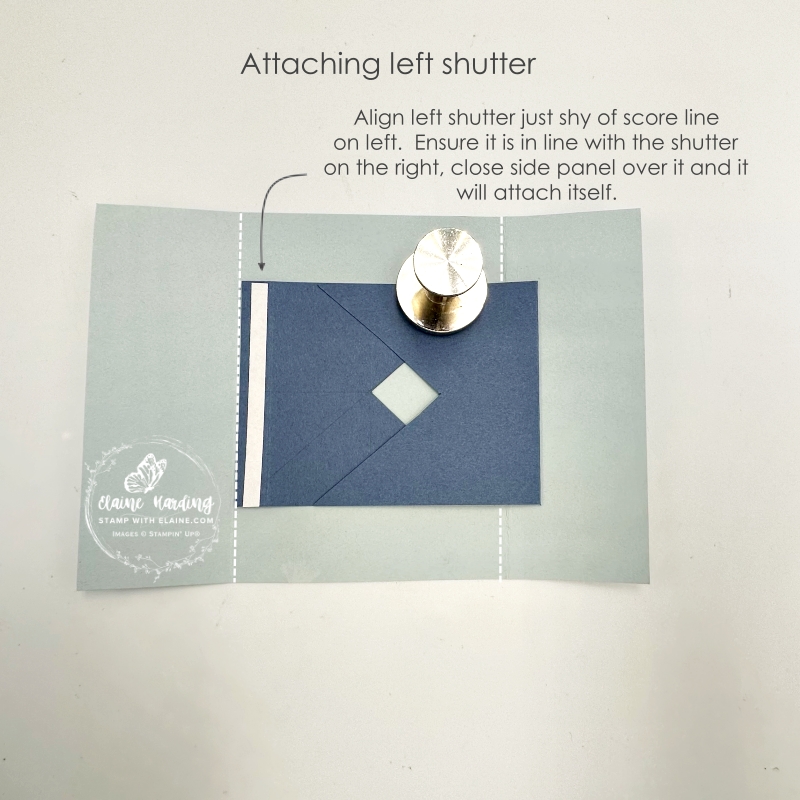
Attaching shutter mechanism
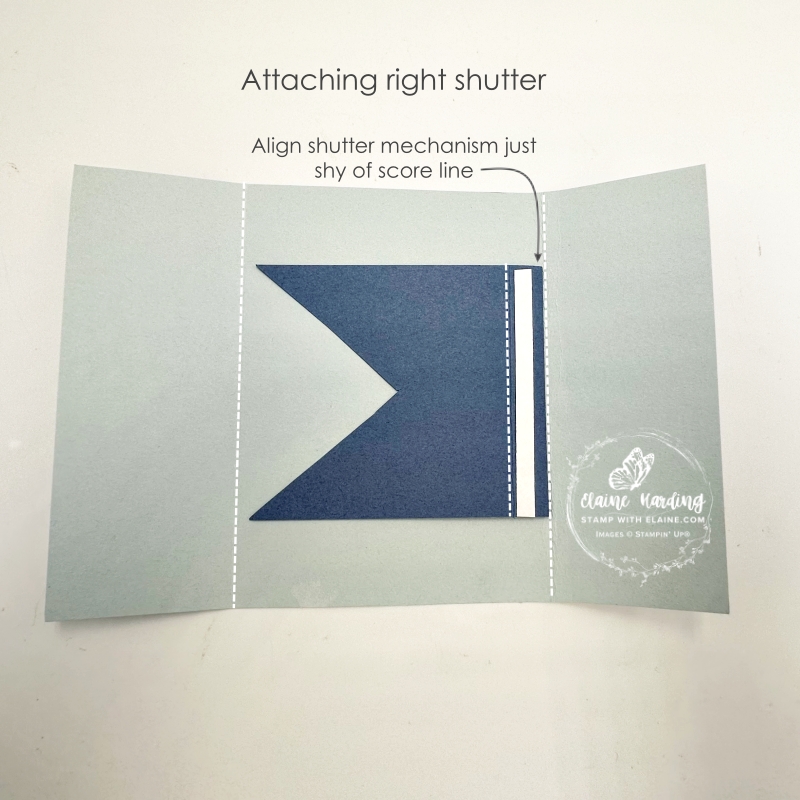
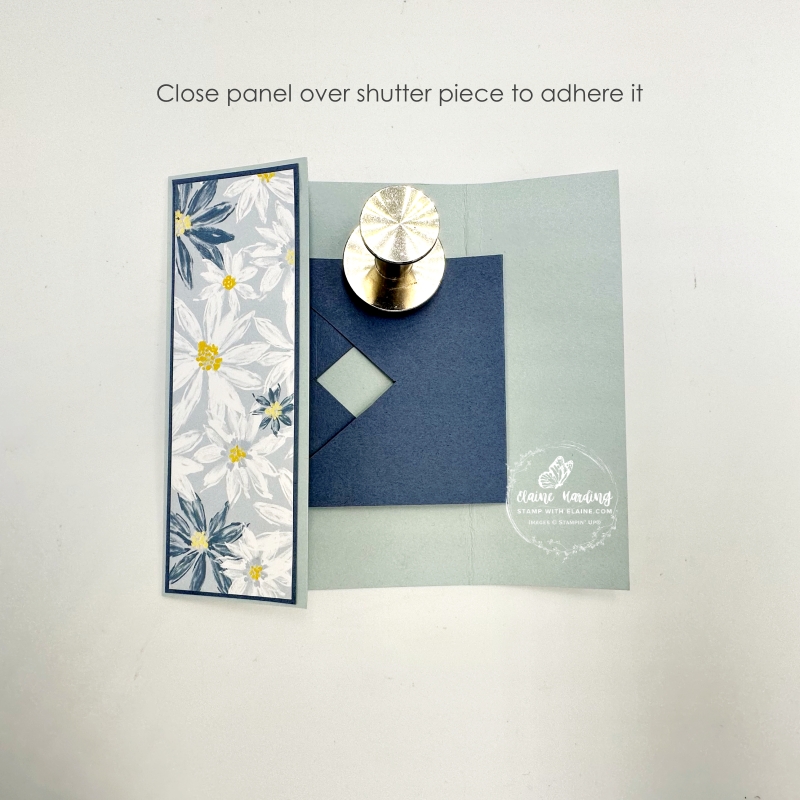
- Align right shutter piece just shy of score line, ensure panel can still close easily before removing backing tape. Close right panel on top to adhere.
- Repeat for left side, open right shutter while you’re aligning the left one. Then close and align both so that they are straight. Remove backing tape then close left panel over the shutter to adhere it.
Stamp and insert circle behind shutter mechanism
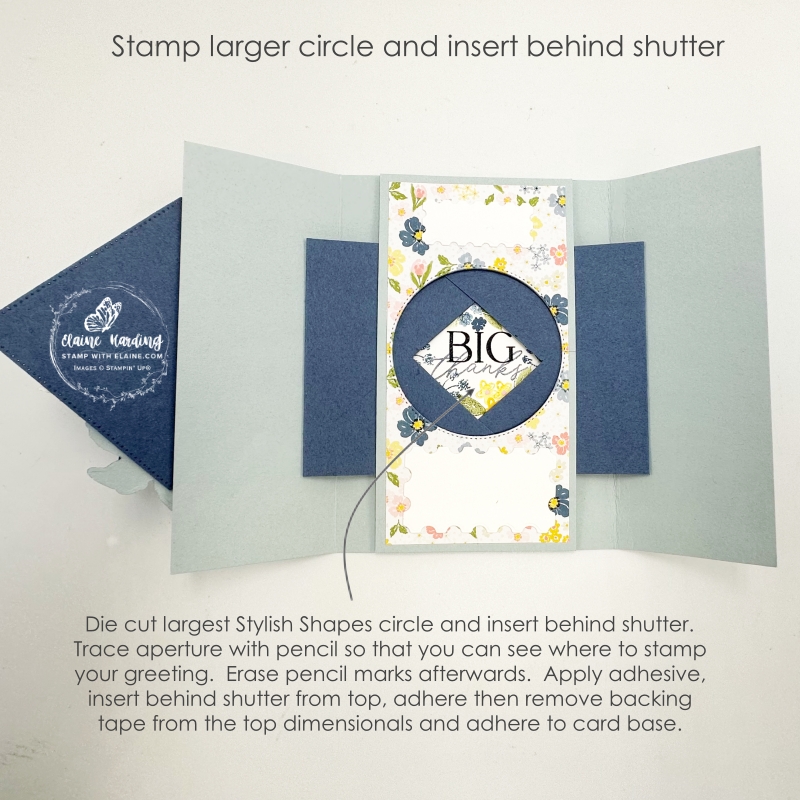
- Remove backing from the bottom two dimensionals on the centre panel. Centre and align with bottom of card and adhere. Leave the backing on the top two dimensionals as you need to access it from the top later.
- Die cut largest Stylish Shapes circle in Basic White. Insert from top and trace aperture of shutter when full opened. Trace a pencil mark round the opening to establish where to stamp.
- Stamp greeting and floral elements of your choice using co-ordinating colours with the DSP.
- Apply adhesive to back of circle, insert from top, position circle so greeting is straight and adhere to card base.
- Remove backing tape from the top dimensionals and adhere to card at the top.
- Die cut rectangles in Basic White from 12 Days of Crafting Advent dies and adhere smaller one at the top and the larger one at the bottom to address recipient and say who it’s from on the centre panel as pictured.
Decorating the front
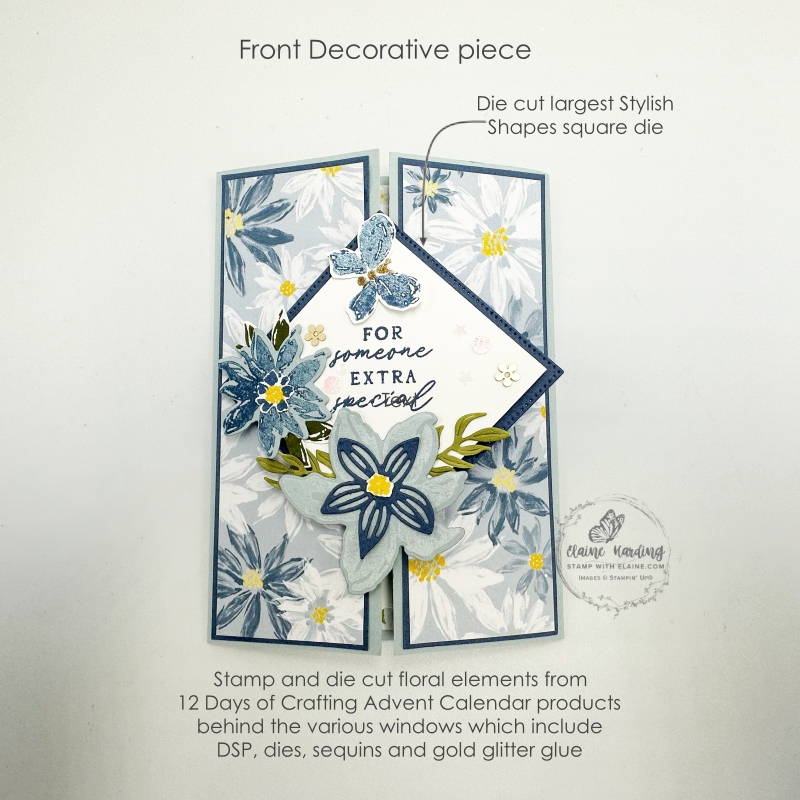
- Die cut the largest Stylish Shapes square in Mist Moonlight.
- Cut a Basic White mat layer 2 ½” x 2 ½” (6.5 x 6.5 cm). Stamp greeting from 12 Days of Crafting Advent Calendar stamp set.
- Stamp 2nd generation Misty Moonlight butterfly image on Basic White card stock and fussy cut. set aside.
- Decorate front of square as you wish, I stamped a variety of flowers, butterfly, leaves and used the sequins, glitter glue as well.
Supply list
Listed below is the supply list. Just click on the picture to take you directly to the item in my online store.

- SHOP ONLINE – EARN 10% REWARDS ON ALL PURCHASES OVER £20
- PURCHASE A STARTER KIT : Get £155 worth of products for only £99. Choose from current catalogues and any specials available. Free Shipping. Read more
- Subscribe to my Video Tutorials – click here