
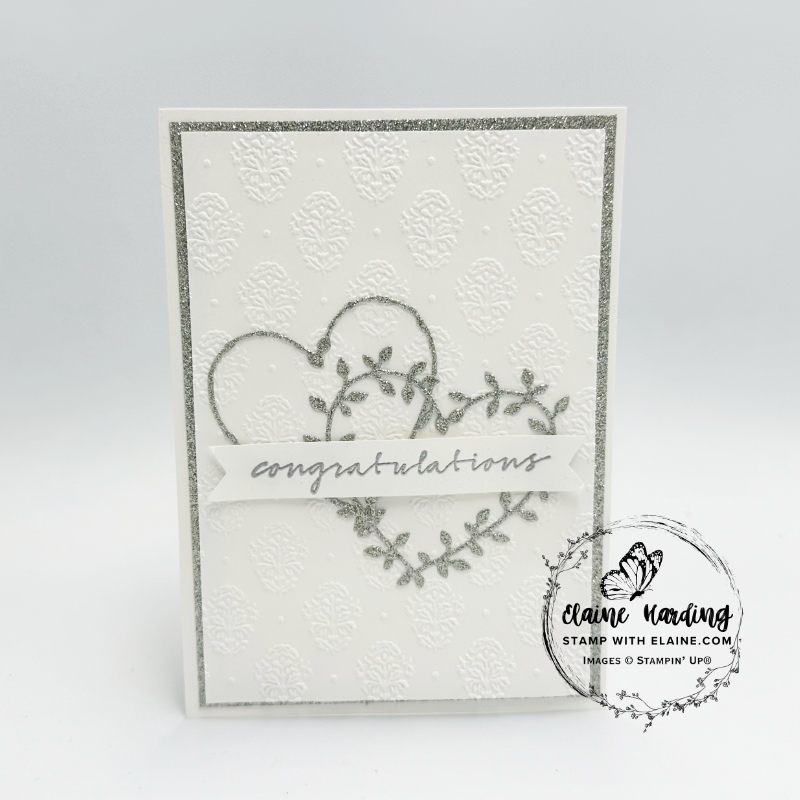
Wedding card with Beautiful Motifs. I made this card for my niece’s wedding in Brisbane back in October. They’d asked us to save the date for early October, 2025 which we did, and were looking forward to a family re-union.
Why we missed wedding
Unfortunately, we were in the process of re-locating to West Yorkshire which entailed selling our house and looking for one in West Yorkshire. This took longer than expected and the actual completion date didn’t happen until merely 4 days after the wedding so we had to decline. Unfortunately, things got delayed by our buyers’ solicitors a fortnight after original date of exchange and we were still waiting for news as to when we could exchange and set a date for completion (day you hand over the keys and vacate the property) at time of writing. Thankfully, we did eventually move in November and are happily settling into our new home.
Cutting guide
- Card base : Basic White Thick cut at 5 ¾” x 8 ¼” (14.5 cm x 21 cm) folded in half
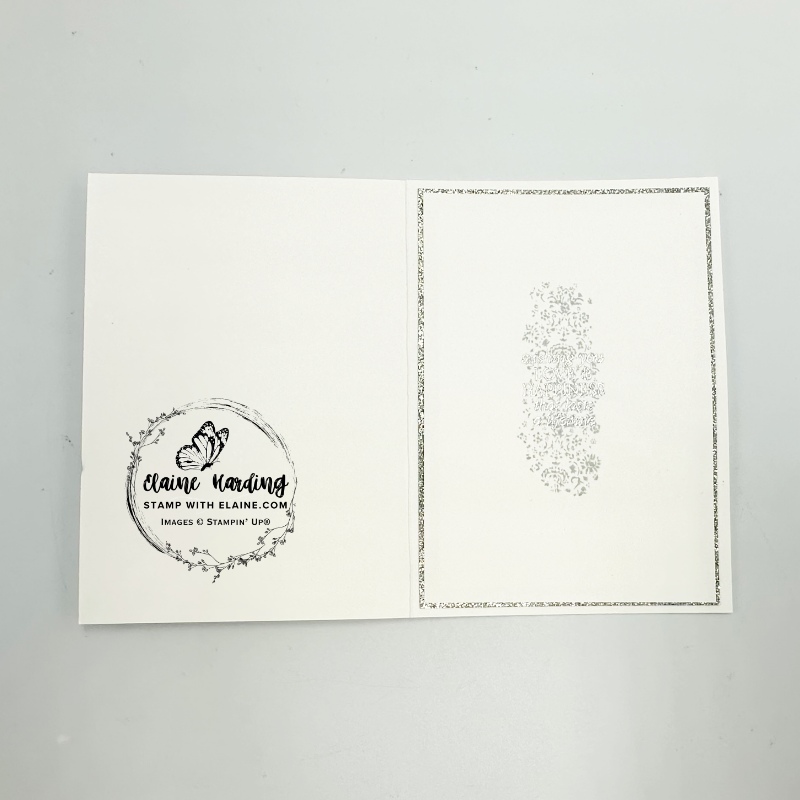
- Mat layer #1 front and inside card : Peaceful Garden Glimmer paper cut 2 pieces 5 ½” x 3 ⅞” (14 cm x 9.8 cm). Insert in trimmer and cut a ¼” (0.6 cm) frame. Reserve insides for another project.
- Basic White mat layer #2 front and inside : cut 2 pieces 5 ⅜” x 3 ¾”
- Back Peaceful Garden Glimmer paper with Adhesive sheet and cut two hearts (Heart Shaped Bundle dies Sale-a-bration January 25 Retired)
Assembly
Card front
- Adhere one of the glimmer paper frames to card front leaving an even border on all 4 sides.
- Emboss one of the Basic White mat layers with Damask Designs embossing folder. Apply dimensionals on the back and adhere to front of card leaving an even border on all 4 sides.
- Trim off all the leaves from one of the die cut hearts. Remove backing tape and adhere hearts on top of embossed layer as pictured.
- Silver emboss “congratulations” from Sunrise Sailing stamp set (online exclusive) on a scrap of Basic White card stock. Trim and cut flag ends on both ends. Apply dimensional in the middle on the back, curl up the ends and attach glue dots to secure to card front as shown.
Inside card
- Adhere glimmer frame to inside of card and leave even border on all 4 sides.
- Stamp motif from Beautiful Motifs stamp set with Cloud Cover ink.
- Silver emboss sentiment “Wishing you LOVE & HAPPINESS that lasts a lifetime” from Beautiful Motifs on top. It’s hard to see in photo, but is visible in real life.
At time of writing, it’s September, but I’m working ahead because I know we’ll be topsy turvy for awhile before/after move and waiting to be re-connected to internet.
Supply list
Listed below is the supply list. Just click on the picture to take you directly to the item in my online store.
Product List![Beautiful Motifs Photopolymer Stamp Set (English) [ 165198 ]](https://assets1.tamsnetwork.com/images/EC042017NF/165198s.jpg "Beautiful Motifs Photopolymer Stamp Set (English) [ 165198 ]")
![Sunrise Sailing Photopolymer Stamp Set (English) [ 165491 ]](https://assets1.tamsnetwork.com/images/EC042017NF/165491s.jpg "Sunrise Sailing Photopolymer Stamp Set (English) [ 165491 ]")
![Damask Designs Embossing Folder [ 165214 ]](https://assets1.tamsnetwork.com/images/EC042017NF/165214s.jpg "Damask Designs Embossing Folder [ 165214 ]")
![Heart Shaped Dies [ 164946 ]](https://assets1.tamsnetwork.com/images/EC042017NF/164946s.jpg "Heart Shaped Dies [ 164946 ]")
![Peaceful Garden 12" X 12" (30.5 X 30.5 Cm) Glimmer Paper [ 165929 ]](https://assets1.tamsnetwork.com/images/EC042017NF/165929s.jpg "Peaceful Garden 12\" X 12\" (30.5 X 30.5 Cm) Glimmer Paper [ 165929 ]")
![Basic White A4 Thick Cardstock [ 159230 ]](https://assets1.tamsnetwork.com/images/EC042017NF/159230s.jpg "Basic White A4 Thick Cardstock [ 159230 ]")
![Basic White A4 Cardstock [ 166781 ]](https://assets1.tamsnetwork.com/images/EC042017NF/166781s.jpg "Basic White A4 Cardstock [ 166781 ]")
![Classic Stampin' Spot Small Assortment 1 [ 166716 ]](https://assets1.tamsnetwork.com/images/EC042017NF/166716s.jpg "Classic Stampin' Spot Small Assortment 1 [ 166716 ]")
![Versamark Pad [ 102283 ]](https://assets1.tamsnetwork.com/images/EC042017NF/102283s.jpg "Versamark Pad [ 102283 ]")
![Embossing Additions Tool Kit [ 159971 ]](https://assets1.tamsnetwork.com/images/EC042017NF/159971s.jpg "Embossing Additions Tool Kit [ 159971 ]")
![Metallics Wow! Embossing Powder [ 165678 ]](https://assets1.tamsnetwork.com/images/EC042017NF/165678s.jpg "Metallics Wow! Embossing Powder [ 165678 ]")
![Heat Tool - Uk Plug [ 129054 ]](https://assets1.tamsnetwork.com/images/EC042017NF/129054s.jpg "Heat Tool - Uk Plug [ 129054 ]")

- SHOP ONLINE – EARN 10% REWARDS ON ALL PURCHASES OVER £20
- PURCHASE A STARTER KIT : Get £155 worth of products for only £99. Choose from current catalogues and any specials available. Free Shipping. Read more
- Subscribe to my Video Tutorials – click here