
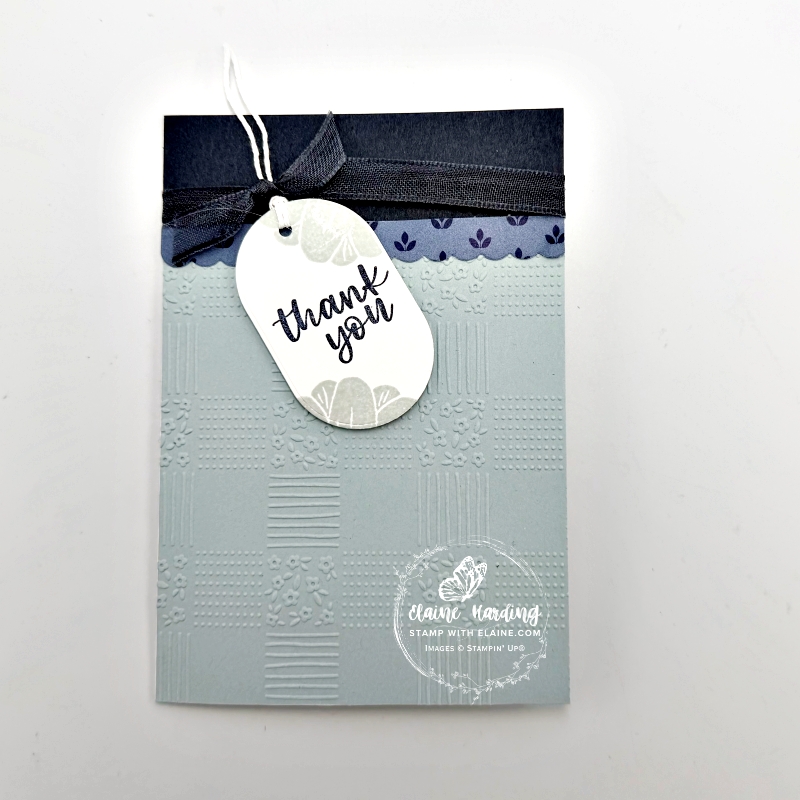
Embossed thank you card. In a previous post, I used A Round of Hellos. Today I’m using the same stamp set but also adding one of the new January-April 2026 embossing folders called All in a Row. In addition, I’ve used the tiny scallop die from Joyful Squares dies which is part of the Joyful Squares bundle in the new January-April 2026 mini and the tag is from the Creative Haven Dies which was an online exclusive released in November 2025.
Cutting guide
- Card base : Basic White 8″ x 5 ¾” (20 cm x 14.5 cm) folded in half
- Cloud cover front layer 4 ¾” x 4″ (12.1 cm x 10 cm).
- Secret Sea front layer 1″ x 4″ (2.5 cm x 10 cm)
- Cut 2 pieces scallop DSP scraps with the Joyful Squares scallop die.
- Scrap of Basic White for label
Inside card
- Secret Sea : 3 ¾” x 5 ½” (9.5 cm x 14 cm)
- Cloud Cover : 3 ⅝” x 5 ⅜ (9.2 cm x 13.7 cm)
Assembly instructions
- Emboss Cloud Cover front layer with All in a Row embossing folder. This is a standard embossing folder and only requires Platform 1, and 2 platform 3s. Omit Platform 2 as it is only required for die cutting and not embossing. Adhere to front of card as pictured.
- Prepare the label by die cutting a Basic White oval label with the Creative Haven die and stamp “thank you” from “A Round of Hellos” stamp set in Secret Sea ink. Next stamp each corner with the floral image in opposite corners with Cloud Cover stampin’ spot. Thread Basic White Bakers twine through hole.
- Adhere the Secret Sea layer above the embossed piece to cover the entire front of the card.
- Cut a slot on the side on the fold wide enough for the ribbon to go through.
- Adhere the 2 DSP scallop die cut pieces as pictured.
- Thread ribbon through side slot and tie a flat knot.
- Apply dimensionals to back of label and adhere at an angle to cover the join between the two scallop pieces as pictured.
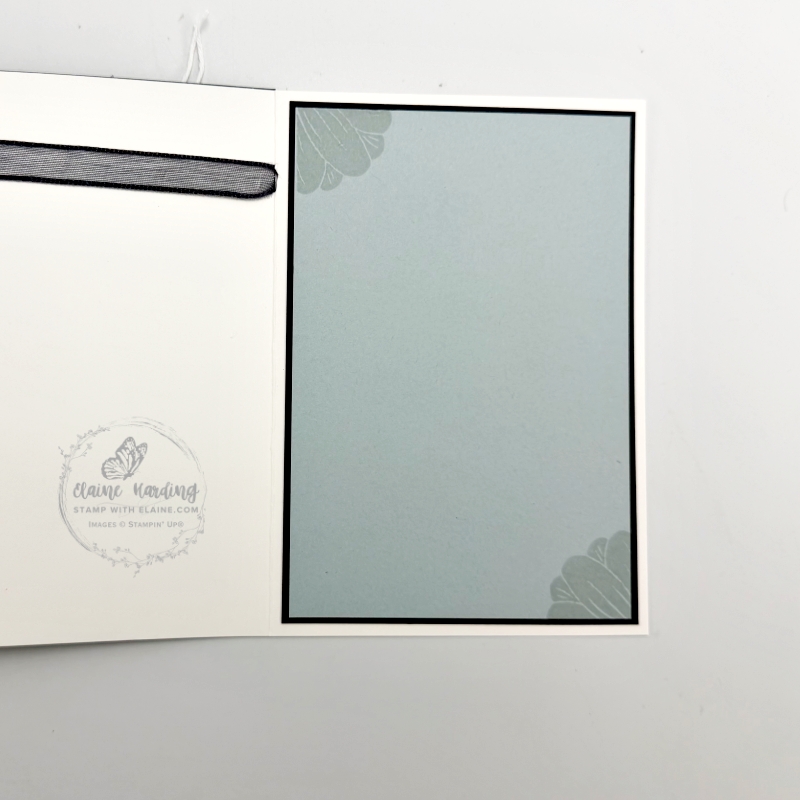
Inside card assembly instructions
- Adhere the 3 ¾” x 5 ½” (9.5 cm x 14 cm) piece of Secret Sea card stock to the inside of card leaving an even border on all 4 sides.
- Stamp a floral image from A Round of Hellos stamp set in opposite corners with Cloud Cover stampin’ spot ink on the Cloud Cover layer.
- Apply adhesive and adhere to inside of card on top of Secret Sea layer to complete card.
Supply list
Listed below is the supply list. Just click on the picture to take you directly to the item in my online store.
Product List![Joyful Squares Bundle (English) [ 166850 ]](https://assets1.tamsnetwork.com/images/EC042017NF/166850s.jpg "Joyful Squares Bundle (English) [ 166850 ]")
![Joyful Squares Dies [ 166849 ]](https://assets1.tamsnetwork.com/images/EC042017NF/166849s.jpg "Joyful Squares Dies [ 166849 ]")
![Joyful Squares Photopolymer Stamp Set (English) [ 166847 ]](https://assets1.tamsnetwork.com/images/EC042017NF/166847s.jpg "Joyful Squares Photopolymer Stamp Set (English) [ 166847 ]")
![All In A Row Embossing Folder [ 166989 ]](https://assets1.tamsnetwork.com/images/EC042017NF/166989s.jpg "All In A Row Embossing Folder [ 166989 ]")
![Creative Haven Bundle (English) [ 167209 ]](https://assets1.tamsnetwork.com/images/EC042017NF/167209s.jpg "Creative Haven Bundle (English) [ 167209 ]")
![Creative Haven Dies [ 167208 ]](https://assets1.tamsnetwork.com/images/EC042017NF/167208s.jpg "Creative Haven Dies [ 167208 ]")
![Creative Haven Photopolymer Stamp Set (English) [ 167202 ]](https://assets1.tamsnetwork.com/images/EC042017NF/167202s.jpg "Creative Haven Photopolymer Stamp Set (English) [ 167202 ]")
![True Blue Florals 12" X 12" (30.5 X 30.5 Cm) Designer Series Paper [ 167970 ]](https://assets1.tamsnetwork.com/images/EC042017NF/167970s.jpg "True Blue Florals 12\" X 12\" (30.5 X 30.5 Cm) Designer Series Paper [ 167970 ]")
![Basic White A4 Cardstock [ 166781 ]](https://assets1.tamsnetwork.com/images/EC042017NF/166781s.jpg "Basic White A4 Cardstock [ 166781 ]")
![Cloud Cover A4 Cardstock [ 165293 ]](https://assets1.tamsnetwork.com/images/EC042017NF/165293s.jpg "Cloud Cover A4 Cardstock [ 165293 ]")
![Secret Sea A4 Cardstock [ 165296 ]](https://assets1.tamsnetwork.com/images/EC042017NF/165296s.jpg "Secret Sea A4 Cardstock [ 165296 ]")
![Classic Stampin' Spot Small Assortment 1 [ 166716 ]](https://assets1.tamsnetwork.com/images/EC042017NF/166716s.jpg "Classic Stampin' Spot Small Assortment 1 [ 166716 ]")
![Secret Sea Classic Stampin' Pad [ 165285 ]](https://assets1.tamsnetwork.com/images/EC042017NF/165285s.jpg "Secret Sea Classic Stampin' Pad [ 165285 ]")
![Secret Sea 3/8" (1 Cm) Bordered Open Weave Ribbon [ 166932 ]](https://assets1.tamsnetwork.com/images/EC042017NF/166932s.jpg "Secret Sea 3/8\" (1 Cm) Bordered Open Weave Ribbon [ 166932 ]")

- SHOP ONLINE – EARN 10% REWARDS ON ALL PURCHASES OVER £20
- PURCHASE A STARTER KIT : Get £155 worth of products for only £99. Choose from current catalogues and any specials available. Free Shipping. Read more
- Subscribe to my Video Tutorials – click here