
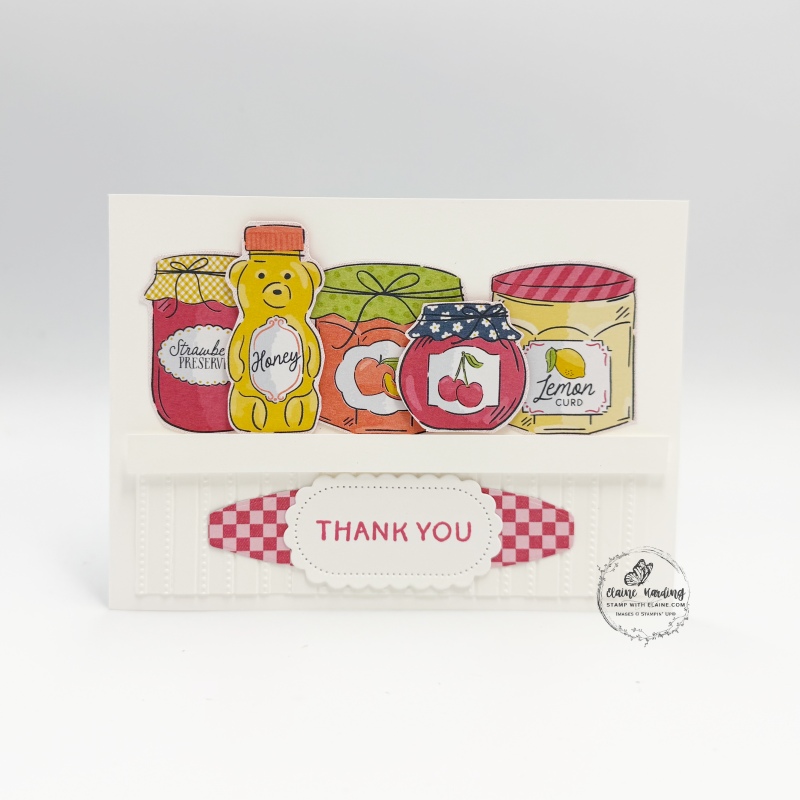
Easy thank you card – Filled with Sweetness. Here’s another idea using the Filled with Sweetness bundle. In a previous post HERE I had used the dies to create a jam jar shaped card but today I’m featuring the Homemade Sweetness 12″ x 12″ (30.5 x 30.5 cm) Designer Series Papers.
Homemade Sweetness Designer Series Papers
The double-sided paper is filled with hand-drawn designs that bring nostalgic, kitchen-crafted charm to your cards and scrapbook pages. You can use the detailed sides to add whimsy with fussy-cut embellishments or let the simpler patterns help balance your layouts. It’s just the ticket for my card today!
Cutting guide
- Card base : Basic white cut at 5 ¾” x 11 ½” (14.5 cm x 29 cm) and folded in half.
- Cut Basic White strip 1 ½” x 5 ¼” (3.8 cm x 13.3 cm) and dry emboss with Lovely Stripes 3D embossing folder (stripes should run vertically).
- Basic White cut at ½” x 5 ⅜” (1.3 cm x 13.7 cm). Apply dimensionals on the back. This piece is for the shelf.
- Inside card : Basic White cut at 3 ⅞” x 5 ½” (9.8 cm x 14 cm)
- From DSP cut 5 jam jars of your choice.
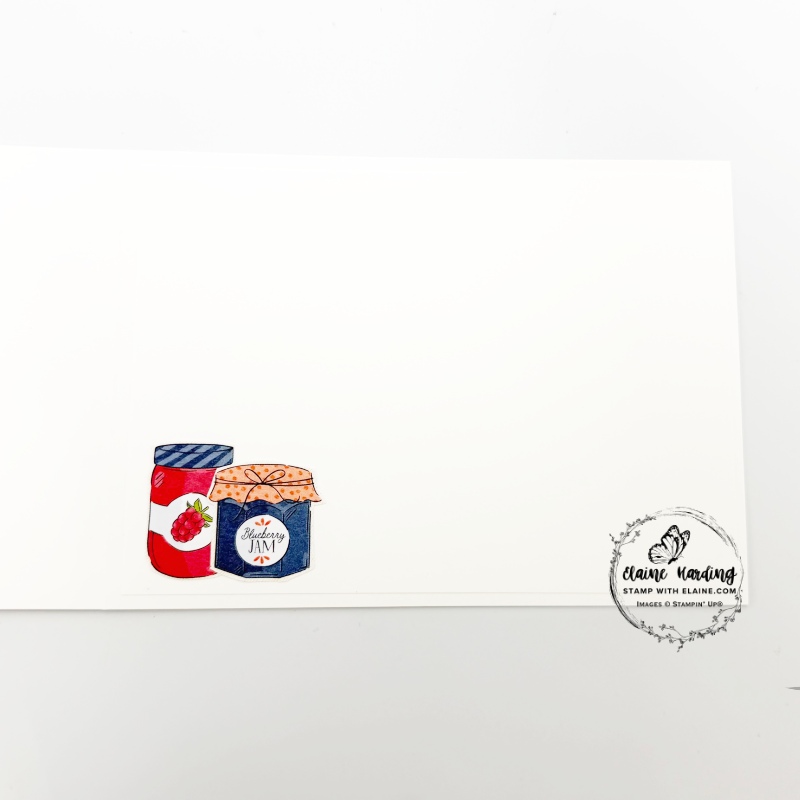
- Select the sheet with smaller jam jars and fussy cut two for the inside of the card.
Die cutting
- Die cut the elongated oval with the small checkered Strawberry Slush design.
- On a scrap of Basic White, stamp “thank you” in Strawberry Slush ink and die cut with scalloped label die from Filled with Sweetness dies.
Card assembly
- Adhere the embossed layer first leaving an even border at the bottom and two sides.
- Next adhere the narrow strip on top with dimensionals.
- Arrange the jars as you wish. Adhere three jars directly on to card base. I popped the honey bear and cherry jam on dimensionals in between as pictured.
- Adhere the checkered label in the centre of embossed piece followed by the stamped “thank you” scalloped label.
- For the inside of the card, adhere the two smaller jam jars then adhere Basic White layer leaving an even border on all four sides to finish.
Supply list
Listed below is the supply list. Just click on the picture to take you directly to the item in my online store.
Product List![Filled With Sweetness Bundle (English) [ 167475 ]](https://assets1.tamsnetwork.com/images/EC042017NF/167475s.jpg "Filled With Sweetness Bundle (English) [ 167475 ]")
![Homemade Sweetness 12" X 12" (30.5 X 30.5 Cm) Designer Series Paper [ 167467 ]](https://assets1.tamsnetwork.com/images/EC042017NF/167467s.jpg "Homemade Sweetness 12\" X 12\" (30.5 X 30.5 Cm) Designer Series Paper [ 167467 ]")
![Lovely Stripes 3 D Embossing Folder [ 167179 ]](https://assets1.tamsnetwork.com/images/EC042017NF/167179s.jpg "Lovely Stripes 3 D Embossing Folder [ 167179 ]")
![Basic White A4 Cardstock [ 166781 ]](https://assets1.tamsnetwork.com/images/EC042017NF/166781s.jpg "Basic White A4 Cardstock [ 166781 ]")
![Strawberry Slush Classic Stampin' Pad [ 165286 ]](https://assets1.tamsnetwork.com/images/EC042017NF/165286s.jpg "Strawberry Slush Classic Stampin' Pad [ 165286 ]")

- SHOP ONLINE – EARN 10% REWARDS ON ALL PURCHASES OVER £20
- PURCHASE A STARTER KIT : Get £155 worth of products for only £99. Choose from current catalogues and any specials available. Free Shipping. Read more
- Subscribe to my Video Tutorials – click here
Pingback: Centre book fold - Delicate Whispers - Stamp with Elaine