
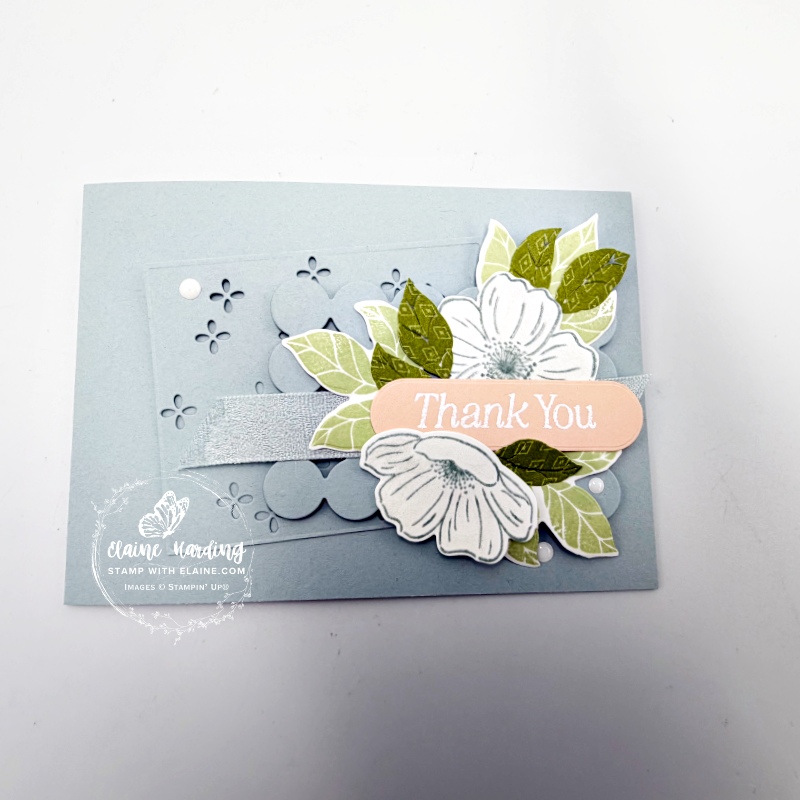
Layered thank you card. I finally got round to exploring the Lovely Arrangements online exclusive which appeared on the scene way back in January 26. It is part of the Lovely Blossoms Suite Collection and the papers are beautiful.
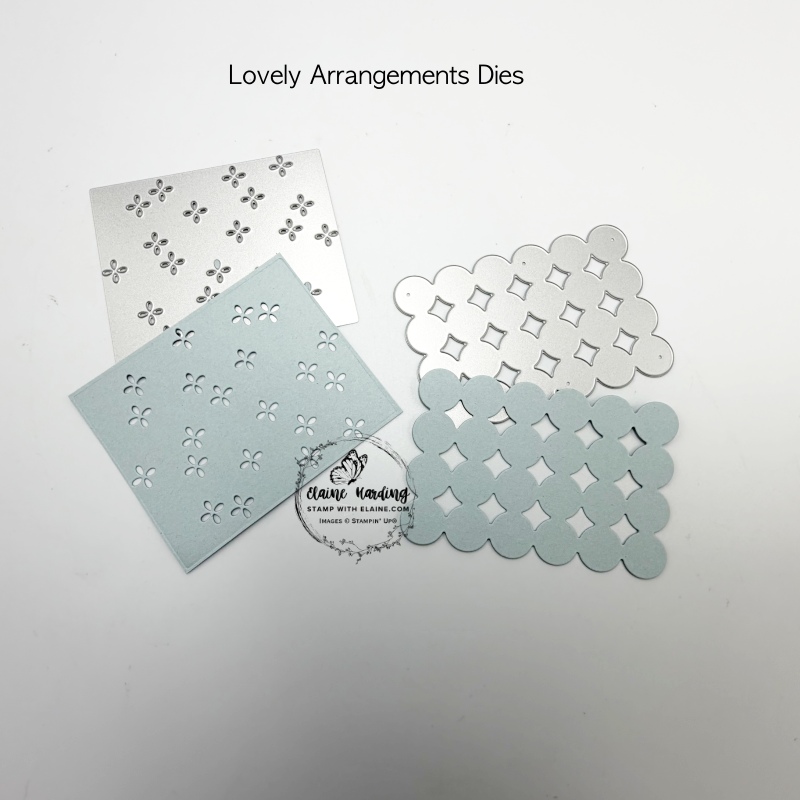
Lovely Arrangements Dies
I loved the samples that Stampin’ Up! created and one in particular caught my eye which was in Petal Pink using the 2 larger dies in the Lovely Arrangements die set. So I simply used the same layout but changed the colour scheme and sentiment.
The eyelet one on the left will die cut the little eyelets, but doesn’t cut the rectangular shape. If you look closely at the die, there are no ridges on its perimeter. So if you want to use it as a layer, you will have to cut it with scissors or your trimmer.
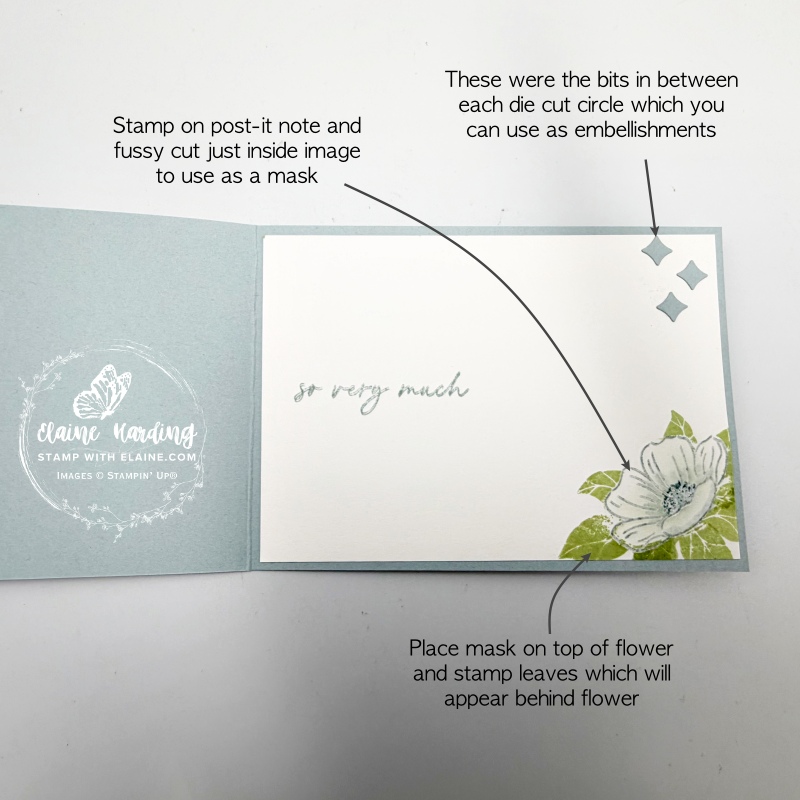
On the right, the joined together circles also make a nice backdrop but the little diamond shapes can be re-purposed as embellishments so don’t throw them away! You can see how I used some for the inside of the card.

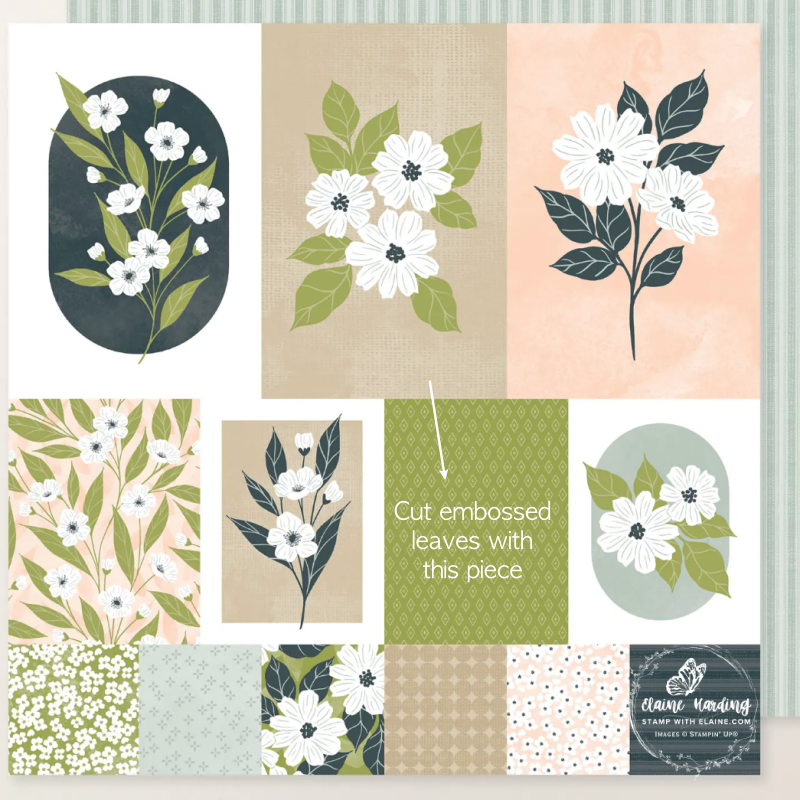
Cutting guide
- Card base : Cloud Cover card stock cut at 4 ⅛” x 11 ½” (10.5 cm x 29 cm) folded in half.
- Cloud Cover scrap – die cut the eyelet piece and trim just shy of the eyelets to keep the pattern and die cut the circular one too. Keep the insides left by the circles so you can use them again.
- Basic White – inside card cut at 3 ⅞” x 5 ½” (9.8 cm x 14 cm)
- Scraps of Basic White to stamp and die cut flowers and leaves.
- Petal Pink scrap to emboss and die cut sentiment.
- Lovely Blossoms DSP to die cut the embossed leaves.
Assembling card
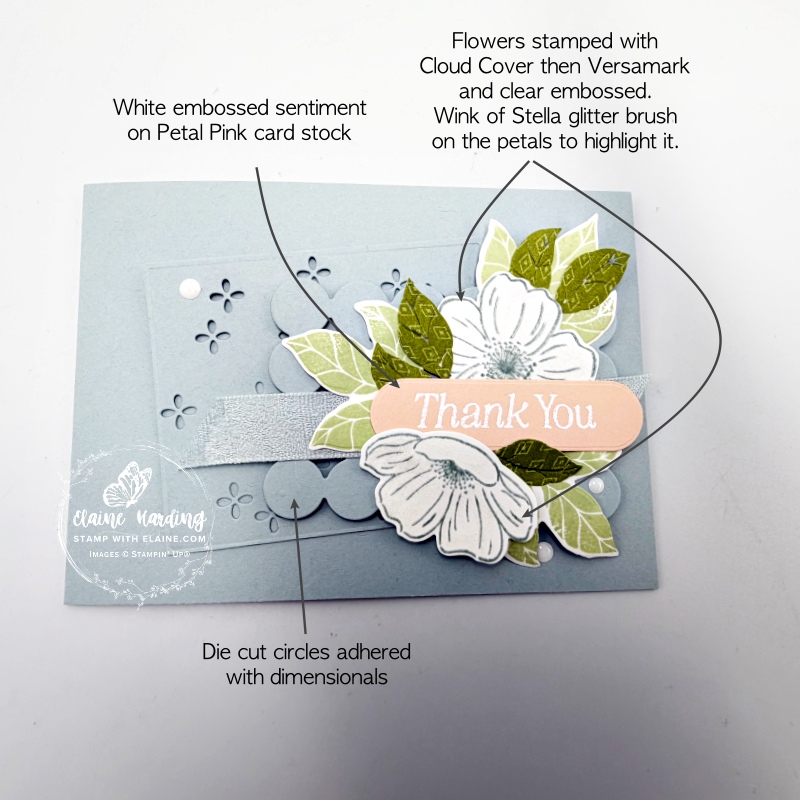
- Adhere the eyelet die cut piece at an angle on card front.
- Apply dimensionals to back of die cut circle piece and adhere on top of eyelet piece.
- Stamp 3 sets of the trio of leaves in Soft Sea Foam and die cut.
- On Petal Pink card stock, stamp sentiment in Versamark and sprinkle white embossing powder, heat set and die cut with Lovely Arrangements Die.
- Using the Stampin’ Positioner, I stamped the flowers with Cloud Cover stampin’ spot, cleaned the stamp then stamped them again with Versamark. Sprinkled Clear embossing powder over it and heat set it.
- Die cut 2 of the pair of leaves with the detailed leaf die and one of the single leaf die from this sheet of Lovely Blossoms 12 x 12 Designer Series Paper pictured below.
- Attach ribbon next then arrange the flowers and leaves and adhere to front of card as pictured.
Lovely Blossoms DSP sheet
Inside card
- Stamp flower on a post-it note and fussy cut just inside the lines. Use this as a mask so that you can stamp the leaves to make them appear behind the flower.
- Next stamp flower on Basic White piece for inside of the card.
- Place mask on top and stamp the leaves .
- Apply a little glue in a staggered configuration and adhere the left over diamond pieces on to it in top right corner of Basic White piece.
- Adhere to inside of card base.
Finishing touch
- Add a trio of Moody Palette Glossy dots on front of card to complete card.
Supply list
Listed below is the supply list. Just click on the picture to take you directly to the item in my online store.
Product List![Lovely Arrangements Bundle (English) [ 167176 ]](https://assets1.tamsnetwork.com/images/EC042017NF/167176s.jpg "Lovely Arrangements Bundle (English) [ 167176 ]")
![Lovely Arrangements Dies [ 167175 ]](https://assets1.tamsnetwork.com/images/EC042017NF/167175s.jpg "Lovely Arrangements Dies [ 167175 ]")
![Lovely Arrangements Photopolymer Stamp Set (English) [ 167169 ]](https://assets1.tamsnetwork.com/images/EC042017NF/167169s.jpg "Lovely Arrangements Photopolymer Stamp Set (English) [ 167169 ]")
![Lovely Blossoms Designer Series Paper & Sticker Sheet (English) [ 167192 ]](https://assets1.tamsnetwork.com/images/EC042017NF/167192s.jpg "Lovely Blossoms Designer Series Paper & Sticker Sheet (English) [ 167192 ]")
![Moody Palette Glossy Dots [ 167180 ]](https://assets1.tamsnetwork.com/images/EC042017NF/167180s.jpg "Moody Palette Glossy Dots [ 167180 ]")
![Cloud Cover 5/8" (1.6 Cm) Textured Ribbon [ 167182 ]](https://assets1.tamsnetwork.com/images/EC042017NF/167182s.jpg "Cloud Cover 5/8\" (1.6 Cm) Textured Ribbon [ 167182 ]")
![Classic Stampin' Spot Small Assortment 1 [ 166716 ]](https://assets1.tamsnetwork.com/images/EC042017NF/166716s.jpg "Classic Stampin' Spot Small Assortment 1 [ 166716 ]")
![Versamark Pad [ 102283 ]](https://assets1.tamsnetwork.com/images/EC042017NF/102283s.jpg "Versamark Pad [ 102283 ]")
![Basics Wow! Embossing Powder [ 165679 ]](https://assets1.tamsnetwork.com/images/EC042017NF/165679s.jpg "Basics Wow! Embossing Powder [ 165679 ]")
![Embossing Additions Tool Kit [ 159971 ]](https://assets1.tamsnetwork.com/images/EC042017NF/159971s.jpg "Embossing Additions Tool Kit [ 159971 ]")
![Heat Tool - Uk Plug [ 129054 ]](https://assets1.tamsnetwork.com/images/EC042017NF/129054s.jpg "Heat Tool - Uk Plug [ 129054 ]")
![Basic White A4 Cardstock [ 166781 ]](https://assets1.tamsnetwork.com/images/EC042017NF/166781s.jpg "Basic White A4 Cardstock [ 166781 ]")
![Cloud Cover A4 Cardstock [ 165293 ]](https://assets1.tamsnetwork.com/images/EC042017NF/165293s.jpg "Cloud Cover A4 Cardstock [ 165293 ]")
![Petal Pink A4 Cardstock [ 147009 ]](https://assets1.tamsnetwork.com/images/EC042017NF/147009s.jpg "Petal Pink A4 Cardstock [ 147009 ]")
![Clear Wink Of Stella Glitter Brush [ 141897 ]](https://assets1.tamsnetwork.com/images/EC042017NF/141897s.jpg "Clear Wink Of Stella Glitter Brush [ 141897 ]")

- SHOP ONLINE – EARN 10% REWARDS ON ALL PURCHASES OVER £20
- PURCHASE A STARTER KIT : Get £155 worth of products for only £99. Choose from current catalogues and any specials available. Free Shipping. Read more
- Subscribe to my Video Tutorials – click here