
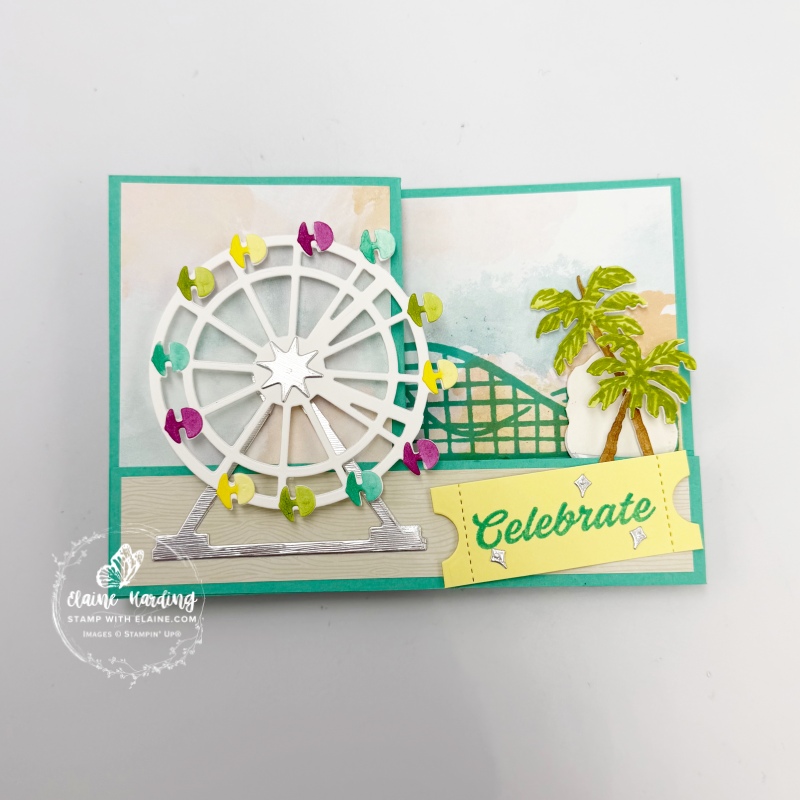
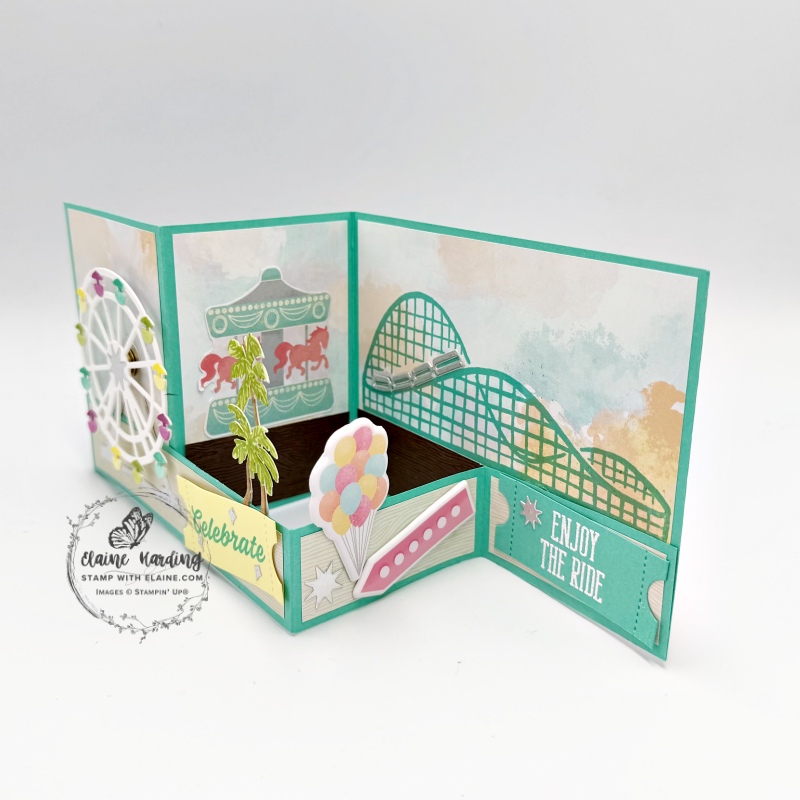
Spinner card – Boardwalk Fun. You’ll find the Boardwalk Fun bundle on pages 46-48 in the January-April 2026 mini. It is part of the Beach Boardwalk Suite. Its coordinating stamps and dies are ideal for creating cards and scrapbook pages that celebrate summer fun, birthdays, and milestones. Quickly create Ferris wheels, palm trees, and tickets, all perfect for summer-themed projects.
Today’s card is a simple double z-fold card with a Ferris wheel which spins. The spinner mechanism is a non-Stampin’ Up! product which you can get from any craft supplier. Simply google “spinner mechanism craft” and you’ll have several sources to choose from.
The fold is simple, but there are a lot of elements to die cut and adhere to the various panels. There are several techniques too; simple stamping, some fussy cutting, a little embossing and adding a spinning mechanism but the effort, I assure you is well worth it!
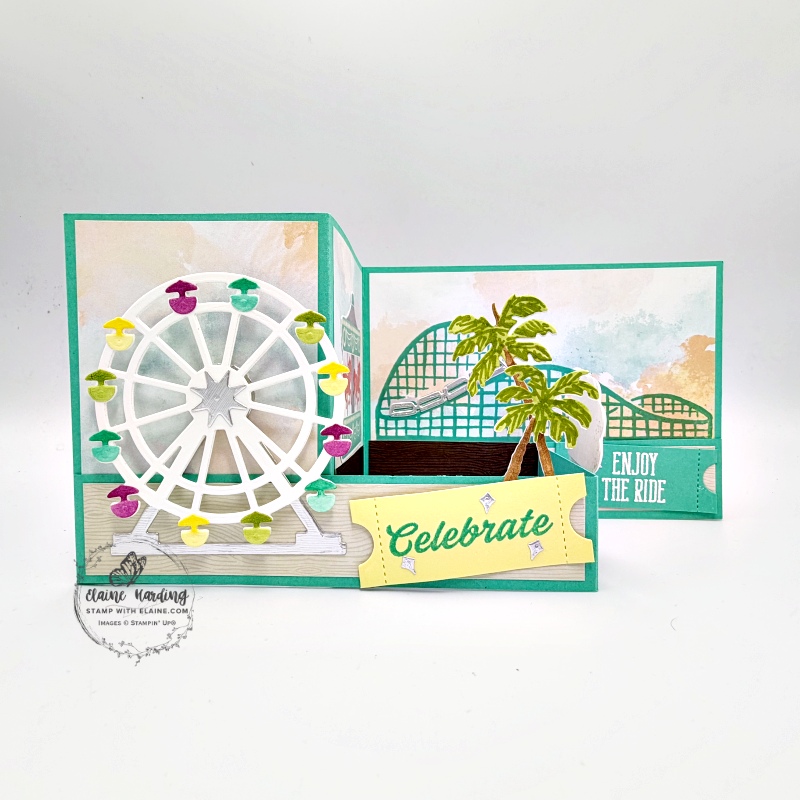
Double z-fold card
For my colour palette, I picked out some of the colours used in the coordinating Beach Boardwalk 12″ x 12″ (30.5 x 30.5 cm) Designer Series Paper pack. Summer Splash, Petunia Pop are some of the In-Colours which were introduced in 2024. In-Colours have a refresh every 2 years and will be retiring at the end of April when Stampin’ Up! introduces 5 new In-Colours. If you love the 2024-2026 in colours, be ahead of the game and order card stock and re-inkers before its retirement is officially announced!
Cutting guide
Main z-fold Card base and second z-fold
- Cut card base – Summer Splash 4 ⅛” x 11 ½” (10.5 cm x 29 cm). On the long side score at 2 ⅞” and 4 ⅛” (7.3 cm and 10.5 cm)
- For second Summer Splash piece cut at 1 ¼” x 11 ½” (1.5 cm x 29 cm). On the long side score at 2 ⅞” and 4 ⅛” (7.3 cm and 10.5 cm)
DSP cutting guide
- Cut 4 pieces of DSP at 2 ⅝” x 5 ½”(6.5 cm x 14 cm) – 2 for the front narrower panels and 2 for the back of the card base.
- Card Base Large front panel DSP cut at 3 ⅞” x 5 ½” (9.8 cm x 14 cm).
- Back large panel for card base cut in Basic White at 3 ⅞” x 5 ½” (9.8 cm x 14 cm).
- Fussy cut partial Ferris Wheel from DSP and also the carousel.
- For the small z-fold piece cut 3 pieces from new Woodgrain Wonders 12″x 12″ (30.5 x 30.5 cm) DSP which will be available from March 3rd at 1″ x 2 ⅝” (2.5 cm x 6.5 cm) and 1 piece at l’ x 5 ½” (2.5 cm x 14 cm)
- Inside front z-fold card base with darker pattern Woodgrain Wonders 12″x 12″ (30.5 x 30.5 cm) DSP – cut 2 pieces 1 ⅛”” x 2 ⅝” (3 cm x 6.5 cm)
Die cutting elements
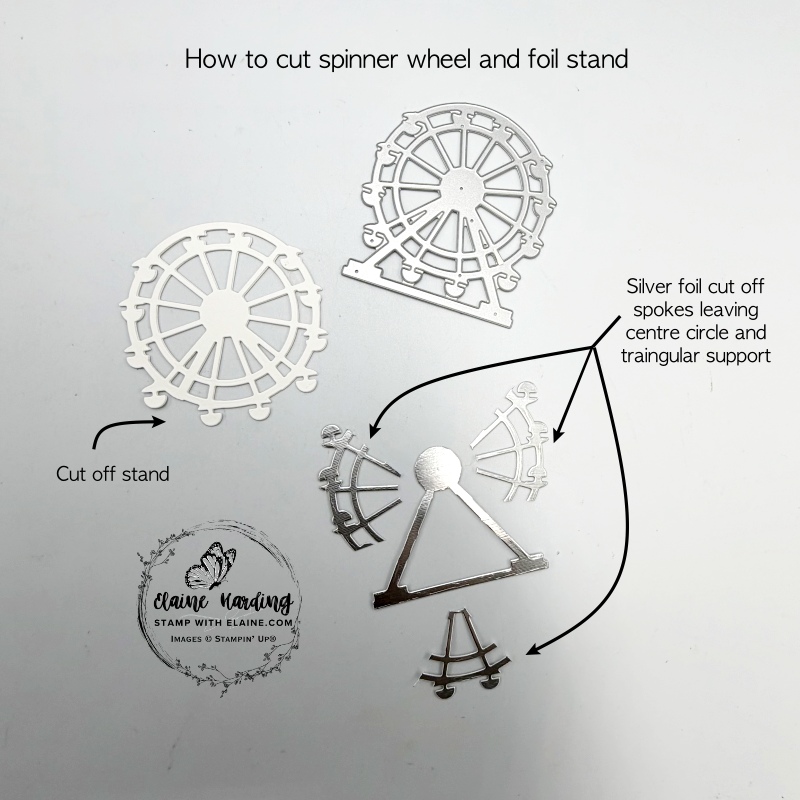
- Apply adhesive sheet to back of Basic White scrap large enough for die cutting 2 ferris wheels.
- Peel backing off one of them and align and attach one on top of the other then cut away the support as pictured above. A double layer adds strength to the Ferris wheel.
- Attach adhesive sheet to back of silver foil large enough to partially die cut Ferris wheel to include the circle portion as pictured above and cut away the excess to leave a triangle support.
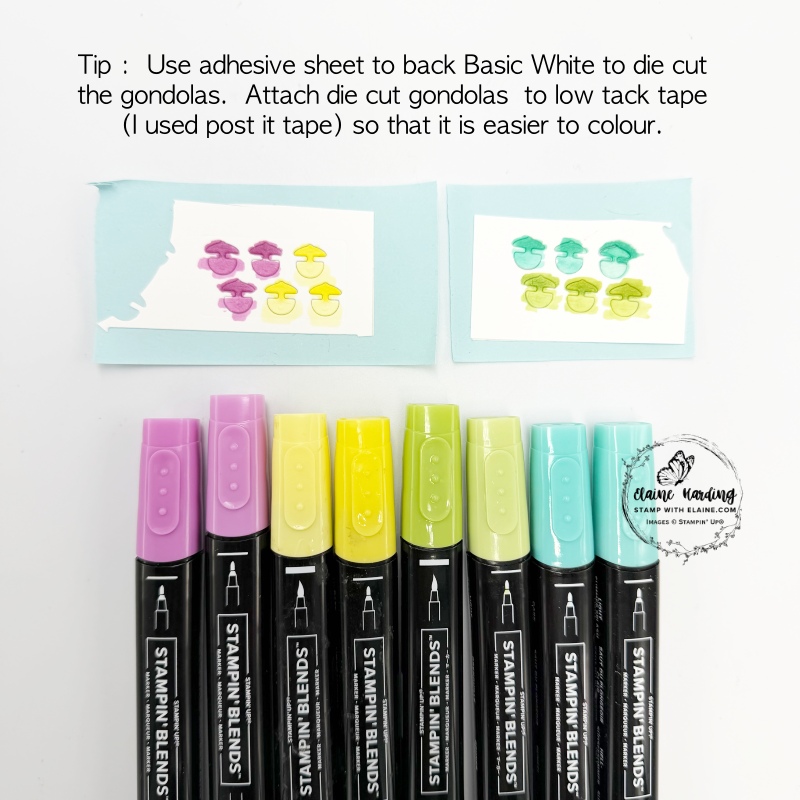
- Next die cut 2 sets of gondolas from Basic White with the adhesive sheet attached on the back. To make it easier to colour, leave the gondolas in situ and adhere both pieces on post-it tape or similar. Colour 3 each with the lighter Stampin’ Blend on the bottom, and the darker Stampin’ Blend for the umbrellas in Petunia Pop, Lemon Lolly, Granny Apple Green and Summer Splash.
- Also die cut from Silver foil the trio of diamonds and stars and carriages for the roller coaster.
- Die cut 1 ticket in Lemon Lolly and 1 ticket in Summer Splash. Trim on both long sides evenly so that they measure 1″ (2.5 cm) to make them narrower.
- Die cut 1 tall and 1 shorter palm tree. Colour tree trunk with Pecan Pie and the palm leaves with Granny Apple Green.
Assembly instructions
Card base z-fold card front
- Adhere the 2 ⅝” x 5 ½”(6.5 cm x 14 cm) DSP panels to front leaving an even border all round.
- Next adhere the 3 ⅞” x 5 ½” (9.8 cm x 14 cm) piece of DSP to the front large panel, then adhere the dark first 1 ⅛”” x 2 ⅝” (3 cm x 6.5 cm) Woodgrain Wonder DSP pieces aligned with the sides and bottom of the small middle panel as pictured above.
- Then adhere the 1 ⅛”” x 2 ⅝” (3 cm x 6.5 cm) second dark Woodgrain Wonder piece aligned with the left and bottom edge of the large panel piece. This is to ground the carousel and roller coaster.
- Adhere the fussy cut carousel butted up against dark Woodgrain Wonder piece on the middle panel.
- Stamp the roller coaster on the DSP panel above the dark Woodgrain Wonder piece and remove backing from foil roller coaster carriages and adhere to corresponding stamped image.
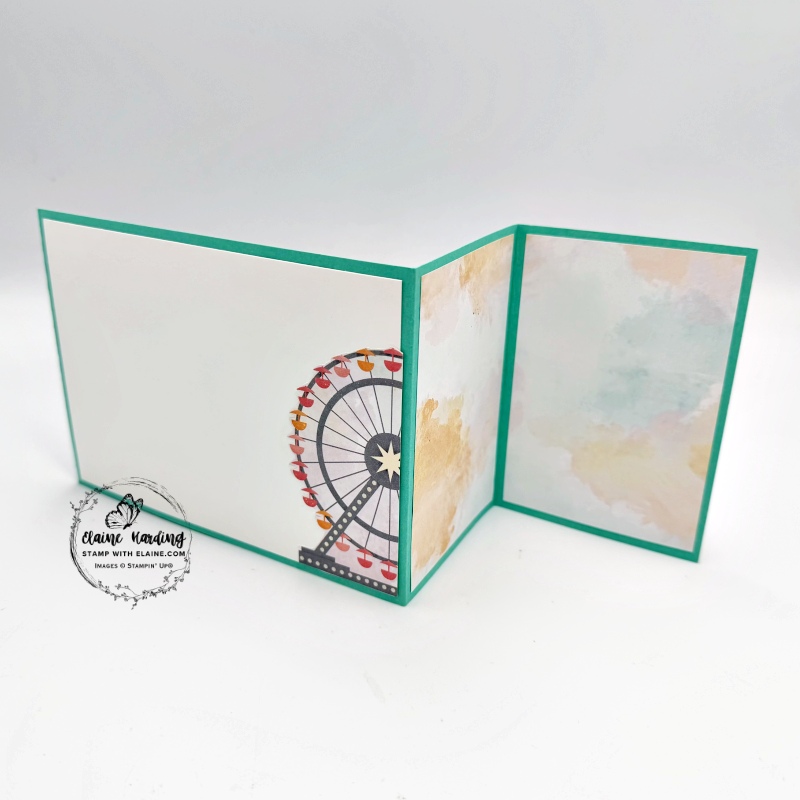
Back of card
- Adhere the fussy cut partial ferris wheel on the right side of Basic White layer then adhere to back of card base.
- Apply adhesive to two remaining 2 ⅝” x 5 ½”(6.5 cm x 14 cm) DSP to the narrower panels.
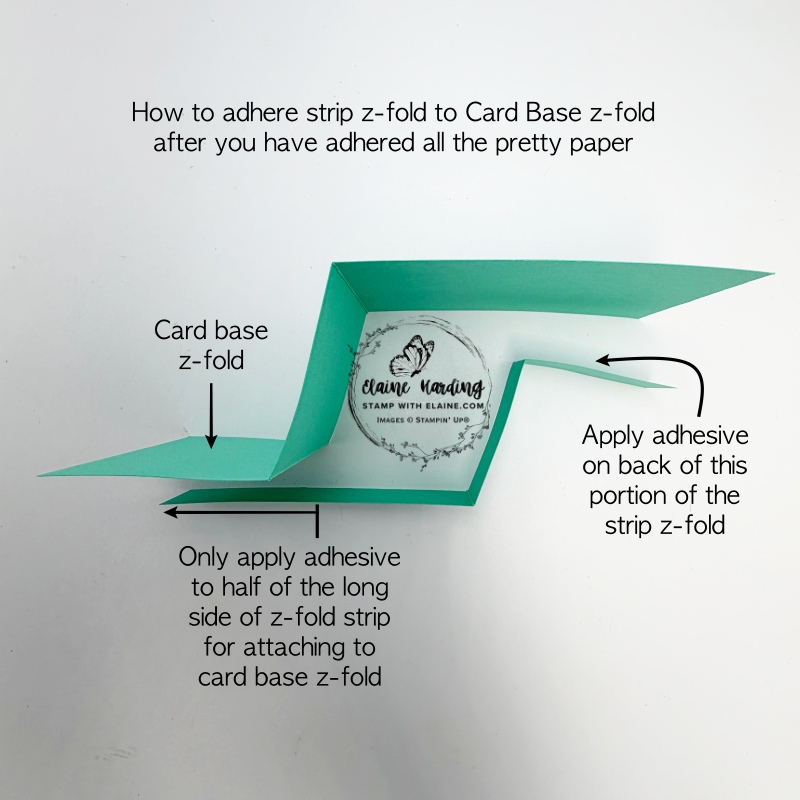
Small Strip base z-fold
- Adhere the longer lighter piece of Woodgrain Wonder 1″ x 5 ½” (2.5 cm x 14 cm) DSP to the longer panel.
- Then adhere the 3 shorter pieces of lighter Woodgrain Wonder 1″ x 2 ⅝” (2.5 cm x 6.5 cm) on the corresponding narrower panels as pictured.
- Now apply adhesive as indicated in picture below and adhere to card base. Once glue has been applied, close the card. Fold the right side of the smaller z-fold on top of each other. It should be aligned with the right edge and bottom then the longer side will naturally fall into place and adhere itself to the front left half of the larger z-fold card. Ensure that the longer piece is also aligned, this time on the left and bottom edge of the larger z-fold card base.
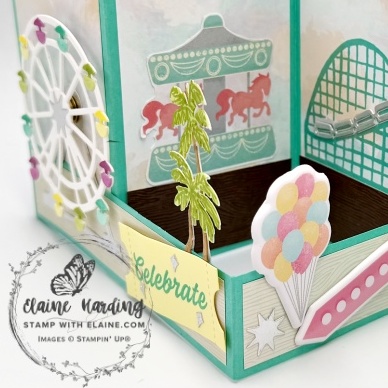
Finishing touches
- Stamp “Celebrate” in Summer Splash ink on the Lemon Lolly ticket. Adhere to longer panel pictured above. Add the silver foil die cut diamonds to embellish.
- Adhere palm trees behind ticket as pictured and the puffy stickers from the suite on the shorter middle panel. Adhere one of the silver foil stars here.
- Lastly ink up “enjoy the ride” in Versamark ink on Summer Splash ticket and sprinkle with white embossing powder and heat emboss to set. Adhere to last panel and embellish with the smallest silver foil star.
Attaching Ferris Wheel
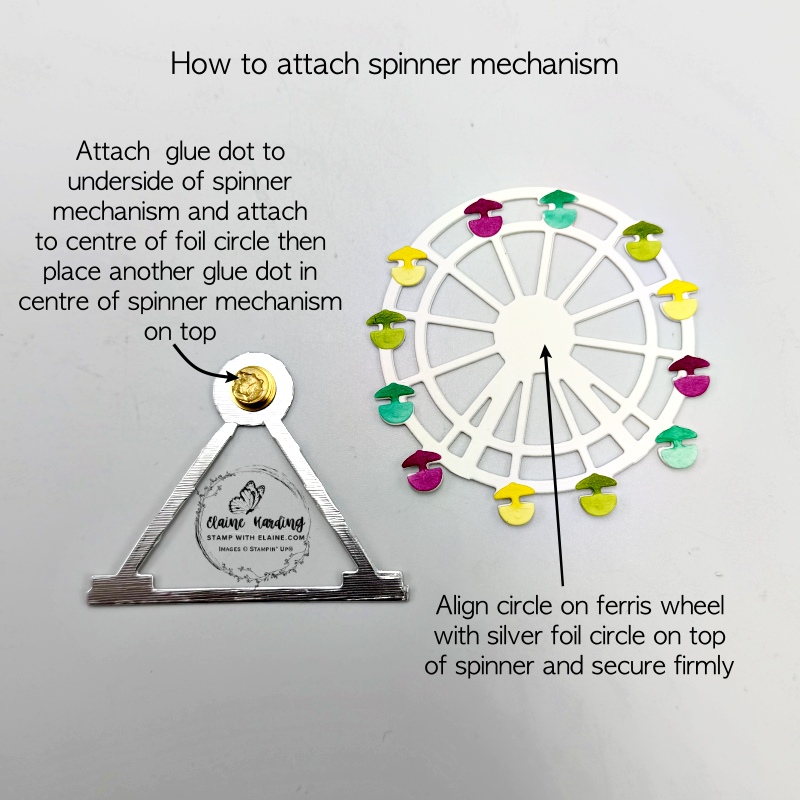
- Remove the backing from each gondola as you adhere each one to the Ferris wheel as pictured above.
- Attach glue dot to underside of spinner mechanism in centre of foil circle. Place a second glue dot on the top of the spinner mechanism.
- Remove backing from silver foil Ferris wheel support and adhere to front of z-fold card base.
- Lastly, attach the Ferris wheel with the denser amount of spokes toward the bottom at the same time aligning it with the silver foil circle underneath.
Voila! project complete – have fun spinning!
Supply list
Listed below is the supply list. Just click on the picture to take you directly to the item in my online store.
Product List![Beach Boardwalk Suite Collection (English) [ 166844 ]](https://assets1.tamsnetwork.com/images/EC042017NF/166844s.jpg "Beach Boardwalk Suite Collection (English) [ 166844 ]")
![Beach Boardwalk 12" X 12" (30.5 X 30.5 Cm) Designer Series Paper [ 166820 ]](https://assets1.tamsnetwork.com/images/EC042017NF/166820s.jpg "Beach Boardwalk 12\" X 12\" (30.5 X 30.5 Cm) Designer Series Paper [ 166820 ]")
![Beach Boardwalk Puffy Stickers [ 166838 ]](https://assets1.tamsnetwork.com/images/EC042017NF/166838s.jpg "Beach Boardwalk Puffy Stickers [ 166838 ]")
![Boardwalk Fun Photopolymer Stamp Set (English) [ 166822 ]](https://assets1.tamsnetwork.com/images/EC042017NF/166822s.jpg "Boardwalk Fun Photopolymer Stamp Set (English) [ 166822 ]")
![Boardwalk Fun Dies [ 166828 ]](https://assets1.tamsnetwork.com/images/EC042017NF/166828s.jpg "Boardwalk Fun Dies [ 166828 ]")
![Silver 12" X 12" (30.5 X 30.5 Cm) Foil Sheets [ 163387 ]](https://assets1.tamsnetwork.com/images/EC042017NF/163387s.jpg "Silver 12\" X 12\" (30.5 X 30.5 Cm) Foil Sheets [ 163387 ]")
![Basic White A4 Cardstock [ 166781 ]](https://assets1.tamsnetwork.com/images/EC042017NF/166781s.jpg "Basic White A4 Cardstock [ 166781 ]")
![Lemon Lolly A4 Cardstock [ 161729 ]](https://assets1.tamsnetwork.com/images/EC042017NF/161729s.jpg "Lemon Lolly A4 Cardstock [ 161729 ]")
![Summer Splash A4 Cardstock [ 163798 ]](https://assets1.tamsnetwork.com/images/EC042017NF/163798s.jpg "Summer Splash A4 Cardstock [ 163798 ]")
![Adhesive Sheets [ 152334 ]](https://assets1.tamsnetwork.com/images/EC042017NF/152334s.jpg "Adhesive Sheets [ 152334 ]")
![Summer Splash Classic Stampin Pad [ 163809 ]](https://assets1.tamsnetwork.com/images/EC042017NF/163809s.jpg "Summer Splash Classic Stampin Pad [ 163809 ]")
![Versamark Pad [ 102283 ]](https://assets1.tamsnetwork.com/images/EC042017NF/102283s.jpg "Versamark Pad [ 102283 ]")
![Embossing Additions Tool Kit [ 159971 ]](https://assets1.tamsnetwork.com/images/EC042017NF/159971s.jpg "Embossing Additions Tool Kit [ 159971 ]")
![Basics Wow! Embossing Powder [ 165679 ]](https://assets1.tamsnetwork.com/images/EC042017NF/165679s.jpg "Basics Wow! Embossing Powder [ 165679 ]")
![Heat Tool - Uk Plug [ 129054 ]](https://assets1.tamsnetwork.com/images/EC042017NF/129054s.jpg "Heat Tool - Uk Plug [ 129054 ]")
![Granny Apple Green Stampin' Blends Combo Pack [ 154885 ]](https://assets1.tamsnetwork.com/images/EC042017NF/154885s.jpg "Granny Apple Green Stampin' Blends Combo Pack [ 154885 ]")
![Pecan Pie Stampin’ Blends Combo Pack [ 161674 ]](https://assets1.tamsnetwork.com/images/EC042017NF/161674s.jpg "Pecan Pie Stampin’ Blends Combo Pack [ 161674 ]")
![Petunia Pop Stampin’ Blends Combo Pack [ 163828 ]](https://assets1.tamsnetwork.com/images/EC042017NF/163828s.jpg "Petunia Pop Stampin’ Blends Combo Pack [ 163828 ]")
![Summer Splash Stampin’ Blends Combo Pack [ 163826 ]](https://assets1.tamsnetwork.com/images/EC042017NF/163826s.jpg "Summer Splash Stampin’ Blends Combo Pack [ 163826 ]")

- SHOP ONLINE – EARN 10% REWARDS ON ALL PURCHASES OVER £20
- PURCHASE A STARTER KIT : Get £155 worth of products for only £99. Choose from current catalogues and any specials available. Free Shipping. Read more
- Subscribe to my Video Tutorials – click here