
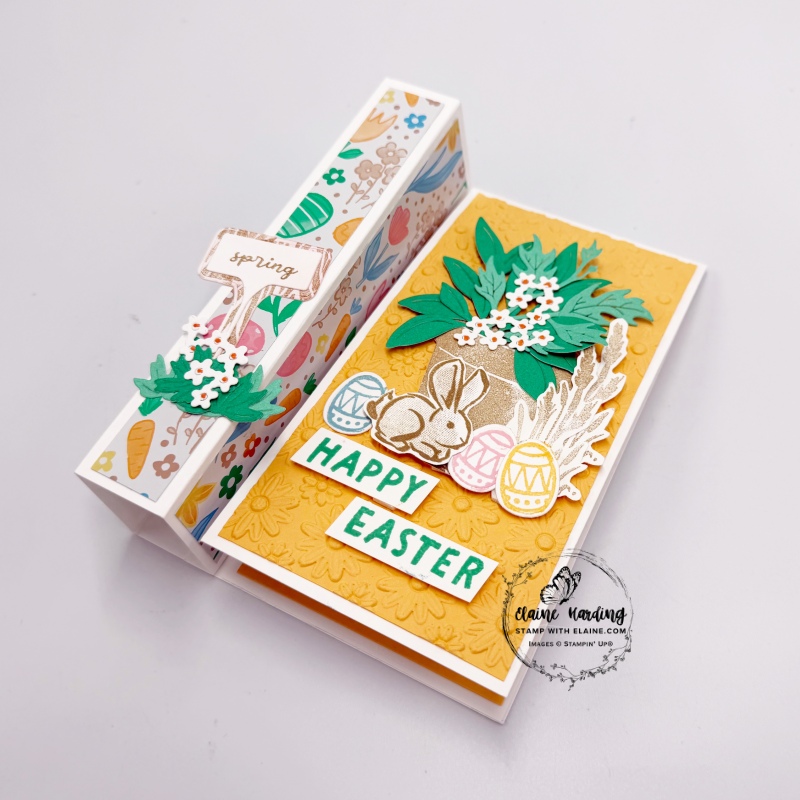
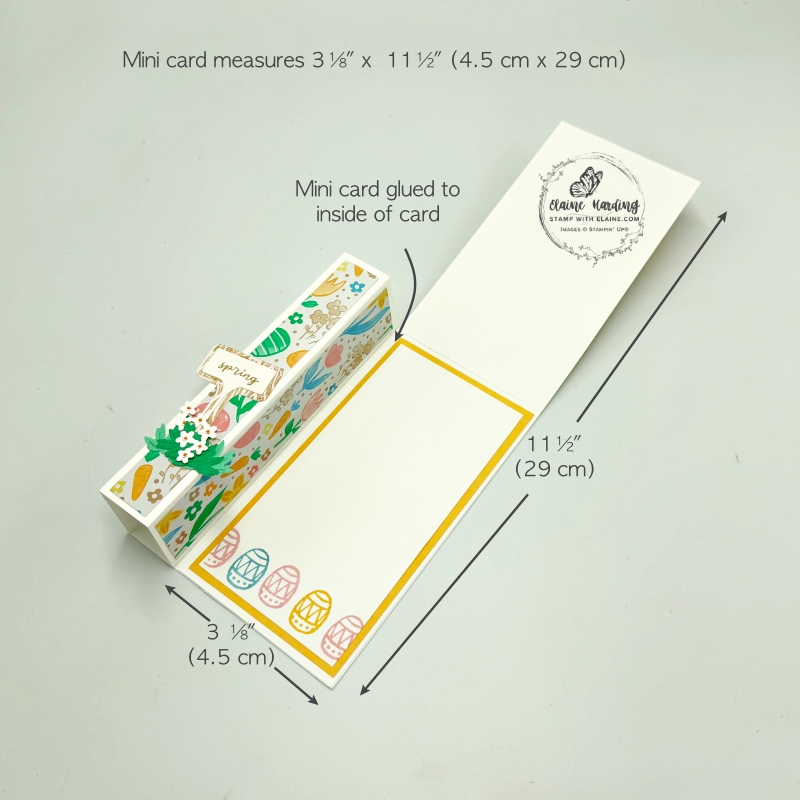
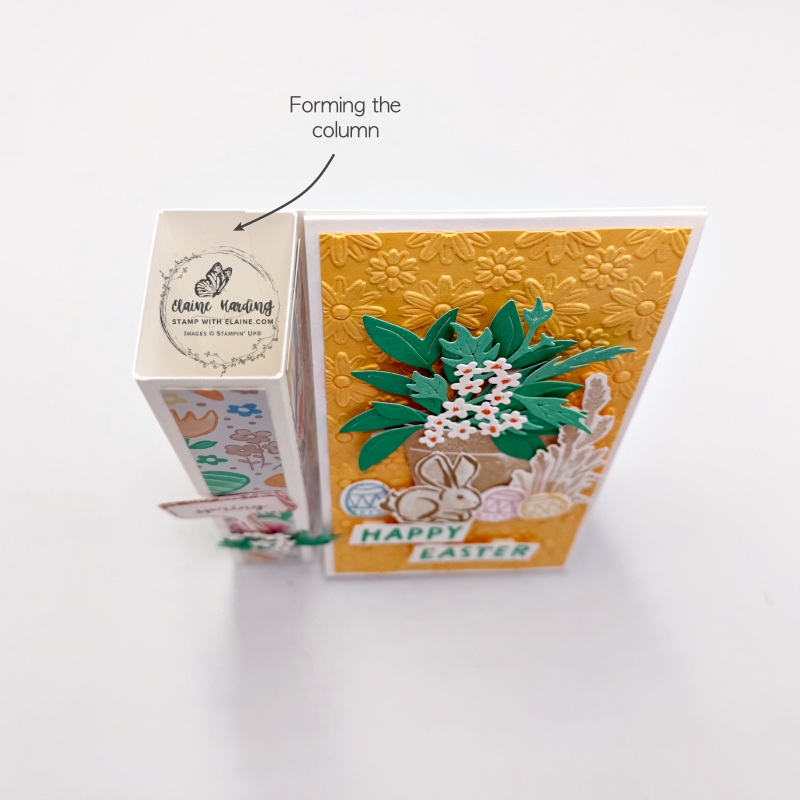
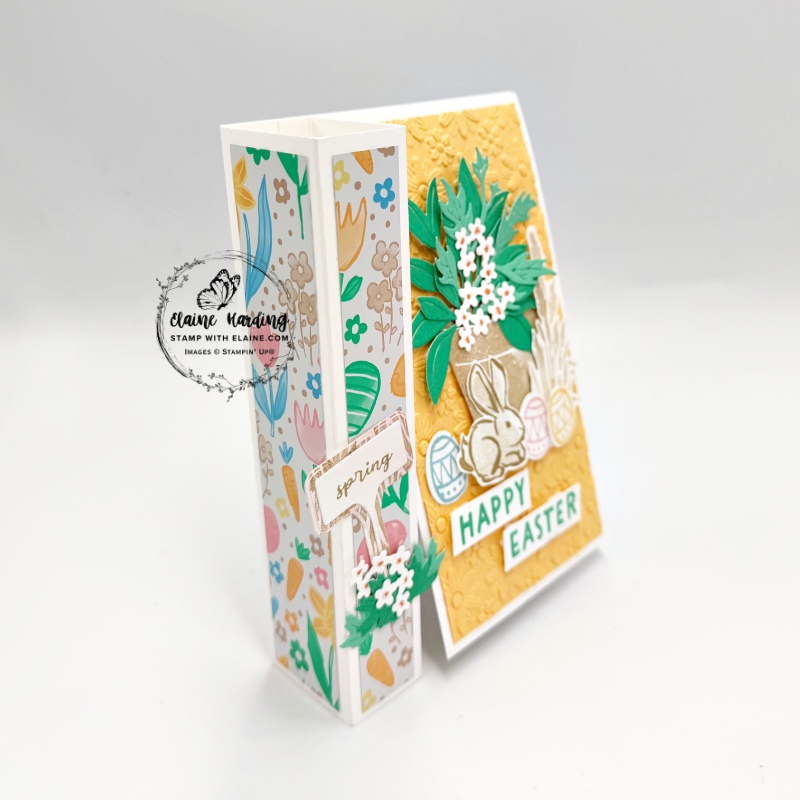
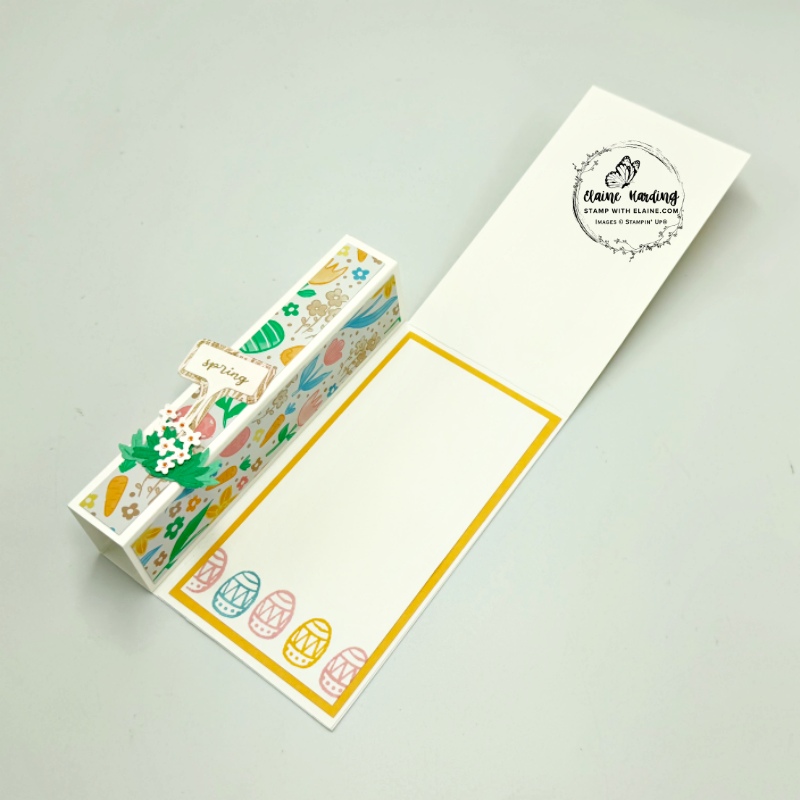
Happy Easter! Today’s card is a Happy Easter fun fold card. The front of the card has been scored so that it forms a column on one side. On the other side (the inside) a mini card has been added and adhered. It folds flat for posting.
Stamps, Dies and Paper used
- Product of the Month – Notes of Spring
- Easter Basket bundle (stamps + dies)
- Help me Grow (new March online exclusive stamps+ dies)
- Easter Joy 12″x 12″ (30.5 x 30.5 cm) Specialty Designer Series Paper (SDSP)
- Two-tone 12″x 12 ” (30.5 x 30.5 cm) Shy Shamrock card stock
- Peach Pie A4 card stock, Basic White A4 card stock and Basic White Thick A4 card stock

Cutting guide
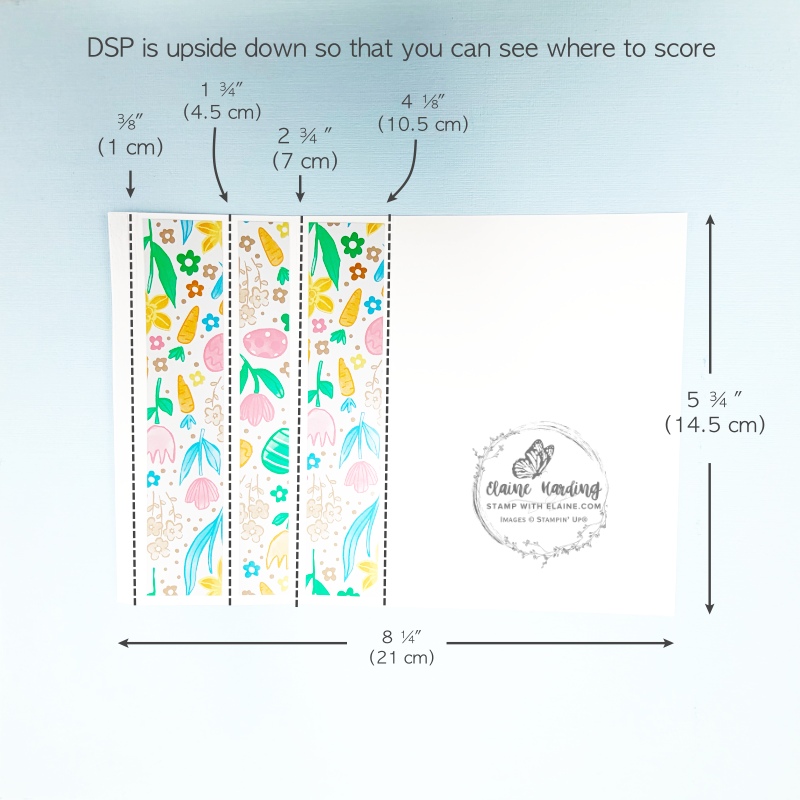
- Card base : 5 ¾” x 8 ¼ ” (14.5 cm x 21 cm). Long side score at ⅜”, 1 ¾”, 2 ¾” and 4 ⅛” (1 cm, 4.5 cm, 7 cm and 10.5 cm)
- Mini card : 3 ⅛” x 11 ½” (8 cm x 29 cm) folded in half.
- Mat layers #1 : Peach Pie cut 2 pieces at 2 ⅞” x 5 ½” (7.5 cm x 14 cm)
- Inside card mat layer #2 : Basic White cut 1 piece at 2 ⅝” x 5 ¼” (7 cm x 13.5 cm)
- Easter Joy DSP : cut 2 pieces 1 1/8″ x 5 1/2″ (3 cm x 14 cm) and 1 piece at 3/4″ x 5 1/2″ (2 cm x 14 cm)
- Scraps of Basic White to stamp and fussy cut wheat sheafs and rabbit from Notes of Spring (Crumb cake ink).
How to create column and adhere DSP strips
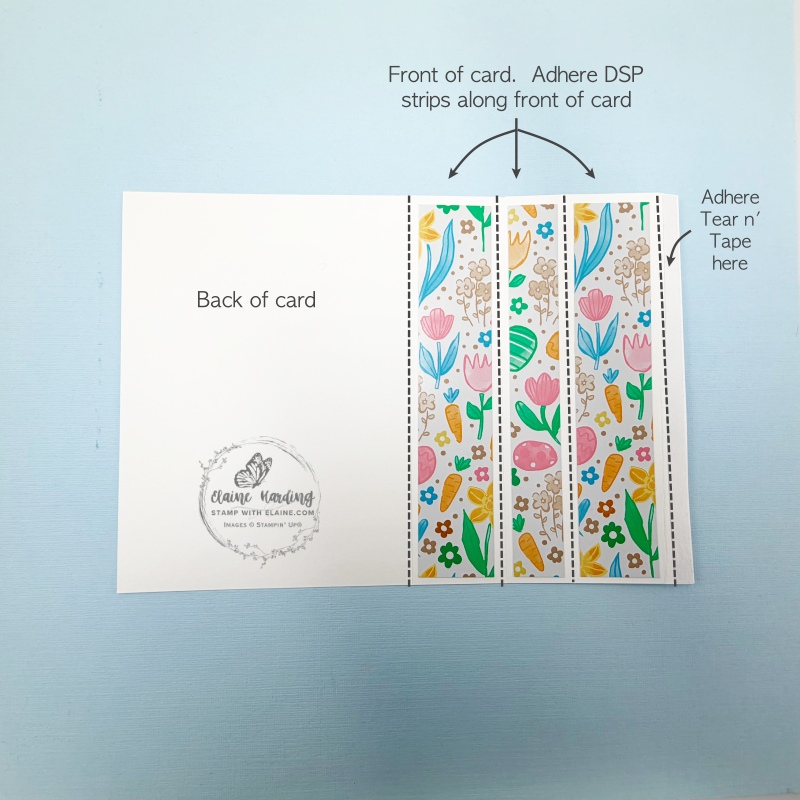
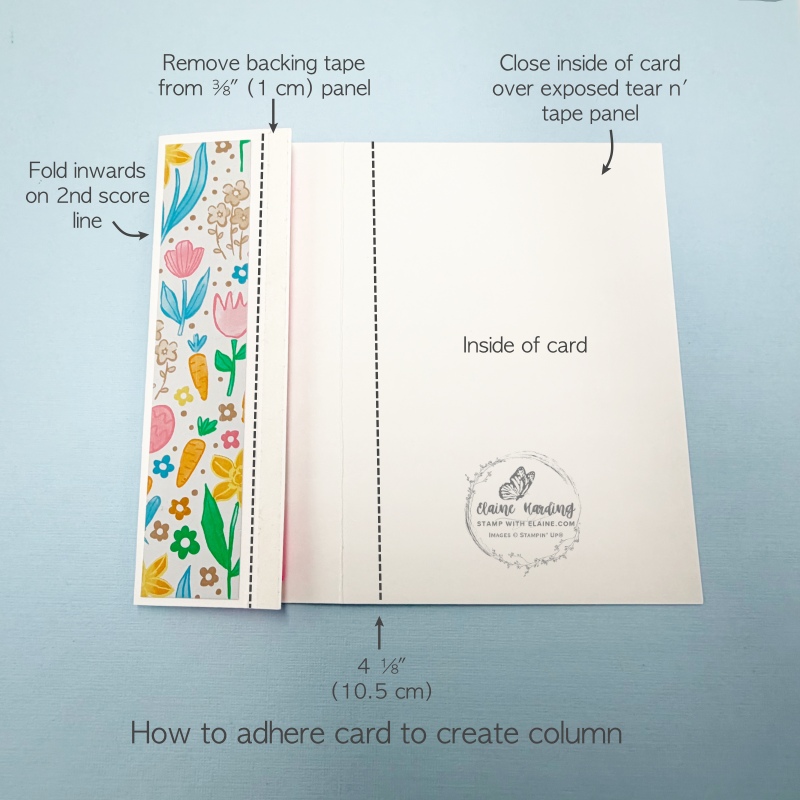
- Easter Joy Specialty DSP – Adhere the 1 1/8″ x 5 1/2″ (3 cm x 14 cm) DSP strips to 1st and 3rd panel as shown above in picture on the left.
- Adhere 3/4″ x 5 1/2″ (2 cm x 14 cm) of Easter Joy SDSP to middle panel.
- Fold as shown in picture on the right above, remove backing on tear n’ tape then close inside of card on top of exposed tear n tape to create the column as shown in picture on the right.
Die cutting
- Mask “hello,” on the greeting “hello, spring” from Easter Basket stamp set so that you only stamp “spring” word. Remember to remove mask before stamping then die cut afterwards.
- Die cut 3 eggs in Basic White card stock from Easter Basket dies. Turn stamp face up. Use Pretty in Pink, Peach Pie and Balmy Blue inks to stamp the eggs. Place each egg blank in turn, right side face down and aligned over stamp to get a stamped even border all round.
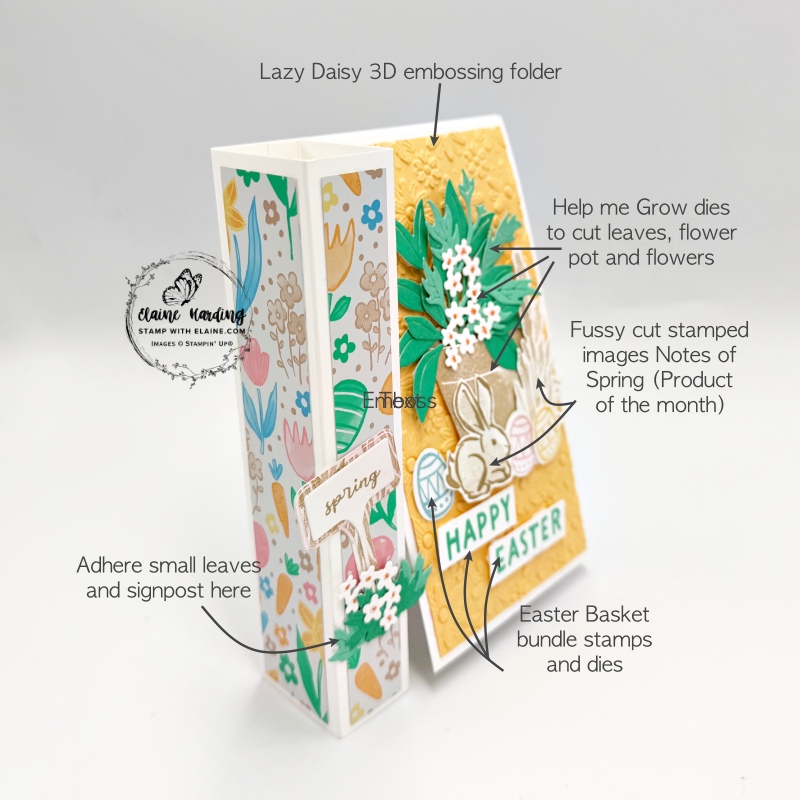
- Two-tone Shy Shamrock card stock – on darker shade of two-tone card stock, die cut 2 sprigs of leaves, and the light side die cut 1 sprig of more detailed leaves pattern. Also die cut the single leaves.
- Stamp the plant pot and drip tray in Crumb Cake and die cut. Both have slots in them so that you can tuck the leaves into the pot and the pot into the drip tray.
- Basic White card stock – cut the small cluster of flowers and colour the centres with Peach Pie marker.
- Die cut spring banner, stamp wood grain and die cut larger banner and adhere the smaller “spring” banner on top.
Assembling card
- Adhere small leaves on front and back of plant label and adhere a small cluster of flowers on top, then apply adhesive to the back of arrangement and adhere to the top of the column on the left as pictured.
- Next adhere the embossed Lazy Daisy Peach Pie layer to front of mini card ensuring even borders on all 4 sides.
- Refer to large picture under “Die Cutting” heading. Insert plant pot into drip tray and adhere with tear n’ tape. Do not remove backing paper.
- Insert leaves through slot in pot, secure with tear n’ tape on the back then apply dimensionals and adhere to front of card.
- Arrange fussy cut wheat sheafs, rabbit, easter eggs and adhere as pictured.
- Trim stamped “happy easter” greeting as pictured and adhere with dimensionals.
Inside card
- Adhere remaining Peach Pie layer to inside of card ensuring even borders on all 4 sides.
- Stamp a row of easter eggs at the bottom of the Basic White layer. Start with stamping Pretty in Pink egg in the middle to get the spacing right. Followed by Balmy Blue to the left, Peach Pie to the right of the pink one. Finish with the pink eggs at each end which may go off the card stock.
- Adhere on top of Peach Pie layer to complete card.
I hope you all have a lovely Easter celebration with family and friends and enjoy the rest of the Easter Break!
Supply list
Listed below is the supply list. Just click on the picture to take you directly to the item in my online store.
Product List![Notes Of Spring Photopolymer Stamp Set (English) [ 167979 ]](https://assets1.tamsnetwork.com/images/EC042017NF/167979s.jpg "Notes Of Spring Photopolymer Stamp Set (English) [ 167979 ]")
![Easter Basket Bundle (English) [ 166947 ]](https://assets1.tamsnetwork.com/images/EC042017NF/166947s.jpg "Easter Basket Bundle (English) [ 166947 ]")
![Help Me Grow Bundle (English) [ 167167 ]](https://assets1.tamsnetwork.com/images/EC042017NF/167167s.jpg "Help Me Grow Bundle (English) [ 167167 ]")
![Lazy Daisy 3 D Embossing Folder [ 167196 ]](https://assets1.tamsnetwork.com/images/EC042017NF/167196s.jpg "Lazy Daisy 3 D Embossing Folder [ 167196 ]")
![Easter Joy 12" X 12" (30.5 X 30.5 Cm) Specialty Designer Series Paper [ 166939 ]](https://assets1.tamsnetwork.com/images/EC042017NF/166939s.jpg "Easter Joy 12\" X 12\" (30.5 X 30.5 Cm) Specialty Designer Series Paper [ 166939 ]")
![Shy Shamrock 12" X 12" (30.5 X 30.5 Cm) Two Tone Cardstock [ 166698 ]](https://assets1.tamsnetwork.com/images/EC042017NF/166698s.jpg "Shy Shamrock 12\" X 12\" (30.5 X 30.5 Cm) Two Tone Cardstock [ 166698 ]")
![Peach Pie A4 Cardstock [ 163800 ]](https://assets1.tamsnetwork.com/images/EC042017NF/163800s.jpg "Peach Pie A4 Cardstock [ 163800 ]")
![Basic White A4 Thick Cardstock [ 159230 ]](https://assets1.tamsnetwork.com/images/EC042017NF/159230s.jpg "Basic White A4 Thick Cardstock [ 159230 ]")
![Basic White A4 Cardstock [ 166781 ]](https://assets1.tamsnetwork.com/images/EC042017NF/166781s.jpg "Basic White A4 Cardstock [ 166781 ]")
![Peach Pie Stampin’ Blends Combo Pack [ 163827 ]](https://assets1.tamsnetwork.com/images/EC042017NF/163827s.jpg "Peach Pie Stampin’ Blends Combo Pack [ 163827 ]")
![Balmy Blue Classic Stampin' Pad [ 147105 ]](https://assets1.tamsnetwork.com/images/EC042017NF/147105s.jpg "Balmy Blue Classic Stampin' Pad [ 147105 ]")
![Crumb Cake Classic Stampin' Pad [ 147116 ]](https://assets1.tamsnetwork.com/images/EC042017NF/147116s.jpg "Crumb Cake Classic Stampin' Pad [ 147116 ]")
![Shy Shamrock Classic Stampin Pad [ 163808 ]](https://assets1.tamsnetwork.com/images/EC042017NF/163808s.jpg "Shy Shamrock Classic Stampin Pad [ 163808 ]")
![Peach Pie Classic Stampin Pad [ 163810 ]](https://assets1.tamsnetwork.com/images/EC042017NF/163810s.jpg "Peach Pie Classic Stampin Pad [ 163810 ]")
![Pretty In Pink Classic Stampin Pad [ 163807 ]](https://assets1.tamsnetwork.com/images/EC042017NF/163807s.jpg "Pretty In Pink Classic Stampin Pad [ 163807 ]")

- SHOP ONLINE – EARN 10% REWARDS ON ALL PURCHASES OVER £20
- PURCHASE A STARTER KIT : Get £155 worth of products for only £99. Choose from current catalogues and any specials available. Free Shipping. Read more
- Subscribe to my Video Tutorials – click here