
New Annual Catalogue is here! So excited to be able to share the pages within! The May 2025 Online exclusives launches today too so it’s a double whammy!
I think another suite called the Beautiful Gallery Suite Collection on pages 52-57 will be another popular one. This suite also has two bundles, the Gallery Blooms Bundle with images only, and the Beautiful Motifs bundle with images as well as words. You’ll fall in love with the eclectic collection of 6”x 6” Beautiful Gallery Designer Series Papers. The papers depict floral sketches, moody landscapes and dramatic artistic details. Also included in the Suite is a lovely Damask Designs 3D embossing folder, beige ribbon and Pressed Flower motifs.
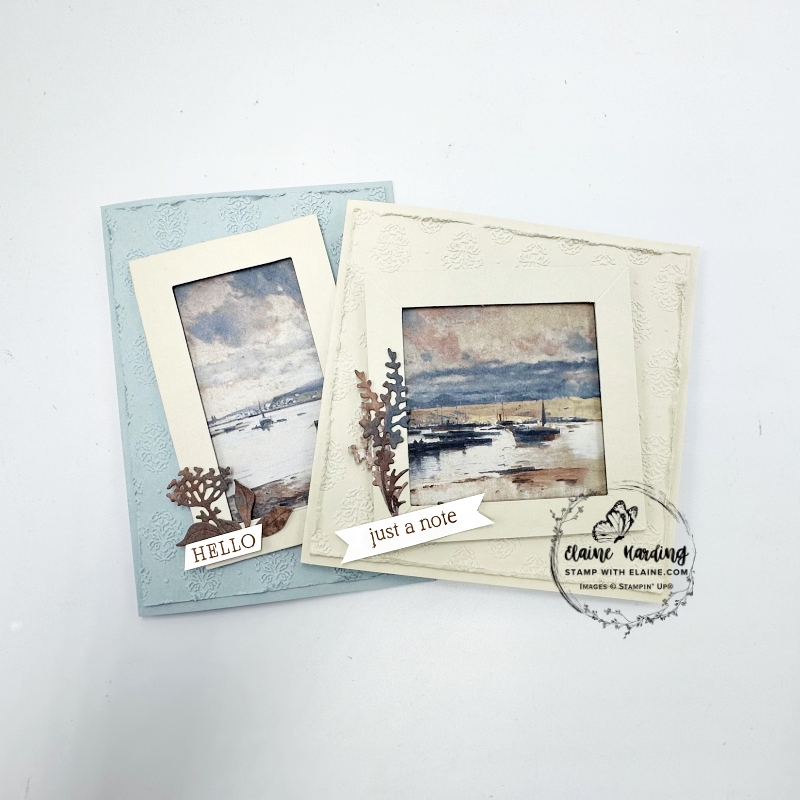
I think my new favourite colour is Cloud Cover – it’s such a soft blue, depending what card stock you use as an accent piece because it switches from blue hues to grey.
How to make the Cloud Cover card
It is such a shame we haven’t got a Cloud Cover Classic Stampin’ pad. In order to stamp the motif from the Beautiful Motifs Photopolymer stamps, I had to ink it up with the 2025-2027 In Color™ Stampin’ Write Markers. It has to be inked and stamped several times on the Stamparatus (now retired) in order to get a satisfactory result.
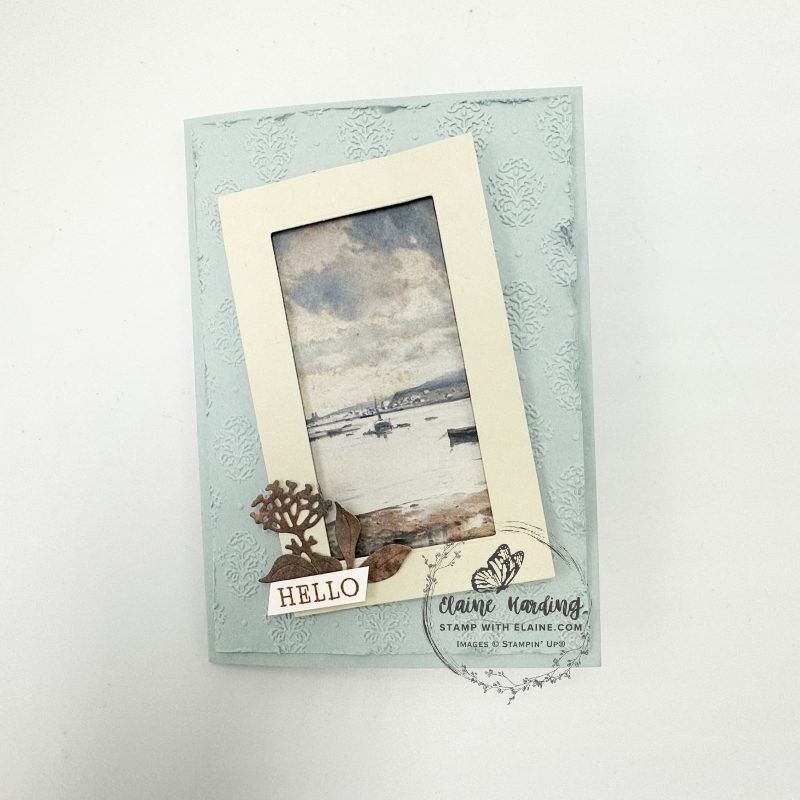
- Card base : Cloud Cover cut at 5 ¾” x 8 ¼” (14.5 cm x 21 cm) folded in half.
- Cut Cloud Cover mat layer 3 ⅞” x 5 ½” (9.8 cm x 14 cm). Emboss with Damask Designs Embossing Folder (for a standard embossing folder you only need Platform 1 and 2 Platform 3). Distress edges and adhere to card front.
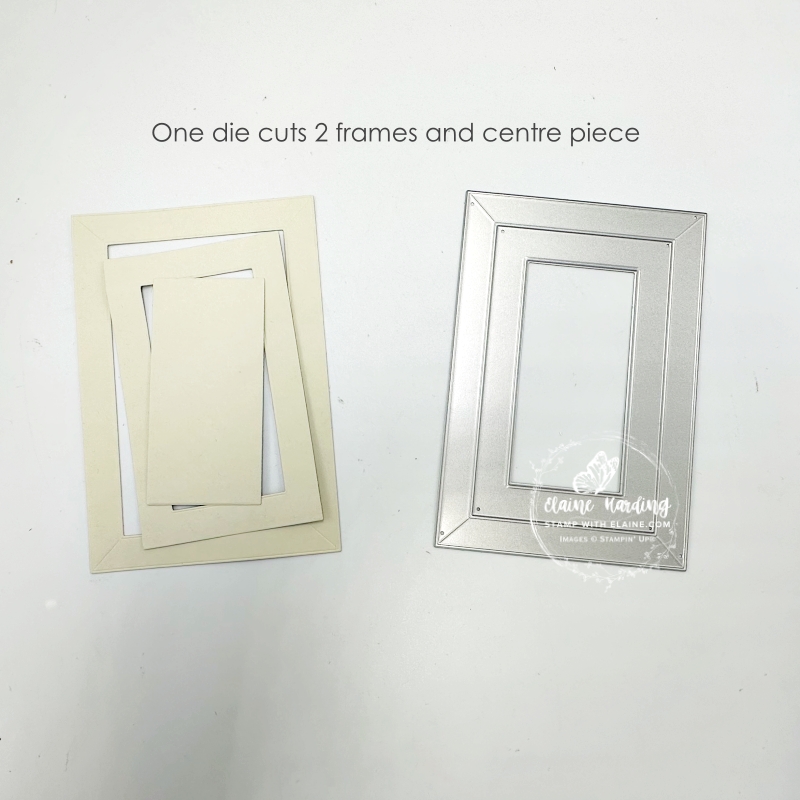
- Basic Beige card stock – cut a frame with the Gallery Blooms Die set. This is a single die, but it will cut 2 frames and a small centre piece. Use the smaller frame.
- Beautiful Gallery 6 x 6 DSP : cut a scene 2 ½” x 4 ⅛” (6.4 cm x 10.5 cm). Adhere this at an angle on embossed Cloud Cover layer.
- Apply dimensionals to back of Basic Beige frame and adhere on top of DSP ensuring it covers all of the DSP.
- With remnants of DSP, die cut the trio of leaves and floral element as pictured, adhere to bottom left corner of frame.
- Stamp “hello” on a scrap of Basic White, trim and adhere on top of floral elements as shown.
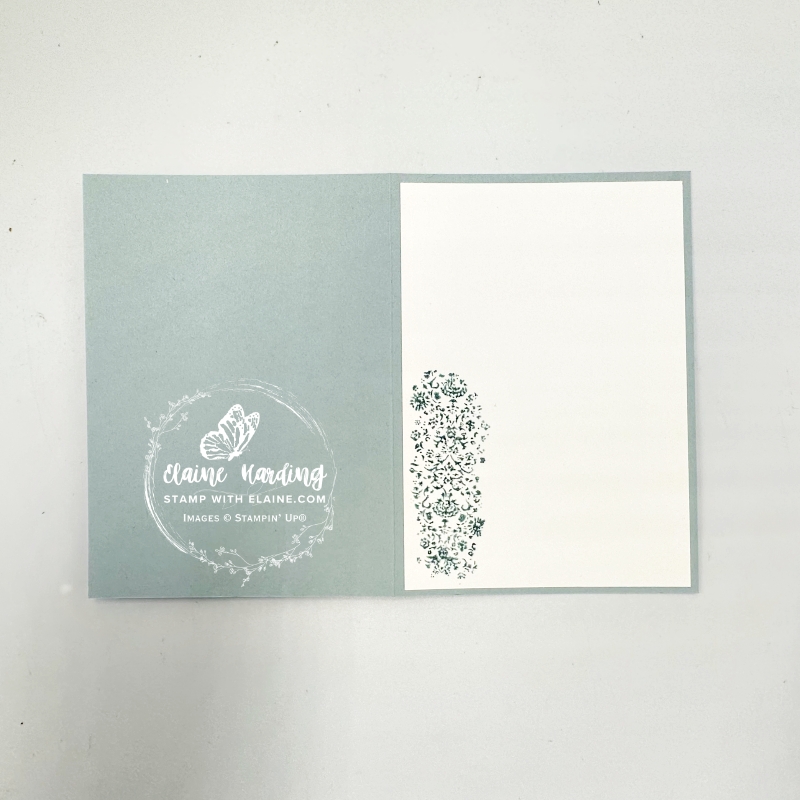
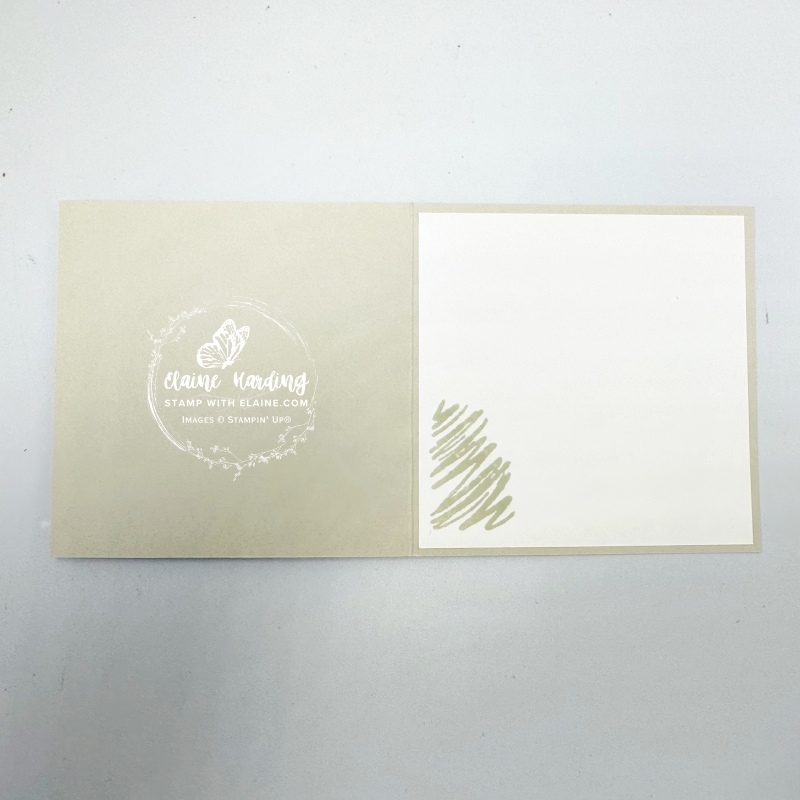
Inside Cloud Cover card
- Cut a Basic White piece 3 ⅞” x 5 ½” (9.8 cm x 14 cm).
- Use the 2025-2027 In Color™ Stampin’ Write Markers and ink up stamp with the Cloud Cover colour. You may have to do this several times so it’s best to use a stamp positioning tool. I used the retired Stamparatus to do this.
- Adhere to inside of card.
Square Basic Beige card
I used the remnant from cutting my first scene for a second card, but this time the card is square instead of the standard C6 type card. There’s very little waste as I used all the leftover bits to die cut the floral elements too.
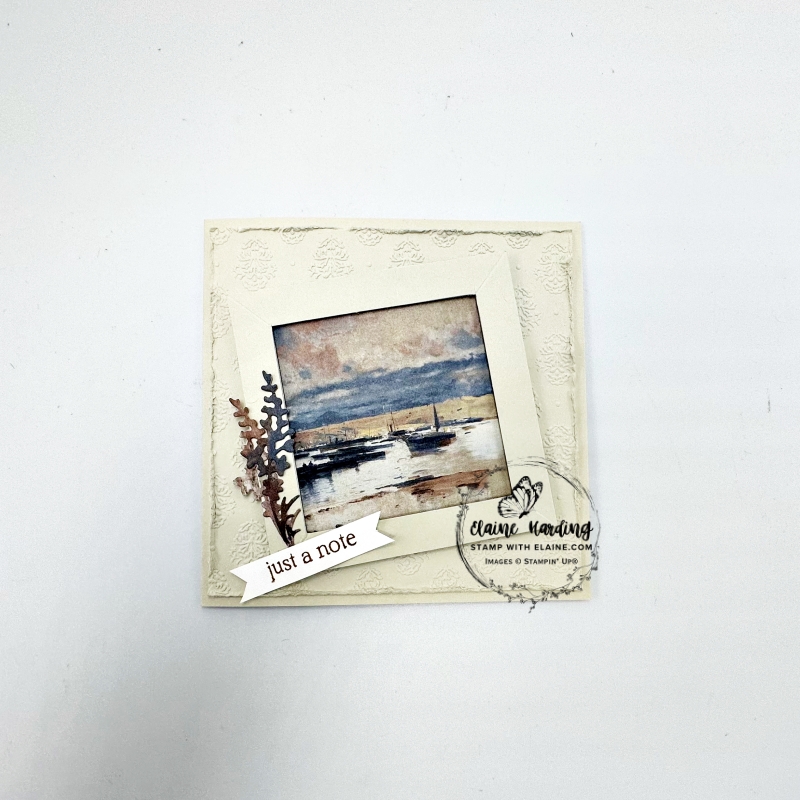
- Basic Beige card base cut at 10″ x 5″ (25 cm x 12.5 cm) folded in half.
- Mat layer for embossing with Damask Design Embossing Folder : Basic Beige 4 ¾” x 4 ¾” (12 cm x 12 cm).
- Cut frame from Basic Beige card stock measuring 3 ⅝” x 3 ⅝” (9.2 cm x 9.2 cm) and use trimmer to cut a ½” (1.3 cm) border all round.
- Use the largest Basic Beige frame and trim to 3 ⅝”. Then adhere the square frame from Step 3 on top.
- DSP – remaining remnant from 1st card adapted for square card trim to 3 ⅜” x 3 ⅜” (8.5 cm x 8.5 cm). Adhere to square card base on top of embossed piece at an angle as pictured.
- From remnants, die cut floral elements and glue to bottom left corner.
- Scrap of Basic White – stamp greeting and cut flag ends on both ends and adhere with dimensionals and glue dots over the flowers.
Inside square Basic Beige card
- Cut a Basic White piece at 4 ¾” x 4 ¾” (12 cm x 12 cm).
- Stamp squiggly image from Beautiful Motifs stamp set in Basic Beige in bottom left corner.
- Adhere Basic White piece to inside of Basic Beige square card.
How to Alter Rectangular frame to Square one
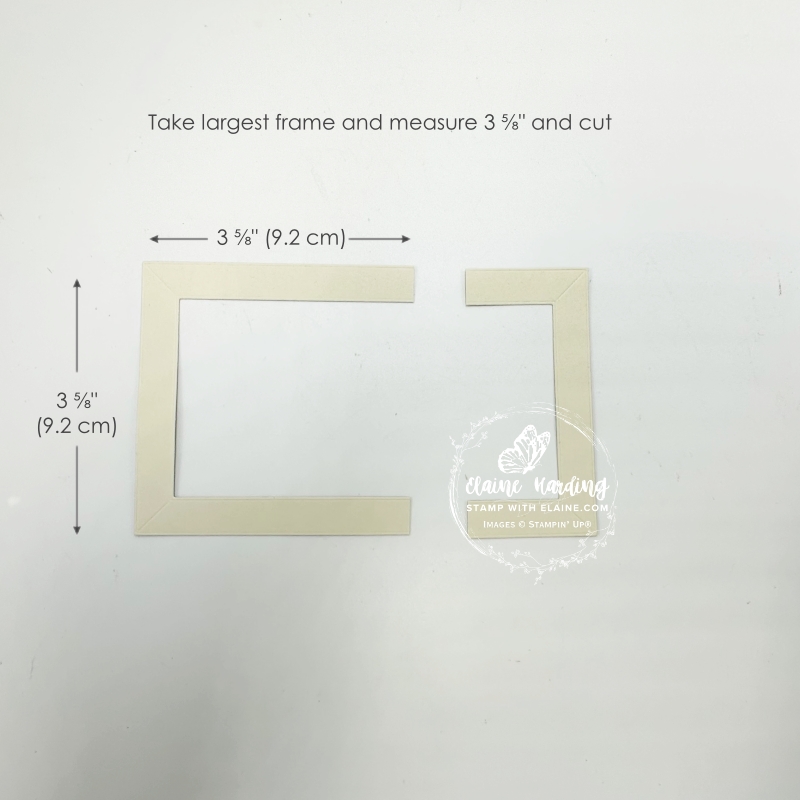
- Take the largest Basic Beige frame and trim down to 3 ⅝” x 3 ⅝” (9.2 cm x 9.2 cm)
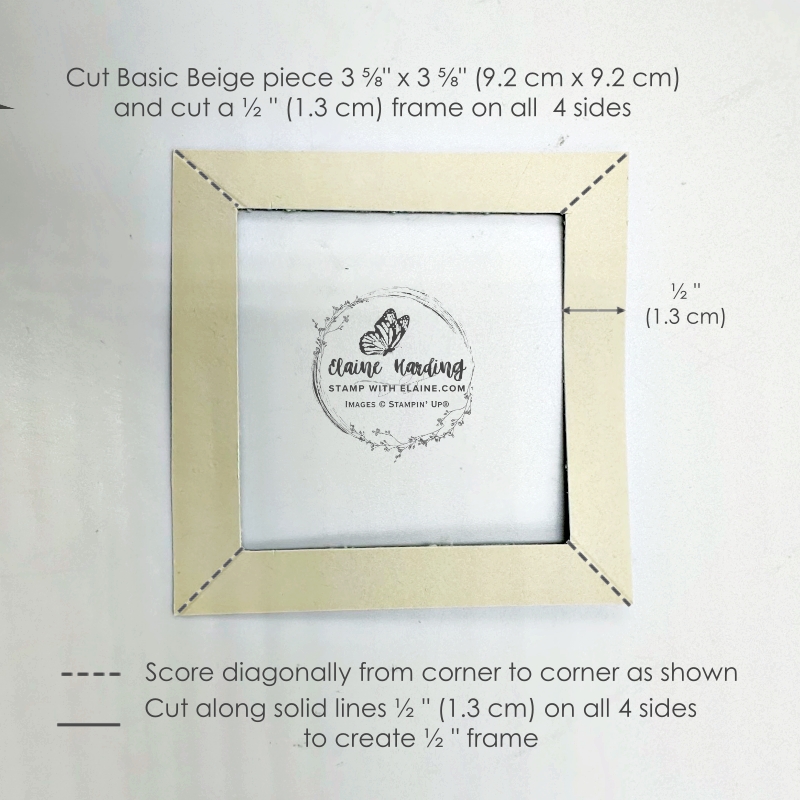
- Cut a Basic Beige square at 3 ⅝” x 3 ⅝” (9.2 cm x 9.2 cm). Gut the inside by cutting a ½” border all round in the trimmer.
- Incorporate diagonal score lines on all 4 corners as shown on the trimmer by aligning the inside corner to the outer corner in the cutting groove of the trimmer and then scoring with the light scoring blade.
- Adhere this to the “U” shaped piece to form a square.
Supply list
Listed below is the supply list. Just click on the picture to take you directly to the item in my online store.
Product List![Beautiful Gallery Suite Collection (English) [ 165217 ]](https://assets1.tamsnetwork.com/images/EC042017NF/165217s.jpg "Beautiful Gallery Suite Collection (English) [ 165217 ]")
![Beautiful Gallery 6" X 6" (15.2 X 15.2 Cm) Designer Series Paper [ 165196 ]](https://assets1.tamsnetwork.com/images/EC042017NF/165196s.jpg "Beautiful Gallery 6\" X 6\" (15.2 X 15.2 Cm) Designer Series Paper [ 165196 ]")
![Beautiful Motifs Bundle (English) [ 165206 ]](https://assets1.tamsnetwork.com/images/EC042017NF/165206s.jpg "Beautiful Motifs Bundle (English) [ 165206 ]")
![Gallery Blooms Bundle [ 165213 ]](https://assets1.tamsnetwork.com/images/EC042017NF/165213s.jpg "Gallery Blooms Bundle [ 165213 ]")
![Damask Designs Embossing Folder [ 165214 ]](https://assets1.tamsnetwork.com/images/EC042017NF/165214s.jpg "Damask Designs Embossing Folder [ 165214 ]")
![Basic Beige A4 Cardstock [ 164512 ]](https://assets1.tamsnetwork.com/images/EC042017NF/164512s.jpg "Basic Beige A4 Cardstock [ 164512 ]")
![Basic White A4 Cardstock [ 166781 ]](https://assets1.tamsnetwork.com/images/EC042017NF/166781s.jpg "Basic White A4 Cardstock [ 166781 ]")
![Cloud Cover A4 Cardstock [ 165293 ]](https://assets1.tamsnetwork.com/images/EC042017NF/165293s.jpg "Cloud Cover A4 Cardstock [ 165293 ]")
![Basic Beige Classic Stampin Pad [ 163806 ]](https://assets1.tamsnetwork.com/images/EC042017NF/163806s.jpg "Basic Beige Classic Stampin Pad [ 163806 ]")
![Pecan Pie Classic Stampin' Pad [ 161665 ]](https://assets1.tamsnetwork.com/images/EC042017NF/161665s.jpg "Pecan Pie Classic Stampin' Pad [ 161665 ]")
I hope you liked both versions and how I stretched that 6″x 6″ piece to make 2 cards instead of one. Thanks for stopping by. Happy stampin’

- SHOP ONLINE – EARN 10% REWARDS ON ALL PURCHASES OVER £20
- PURCHASE A STARTER KIT : Get £155 worth of products for only £99. Choose from current catalogues and any specials available. Free Shipping. Read more
- Subscribe to my Video Tutorials – click here