
Anniversary card – Feathered Fun. Don’t you just love reversible stamps? You can stamp on both sides! One side has all the details, but the reverse has the general shape. It means if you’re not keen on colouring, the solid image on the reverse does that for you. What a time saving bonus! All the images in the Feathered Fun Photopolymer stamp set are of pairs of birds which can snuggle together. There are no sentiments, so you can just add your own from any stamp set. That gives it so much versatility.
Golden Anniversary card
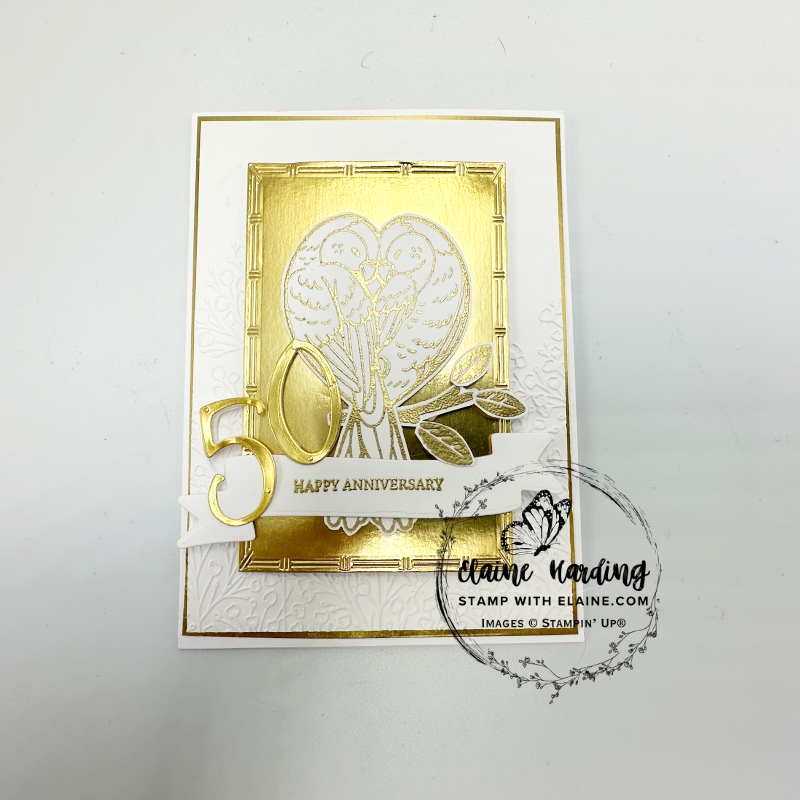
I made this for my hubby to mark our Golden Wedding Anniversary. Has it really been 50 years already? Showing my age now! By the time this is published, the day would have come and gone, so I think it’s pretty safe to post it here.
Something old and something new
- I used the Birthday Celebration Dies from The Wildflower Birthday Suite Collection which was in the 2025 January-April Mini for the number “50”.
- The Gold Foil mat layer was cut with the Textured Notes Dies an Online Exclusive which was released in March 2025. There are 7 nested rectangular dies and another stand alone rectangle die in the set. One being the smallest in the nest of 7, I used number 5.
- Gold embossed lovebirds are stamps from Feathered Fun, a new online exclusive coming in May 2025.
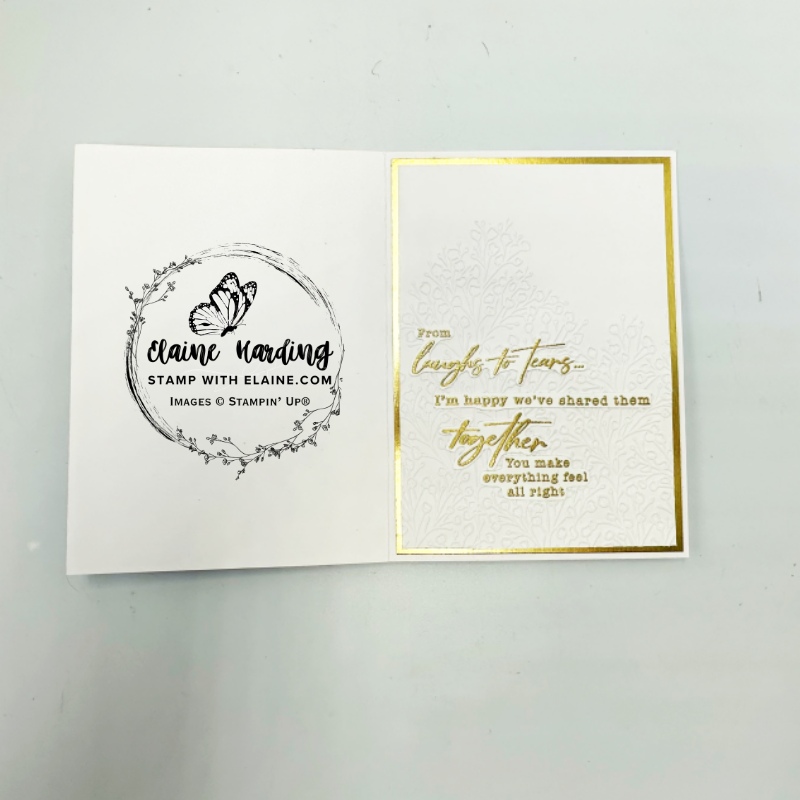
- The fussy cut embossed text adhered to the inside of the card is from Sentimental Framing Bundle which is also a new Online exclusive which will be available from 6 May 2025.
How to make the card
- Cut White Willow 12″x 12″ (30.5 x 30.5 cm) card stock : 5 ¾” x 8 ¼” (14.5 cm x 21 cm). Fold in half.
- Gold Foil – cut 2 pieces 4″ x 5 ⅝” (10 cm x 14 cm). Conserve Gold Foil by “gutting the insides”. Place in trimmer and cut a ¼” border frame on all 4 sides on both pieces. Attach tear n’ tape to the frame and adhere to card front leaving an even border on all 4 sides. Repeat for the other piece and set aside for later. Reserve remnant for future use on another project.
- Cut 2 pieces of White Willow : 3 ⅞” x 5 ½” (9.5 cm x 13.5 cm). Emboss both pieces with new May 25 Online Exclusive Pressed Flowers Embossing Folder .
- Adhere number 5 die cut Textured Notes die in Gold Foil and adhere with dimensionals on top of White Willow Pressed Flowers embossed layer.
- Stamp and emboss Lovebirds from the Feathered Fun stamp set in Versamark ink and gold emboss. Fussy cut and adhere with dimensionals on to gold foil layer.
- Also stamp branch and leaves in Versamark ink and gold emboss then arrange and adhere to card front. Remember to adhere branch behind the Lovebirds tails.
Die cutting numerals and sentiment
- Attach gold foil to adhesive sheet and die cut the numerals five and zero from the Birthday Celebration dies.
- For the sentiment use the Mixed Labels Bundle and stamp “Happy Anniversary” with Versamark ink, sprinkle with Wow gold embossing powder and heat set. Use the label die from Mixed Labels Dies to die cut the banner then adhere to card front as pictured above.
- Stamp the sentiments from the new May 25 Online Exclusive – Sentimental Framing stamp set and fussy cut them. Set aside till needed.
Inside card
- Adhere remaining gold foil frame inside card leaving an even border on all 4 sides.
- Also adhere the remaining White Willow embossed piece on top of gold foil frame leaving an even border on all 4 sides.
- Fussy cut all the sentiments from Sentimental Framing stamp set and adhere to inside card as pictured to complete card.
Supply list
Listed below is the supply list. Just click on the picture to take you directly to the item in my online store.
Product List![Feathered Fun Photopolymer Stamp Set [ 165336 ]](https://assets1.tamsnetwork.com/images/EC042017NF/165336s.jpg "Feathered Fun Photopolymer Stamp Set [ 165336 ]")
![Sentimental Framing Bundle (English) [ 165477 ]](https://assets1.tamsnetwork.com/images/EC042017NF/165477s.jpg "Sentimental Framing Bundle (English) [ 165477 ]")
![Birthday Celebration Bundle (English) [ 164599 ]](https://assets1.tamsnetwork.com/images/EC042017NF/164599s.jpg "Birthday Celebration Bundle (English) [ 164599 ]")
![Birthday Celebration Dies [ 164598 ]](https://assets1.tamsnetwork.com/images/EC042017NF/164598s.jpg "Birthday Celebration Dies [ 164598 ]")
![Textured Notes Dies [ 165555 ]](https://assets1.tamsnetwork.com/images/EC042017NF/165555s.jpg "Textured Notes Dies [ 165555 ]")
![Pressed Flowers Embossing Folder [ 165614 ]](https://assets1.tamsnetwork.com/images/EC042017NF/165614s.jpg "Pressed Flowers Embossing Folder [ 165614 ]")
![Basic White A4 Cardstock [ 166781 ]](https://assets1.tamsnetwork.com/images/EC042017NF/166781s.jpg "Basic White A4 Cardstock [ 166781 ]")
![Gold Foil Sheets [ 132622 ]](https://assets1.tamsnetwork.com/images/EC042017NF/132622s.jpg "Gold Foil Sheets [ 132622 ]")
![Versamark Pad [ 102283 ]](https://assets1.tamsnetwork.com/images/EC042017NF/102283s.jpg "Versamark Pad [ 102283 ]")
![Embossing Additions Tool Kit [ 159971 ]](https://assets1.tamsnetwork.com/images/EC042017NF/159971s.jpg "Embossing Additions Tool Kit [ 159971 ]")
![Metallics Wow! Embossing Powder [ 165678 ]](https://assets1.tamsnetwork.com/images/EC042017NF/165678s.jpg "Metallics Wow! Embossing Powder [ 165678 ]")
![Heat Tool - Uk Plug [ 129054 ]](https://assets1.tamsnetwork.com/images/EC042017NF/129054s.jpg "Heat Tool - Uk Plug [ 129054 ]")

- SHOP ONLINE – EARN 10% REWARDS ON ALL PURCHASES OVER £20
- PURCHASE A STARTER KIT : Get £155 worth of products for only £99. Choose from current catalogues and any specials available. Free Shipping. Read more
- Subscribe to my Video Tutorials – click here