
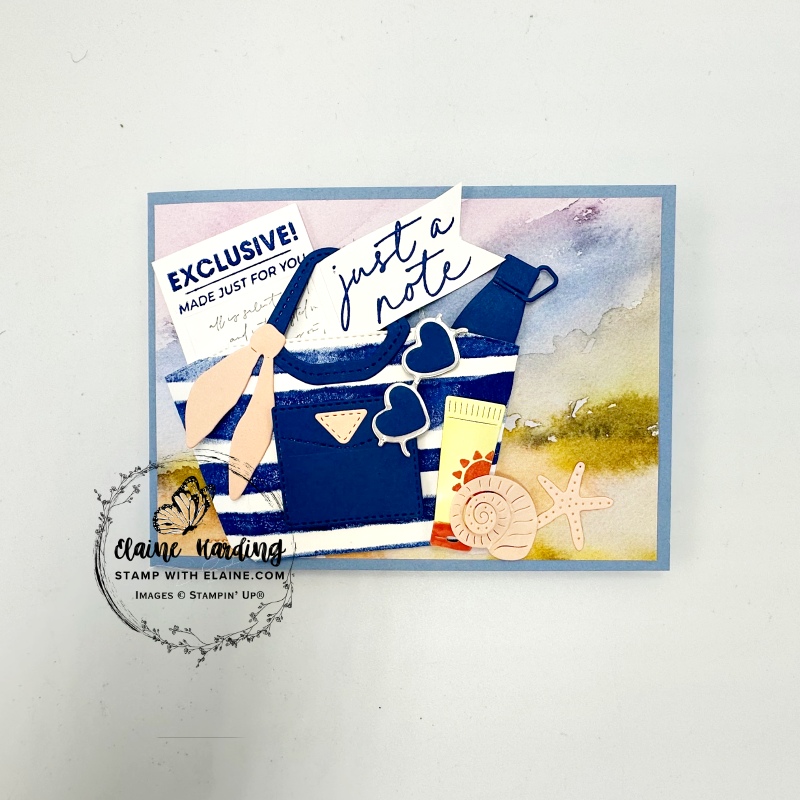
Just a Note – Notes & Totes. Whenever someone you know needs a “pick-me-up” it’s always handy to have a card which says “Just a Note” so that you can let them know they’re not alone and that you’re thinking of them. You’ll find Notes & Totes in the Bundle section from pages 81-87 in the May 25-April 26 Annual Catalogue.
Notes & Totes Bundle
“Just a Note” is one of the sentiments in the Notes & Totes stamp set. The Notes & Totes photopolymer stamp set has a mixture of script and Upper Case letters for the greetings. In addition, there are stamps which are “fillers”. One is a group of dots, a cluster of flowers, a hibiscus, a sun, and drops of water. There are additional dies to die cut a scarf, different handles for the tote, a tube of sun cream, a water bottle, sunglasses, seashell, starfish, tag, wood grain planks (for making a picket fence), design elements for tote bag, and even a newspaper!
The dies used on Just a Note card
On the Just a Note card, I’ve used the dies to cut the handle, tote bag base, a pocket, tube of sun cream, scarf, Newspaper (Exclusive! Made just for you), water bottle, sunglasses, seashell and starfish.
How to make the Just a note card
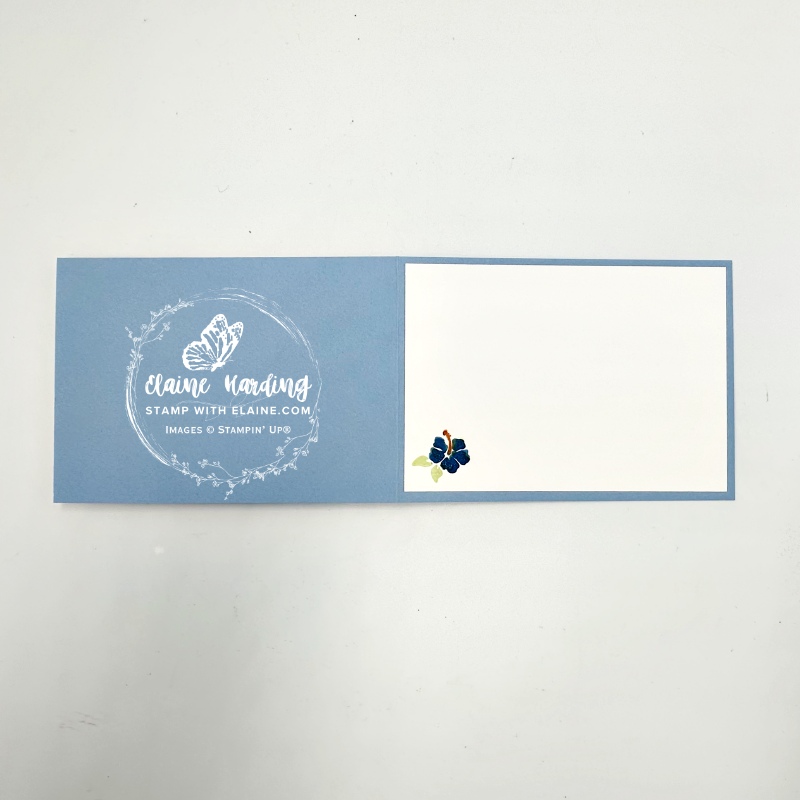
- Card base : Boho Blue (retired) cut at 4 ⅛” x 11 ½” (10.5 cm x 29 cm) folded in half.
- DSP Thoughtful Journey 6″ x 6″ (15.2 x 15.2 cm) cut at 3 ⅞” x 5 ½” (9.8 cm x 14 cm) adhered to card front.
- Cut Basic White piece for inside card at 3 ⅞” x 5 ½” (9.8 cm x 14 cm). Stamp hibiscus in bottom left corner and adhere inside card.
- Petal Pink card stock – die cut the scarf, triangular decorative piece, sea shell and star fish.
- Basic White card stock – die cut Newspaper, stamp with “Exclusive! Made Just for You”, apply adhesive to the narrow tab on the left and arrange and adhere inside tote bag.
- Stamp “just a note” in script with Blueberry Bushel ink. Switch to Gray Granite ink – mask edges on all 4 sides and stamp Elements of Text underneath the “Exclusive” headline . Apply adhesive to narrow tab on left side, insert and adhere to inside of tote.
Tote bag construction
- Stamp a scrap of Basic White with the Painted Stripes stamp in Blueberry Bushel and die cut one Tote bag front. Fold tabs and adhere to card front on top of DSP layer.
- Blueberry Bushel card stock – Die cut handle, pocket and and water bottle and sunglasses heart shaped lens.
- Burnish the score lines on the striped tote bag, add adhesive to the tabs, fold under and adhere to card front.
- Adhere Blueberry Bushel handle to middle of tote bag. Next adhere pocket underneath. Attach water bottle to right side of tote bag with dimensionals.
- Silver foil – die cut sun glasses. Die cut a second pair of sun glasses in Blueberry Bushel card stock. Adhere heart shaped pieces on top of Silver foil as pictured above.
Petal Pink elements
- Die cut scarf and adhere to handle as pictured.
- Adhere die cut triangle to pocket.
- Apply dimensionals to sea shell and adhere to card as shown, and adhere starfish directly to the DSP to finish card.
Dies for creating 3D Tote bag
You can also make the tote bag into a 3D project so that it can stand up on its own.
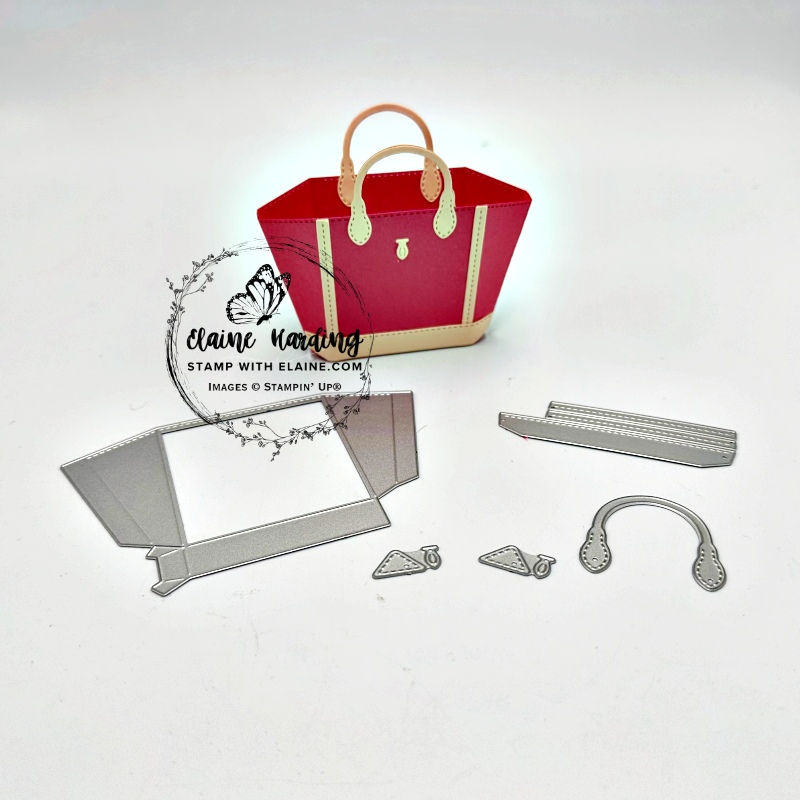
- Cutting two tote bag bases in Strawberry Slush card stock. Burnish score lines and apply adhesive to the tabs and glue together.
- Petal Pink – die cut 4 handles and adhere to tote bag as shown. (You need 4 handles so that you can sandwich the tote bag to give the handles a more finished look. The reverse side of the die cut looks rough, so by adhering the wrong sides back to back, the nicer front of the die cut will be visible on both sides.)
- Use the die in the top right in the photo and run it through the die cutting machine twice to cut 4 decorative strips and 2 bottom decorative strips in Petal Pink. Adhere elements to tote bag.
- Lastly die cut 2 pieces of the “key” shape and adhere to tote bag as shown.
Supply list
Listed below is the supply list. Just click on the picture to take you directly to the item in my online store.
Product List![Notes & Totes Bundle (English) [ 165241 ]](https://assets1.tamsnetwork.com/images/EC042017NF/165241s.jpg "Notes & Totes Bundle (English) [ 165241 ]")
![Painted Stripes Cling Stamp Set [ 165437 ]](https://assets1.tamsnetwork.com/images/EC042017NF/165437s.jpg "Painted Stripes Cling Stamp Set [ 165437 ]")
![Elements Of Text Cling Stamp Set [ 164774 ]](https://assets1.tamsnetwork.com/images/EC042017NF/164774s.jpg "Elements Of Text Cling Stamp Set [ 164774 ]")
![Thoughtful Journey 6" X 6" (15.2 X 15.2 Cm) Designer Series Paper [ 163303 ]](https://assets1.tamsnetwork.com/images/EC042017NF/163303s.jpg "Thoughtful Journey 6\" X 6\" (15.2 X 15.2 Cm) Designer Series Paper [ 163303 ]")
![Silver Foil Sheets [ 132178 ]](https://assets1.tamsnetwork.com/images/EC042017NF/132178s.jpg "Silver Foil Sheets [ 132178 ]")
![Basic White A4 Cardstock [ 166781 ]](https://assets1.tamsnetwork.com/images/EC042017NF/166781s.jpg "Basic White A4 Cardstock [ 166781 ]")
![Blueberry Bushel A4 Cardstock [ 146991 ]](https://assets1.tamsnetwork.com/images/EC042017NF/146991s.jpg "Blueberry Bushel A4 Cardstock [ 146991 ]")
![Boho Blue A4 Cardstock [ 161733 ]](https://assets1.tamsnetwork.com/images/EC042017NF/161733s.jpg "Boho Blue A4 Cardstock [ 161733 ]")
![Petal Pink A4 Cardstock [ 147009 ]](https://assets1.tamsnetwork.com/images/EC042017NF/147009s.jpg "Petal Pink A4 Cardstock [ 147009 ]")
![Strawberry Slush A4 Cardstock [ 165297 ]](https://assets1.tamsnetwork.com/images/EC042017NF/165297s.jpg "Strawberry Slush A4 Cardstock [ 165297 ]")
![Calypso Coral Classic Stampin' Pad [ 147101 ]](https://assets1.tamsnetwork.com/images/EC042017NF/147101s.jpg "Calypso Coral Classic Stampin' Pad [ 147101 ]")
![Gray Granite Classic Stampin' Pad [ 147118 ]](https://assets1.tamsnetwork.com/images/EC042017NF/147118s.jpg "Gray Granite Classic Stampin' Pad [ 147118 ]")
![Lemon Lolly Classic Stampin' Pad [ 161666 ]](https://assets1.tamsnetwork.com/images/EC042017NF/161666s.jpg "Lemon Lolly Classic Stampin' Pad [ 161666 ]")
![Soft Sea Foam Classic Stampin' Pad [ 147102 ]](https://assets1.tamsnetwork.com/images/EC042017NF/147102s.jpg "Soft Sea Foam Classic Stampin' Pad [ 147102 ]")

- SHOP ONLINE – EARN 10% REWARDS ON ALL PURCHASES OVER £20
- PURCHASE A STARTER KIT : Get £155 worth of products for only £99. Choose from current catalogues and any specials available. Free Shipping. Read more
- Subscribe to my Video Tutorials – click here