
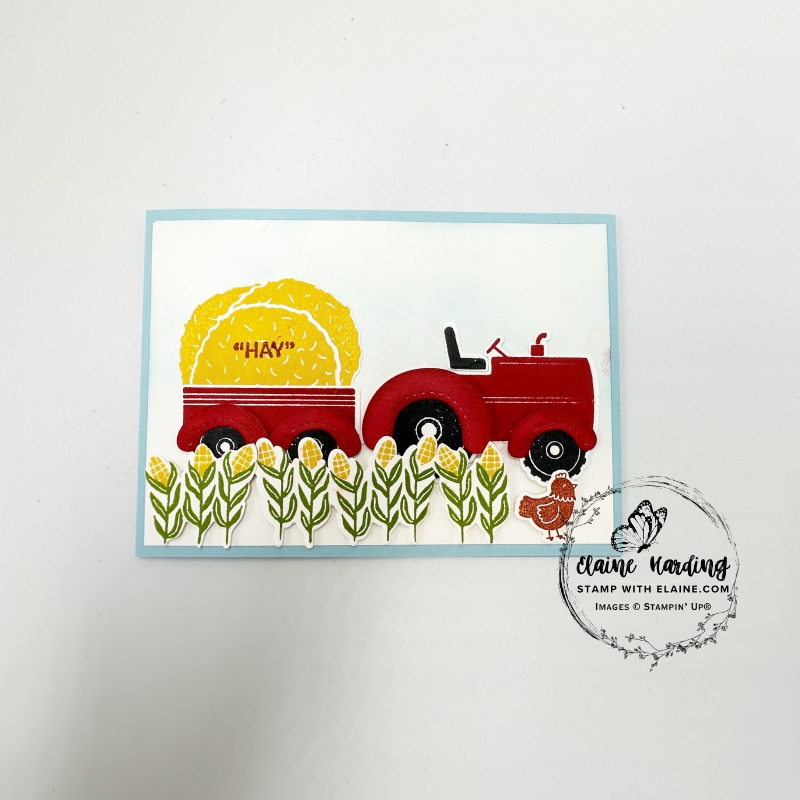
Birthday card for a kid. I made a kid’s birthday card with the Tractor & Co stamps and dies bundle is a new online exclusive released in July 25. I’m not sure what all the different parts of the tractor is called. The most obvious ones are the wheels, the wheel arch covers, the body, trailer and so on. Extras are for the hay, corn and a bird of some description.
Farm machinery, trucks, cars etc appeal to toddlers. I thought this set would be perfect for a kiddie’s card and here’s one I made in landscape.
Cutting guide
- Card base : Balmy Blue cut at 4 ⅛” x 11 ½” (10.5 cm x 29 cm). On the long side, score at 5 ¾” (14.5 cm)
- Cut 2 pieces Basic White at 3 ⅞” x 5 ½” (9.8 cm x 14 cm)
- Scrap of Basic White to stamp tractor body, trailer in Real Red. Stamp 3 pieces of hay in Crushed Curry and die cut. Stamp seat in Tuxedo Black Memento ink and die cut. Stamp 2 sets of leaves in Granny Apple Green and die cut. Stamp 2 sets of corn and die cut. Stamp Chicken in Cajun Craze and die cut. Stamp one big wheel and 3 small ones in Tuxedo Black memento ink and die cut.
- Die cut 1 large wheel arch and 3 smaller ones in Real Red card stock. Sponge the arches with a Sponge dauber and real red ink.
Assembling card
- On one of the Basic White pieces, use a blending brush and lightly add colour for the sky. It’s okay if it is patchy because that represents clouds.
- Adhere to front of card base.
- Apply adhesive to back of tractor and adhere as pictured.
- Next adhere the seat in the tractor.
- Put dimensionals on all the wheels and adhere them as pictured.
- Apply wet adhesive to the upper half of the wheels and attach respective wheel arches.
Adhering trailer
- Apply adhesive to the lower part of trailer – you want to keep the top free of glue because you need to tuck the hay behind top of trailer. Adhere behind tractor.
- Arrange the stacks of hay – adhere the top left one first, the top right next and the centre front one tucked behind the trailer last.
- Apply dimensionals to the remaining wheels. Put adhesive on top half of wheels and attach wheel arches as pictured.
Corn field
- or
- Put dimensionals on back of corn leaves and adhere at bottom of card. Be aware where you place your dimensionals otherwise you will have a double height of dimensionals over the wheels.
- Note, you can stamp the leaves and then stamp the corn to nestle between the leaves then fussy cut them whole…..
- Or you can stamp the leaves separately, and then die cut them. The corn is stamped separately, and die cut separately and then you have to glue them behind each set of leaves.
Inside card
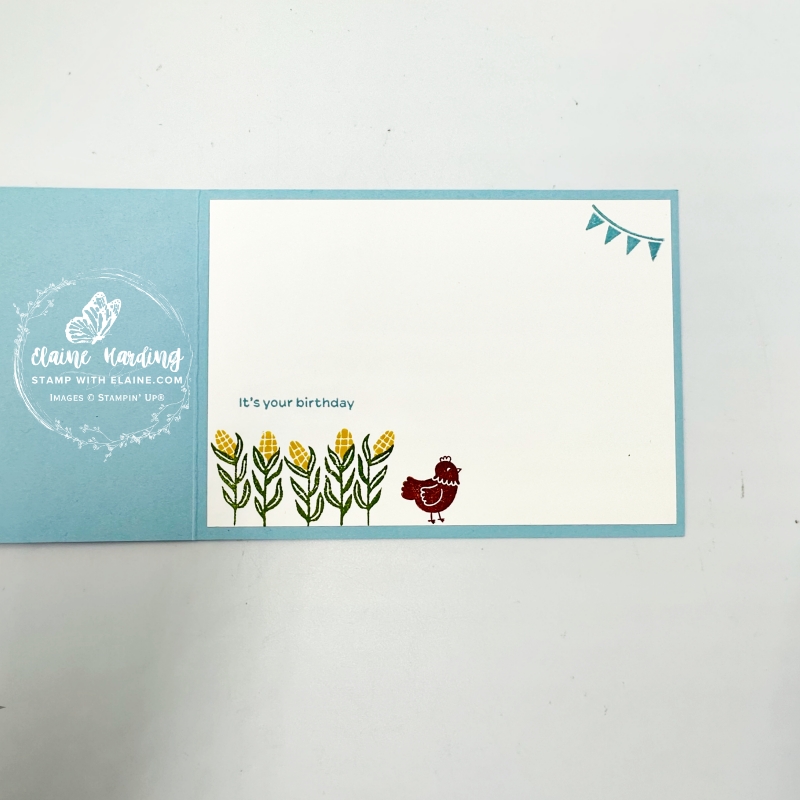
- For the inside of the card, I stamped the leaves first. Then I stamped the corn separately positioning stamp in between the leaves.
- Stamp the greeting and bunting in Balmy Blue.
- The chic was stamped in Cajun Craze.
Supply list
Listed below is the supply list. Just click on the picture to take you directly to the item in my online store.
Product List![Tractor & Co Bundle (English) [ 166116 ]](https://assets1.tamsnetwork.com/images/EC042017NF/166116s.jpg "Tractor & Co Bundle (English) [ 166116 ]")
![Tractor & Co Photopolymer Stamp Set (English) [ 166113 ]](https://assets1.tamsnetwork.com/images/EC042017NF/166113s.jpg "Tractor & Co Photopolymer Stamp Set (English) [ 166113 ]")
![Tractor & Co Dies [ 166115 ]](https://assets1.tamsnetwork.com/images/EC042017NF/166115s.jpg "Tractor & Co Dies [ 166115 ]")
![Balmy Blue A4 Cardstock [ 147007 ]](https://assets1.tamsnetwork.com/images/EC042017NF/147007s.jpg "Balmy Blue A4 Cardstock [ 147007 ]")
![Basic White A4 Cardstock [ 166781 ]](https://assets1.tamsnetwork.com/images/EC042017NF/166781s.jpg "Basic White A4 Cardstock [ 166781 ]")
![Balmy Blue Classic Stampin' Pad [ 147105 ]](https://assets1.tamsnetwork.com/images/EC042017NF/147105s.jpg "Balmy Blue Classic Stampin' Pad [ 147105 ]")
![Cajun Craze Classic Stampin' Pad [ 147085 ]](https://assets1.tamsnetwork.com/images/EC042017NF/147085s.jpg "Cajun Craze Classic Stampin' Pad [ 147085 ]")
![Crushed Curry Classic Stampin' Pad [ 147087 ]](https://assets1.tamsnetwork.com/images/EC042017NF/147087s.jpg "Crushed Curry Classic Stampin' Pad [ 147087 ]")
![Granny Apple Green Stampin' Pad [ 147095 ]](https://assets1.tamsnetwork.com/images/EC042017NF/147095s.jpg "Granny Apple Green Stampin' Pad [ 147095 ]")
![Tuxedo Black Memento Ink Pad [ 132708 ]](https://assets1.tamsnetwork.com/images/EC042017NF/132708s.jpg "Tuxedo Black Memento Ink Pad [ 132708 ]")

- SHOP ONLINE – EARN 10% REWARDS ON ALL PURCHASES OVER £20
- PURCHASE A STARTER KIT : Get £155 worth of products for only £99. Choose from current catalogues and any specials available. Free Shipping. Read more
- Subscribe to my Video Tutorials – click here