
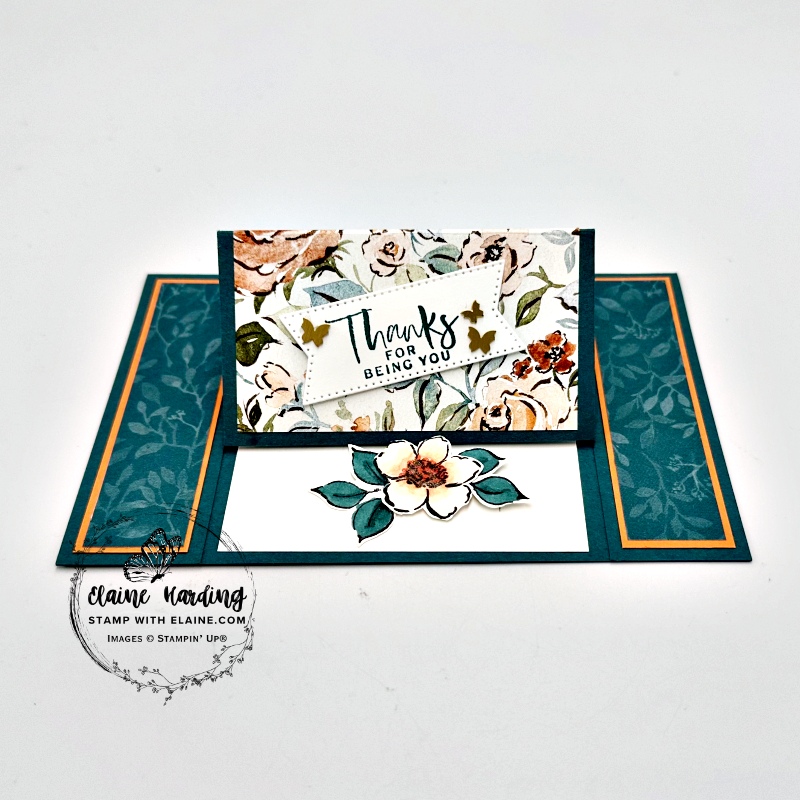
Centre easel card – Charming Day. I made this centre easel card with Charming Day bundle which is one of the newly released online exclusive suites released in July 25. To create the centre easel, you simply cut the card front on both ends to create 3 sections. Orient the card in landscape, adhere the two outer panels to the card base, leaving the centre panel free. The centre panel will be the easel part of the card.

Cutting guide
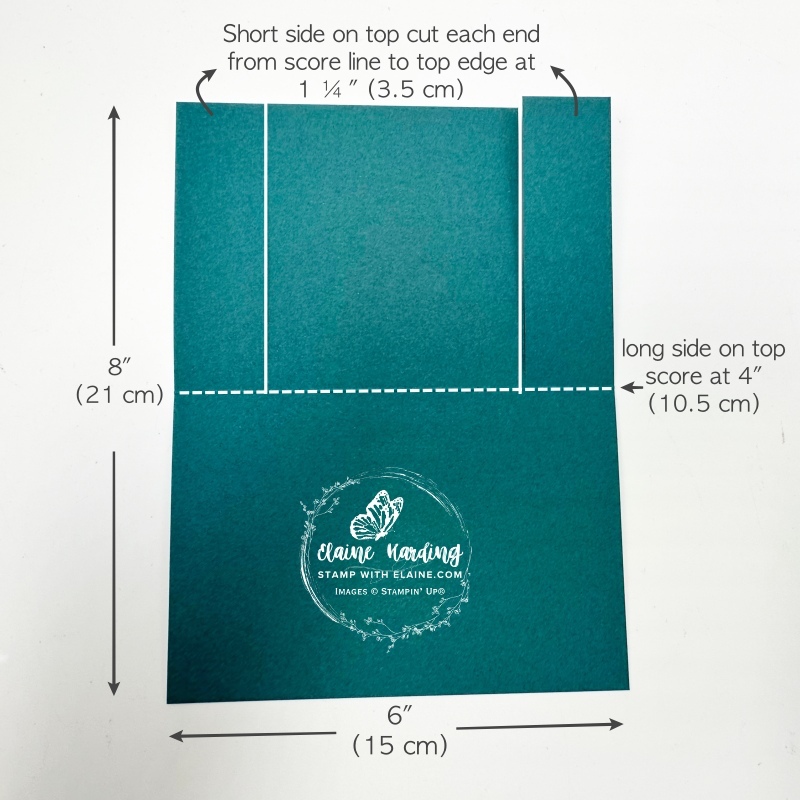
Card base
- Pretty Peacock card base 6″ x 8″ (15 cm x 21 cm)
- 8″ (long side) on top, score at 4″ (10.5 cm)
- Orient card stock so that the short side is at the top. Align left edge at 1 ¼” to left of cutting groove on trimmer from score line up to top.
- Align right edge to right of cutting groove at 1 ¼” and cut from score line up to top.
Mat layers
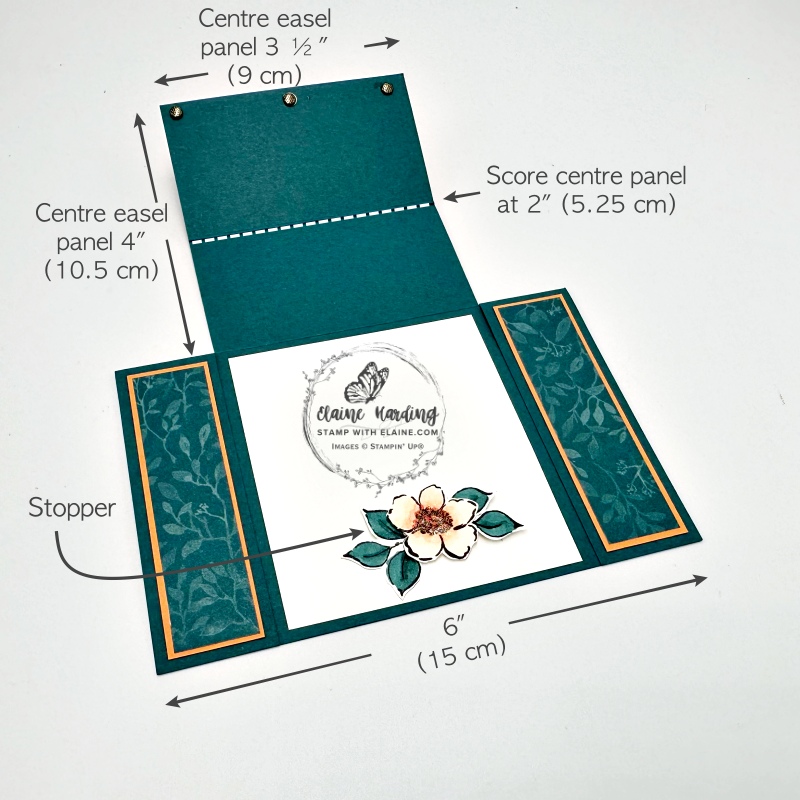
- Centre panel – DSP 3 ¼” x 3 ¾” (8.5 cm x 9.5 cm). Adhere DSP before scoring centre line as pictured above on the right.
- Side panels : Cut 2 pieces Timid Tiger at 1″ x 3 ¾” (2.5 cm x 9.5 cm)
- DSP side panels : Cut 2 pieces DSP Pretty Peacock ⅞” x 3 ⅝” (2.2 cm x 9.2 cm)
- Inside card centre panel Basic White : 3 ¼” x 3 ¾” (8.5 cm x 9.5 cm).
- Stamp greeting and die cut with Stylish Shapes flag end die.
Stopper
- Scrap of Basic White : stamp and colour floral element and colour leaves with Pretty Peacock Stampin’ blends and fussy cut.
- Stamp a second flower, colour with Calypso Coral and Petal Pink Stampin’ Blends and fussy cut just the flower only. Use Clear Wink of Stella to highlight flower centre. Attach dimensionals to back of flower and align and adhere over the leaves and floral element.
Card assembly
- Adhere DSP for side panels on to Timid Tiger mat layers leaving an even border all round then adhere to side panels leaving an even border all around.
- Next adhere side panels to card base ensuring that it is aligned with corners of card base.
- Centre panel – adhere DSP to centre panel first. Then score centre panel at 2″ (5.25 cm)
- Attach Stylish Shapes die cut flag end sentiment with dimensionals and add some Brushed Brass Butterflies.
- Adhere Basic White mat layer inside centre panel of card base.
- Apply adhesive to the leaves on the stopper and adhere in the middle of inside of card base as pictured.
- Optional, you can add extra weight to centre panel by using Adhesive Backed Textured dots.
Supply list
Listed below is the supply list. Just click on the picture to take you directly to the item in my online store.
Product List![Charming Day Bundle (English) [ 166136 ]](https://assets1.tamsnetwork.com/images/EC042017NF/166136s.jpg "Charming Day Bundle (English) [ 166136 ]")
![Charming Day Cling Stamp Set (English) [ 166126 ]](https://assets1.tamsnetwork.com/images/EC042017NF/166126s.jpg "Charming Day Cling Stamp Set (English) [ 166126 ]")
![Charming Day Dies [ 166135 ]](https://assets1.tamsnetwork.com/images/EC042017NF/166135s.jpg "Charming Day Dies [ 166135 ]")
![Stylish Shapes Dies [ 159183 ]](https://assets1.tamsnetwork.com/images/EC042017NF/159183s.jpg "Stylish Shapes Dies [ 159183 ]")
![Adhesive Backed Textured Dots [ 163338 ]](https://assets1.tamsnetwork.com/images/EC042017NF/163338s.jpg "Adhesive Backed Textured Dots [ 163338 ]")
![Brushed Brass Butterflies [ 158136 ]](https://assets1.tamsnetwork.com/images/EC042017NF/158136s.jpg "Brushed Brass Butterflies [ 158136 ]")
![Floral Charm 12" X 12" (30.5 X 30.5 Cm) Designer Series Paper [ 166125 ]](https://assets1.tamsnetwork.com/images/EC042017NF/166125s.jpg "Floral Charm 12\" X 12\" (30.5 X 30.5 Cm) Designer Series Paper [ 166125 ]")
![Pretty Peacock A4 Cardstock [ 150886 ]](https://assets1.tamsnetwork.com/images/EC042017NF/150886s.jpg "Pretty Peacock A4 Cardstock [ 150886 ]")
![Timid Tiger A4 Cardstock [ 165298 ]](https://assets1.tamsnetwork.com/images/EC042017NF/165298s.jpg "Timid Tiger A4 Cardstock [ 165298 ]")
![Basic White A4 Cardstock [ 166781 ]](https://assets1.tamsnetwork.com/images/EC042017NF/166781s.jpg "Basic White A4 Cardstock [ 166781 ]")
![Clear Wink Of Stella Glitter Brush [ 141897 ]](https://assets1.tamsnetwork.com/images/EC042017NF/141897s.jpg "Clear Wink Of Stella Glitter Brush [ 141897 ]")
![Calypso Coral Stampin' Blends Combo Pack [ 154881 ]](https://assets1.tamsnetwork.com/images/EC042017NF/154881s.jpg "Calypso Coral Stampin' Blends Combo Pack [ 154881 ]")
![Petal Pink Stampin' Blends Combo Pack [ 154893 ]](https://assets1.tamsnetwork.com/images/EC042017NF/154893s.jpg "Petal Pink Stampin' Blends Combo Pack [ 154893 ]")
![Pretty Peacock Stampin’ Blends Combo Pack [ 161676 ]](https://assets1.tamsnetwork.com/images/EC042017NF/161676s.jpg "Pretty Peacock Stampin’ Blends Combo Pack [ 161676 ]")
![Pretty Peacock Classic Stampin’ Pad [ 150083 ]](https://assets1.tamsnetwork.com/images/EC042017NF/150083s.jpg "Pretty Peacock Classic Stampin’ Pad [ 150083 ]")
![Tuxedo Black Memento Ink Pad [ 132708 ]](https://assets1.tamsnetwork.com/images/EC042017NF/132708s.jpg "Tuxedo Black Memento Ink Pad [ 132708 ]")
![Paper Trimmer [ 152392 ]](https://assets1.tamsnetwork.com/images/EC042017NF/152392s.jpg "Paper Trimmer [ 152392 ]")

- SHOP ONLINE – EARN 10% REWARDS ON ALL PURCHASES OVER £20
- PURCHASE A STARTER KIT : Get £155 worth of products for only £99. Choose from current catalogues and any specials available. Free Shipping. Read more
- Subscribe to my Video Tutorials – click here