
Nature themed blog hop. August’s theme is Nature for the Build & Bloom (formerly Tech 4 Stampers) blog hop. Now that school’s out August seems to be the time for holidays, summer breaks or the great outdoors.
Did you know new items have been added to the Last Chance List? Those longed for stamp sets or dies could be as much as 50% off and worth checking out. The Wooded Acres stamp set is half price and the Painted Stripes background stamp is 10% off which is what prompted this card. A last Hurrah! before it’s gone. I also used the Textured Notes Dies for some of my mat layers and labels.
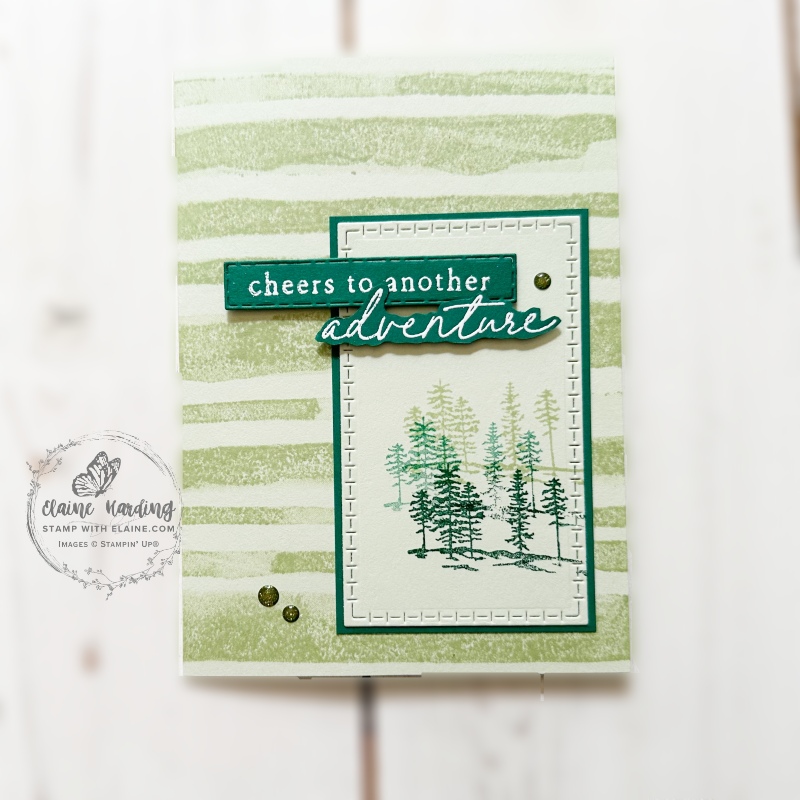
My card is relatively simple to make. In lieu of pretty paper, I stamped directly on to the card front with the Painted Stripes background stamp. As Wooded Acres have only images, I introduced another stamp set called Scenic Adventures.

The Build & Bloom Stampers Blog hop (formerly Tech 4 Stampers)is a monthly subscription group run by Louise Sims. She mentors and enables members to understand IT jargon and equips them with a fountain of Technical knowledge to build or manage their own websites. It takes the mystery out of “tech” and I’ve certainly grown in confidence thanks to her expertise, patience and guidance. Not only that, I’ve met and made new friends with my fellow “Techs” and love the camaraderie within the group.
Cutting guide

Card base
- Cut Soft Sea Foam 5 ¾” x 8 ¼” (14.5 cm x 21 cm) and fold in half.
- Ink the Painted Striped background stamp with Soft Sea Foam ink and stamp directly on to card front. Set aside.
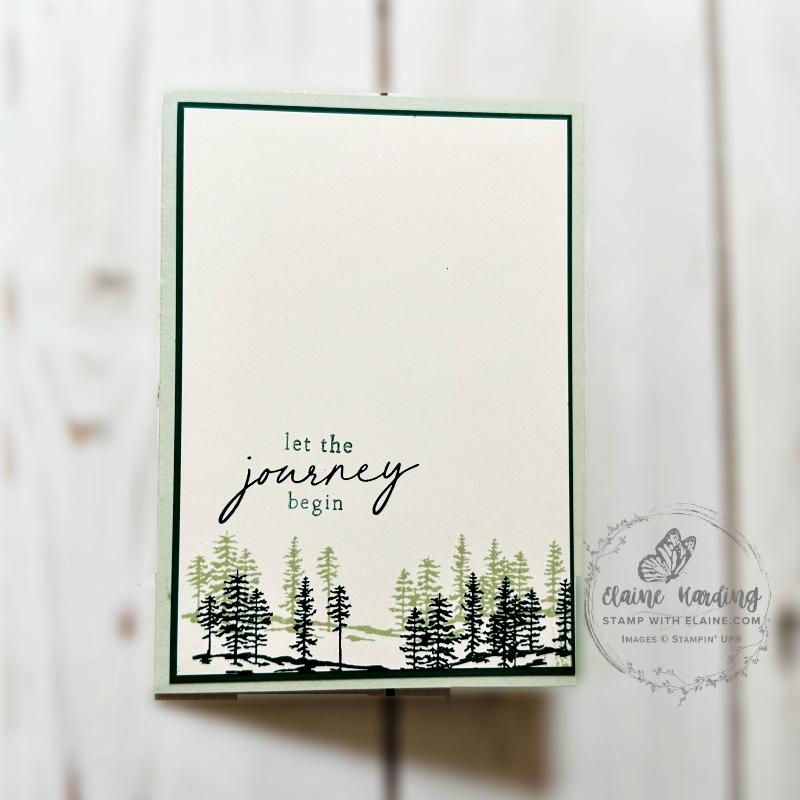
Inside card – picture on right
- Cut Shaded Spruce mat layer 5 ½” x 3 ⅞” (14 cm x 9.8 cm). Adhere to inside of card.
- Very Vanilla mat layer 5 ⅜” x 3 ¾” (13.5 cm x 9.5 cm). Stamp 2 rows of trees from Wooded Acres at the bottom using Soft Sea Foam and Shaded Spruce inks, then stamp the greeting from Scenic Adventures as pictured. Adhere to Shaded Spruce layer.
Card front
- Cut Shaded Spruce mat layer 2 ⅜”x 3 ⅞” (6 cm x 9.8 cm).
- Use 4th smallest die in the Textured Notes Die set to die cut a Soft Sea foam rectangle. Stagger and stamp 3 rows of trees in Soft Sea Foam, the middle row – stamp second generation ink in Shaded Spruce and the third row in first generation Shaded Spruce ink.
- Adhere to Shaded Spruce layer then adhere to card front in the bottom right corner as per picture on the left.
Embossing labels
- Use embossing buddy on a scrap of Shaded Spruce, stamp “cheers to another” from Scenic Adventure in Versamark ink and white emboss and set with heat tool. Die cut with narrow rectangular Textured Notes Die to fit sentiment.
- Repeat embossing process this time with the word “adventure” from Scenic Adventure. Fussy cut.
- Adhere both labels as pictured with dimensionals overlapping each other and lastly add a trio of low profile sparkle dots to finish.
Supply list
Listed below is the supply list. Just click on the picture to take you directly to the item in my online store.
Product List![Wooded Acres Photopolymer Stamp Set [ 165451 ]](https://assets1.tamsnetwork.com/images/EC042017NF/165451s.jpg "Wooded Acres Photopolymer Stamp Set [ 165451 ]")
![Painted Stripes Cling Stamp Set [ 165437 ]](https://assets1.tamsnetwork.com/images/EC042017NF/165437s.jpg "Painted Stripes Cling Stamp Set [ 165437 ]")
![Scenic Adventure Bundle (English) [ 165468 ]](https://assets1.tamsnetwork.com/images/EC042017NF/165468s.jpg "Scenic Adventure Bundle (English) [ 165468 ]")
![Scenic Adventure Dies [ 165467 ]](https://assets1.tamsnetwork.com/images/EC042017NF/165467s.jpg "Scenic Adventure Dies [ 165467 ]")
![Scenic Adventure Photopolymer Stamp Set (English) [ 165466 ]](https://assets1.tamsnetwork.com/images/EC042017NF/165466s.jpg "Scenic Adventure Photopolymer Stamp Set (English) [ 165466 ]")
![Textured Notes Bundle (English) [ 165556 ]](https://assets1.tamsnetwork.com/images/EC042017NF/165556s.jpg "Textured Notes Bundle (English) [ 165556 ]")
![Textured Notes Dies [ 165555 ]](https://assets1.tamsnetwork.com/images/EC042017NF/165555s.jpg "Textured Notes Dies [ 165555 ]")
![Textured Notes Cling Stamp Set (English) [ 165548 ]](https://assets1.tamsnetwork.com/images/EC042017NF/165548s.jpg "Textured Notes Cling Stamp Set (English) [ 165548 ]")
![Soft Sea Foam A4 Cardstock [ 147012 ]](https://assets1.tamsnetwork.com/images/EC042017NF/147012s.jpg "Soft Sea Foam A4 Cardstock [ 147012 ]")
![Shaded Spruce A4 Cardstock [ 147006 ]](https://assets1.tamsnetwork.com/images/EC042017NF/147006s.jpg "Shaded Spruce A4 Cardstock [ 147006 ]")
![Very Vanilla A4 Cardstock [ 166785 ]](https://assets1.tamsnetwork.com/images/EC042017NF/166785s.jpg "Very Vanilla A4 Cardstock [ 166785 ]")
![Soft Sea Foam Classic Stampin' Pad [ 147102 ]](https://assets1.tamsnetwork.com/images/EC042017NF/147102s.jpg "Soft Sea Foam Classic Stampin' Pad [ 147102 ]")
![Shaded Spruce Classic Stampin' Pad [ 147088 ]](https://assets1.tamsnetwork.com/images/EC042017NF/147088s.jpg "Shaded Spruce Classic Stampin' Pad [ 147088 ]")
![Versamark Pad [ 102283 ]](https://assets1.tamsnetwork.com/images/EC042017NF/102283s.jpg "Versamark Pad [ 102283 ]")
![Basics Wow! Embossing Powder [ 165679 ]](https://assets1.tamsnetwork.com/images/EC042017NF/165679s.jpg "Basics Wow! Embossing Powder [ 165679 ]")
![Embossing Additions Tool Kit [ 159971 ]](https://assets1.tamsnetwork.com/images/EC042017NF/159971s.jpg "Embossing Additions Tool Kit [ 159971 ]")
![Heat Tool - Uk Plug [ 129054 ]](https://assets1.tamsnetwork.com/images/EC042017NF/129054s.jpg "Heat Tool - Uk Plug [ 129054 ]")
![Low Profile Sparkle Dots [ 166157 ]](https://assets1.tamsnetwork.com/images/EC042017NF/166157s.jpg "Low Profile Sparkle Dots [ 166157 ]")
Thanks for visiting. I would love to know what you think of my project and would appreciate it if you could leave a comment. To visit the next person on the list and see their fabulous creations, simply click on the link below or before my name depending who you visited initially. Happy hopping!

- SHOP ONLINE – EARN 10% REWARDS ON ALL PURCHASES OVER £20
- PURCHASE A STARTER KIT : Get £155 worth of products for only £99. Choose from current catalogues and any specials available. Free Shipping. Read more
- Subscribe to my Video Tutorials – click here
Great card! I love the Painted Stripes background!
Thank you, Diane.