
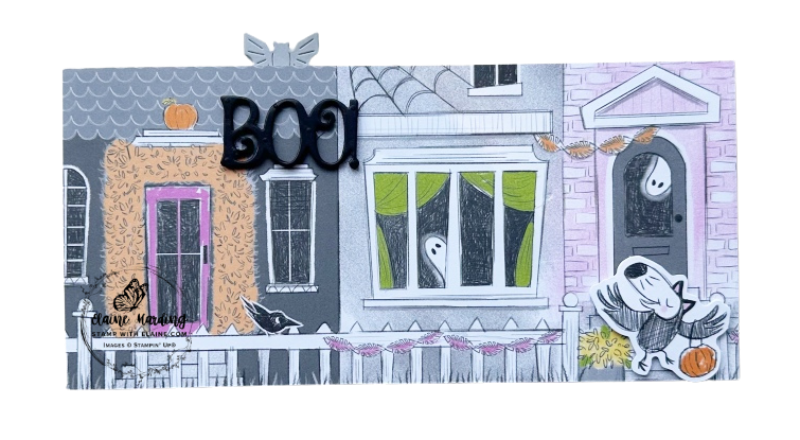
Long slim Halloween card. In week 4 of my 6 week Countdown to Halloween series, I created a long slim card in landscape. An A4 sheet wasn’t long enough to make my kind of tent card. Tent cards tend to collapse on me, so I’d rather the spine of the fold is vertical and not horizontal.
To create this landscape card I joined together 2 pieces of card stock for the card base. This will fit in a DL envelope which in Europe measures 110 mm x 220 mm (approximately 4 ⅓” x 8 ¾”).
Cutting guide
- Basic White Thick – 4″ x 8 ¾” (10 cm x 22 cm). Long side score one end at ½” (1 cm).
- 2nd Basic White Thick – 4″ x 8 ¼” (10 cm x 21 cm).
- Spooky Sweet 12 x 12 DSP : Cut at 4″ x 8 ¼” (10 cm x 21 cm).
- Left inside panel Spooky Sweet 12 x 12 DSP : 3 ⅝” x 3 ¾”.
- Inside right side : Basic White 8″ x 3 ¾” (21.5 cm x 9.5 cm).
How to make card
Card front
- Card base joining the 2 pieces of Basic White card stock : Orient larger piece of Basic White Thick so the score line and tab is on the right. Apply adhesive on inside to right of score line then adhere smaller Basic White piece on top of “hinge” just shy of score line. This will make up your long slim card base.
- Adhere larger piece of DSP to card front.
- Die cut BOO from Basic Black scrap but first adhere an adhesive foam sheet to the back of Basic Black scrap before running it through the die-cutting machine.
- Use a black Stampin’ Write marker and colour in all the white sides along the contour of the words of foam sheet die cut word. Once dry, attach to top left corner as pictured.
- Select a bird with a pumpkin pre cut image and attach with dimensionals by the front door as shown.
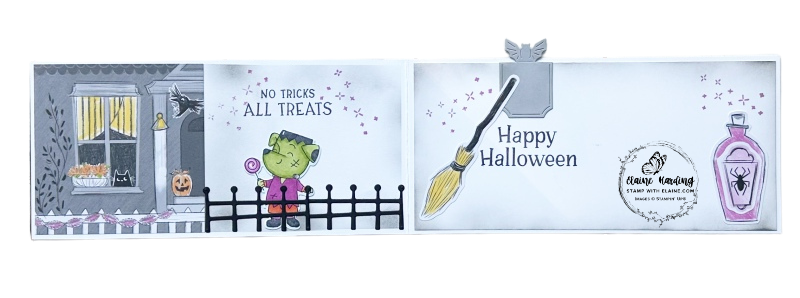
Left inside panel
- Adhere Spooky Sweet 3 ⅝” (9.2 cm) square DSP to left inside of card.
- Stamp the Frankenstein dog and colour with Stampin’ Blends in Granny Apple Green, Petunia Pop and Pumpkin Pie. Adhere in middle of remaining white space.
- Optional, attach adhesive sheet to back of 2″ x 5″ (5 cm x 12.5 cm) Basic Black card stock and die cut several sections of fence. Remove backing tape and adhere as shown in picture.
- Mask ⅛” border on top, side and bottom of left side of card and use a blending brush to add Smoky Slate colour to simulate a faux layer of card stock to mirror the right inside of card.
- Stamp sentiment in Tuxedo Black Memento ink followed by clusters of crosses in Petunia Pop ink.
Right inside panel
- Use blending brush to darken edges of Basic White layer.
- Die cut 2 bookmark pieces with scrap of Smoky Slate card stock. Apply adhesive to back of book mark as pictured above. Trim off just the bird on the second bookmark, discard the bottom. Apply adhesive to back of bird, and adhere remaining bird, wrong sides face to face so that both right sides face outwards.
- Apply adhesive to pre-cut broom, potion bottle and spider and adhere as pictured.
- Stamp cluster of crosses in the top left and top right corner.
- Adhere Basic White layer to inside right of card with an even border on all 4 sides.
Supply list
Listed below is the supply list. Just click on the picture to take you directly to the item in my online store.
Product List![Spooky Halloween Bundle (English) [ 166199 ]](https://assets1.tamsnetwork.com/images/EC042017NF/166199s.jpg "Spooky Halloween Bundle (English) [ 166199 ]")
![Spooky Halloween Photopolymer Stamp Set (English) [ 166192 ]](https://assets1.tamsnetwork.com/images/EC042017NF/166192s.jpg "Spooky Halloween Photopolymer Stamp Set (English) [ 166192 ]")
![Spooky Halloween Dies [ 166198 ]](https://assets1.tamsnetwork.com/images/EC042017NF/166198s.jpg "Spooky Halloween Dies [ 166198 ]")
![Fright Night Dies [ 166106 ]](https://assets1.tamsnetwork.com/images/EC042017NF/166106s.jpg "Fright Night Dies [ 166106 ]")
![Spooky Sweet Specialty Designer Series Paper & Sticker Sheet (English) [ 167365 ]](https://assets1.tamsnetwork.com/images/EC042017NF/167365s.jpg "Spooky Sweet Specialty Designer Series Paper & Sticker Sheet (English) [ 167365 ]")
![Basic White A4 Thick Cardstock [ 159230 ]](https://assets1.tamsnetwork.com/images/EC042017NF/159230s.jpg "Basic White A4 Thick Cardstock [ 159230 ]")
![Card Stock A4 Smoky Slate [ 131291 ]](https://assets1.tamsnetwork.com/images/EC042017NF/131291s.jpg "Card Stock A4 Smoky Slate [ 131291 ]")
![Blending Brushes [ 153611 ]](https://assets1.tamsnetwork.com/images/EC042017NF/153611s.jpg "Blending Brushes [ 153611 ]")
![Smoky Slate Classic Stampin' Pad [ 147113 ]](https://assets1.tamsnetwork.com/images/EC042017NF/147113s.jpg "Smoky Slate Classic Stampin' Pad [ 147113 ]")
![Petunia Pop Classic Stampin Pad [ 163811 ]](https://assets1.tamsnetwork.com/images/EC042017NF/163811s.jpg "Petunia Pop Classic Stampin Pad [ 163811 ]")
![Granny Apple Green Stampin' Blends Combo Pack [ 154885 ]](https://assets1.tamsnetwork.com/images/EC042017NF/154885s.jpg "Granny Apple Green Stampin' Blends Combo Pack [ 154885 ]")
![Petunia Pop Stampin’ Blends Combo Pack [ 163828 ]](https://assets1.tamsnetwork.com/images/EC042017NF/163828s.jpg "Petunia Pop Stampin’ Blends Combo Pack [ 163828 ]")
![Pumpkin Pie Stampin' Blends Combo Pack [ 154897 ]](https://assets1.tamsnetwork.com/images/EC042017NF/154897s.jpg "Pumpkin Pie Stampin' Blends Combo Pack [ 154897 ]")
![Adhesive Sheets [ 152334 ]](https://assets1.tamsnetwork.com/images/EC042017NF/152334s.jpg "Adhesive Sheets [ 152334 ]")
![Basic Black A4 Card Stock [ 121688 ]](https://assets1.tamsnetwork.com/images/EC042017NF/121688s.jpg "Basic Black A4 Card Stock [ 121688 ]")

- SHOP ONLINE – EARN 10% REWARDS ON ALL PURCHASES OVER £20
- PURCHASE A STARTER KIT : Get £155 worth of products for only £99. Choose from current catalogues and any specials available. Free Shipping. Read more
- Subscribe to my Video Tutorials – click here