
Christmas cards – Mix and Match Ephemera. Welcome to week 4 of my Christmas Countdown Series. This week we’re looking at making quick Christmas card with Mix and Match ephemera packs.
On page 15 of the September-December 2025 Mini catalogue, you’ll find a hidden gem – the Christmas Tags & More 6″x 6″ (15.2 x 15.2 cm) Mix & Match Specialty Designer Series Paper pack and I’ve paired this with the Greetings for You Mix & Match Ephemera pack. There’s hardly any stamping at all. I’ve made 4 cards to give you some ideas to kick start with, but I could so easily have carried on to finish the whole pack.

Extras used for making cards
I added gold foil to frame some of the layers and Soft Sea Foam ink and a blending brush to add colour to some of the layers. Also added some Real Red and Basic White card stock. You can also use Garden Green, Cherry Cobbler, Crumb Cake, Soft Sea Foam which are the colours in the papers.
First card


- Real Red card base cut at 5 ¾” x 8 ¼” (14.5 cm x 21 cm) and folded in half.
- Gold Foil 3 ⅞” x 5 ½” (9.8 cm x 14 cm). Gut the insides by placing in trimmer and cutting ½” (0.3 cm) frame on all 4 sides. Reserve inside for another project.
- Trim DSP with ornaments to 3 ¾” x 5 ⅜” (9.5 cm x 13.7 cm). Adhere to gold foil frame and adhere frame to card base.
- Inside card : Basic White cut at 3 ⅞” x 5 ½” (9.8 cm x 14 cm). Trim ¾” x 5 ½” (2 cm x 14 cm) from remnant and adhere to inside of card. It doesn’t show in the photo, but the remnant also incorporates a plain Soft Sea Foam colour next to the Crumb Cake polka dot piece.
- Select sentiment from Greetings For You, remove backing tape, centre and adhere to card front as shown.
Second card


- Real Red card base : cut at 4 ⅛” x 11 ½” (10.5 cm x 29 cm) folded in half.
- As for previous card, cut Gold Foil 3 ⅞” x 5 ½” (9.8 cm x 14 cm). Gut the insides by placing in trimmer and cutting ½” (0.3 cm) frame on all 4 sides. Reserve inside for another project.
- Trim DSP with partial wreath to 3 ¾” x 5 ⅜” (9.5 cm x 13.7 cm). Adhere to gold foil frame and adhere frame to card base.
- Add pre-cut elements as shown. I stuck an adhesive sheet to a remnant of Gold Foil and cut 1/16″ lengths to hand the ornaments with.
- Select greeting from Greetings For you – remove backing tape and adhere as shown.
- Inside card : Basic White cut at 3 ⅞” x 5 ½” (9.8 cm x 14 cm).
- Adhere ⅛” x 4 ⅛” adhesive backed gold foil strip next to the DSP strip as pictured, then adhere to inside of card base.
Third card


- Real Red card base : cut at 4 ⅛” x 11 ½” (10.5 cm x 29 cm) folded in half.
- Trim the reverse side of the partial Wreath DSP piece at 3 ⅞” x 5 ½” (9.8 cm x 14 cm) and adhere to card front.
- Use the inside remnant of gold foil as a mat layer. Gut the inside this time with a ¼” (0.6 cm) frame.
- Basic White cut at 2 ¾” x 4 ⅛” (7 cm x 10.5 cm). Use a blending brush to add Soft Sea Foam to Basic White layer.
- Adhere bells in top left corner, the sentiment as shown and lastly a sprig of mistletoe then adhere to Gold foil frame and adhere frame to DSP leaving and even border on all 4 sides.
- Add Real Red & White Adhesive-backed peppermints as embellishments.
- Inside card : Basic White cut at 3 ⅞” x 5 ½” (9.8 cm x 14 cm).
- Adhere strip of DSP horizontally as shown and add sentiment.
Fourth card

- Real Red card base cut at 5 ¾” x 8 ¼” (14.5 cm x 21 cm) and folded in half.
- Trim plaid DSP 3 ⅞” x 5 ½” (9.8 cm x 14 cm) and adhere to card front.
- Cut Real Red piece 2 ⅞” x 4 ½” (7.3 cm x 11.4 cm). Centre and adhere on top of plaid DSP piece.
- Trim tag Christmas Tree 2″ x 2 ¾” (5 cm x 7 cm) and adhere to last remnant of Gold Foil piece [2 ⅛” x 2 ⅞” (5.4 cm x 7.3 cm)], then adhere this to the small Real Red layer on card front leaving an even border on the top and two sides.
- Select a double flag end greeting and adhere below as shown.
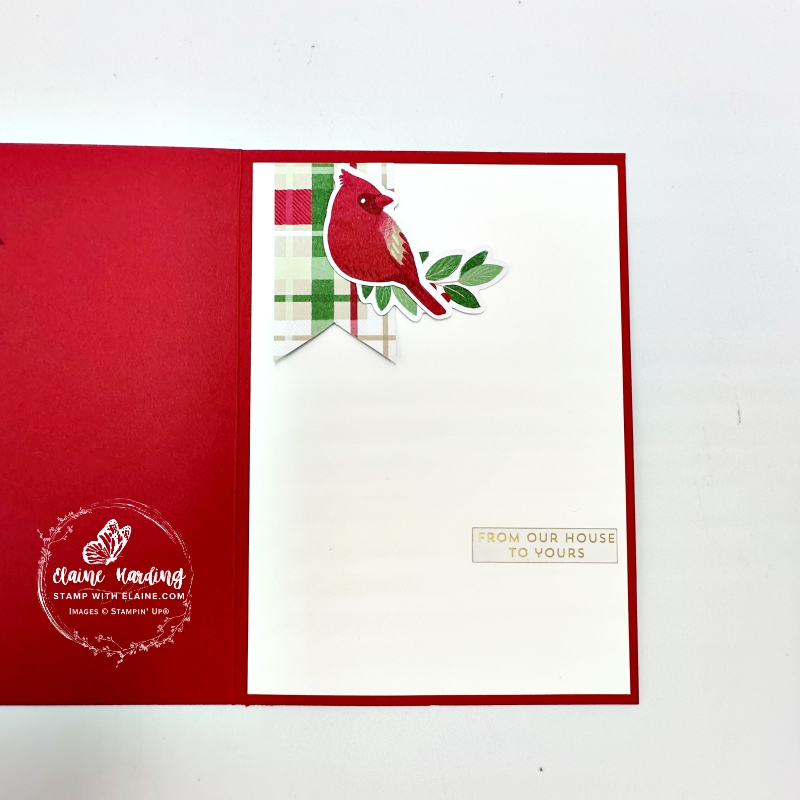
- Inside card : Basic White cut at 3 ⅞” x 5 ½” (9.8 cm x 14 cm).
- Trim remaining DSP to 1 ¼” x 2 ⅛” (3.2 cm x 5.4 cm) and cut a flag end on the short side at one end. Adhere toward top left as shown.
- Select a sprig and adhere overlapping banner and adhere the cardinal perched on sprig as shown.
- Adhere Basic White piece to inside card.
Now that I’ve shown you how easy it comes together, you can make your own. The added bonus, of course is that they’re relatively flat and will be post friendly!
Supply list
Listed below is the supply list. Just click on the picture to take you directly to the item in my online store.
Product List![Christmas Tags & More 6" X 6" (15.2 X 15.2 Cm) Mix & Match Specialty Designer Series Paper [ 165907 ]](https://assets1.tamsnetwork.com/images/EC042017NF/165907s.jpg "Christmas Tags & More 6\" X 6\" (15.2 X 15.2 Cm) Mix & Match Specialty Designer Series Paper [ 165907 ]")
![Greetings For You Mix & Match Ephemera Pack (English) [ 166208 ]](https://assets1.tamsnetwork.com/images/EC042017NF/166208s.jpg "Greetings For You Mix & Match Ephemera Pack (English) [ 166208 ]")
![Real Red A4 Card Stock [ 106578 ]](https://assets1.tamsnetwork.com/images/EC042017NF/106578s.jpg "Real Red A4 Card Stock [ 106578 ]")
![Basic White A4 Cardstock [ 166781 ]](https://assets1.tamsnetwork.com/images/EC042017NF/166781s.jpg "Basic White A4 Cardstock [ 166781 ]")
![Gold Foil Sheets [ 132622 ]](https://assets1.tamsnetwork.com/images/EC042017NF/132622s.jpg "Gold Foil Sheets [ 132622 ]")
![Real Red & White Adhesive Backed Peppermints [ 164050 ]](https://assets1.tamsnetwork.com/images/EC042017NF/164050s.jpg "Real Red & White Adhesive Backed Peppermints [ 164050 ]")
![Paper Trimmer [ 152392 ]](https://assets1.tamsnetwork.com/images/EC042017NF/152392s.jpg "Paper Trimmer [ 152392 ]")

- SHOP ONLINE – EARN 10% REWARDS ON ALL PURCHASES OVER £20
- PURCHASE A STARTER KIT : Get £155 worth of products for only £99. Choose from current catalogues and any specials available. Free Shipping. Read more
- Subscribe to my Video Tutorials – click here