
Festive Friends for Christmas. Welcome, welcome, welcome! It’s week 5 and time to meet with Festive Friends – another Online exclusive! Christmas isn’t Christmas without Santa or his Elf or a snowman! I will leave the elf for another day, so do pop back!
Continuing with my mission to reduce the thickness of the cards for posting, so here are a couple more ideas with the Festive Friends bundle. The dies in this set has some hidden gems. Beside the dies to coordinate with the stamped images, there are trees, stars, snowflakes and a tag!
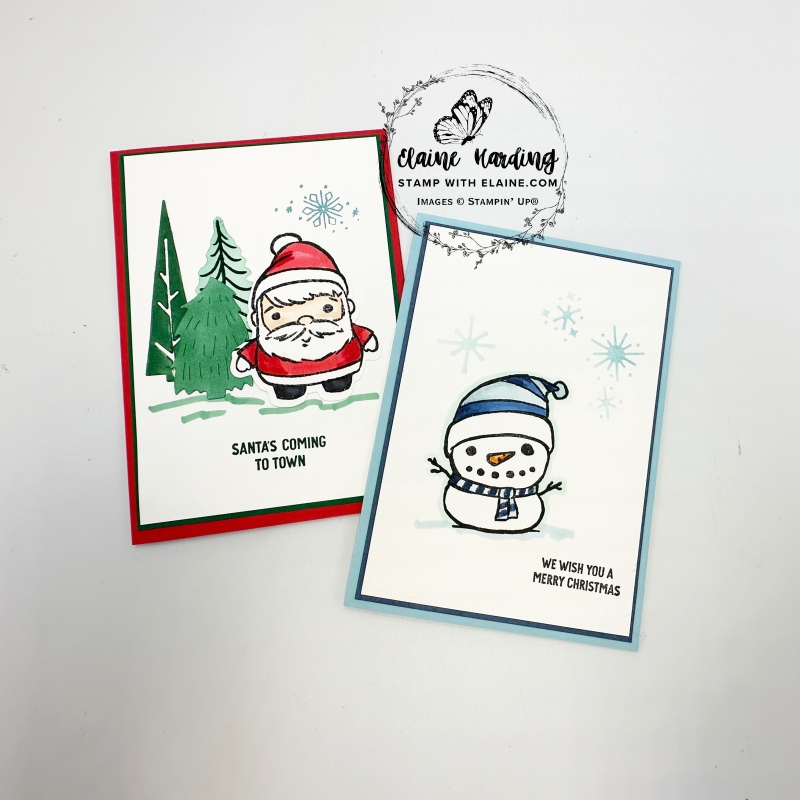
Whether you like colouring or not, these line images are small enough that they’re easy to do. My preference is to use alcohol markers. They blend beautifully and come in a combo pack of two – one light and one dark shade.
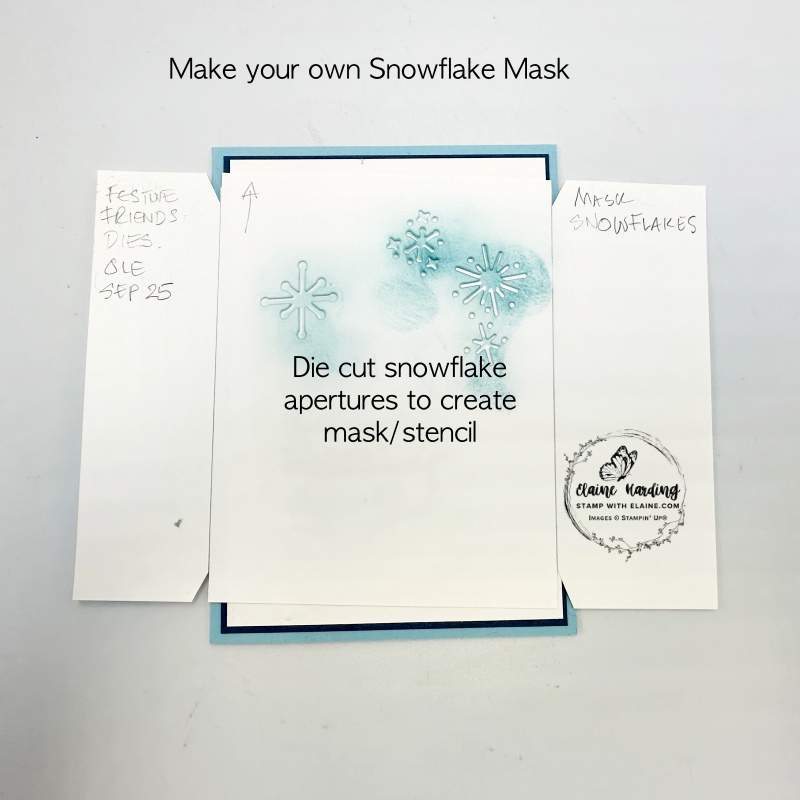
Masking template
I made a masking template for the snowman card. There are some dies in the Festive Friends die set of what looks like stars/snowflakes.
Cut the masking template out of Basic White card stock slightly shorter than the height of your Basic White card layer and longer in width. Mark top and bottom of each side of layer and draw a line between the two points as pictured. Cut along the lines about ¼” (approximately 0.5 cm) in on all 4 sides, then make an angled cut as pictured. This will make it easy to align with your layer.
Place a variety of snowflake dies randomly on template and run it through die cutting machine. The apertures left from the die cuts will act as a mask/stencil. By using card stock, it will be much sturdier than using copy paper especially if you’re making multiples of the same card.
Snowman card

Cutting guide
- Card base Balmy Blue cut at 5 ¾” x 8 ¼” (14.5 cm x 21 cm). Long side on top scored at 4 ⅛” (10.5 cm).
- Mat layer Misty Moonlight #1 : 5 ½” x 3 ⅞” (14 cm x 9.8 cm)
- Basic White Mat layer #2 : 5 ⅜” x 3 ¾” (13.7 cm x 9.5 cm)
- Create your own stencil with a scrap of Basic White as described under Masking Template heading.
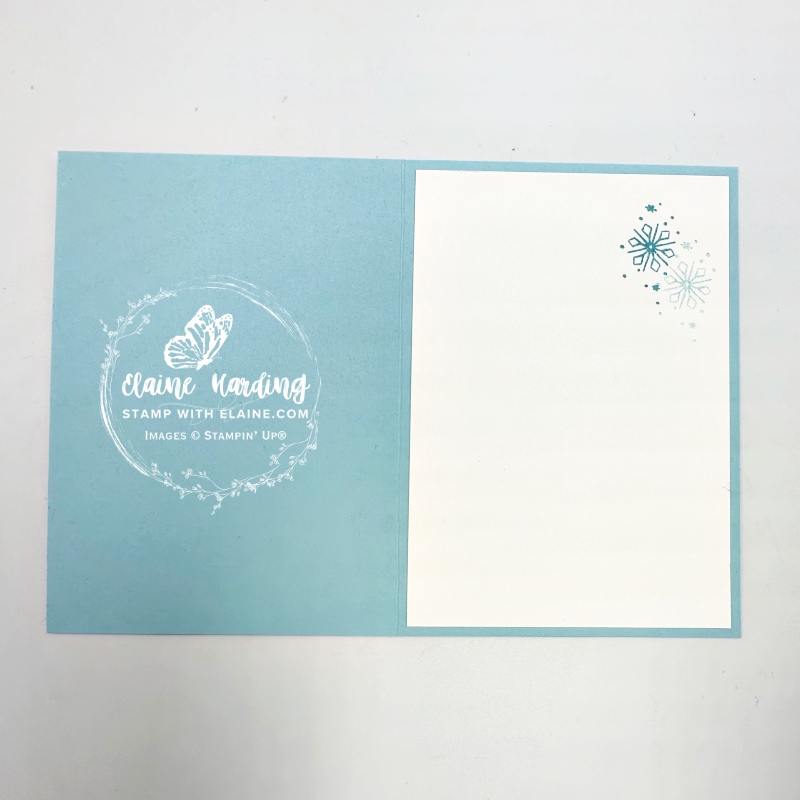
- Inside card Basic White Mat layer : 5 ½” x 3 ⅞” (14 cm x 9.8 cm)
Assembly
- Align and place mask over Basic White layer for card front. Use blending brush and apply Balmy Blue ink to create snowflakes.
- Stamp snowman with Tuxedo Black Memento ink then colour this nose with Pumpkin Pie stampin’ blends.
- Colour the scarf and hat with Misty Moonlight stampin’ blends using alternate light and dark shades.
- Ground snowman by adding a line for him to “stand” on then adhere layer to card base.
- Stamp snowflakes in top right corner with Balmy Blue ink and adhere to inside card base.
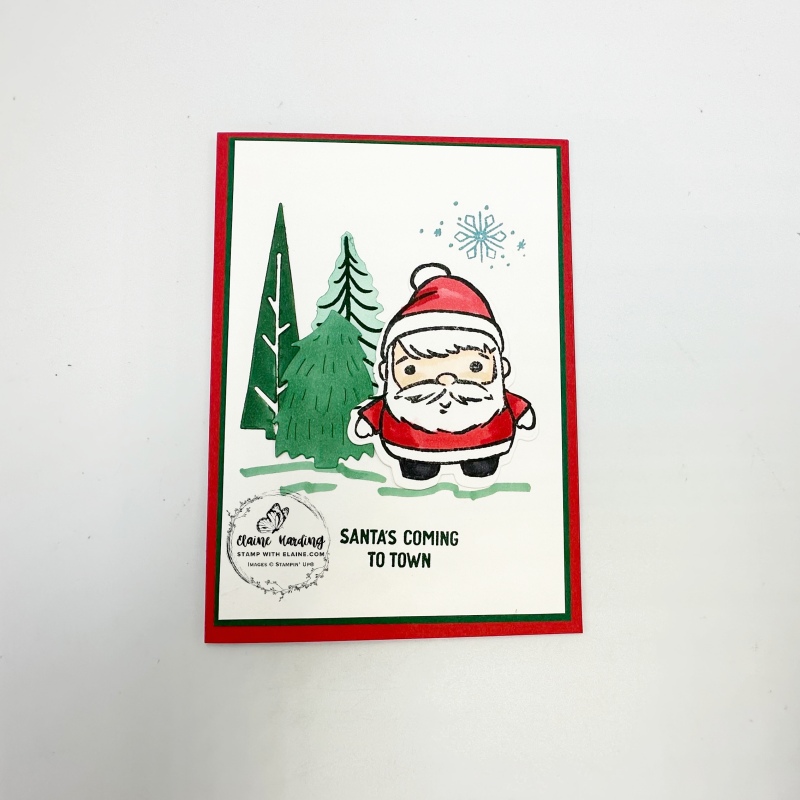
Santa Card

Cutting guide
- Real Red card base cut at 5 ¾” x 8 ¼” (14.5 cm x 21 cm). Long side on top scored at 4 ⅛” (10.5 cm).
- Shaded Spruce mat layer #1 : 5 ½” x 3 ⅞” (14 cm x 9.8 cm)
- Basic White layer for card front : cut 1 piece @ 5 ⅜” x 3 ¾” (13.7 cm x 9.5 cm)
- Inside card Basic White layer : cut 1 piece @ 5 ½” x 3 ⅞” (14 cm x 9.8 cm)
- Scrap of Basic White to stamp and die cut trees and Santa.
Assembly
- Adhere Shaded Spruce mat layer to card front.
- Stamp Santa in Tuxedo Black Memento ink on Scrap of Basic White card stock, colour with Real Red, Basic Black, Petal Pink Stampin’ blends. Then stamp tree in Shaded Spruce and fussy cut Shaded Spruce stamped tree. Use a blending brush to add background colour to tree. Set aside.
- Place die over Santa and secure with low tack tape, arrange tree dies on the scrap of Basic White and run through die cutting machine.
- Colour the tall triangular tree with dark Shaded Spruce Stampin’ blend and the shorter fat tree with light Shaded Spruce Stampin’ blend.
- Arrange and adhere trees, fussy cut one first, triangular tree next, short fat tree overlapping both and Santa last as pictured.
- Stamp snowflakes in top right corner with Balmy Blue ink.
- Ground Santa with light Shaded Spruce Stampin’ blend and lastly stamp sentiment below with Tuxedo Black Memento ink.
- Inside card – stamp tree in Shaded Spruce first generation and second generation ink and adhere to inside of card base.
Supply list
Listed below is the supply list. Just click on the picture to take you directly to the item in my online store.
Product List![Festive Friends Bundle (English) [ 166039 ]](https://assets1.tamsnetwork.com/images/EC042017NF/166039s.jpg "Festive Friends Bundle (English) [ 166039 ]")
![Festive Friends Cling Stamp Set (English) [ 166035 ]](https://assets1.tamsnetwork.com/images/EC042017NF/166035s.jpg "Festive Friends Cling Stamp Set (English) [ 166035 ]")
![Festive Friends Dies [ 166038 ]](https://assets1.tamsnetwork.com/images/EC042017NF/166038s.jpg "Festive Friends Dies [ 166038 ]")
![Basic White A4 Cardstock [ 166781 ]](https://assets1.tamsnetwork.com/images/EC042017NF/166781s.jpg "Basic White A4 Cardstock [ 166781 ]")
![Real Red A4 Card Stock [ 106578 ]](https://assets1.tamsnetwork.com/images/EC042017NF/106578s.jpg "Real Red A4 Card Stock [ 106578 ]")
![Shaded Spruce A4 Cardstock [ 147006 ]](https://assets1.tamsnetwork.com/images/EC042017NF/147006s.jpg "Shaded Spruce A4 Cardstock [ 147006 ]")
![Balmy Blue Classic Stampin' Pad [ 147105 ]](https://assets1.tamsnetwork.com/images/EC042017NF/147105s.jpg "Balmy Blue Classic Stampin' Pad [ 147105 ]")
![Tuxedo Black Memento Ink Pad [ 132708 ]](https://assets1.tamsnetwork.com/images/EC042017NF/132708s.jpg "Tuxedo Black Memento Ink Pad [ 132708 ]")
![Basic Black Stampin' Blends Combo Pack [ 154843 ]](https://assets1.tamsnetwork.com/images/EC042017NF/154843s.jpg "Basic Black Stampin' Blends Combo Pack [ 154843 ]")
![Misty Moonlight Stampin' Blends Combo Pack [ 153108 ]](https://assets1.tamsnetwork.com/images/EC042017NF/153108s.jpg "Misty Moonlight Stampin' Blends Combo Pack [ 153108 ]")
![Petal Pink Stampin' Blends Combo Pack [ 154893 ]](https://assets1.tamsnetwork.com/images/EC042017NF/154893s.jpg "Petal Pink Stampin' Blends Combo Pack [ 154893 ]")
![Real Red Stampin' Blends Combo Pack [ 154899 ]](https://assets1.tamsnetwork.com/images/EC042017NF/154899s.jpg "Real Red Stampin' Blends Combo Pack [ 154899 ]")
![Shaded Spruce Stampin' Blends Combo Pack [ 154903 ]](https://assets1.tamsnetwork.com/images/EC042017NF/154903s.jpg "Shaded Spruce Stampin' Blends Combo Pack [ 154903 ]")
![Blending Brushes [ 153611 ]](https://assets1.tamsnetwork.com/images/EC042017NF/153611s.jpg "Blending Brushes [ 153611 ]")

- SHOP ONLINE – EARN 10% REWARDS ON ALL PURCHASES OVER £20
- PURCHASE A STARTER KIT : Get £155 worth of products for only £99. Choose from current catalogues and any specials available. Free Shipping. Read more
- Subscribe to my Video Tutorials – click here