
Christmas card – Branching Out. It’s week 6 of 12, already half way through my 12 week Countdown to Christmas Series. When I first begin to design a card, I never know what direction it will take. It goes without saying that establishing what colour card stock and pretty papers you want to use is the first step.
Branching Out is a stamp set which has birthday greetings and sentiments which would suit other occasions. The pine needles and branches are perennial images which can be used throughout the year. Oftentimes we’re trying to find ways to adapt pre-dominantly Christmas stamp sets for other occasions to maximise its use, and its unusual to apply the reverse to the Branching out stamp set which isn’t.
I added another stamp set called Magic & Hope cling stamp set because I love that bow which was perfect for “tying” my bouquet.

Cutting guide
- Card base Lost Lagoon cut at 5 ¾” x 8 ¼” (14.5 cm x 21 cm) folded in half.
- Elegant Pine Snowflakes DSP : 4″ x 5 ⅝” (10.2 cm x 14.3 cm).
- Branching out dies – 3rd and 4th larges die to cut frame in Lost Lagoon.
- Take centre remnant and use 2nd smallest die to cut the piece for the centre as pictured.
- Die cut 2 pairs of Old Olive pine leaves, and two Basic White pine berry sprigs from Branching Out dies.
- Inside card : cut Basic White layer 3 ⅞” x 5 ½” (9.8 cm x 14 cm)
Assembly
Card front
- Adhere Elegant Pine Snowflakes DSP to card front leaving an even border on all 4 sides.
- Take larger Lost Lagoon frame, centre and adhere on top of DSP layer as shown.
- Apply dimensionals on back of Lost Lagoon centre piece and adhere with even border to middle as shown.
- Colour two Basic White pine berry sprigs. Use Cherry Cobbler Stampin’ Write marker for the berries and Pecan Pie Stampin’ Write marker for the branches. Set aside.
- Stamp 3 fir cones with Early Espresso ink on Basic White card stock and die cut with Delicate Pines dies. Then stamp the bow in Cherry Cobbler from Magic & Hope stamp set and fussy cut.
- Arrange berry sprigs, pine leaves and fir cones as shown and adhere to card. Apply dimensionals to back of bow and adhere over sprigs.
- Stamp “NOEL” in Lost Lagoon ink, trim and adhere to card front as shown.
Inside card
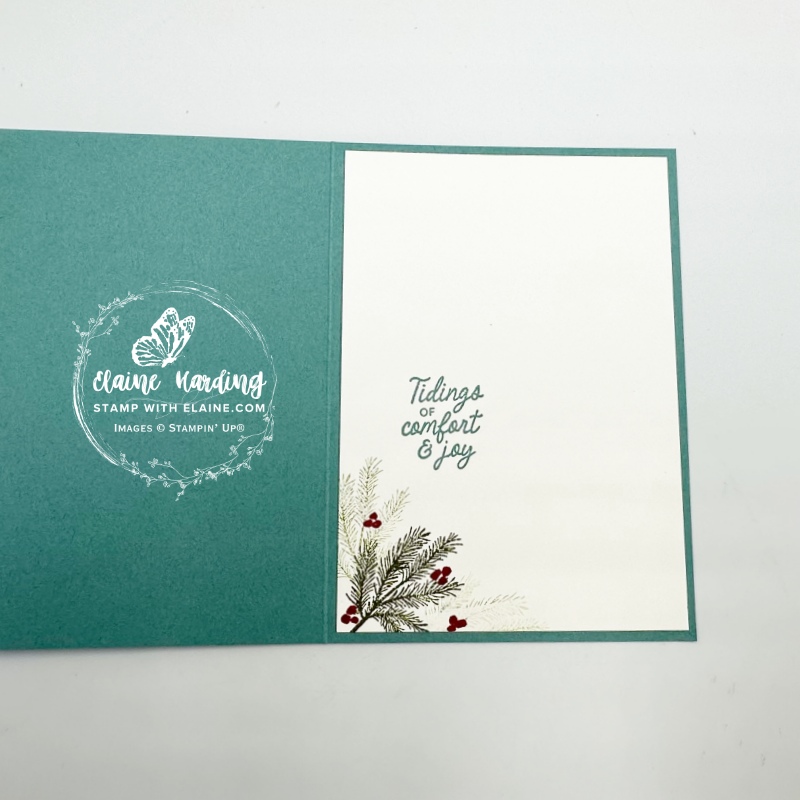
- Use pine stamp from Magic & Hope and ink up with Old Olive, stamp in bottom left corner 3 times without re-inking as shown.
- Cherry Cobbler Stampin’ Write Marker – draw free hand clusters of berries as shown.
- Stamp greeting from Magic & Hop with Lost Lagoon ink.
- Adhere Basic White layer to inside of card base.
Thanks for stopping by. I hope you’ve been inspired by this card to make your own.
Supply list
Listed below is the supply list. Just click on the picture to take you directly to the item in my online store.
Product List![Branching Out Bundle (English) [ 165776 ]](https://assets1.tamsnetwork.com/images/EC042017NF/165776s.jpg "Branching Out Bundle (English) [ 165776 ]")
![Magic & Hope Cling Stamp Set (English) [ 165950 ]](https://assets1.tamsnetwork.com/images/EC042017NF/165950s.jpg "Magic & Hope Cling Stamp Set (English) [ 165950 ]")
![Elegant Pine Snowflakes 12" X 12" (30.5 X 30.5 Cm) Designer Series Paper [ 166066 ]](https://assets1.tamsnetwork.com/images/EC042017NF/166066s.jpg "Elegant Pine Snowflakes 12\" X 12\" (30.5 X 30.5 Cm) Designer Series Paper [ 166066 ]")
![Basic White A4 Cardstock [ 166781 ]](https://assets1.tamsnetwork.com/images/EC042017NF/166781s.jpg "Basic White A4 Cardstock [ 166781 ]")
![Lost Lagoon A4 Cardstock [ 133686 ]](https://assets1.tamsnetwork.com/images/EC042017NF/133686s.jpg "Lost Lagoon A4 Cardstock [ 133686 ]")
![Cherry Cobbler Classic Stampin' Pad [ 147083 ]](https://assets1.tamsnetwork.com/images/EC042017NF/147083s.jpg "Cherry Cobbler Classic Stampin' Pad [ 147083 ]")
![Early Espresso Classic Stampin' Pad [ 147114 ]](https://assets1.tamsnetwork.com/images/EC042017NF/147114s.jpg "Early Espresso Classic Stampin' Pad [ 147114 ]")
![Lost Lagoon Classic Stampin' Pad [ 161678 ]](https://assets1.tamsnetwork.com/images/EC042017NF/161678s.jpg "Lost Lagoon Classic Stampin' Pad [ 161678 ]")
![Old Olive Classic Stampin' Pad [ 147090 ]](https://assets1.tamsnetwork.com/images/EC042017NF/147090s.jpg "Old Olive Classic Stampin' Pad [ 147090 ]")
![Regals Stampin' Write Markers [ 161699 ]](https://assets1.tamsnetwork.com/images/EC042017NF/161699s.jpg "Regals Stampin' Write Markers [ 161699 ]")
![Neutrals Stampin' Write Markers [ 161697 ]](https://assets1.tamsnetwork.com/images/EC042017NF/161697s.jpg "Neutrals Stampin' Write Markers [ 161697 ]")

- SHOP ONLINE – EARN 10% REWARDS ON ALL PURCHASES OVER £20
- PURCHASE A STARTER KIT : Get £155 worth of products for only £99. Choose from current catalogues and any specials available. Free Shipping. Read more
- Subscribe to my Video Tutorials – click here