
Landscape Christmas card with Gift of Joy. Hello – happy Sunday. I thought I would continue with Gift of Joy’s stocking images to complete the set. This time in landscape. Tent cards and me are not friends, so I usually do my landscape cards hinged vertically rather than horizontally.
I usually try to keep Christmas cards very simple with as few layers as possible because of the cost of postage if you have bulky cards, but I still think cards can look equally stunning even if it is minimalist. Don’t you agree?

Cutting guide
- Landscape Basic White Thick : 4 ⅛” x 11 ½” (10.5 cm x 29 cm) folded in half.
- Brights 6″x 6″ (15.2 x 15.2 cm) Designer Series Paper : Lemon Lime Twist sheet cut at 3 ⅞” x 5 ½” (9.8 cm x 14 cm).
- Cut Basic White piece 3 ¾” x 5 ⅜ (9.5 cm x 13.7 cm) for card front.
- Trim the remnant DSP to 2″ x 5 ⅜” (5 cm x 13.7 cm)
Assembly
Front of card
- Adhere DSP to card front leaving an even border on all 4 sides.
- On scrap of Basic White, stamp linear image first generation : 2 stockings in Granny Apple Green and 1 stocking in Real Red.
- Next stamp second generation ink with the filler stamp for corresponding stockings in Granny Apple Green and Real Red. Fussy cut all three stockings – set aside.
- Stamp 3 bows in Real Red and fussy cut those too. Set aside.
- Adhere DSP 2″ x 5 ⅜” (5 cm x 13.7 cm) to Basic White 3 ¾” x 5 ⅜ (9.5 cm x 13.7 cm) layer, then adhere layer on top of DSP adhered to card front leaving an even border on all 4 sides.
Stamping garland and attaching stockings and sentiment
- Stamp linear garland first generation Granny Apple Green ink in the middle first, then on either side. Mask sides if necessary. I may be an idea to stamp this first before adhering to card front, but I forgot!
- *Adhere stockings as shown then attach bows.
- Select a greeting and adhere as shown.
*Tip: I put a tiny bit of glue in the left corner of stocking and adhered bow. In order to get the bows all at the same position, I stacked stocking on top of the previously glued one so that it would all present at the same angle on each stocking.
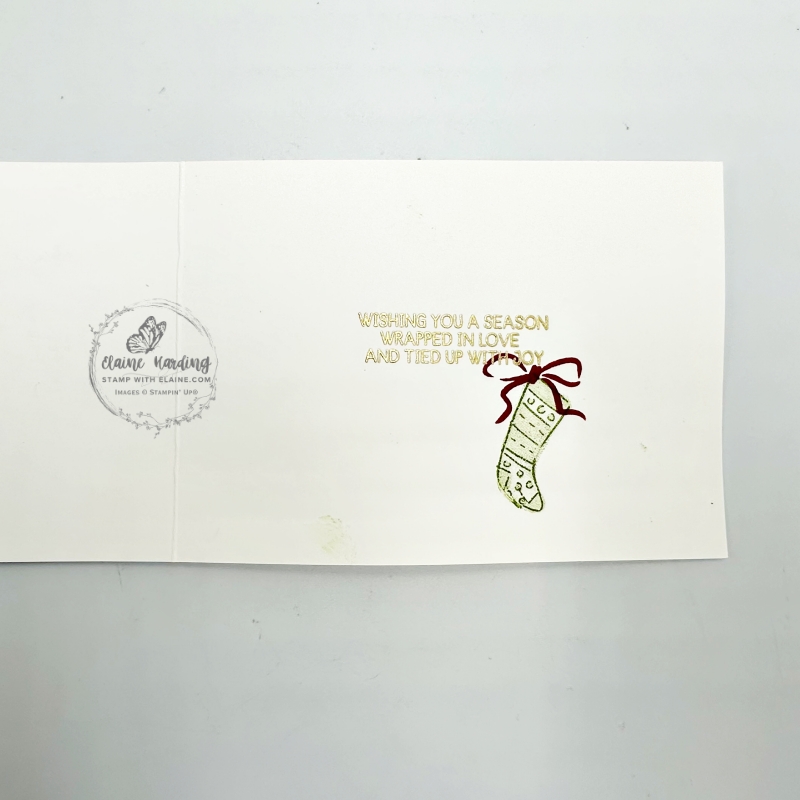
Inside card
- Use a dust buddy to prevent static before you stamp greeting from Gift of Joy on the inside of card.
- Gold emboss and heat set.
- Once cooled, stamp stocking and bow.
Supply list
Listed below is the supply list. Just click on the picture to take you directly to the item in my online store.
Product List![Gift Of Joy Photopolymer Stamp Set (English) [ 165964 ]](https://assets1.tamsnetwork.com/images/EC042017NF/165964s.jpg "Gift Of Joy Photopolymer Stamp Set (English) [ 165964 ]")
![Greetings For You Mix & Match Ephemera Pack (English) [ 166208 ]](https://assets1.tamsnetwork.com/images/EC042017NF/166208s.jpg "Greetings For You Mix & Match Ephemera Pack (English) [ 166208 ]")
![Basic White A4 Thick Cardstock [ 159230 ]](https://assets1.tamsnetwork.com/images/EC042017NF/159230s.jpg "Basic White A4 Thick Cardstock [ 159230 ]")
![Basic White A4 Cardstock [ 166781 ]](https://assets1.tamsnetwork.com/images/EC042017NF/166781s.jpg "Basic White A4 Cardstock [ 166781 ]")
![Brights 6" X 6" (15.2 X 15.2 Cm) Designer Series Paper [ 165301 ]](https://assets1.tamsnetwork.com/images/EC042017NF/165301s.jpg "Brights 6\" X 6\" (15.2 X 15.2 Cm) Designer Series Paper [ 165301 ]")
![Granny Apple Green Stampin' Pad [ 147095 ]](https://assets1.tamsnetwork.com/images/EC042017NF/147095s.jpg "Granny Apple Green Stampin' Pad [ 147095 ]")
![Real Red Classic Stampin' Pad [ 147084 ]](https://assets1.tamsnetwork.com/images/EC042017NF/147084s.jpg "Real Red Classic Stampin' Pad [ 147084 ]")
![Versamark Pad [ 102283 ]](https://assets1.tamsnetwork.com/images/EC042017NF/102283s.jpg "Versamark Pad [ 102283 ]")
![Metallics Wow! Embossing Powder [ 165678 ]](https://assets1.tamsnetwork.com/images/EC042017NF/165678s.jpg "Metallics Wow! Embossing Powder [ 165678 ]")
![Embossing Additions Tool Kit [ 159971 ]](https://assets1.tamsnetwork.com/images/EC042017NF/159971s.jpg "Embossing Additions Tool Kit [ 159971 ]")
![Heat Tool - Uk Plug [ 129054 ]](https://assets1.tamsnetwork.com/images/EC042017NF/129054s.jpg "Heat Tool - Uk Plug [ 129054 ]")
Thanks for stopping by – enjoy the rest of your weekend!

- SHOP ONLINE – EARN 10% REWARDS ON ALL PURCHASES OVER £20
- PURCHASE A STARTER KIT : Get £155 worth of products for only £99. Choose from current catalogues and any specials available. Free Shipping. Read more
- Subscribe to my Video Tutorials – click here