
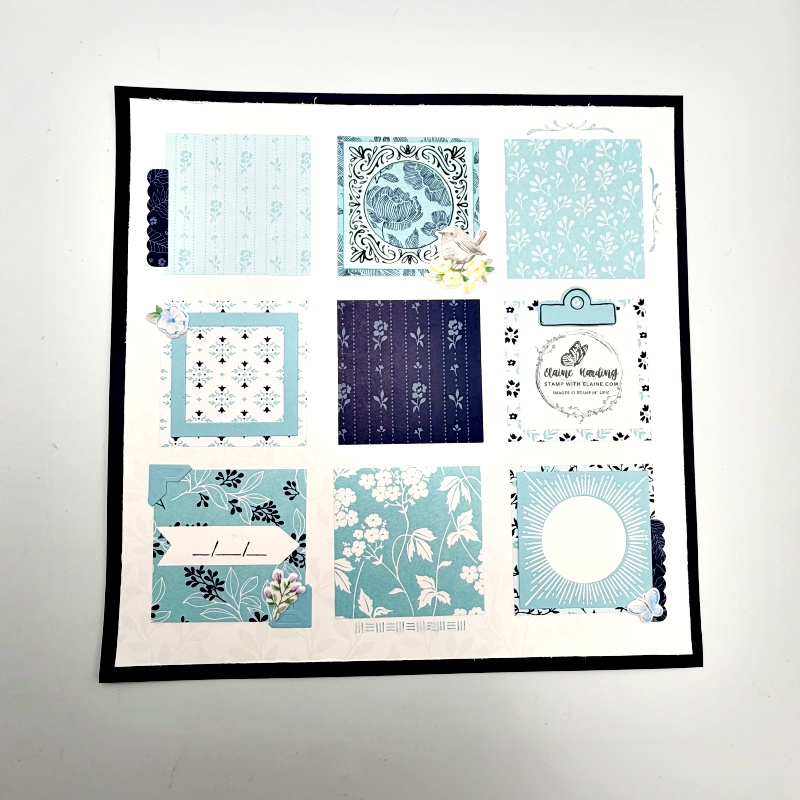
A Scrapbook layout with Joyful Squares. If you get stuck, I encourage you to take inspiration from the catalogue. There are so many ideas you can either copy or tweak. I’ve omitted putting any wording on my scrapbook layout as I haven’t got the photos sorted yet, but will add wording and a title as appropriate at a later date.
Something I missed are the Square Snippets 12″x 12″ (30.5 x 30.5 cm) Designer Series Paper on page 55 of the January-April 2026 mini. It’s on my list but will wait until I have enough on my list to take advantage of Bonus Days.
Earn Coupons during Bonus Days Period
During the Bonus Days promotion from 6 January to 2 February, you can earn a £4.50 coupon for every £45 spend excluding shipping. You must have an online account with Stampin’ Up! and a valid email address so that Stampin’ Up! can email the code to you. Keep these safe because they cannot be re-instated. They also have to be redeemed during the redemption period of 3 -28 February as they will expire after that date.
Materials needed
- One sheet of 12″x 12″ (30.5 x 30.5 cm) card stock – I used Secret Sea two-tone 12 x 12.
- Basic White cut at 11″x 11″ (28 cm x 28 cm)
- Cut 9 square of Designer Series Paper with different patterns measuring 3″x 3″ (7.6 x 7.6 cm). In this sample I used the True Blue Floras 12″x 12″ (30.5 x 30.5 cm) papers which were December’s product of the month.
- Balmy Blue card stock to die cut picture frame with Joyful Squares dies, white emboss sun rays, bull-dog paper clip and photo corners.
- Basic White scrap for fussy cutting arrow with date, backing behind white embossed Balmy Blue ray motif square and for stamping frame in top row in the middle.
- Softest Spring Mix & Match puffy stickers.
How to assemble page
- Use the edge of the scissors to distress all 4 sides of Basic White 11″x 11″ (28 cm x 28 cm) layer and adhere to Secret Sea darker side of two-tone card stock.
- Arrange squares as pictured above in a grid 3 across and 3 down as pictured.
- Apply adhesive and adhere to Basic White layer equidistant from each other.
- Embellish as you wish with a variety of frames as pictured. Note that some squares have been left blank waiting for photos to be inserted.
Note:
- Top row middle square : Stamp and die cut with Joyful Squares dies including the circle in the centre. Use a blending brush to add Balmy Blue colour before adhering to DSP square.
- Bottom row right corner square : Stamp on a scrap of Balmy Blue card stock with Versamark ink the rays, rotate card stock and stamp the other side to complete circle. White emboss then use Joyful Squares dies to die cut square and the centre circle before adhering to DSP square.
Supply list
Listed below is the supply list. Just click on the picture to take you directly to the item in my online store.
Product List![True Blue Florals 12" X 12" (30.5 X 30.5 Cm) Designer Series Paper [ 167970 ]](https://assets1.tamsnetwork.com/images/EC042017NF/167970s.jpg "True Blue Florals 12\" X 12\" (30.5 X 30.5 Cm) Designer Series Paper [ 167970 ]")
![Joyful Squares Bundle (English) [ 166850 ]](https://assets1.tamsnetwork.com/images/EC042017NF/166850s.jpg "Joyful Squares Bundle (English) [ 166850 ]")
![Joyful Squares Dies [ 166849 ]](https://assets1.tamsnetwork.com/images/EC042017NF/166849s.jpg "Joyful Squares Dies [ 166849 ]")
![Joyful Squares Photopolymer Stamp Set (English) [ 166847 ]](https://assets1.tamsnetwork.com/images/EC042017NF/166847s.jpg "Joyful Squares Photopolymer Stamp Set (English) [ 166847 ]")
![Secret Sea 12" X 12" (30.5 X 30.5 Cm) Two Tone Cardstock [ 166709 ]](https://assets1.tamsnetwork.com/images/EC042017NF/166709s.jpg "Secret Sea 12\" X 12\" (30.5 X 30.5 Cm) Two Tone Cardstock [ 166709 ]")
![Basic White 12 X12 (30.5 X 30.5 Cm) Cardstock [ 159231 ]](https://assets1.tamsnetwork.com/images/EC042017NF/159231s.jpg "Basic White 12 X12 (30.5 X 30.5 Cm) Cardstock [ 159231 ]")
![Balmy Blue Classic Stampin' Pad [ 147105 ]](https://assets1.tamsnetwork.com/images/EC042017NF/147105s.jpg "Balmy Blue Classic Stampin' Pad [ 147105 ]")
![Secret Sea Classic Stampin' Pad [ 165285 ]](https://assets1.tamsnetwork.com/images/EC042017NF/165285s.jpg "Secret Sea Classic Stampin' Pad [ 165285 ]")
![Versamark Pad [ 102283 ]](https://assets1.tamsnetwork.com/images/EC042017NF/102283s.jpg "Versamark Pad [ 102283 ]")
![Embossing Additions Tool Kit [ 159971 ]](https://assets1.tamsnetwork.com/images/EC042017NF/159971s.jpg "Embossing Additions Tool Kit [ 159971 ]")
![Basics Wow! Embossing Powder [ 165679 ]](https://assets1.tamsnetwork.com/images/EC042017NF/165679s.jpg "Basics Wow! Embossing Powder [ 165679 ]")
![Heat Tool - Uk Plug [ 129054 ]](https://assets1.tamsnetwork.com/images/EC042017NF/129054s.jpg "Heat Tool - Uk Plug [ 129054 ]")
![Blending Brushes [ 153611 ]](https://assets1.tamsnetwork.com/images/EC042017NF/153611s.jpg "Blending Brushes [ 153611 ]")
![Softest Spring Mix & Match Puffy Stickers [ 166986 ]](https://assets1.tamsnetwork.com/images/EC042017NF/166986s.jpg "Softest Spring Mix & Match Puffy Stickers [ 166986 ]")

- SHOP ONLINE – EARN 10% REWARDS ON ALL PURCHASES OVER £20
- PURCHASE A STARTER KIT : Get £155 worth of products for only £99. Choose from current catalogues and any specials available. Free Shipping. Read more
- Subscribe to my Video Tutorials – click here
Pingback: Square mosaic card plus Free Shipping - Stamp with Elaine