
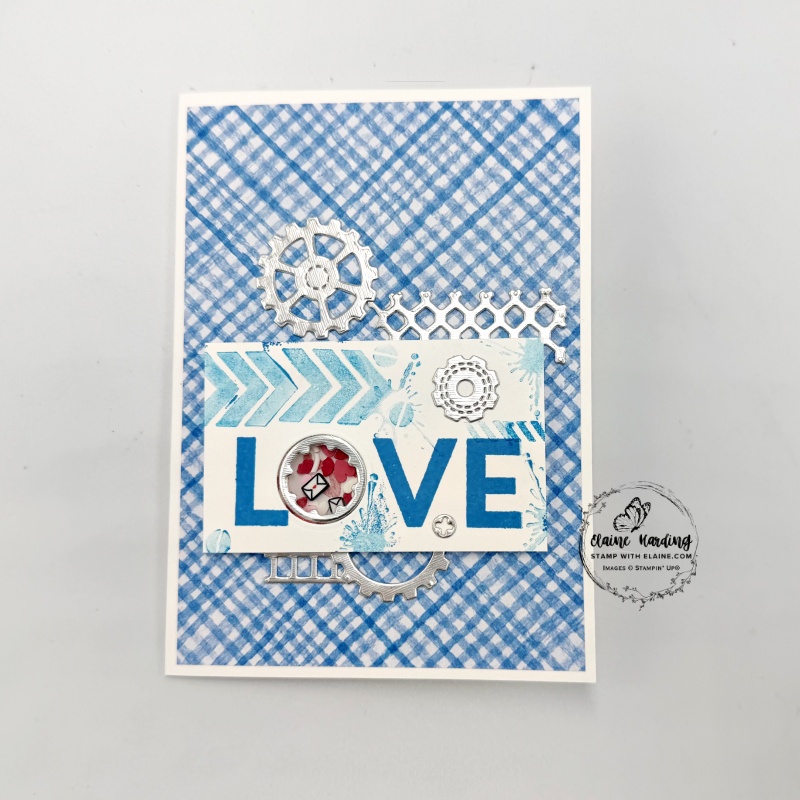
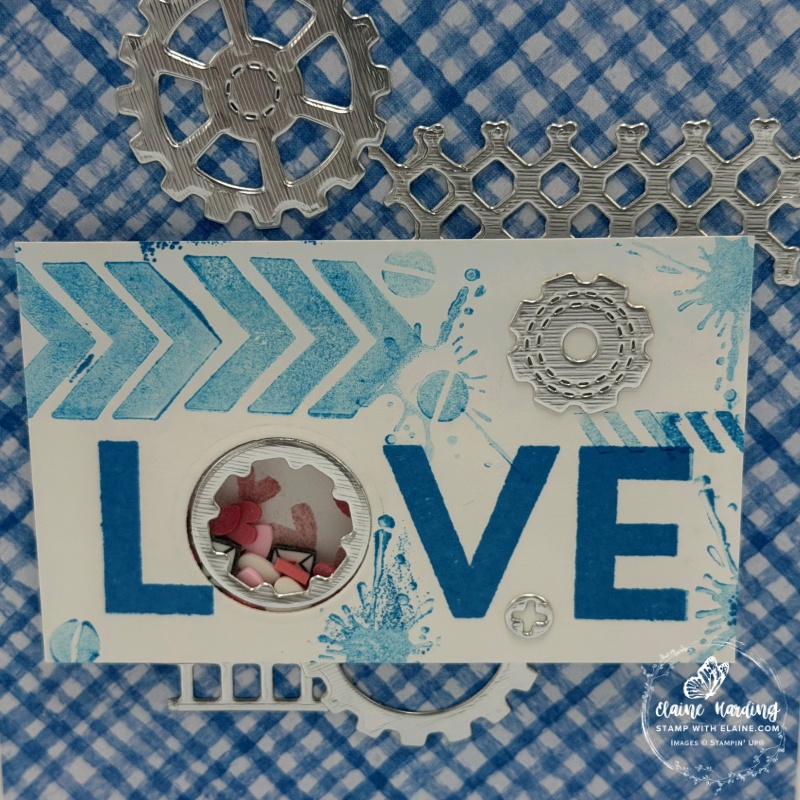
Masculine Shaker Valentine card. Recently I used the Gears & Textures stamps to make a birthday card which you can see HERE. This time I’ve used the Gears & Textures dies which I die cut with silver foil. I combined it with the Hope, Love & Joy bundle to create the masculine shaker valentine card.
Designer Series Paper
The papers I used are on page 17 of the January-April 2026 mini in the Mix & Match section. Love Notes 6″x 6″ (15.2 x 15.2 cm). There are 48 sheets in a pack with 8 each of 6 double-sided designs. More than enough to create Valentine themed projects.
Cutting guide
- Card base – Basic White thick cut at 5 ¾” x 8 ¼” (14.5 cm x 21 cm) and folded in half.
- DSP for card front : 5 ½” x 3 ⅞” (14 cm x 9.8 cm) – reserve remnant for inside of card.
- Basic White label : 3 ½” x 2” (9 cm x 5 cm)
- Silver Foil and adhesive sheet – cut adhesive sheet same size as Silver foil and adhere to to back. Place a variety of Gears & Textures dies on foil and die cut as many as will fit on your foil sheet.
- Window sheet cut at 1 ¼” x 1 ½” (3.2 x 4 cm)
- DSP (heart pattern) cut at 1 ½”x 1 ½” (3.2 x 4 cm)
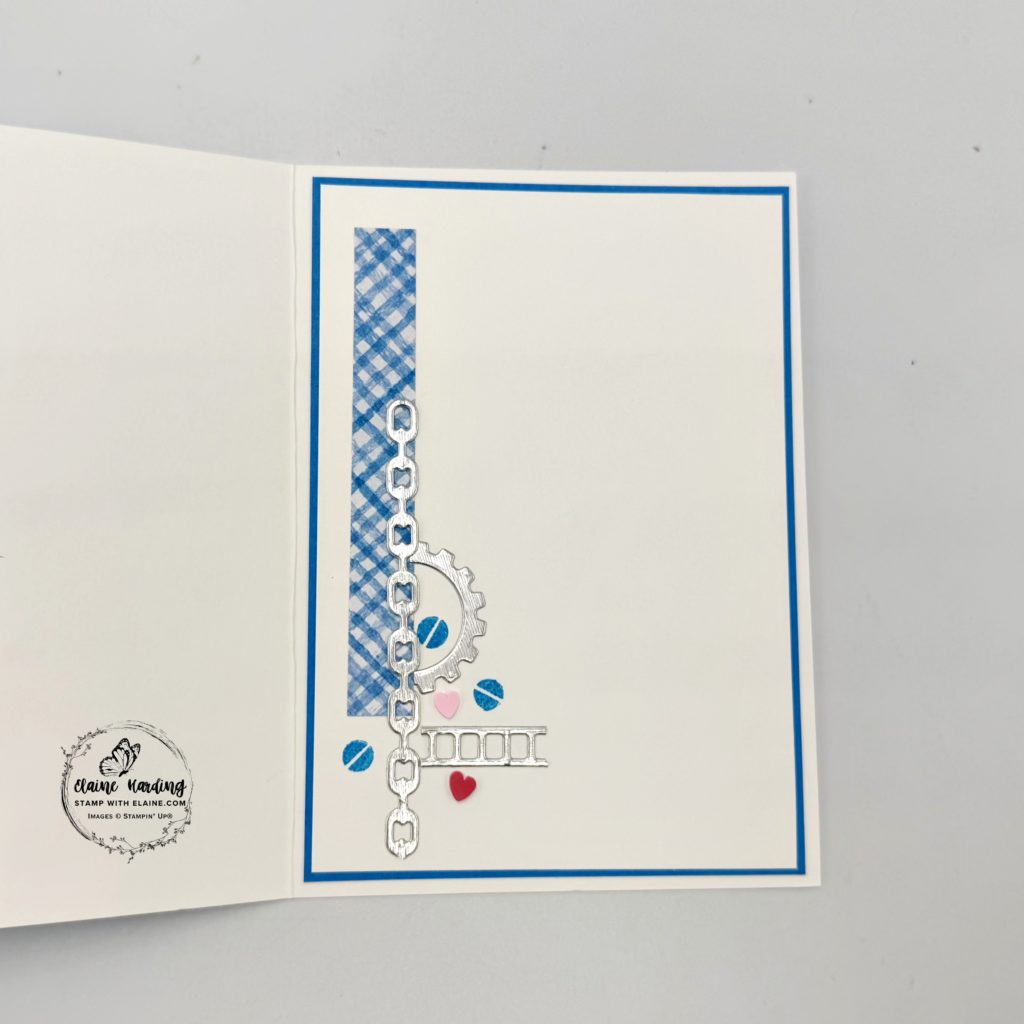
Inside card
- Azure Afternoon card stock : 5 ½” x 3 ⅞” (14 cm x 9.8 cm)
- Basic White card stock : 5 ⅜” x 3 ¾” (13.7 cm x 9.5 cm)
Assembly instructions
- Adhere DSP to card front.
- Stamp L_VE from Hope, Love & Joy stamp set in Azure Afternoon ink at the bottom of the 3 ½” x 2” (9 cm x 5 cm) Basic White piece.
- Die cut the “O” with the Hope, Love & Joy die in the space of stamped L_VE.
- Adhere Window sheet on the back over the aperture.
- Flip it back to right side and adhere some of the silver foil die cut elements.
- Stamp 2nd generation splashes, arrows and screw head as shown.
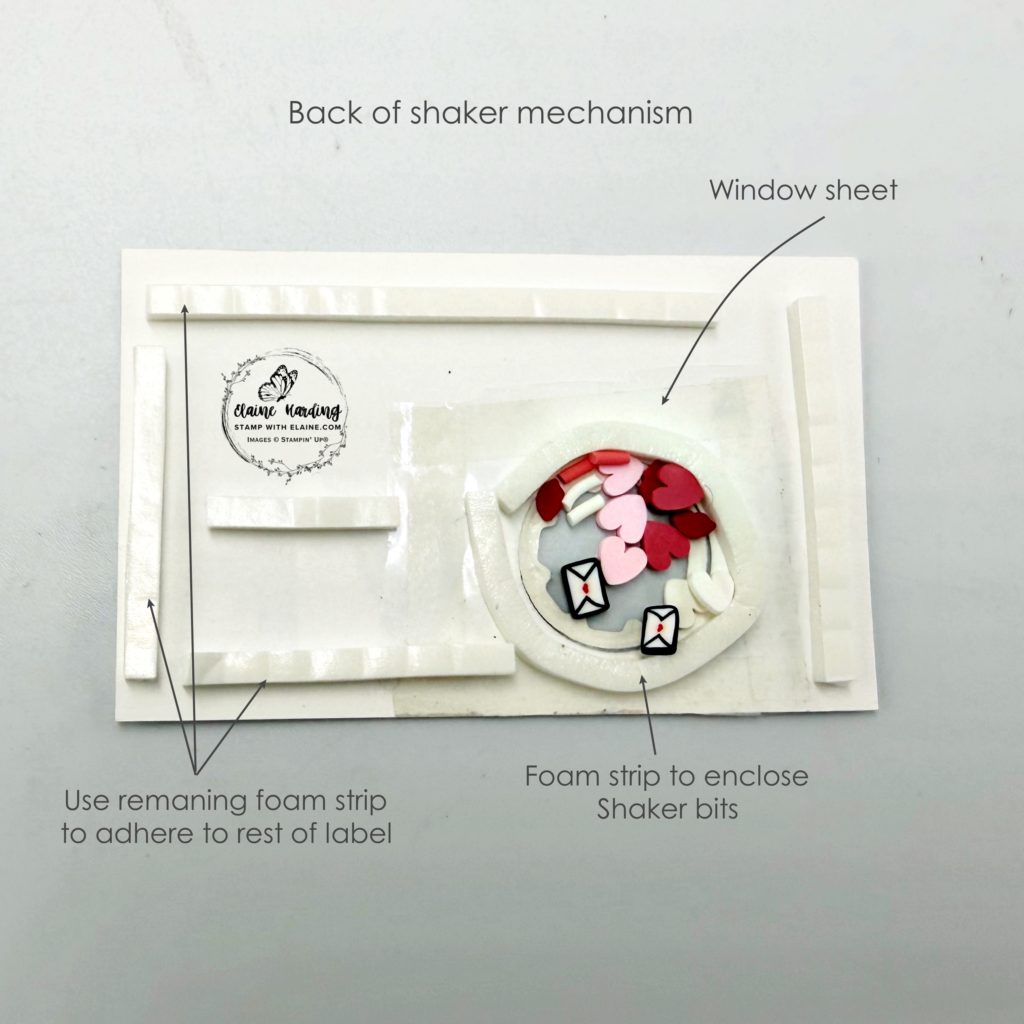
Prepare shaker mechanism
- Flip label to reverse side. Use foam strips to enclose aperture. Ensure there are no gaps.
- Apply foam strips as shown.
- Fill the circle with loose Valentine’s assortment.
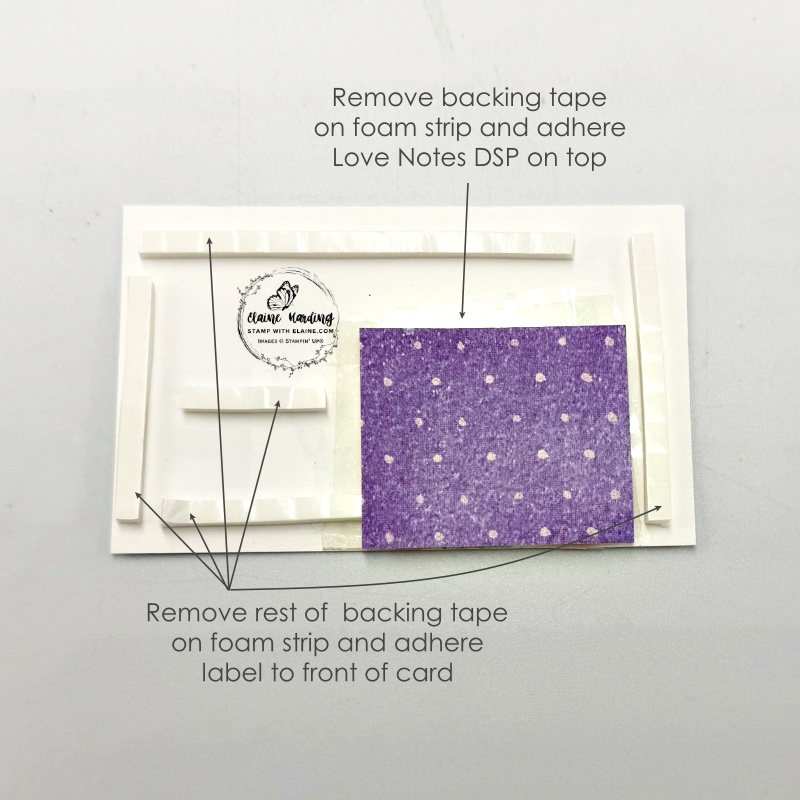
- Remove backing tape from foam strip and attach the piece of heart DSP1 ½”x 1 ½” (3.2 x 4 cm) to enclose shaker as pictured.
- Lastly remove remaining backing strip, flip it back with right side face up and carefully position and adhere to front of card.
Finishing touches to card
- Use some of the silver foil Gears & Textures die cut to adhere above and below label as shown.
- You can snip the Gears & Textures die cuts in half so that you can use the other half for the inside of the card.
- For the inside of the card – adhere the Afternoon Azure piece first.
- Adhere the remnant of the Love Notes DSP to left of Basic White piece.
- Then adhere remaining silver foil Gears & Textures die cuts as shown and stamp a trio of screw heads as pictured.
- Lastly add 2 loose Valentine’s assortment as pictured above to complete card.
Supply list
Listed below is the supply list. Just click on the picture to take you directly to the item in my online store.
Product List![Gears & Textures Bundle (English) [ 166854 ]](https://assets1.tamsnetwork.com/images/EC042017NF/166854s.jpg "Gears & Textures Bundle (English) [ 166854 ]")
![Gears & Textures Dies [ 166853 ]](https://assets1.tamsnetwork.com/images/EC042017NF/166853s.jpg "Gears & Textures Dies [ 166853 ]")
![Gears & Textures Photopolymer Stamp Set [ 166851 ]](https://assets1.tamsnetwork.com/images/EC042017NF/166851s.jpg "Gears & Textures Photopolymer Stamp Set [ 166851 ]")
![Hope Love & Joy Bundle (English) [ 166858 ]](https://assets1.tamsnetwork.com/images/EC042017NF/166858s.jpg "Hope Love & Joy Bundle (English) [ 166858 ]")
![Hope Love & Joy Dies [ 166857 ]](https://assets1.tamsnetwork.com/images/EC042017NF/166857s.jpg "Hope Love & Joy Dies [ 166857 ]")
![Hope Love & Joy Photopolymer Stamp Set (English) [ 166855 ]](https://assets1.tamsnetwork.com/images/EC042017NF/166855s.jpg "Hope Love & Joy Photopolymer Stamp Set (English) [ 166855 ]")
![Love Notes 6" X 6" (15.2 X 15.2 Cm) Mix & Match Designer Series Paper [ 166985 ]](https://assets1.tamsnetwork.com/images/EC042017NF/166985s.jpg "Love Notes 6\" X 6\" (15.2 X 15.2 Cm) Mix & Match Designer Series Paper [ 166985 ]")
![Window Sheets [ 142314 ]](https://assets1.tamsnetwork.com/images/EC042017NF/142314s.jpg "Window Sheets [ 142314 ]")
![Silver 12" X 12" (30.5 X 30.5 Cm) Foil Sheets [ 163387 ]](https://assets1.tamsnetwork.com/images/EC042017NF/163387s.jpg "Silver 12\" X 12\" (30.5 X 30.5 Cm) Foil Sheets [ 163387 ]")
![Adhesive Sheets [ 152334 ]](https://assets1.tamsnetwork.com/images/EC042017NF/152334s.jpg "Adhesive Sheets [ 152334 ]")
![Foam Adhesive Strips [ 141825 ]](https://assets1.tamsnetwork.com/images/EC042017NF/141825s.jpg "Foam Adhesive Strips [ 141825 ]")
![Azure Afternoon A4 Cardstock [ 161728 ]](https://assets1.tamsnetwork.com/images/EC042017NF/161728s.jpg "Azure Afternoon A4 Cardstock [ 161728 ]")
![Basic White A4 Cardstock [ 166781 ]](https://assets1.tamsnetwork.com/images/EC042017NF/166781s.jpg "Basic White A4 Cardstock [ 166781 ]")
![Azure Afternoon Classic Stampin' Pad [ 161663 ]](https://assets1.tamsnetwork.com/images/EC042017NF/161663s.jpg "Azure Afternoon Classic Stampin' Pad [ 161663 ]")
![Loose Valentine's Assortment [ 167074 ]](https://assets1.tamsnetwork.com/images/EC042017NF/167074s.jpg "Loose Valentine's Assortment [ 167074 ]")

- SHOP ONLINE – EARN 10% REWARDS ON ALL PURCHASES OVER £20
- PURCHASE A STARTER KIT : Get £155 worth of products for only £99. Choose from current catalogues and any specials available. Free Shipping. Read more
- Subscribe to my Video Tutorials – click here