
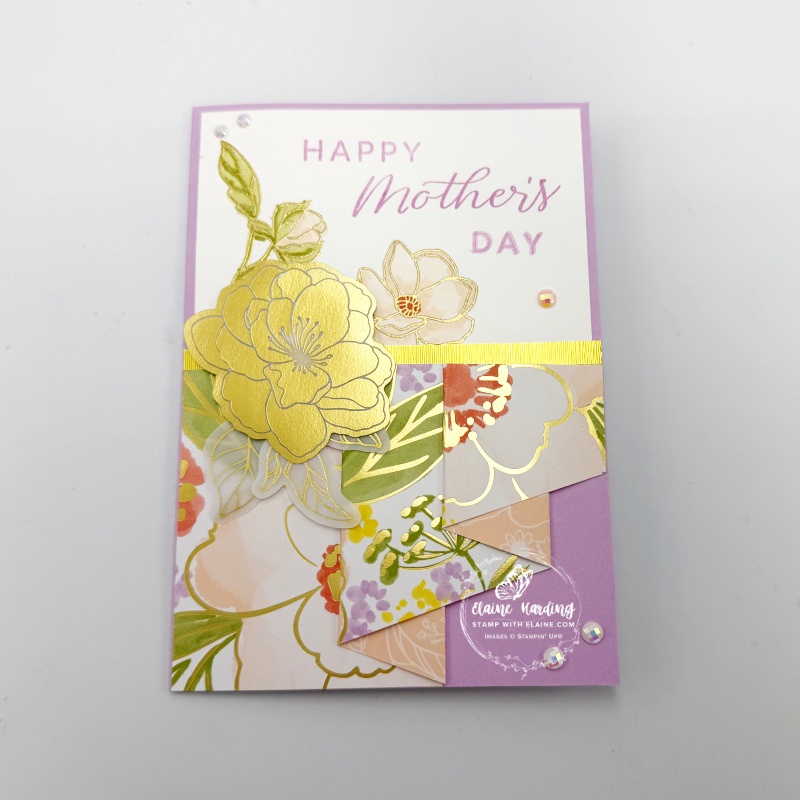
Curtain fold – Mother’s Day card. I am re-visiting the curtain fold. I thought the curtain fold would make a lovely Mother’s Day card so I am using the Simply Beautiful Bundle. This is part of a mega suite collection called Lovely & Beautiful in the Jan-Apr 2026 Mini on pages 23 – 29 and has a 7 page spread with a plethora of examples to draw inspiration from.
Simply Beautiful bundle
I chose to make a Mother’s Day card today with the Simply Beautiful bundle which is part of the Lovely & Beautiful Suite. However, you can also create stunning wedding and celebration crafts with this Lovely & Beautiful Suite Collection which comprises two stamp and die bundles. It features watercolour floral stamps, delicate foliage, and gold accents. The collection offers seamless coordination between the pieces to layer and embellish your cards or scrapbooks with.
Cutting guide
- Card base : 5 ¾” x 8 ¼” (14.5 cm x 21 cm) folded in half.
- Basic White for front of card : 3 ⅞” x 2 ½” (9.8 cm x 6.5 cm)
- Inside card : Basic White 3 ⅞” x 5 ½” (9.8 cm x 14 cm)
- Gold Foil : ½” x 4 ⅛” (1.5 cm x 10.5 cm)
- DSP Lovely & Beautiful : 3″ x 8″ (7.5 cm x 20 cm). Long side score at 2 ½”, 3 ½”, 5 ½” and 6 ½” (6.5 cm, 9 cm, 14 cm, and 16.5 cm)
Gold embossing
- Take Basic White piece for front of card and stamp the bud and leaf in Versamark ink.
- Also stamp the small linear flower image in Versamark.
- Sprinkle both images with Metallic Wow gold embossing powder, shake of excess and heat emboss with heat tool.
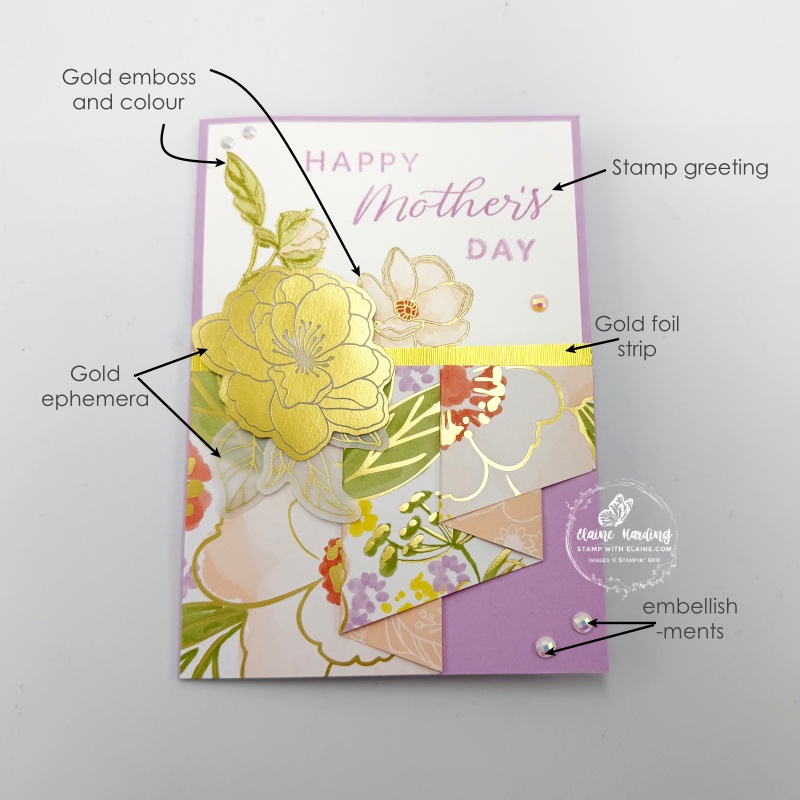
- Stamp Happy Mother’s Day with FamilyTies stamps in Fresh Freesia ink as pictured.
- Colour in images with Stampin’ Blends in Old Olive and Petal Pink and the centre of the flower with Calypso Coral.
- Set aside.
Curtain fold
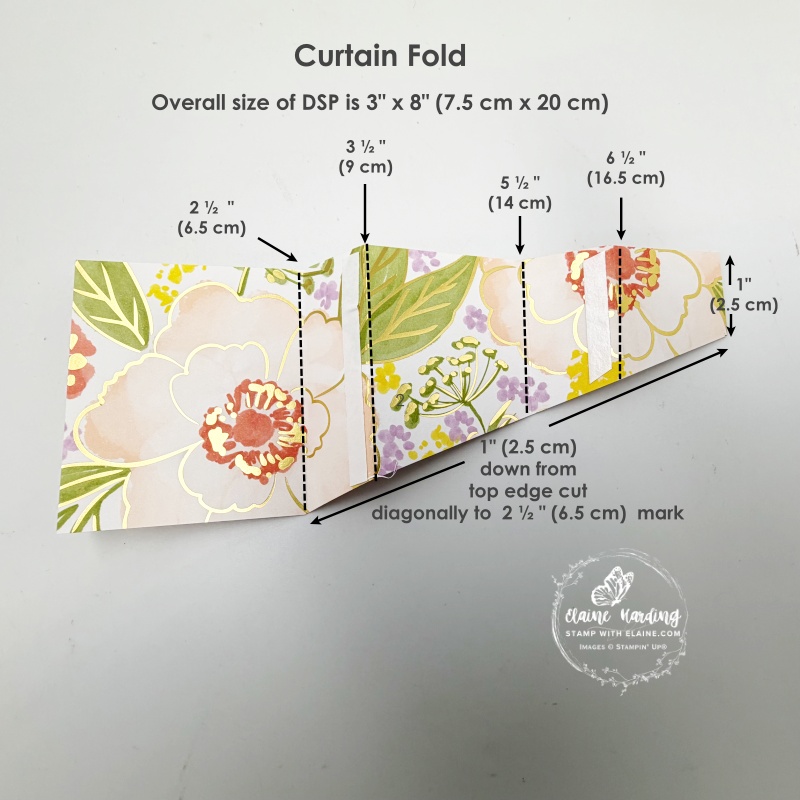
- Take the 3″x 8″ (7.5 cm x 20 cm) and make a 1″ mark down from the top edge on the right.
- Insert in trimmer and cut from 1″ mark down to the bottom of the 2 ½” (6.5 cm) score line and cut diagonally.
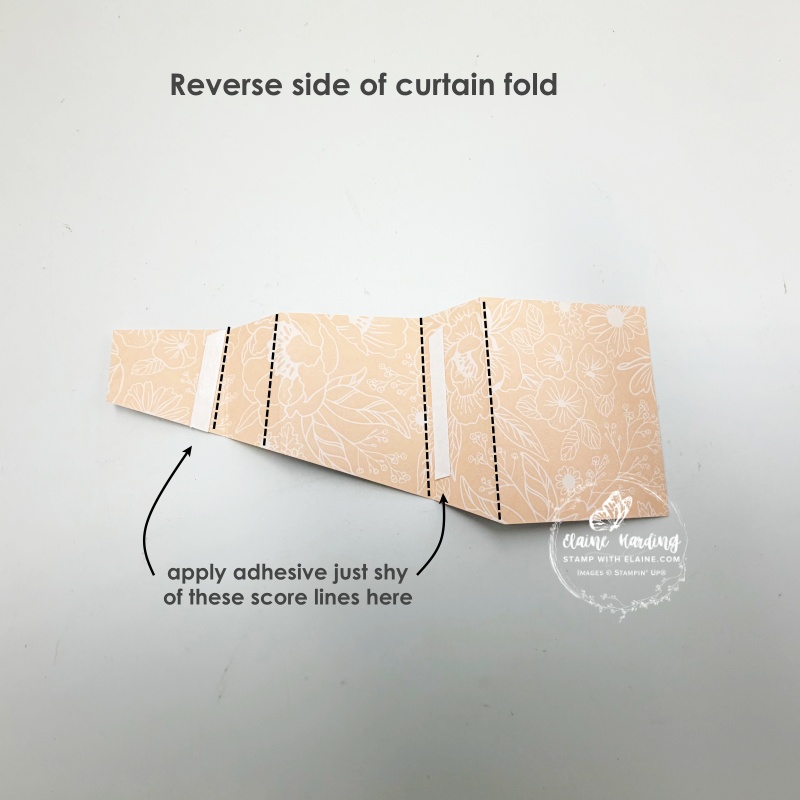
- Apply adhesive just shy of the 3 ½” and 6 ½” (9 cm and 16.5 cm) score line on the side of DSP you want to display face up.
- Flip it over to the reverse side and apply adhesive as pictured. Remove backing tape from both sides and fold in concertina to resemble curtain. The adhesive strips help anchor the folds and keep its shape.
Attaching different elements
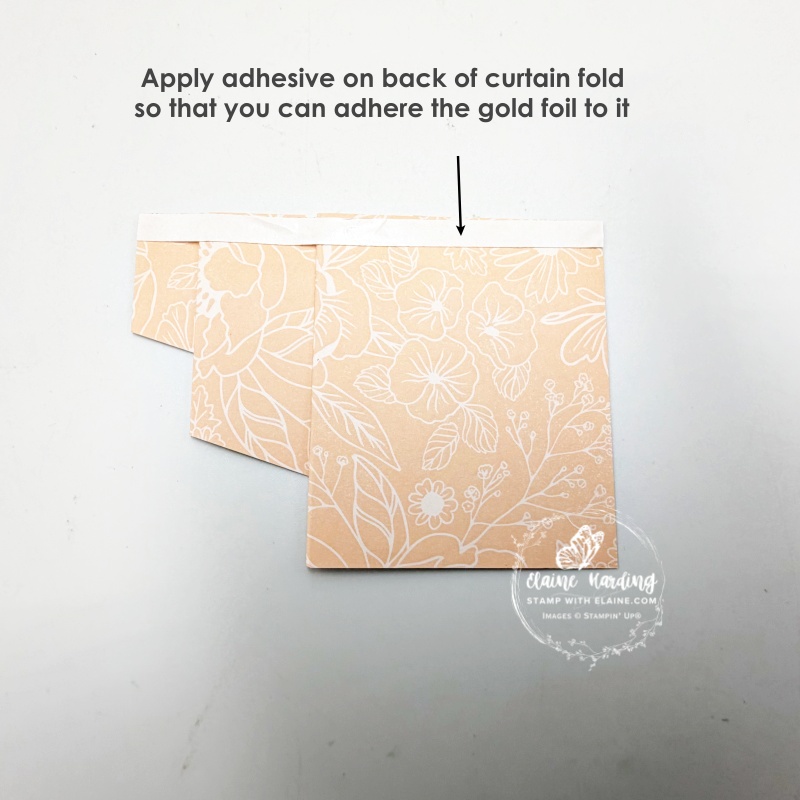
- On the reverse side of the curtain fold, apply tear n’ tape at the top.
- Remove backing and adhere the ½” (1.5 cm) gold foil strip to it so that ¼” (7.5 cm) is visible from the front (picture on the right.
- Adhere the Basic White gold embossed and coloured floral piece with Mother’s day greeting you prepared earlier in the top half of card leaving an even border at the top and two sides.
- Apply adhesive to the Curtain fold piece, align left edge with left side of card and ensure the longest part of the curtain is in line with the bottom edge of card front and that the shortest part of curtain is aligned with right edge of card before sticking it down.
- On the back of the gold ephemera flower, apply mini dimensionals to the top and middle of flower and adhere as shown.
- Use glue dots to adhere the ephemera leaves.
- Lastly add some Pearlized Faceted Pearls.
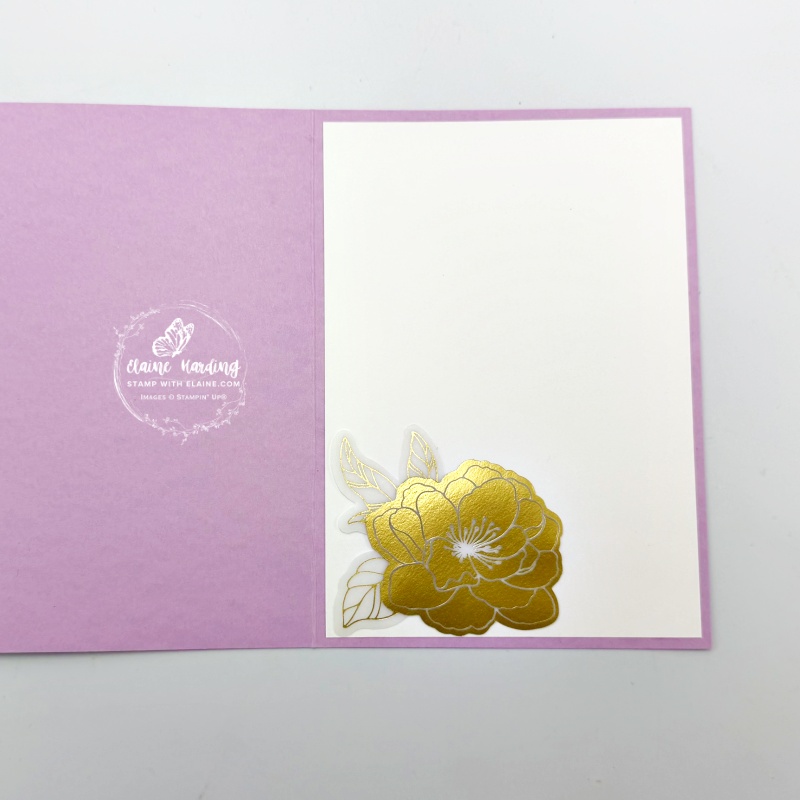
Inside card

- Adhere the 3 ⅞” x 5 ½” (9.8 cm x 14 cm) Basic White piece to the inside of the card.
- Select a gold ephemera flower and leaves and adhere in the bottom left corner of card with glue dots.
Supply list
Listed below is the supply list. Just click on the picture to take you directly to the item in my online store.
Product List![Simply Beautiful Bundle (English) [ 166965 ]](https://assets1.tamsnetwork.com/images/EC042017NF/166965s.jpg "Simply Beautiful Bundle (English) [ 166965 ]")
![Family Ties Photopolymer Stamp Set (English) [ 166897 ]](https://assets1.tamsnetwork.com/images/EC042017NF/166897s.jpg "Family Ties Photopolymer Stamp Set (English) [ 166897 ]")
![Lovely & Beautiful 12" X 12" (30.5 X 30.5 Cm) Specialty Designer Series Paper [ 166957 ]](https://assets1.tamsnetwork.com/images/EC042017NF/166957s.jpg "Lovely & Beautiful 12\" X 12\" (30.5 X 30.5 Cm) Specialty Designer Series Paper [ 166957 ]")
![Beautifully Adorned Ephemera Pack [ 166980 ]](https://assets1.tamsnetwork.com/images/EC042017NF/166980s.jpg "Beautifully Adorned Ephemera Pack [ 166980 ]")
![Pearlized Faceted Circles [ 166978 ]](https://assets1.tamsnetwork.com/images/EC042017NF/166978s.jpg "Pearlized Faceted Circles [ 166978 ]")
![Fresh Freesia A4 Cardstock [ 155614 ]](https://assets1.tamsnetwork.com/images/EC042017NF/155614s.jpg "Fresh Freesia A4 Cardstock [ 155614 ]")
![Basic White A4 Cardstock [ 166781 ]](https://assets1.tamsnetwork.com/images/EC042017NF/166781s.jpg "Basic White A4 Cardstock [ 166781 ]")
![Gold Foil Sheets [ 132622 ]](https://assets1.tamsnetwork.com/images/EC042017NF/132622s.jpg "Gold Foil Sheets [ 132622 ]")
![Fresh Freesia Classic Stampin' Pad [ 155611 ]](https://assets1.tamsnetwork.com/images/EC042017NF/155611s.jpg "Fresh Freesia Classic Stampin' Pad [ 155611 ]")
![Versamark Pad [ 102283 ]](https://assets1.tamsnetwork.com/images/EC042017NF/102283s.jpg "Versamark Pad [ 102283 ]")
![Embossing Additions Tool Kit [ 159971 ]](https://assets1.tamsnetwork.com/images/EC042017NF/159971s.jpg "Embossing Additions Tool Kit [ 159971 ]")
![Metallics Wow! Embossing Powder [ 165678 ]](https://assets1.tamsnetwork.com/images/EC042017NF/165678s.jpg "Metallics Wow! Embossing Powder [ 165678 ]")
![Heat Tool - Uk Plug [ 129054 ]](https://assets1.tamsnetwork.com/images/EC042017NF/129054s.jpg "Heat Tool - Uk Plug [ 129054 ]")

- SHOP ONLINE – EARN 10% REWARDS ON ALL PURCHASES OVER £20
- PURCHASE A STARTER KIT : Get £155 worth of products for only £99. Choose from current catalogues and any specials available. Free Shipping. Read more
- Subscribe to my Video Tutorials – click here